Our blog for more recipes:
blackdirtrecipes.wordpress.com
YouTube Channel:
youtube.com/channel/UCPYfuRXgE6SgaLMmd_vYx9Q
Instagram @yesifarm
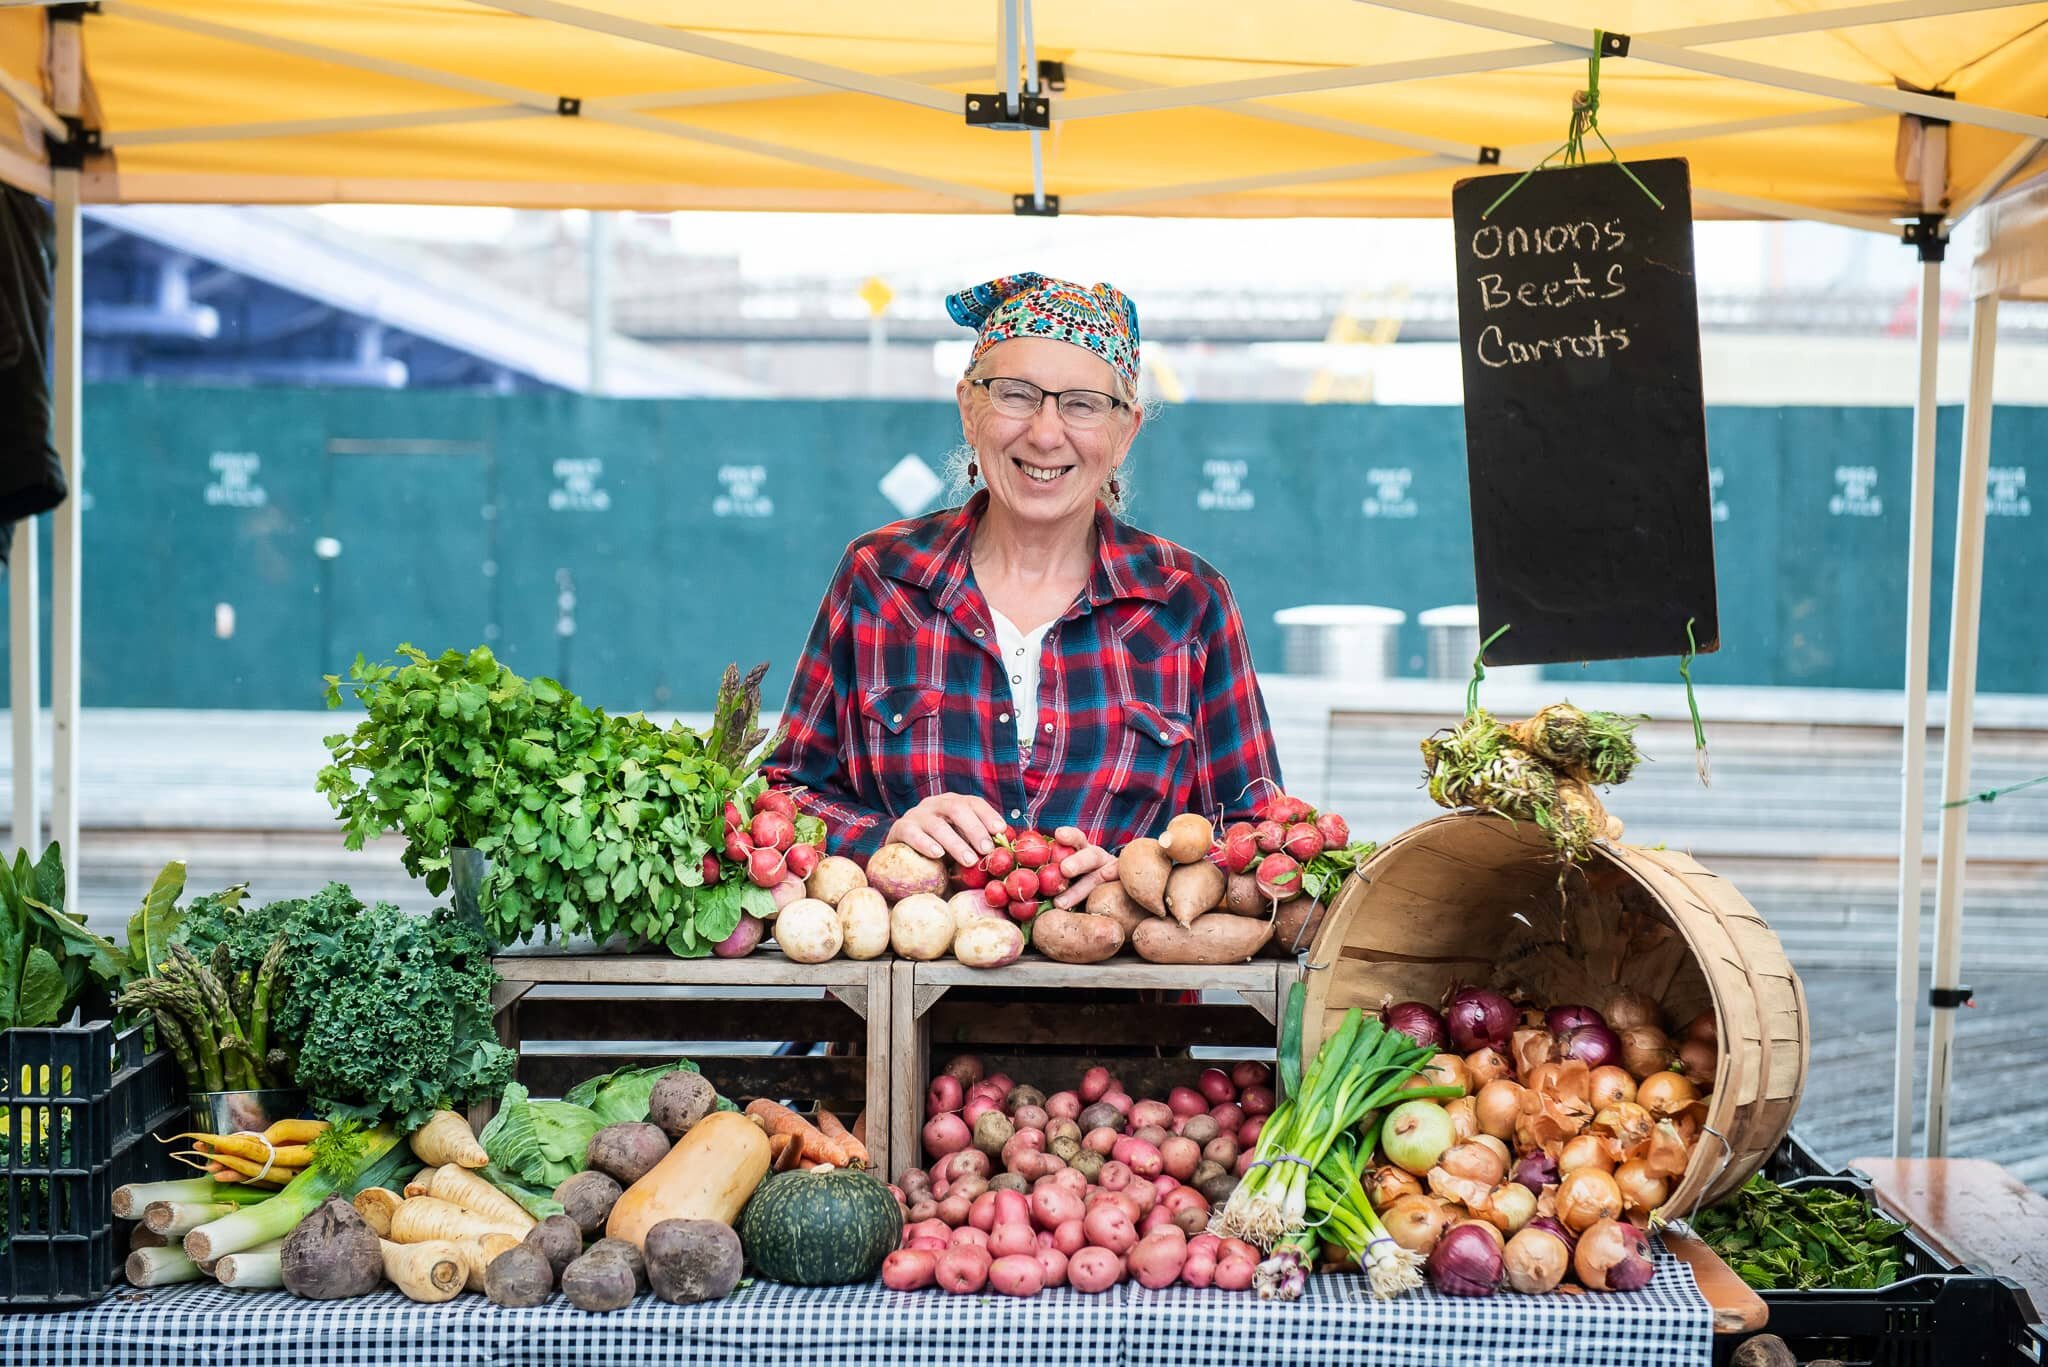
NOTES FROM FARMER CHERYL ROGOWSKI
SUMMER SHARE WEEK 2
Wow to say it’s hot is a serious understatement. I tried to choreograph the work schedule so our farmers wouldn’t be in the fields today. I don’t know what you know about the region where we farm, but it’s quite beautiful, almost primeval at times. The bottom of an ancient glacial lake composed of decayed vegetation from the days of the dinosaurs. Ranging in depth from mere inches to hundreds of feet. With over 25,000 contiguous acres, lying in New York and New Jersey it is the largest concentration of such soil in the United States outside the Florida Everglades (Wikipedia). One of the many things I find fascinating about our soil is the geothermal effect of the soil. It’s one of the main reasons hot air balloonists and glider planes love to fly over our region. The thermal effect of the soil is intense. Heat is absorbed and released potentially increasing the air temperature by ten or more degrees. So if the weather forecast is calling for 100 plus degrees like today, the temperature in the fields feels closer to 110 or more. Potentially very dangerous conditions. So it's far safer to start work as daylight breaks, stop midmorning and continue as it gets closer to nightfall, with frequent breaks, wide brimmed hats and taking it slow and easy. Tomorrow is another day!!
BABY BOK CHOY SALAD WITH SESAME DRESSINGSource: https://www.culinaryhill.com/baby-bok-choy-with-sesame-dressing/#wprm-recipe-container-29085
Ingredients
For the sesame dressing:
1/4 cup light brown sugar packed
1/4 cup olive oil
2 tablespoons red wine vinegar
2 tablespoons toasted sesame seeds (see note 1)
1 tablespoon soy sauce
For the salad:
2 tablespoons olive oil
1 package ramen noodles crumbled, seasoning packet discarded (see note 2)
1/4 cup sliced almonds (see note 3)
1 bunch baby bok choy sliced (5 – 6 bulbs, see note 5)
5 scallions chopped
Instructions
1. To make the dressing, in a small bowl, whisk together brown sugar, olive oil, vinegar, sesame seeds, and soy sauce. Allow flavors to blend at room temperature while preparing the rest of the salad.
2. In a large sauce pan over medium heat, heat olive oil until shimmering. Reduce heat to low. Add ramen noodles and almonds; sauté until toasted, about 10 minutes, stirring frequently to avoid scorching.
3. In a large bowl, combine baby bok choy, scallions, and crunchy mix. Drizzle salad dressing over the top and toss until uniformly combined. Serve at room temperature.
Notes
1. Sesame seeds: Raw or toasted; take your pick. To toast sesame seeds, in a medium skillet over medium heat, heat the sesame seeds until golden brown and fragrant, stirring occasionally, about 3 to 5 minutes. Remove from heat and immediately transfer to a plate to cool completely. Store in an airtight container in the pantry for 6 months or freezer storage bag in the freezer for up to 1 year.
2. Ramen noodles: Dry, raw ramen noodles, right out of the package. And no, you don’t need the seasoning packet for this recipe (but see FAQs for ideas on what to do with it).
3. Sliced almonds: I like the blanched, skinless sliced kind, but skin-on almonds or slivered almonds are fine, too.
4. Scallions: you can substitute chives for these
5. Baby bok choy: Usually found sold in big bags at Asian markets. Use mature bok choy (Chinese cabbage) or Napa cabbage instead. Cut and clean bok choy just like you would celery: Trim off and discard the end of the bulb and separate the stalks. Rinse the stalks in cool water, carefully brushing away any sand or dirt on the leaves. Use the bok choy, both the leaves and the stems, right away, or wrap in paper towels and store for up to 1 week in your refrigerator’s crisper drawer.
6. Yield: This recipe makes about 12 c. salad (or more depending on the size of your baby bok choy).
7. Storage: Store leftovers covered in the refrigerator. While the salad is still safe to eat for up to 4 days, the noodles will soften over time.
8. Make ahead: Make the salad dressing up to 7 days in advance. The toasted, cooled noodles and nuts can be stored in an airtight container for up to 6 months, or frozen for up to 1 year. Chop the bok choy and scallions the night before and refrigerate separately until serving time.
CARROT SLAW WITH CRANBERRIES, WALNUTES & CITRUS VINAIGRETTE
Source: Carrot Slaw with Cranberries, Toasted Walnuts & Citrus Vinaigrette
One of my sisters favorite salads is carrot slaw. She likes it the way Mom used to make it, shredded carrots, mayonnaise, raisins and salt and pepper to taste. Bright, fresh, and endlessly versatile, the following carrot slaw adds color and crunch to any meal. Perfect for a potluck or picnic. This recipe is also quite good when used as an addition to bok choy for a hearty salad.
Ingredients
½ cup walnuts, coarsely chopped
1 pound shredded carrots, or 1⅓ pounds carrots, peeled and shredded
3 tablespoons extra virgin olive oil or walnut oil
1 teaspoon lemon zest and 2 tablespoons lemon juice, from 1 lemon
3 tablespoons freshly squeezed orange juice, from 1 orange
2 tablespoons honey
½ cup dried cranberries
3 scallions, white and green parts, thinly sliced
3 tablespoons chopped fresh Italian parsley
Heaping ¼ teaspoon salt
¼ teaspoon freshly ground black pepper
Instructions
1. Set oven rack to middle position and preheat oven to 350°F (175°C). Place walnuts on a baking sheet and bake until toasted and fragrant, 7 to 10 minutes. Set aside to cool.
2. Combine all remaining ingredients in a large bowl and toss well. Cover and refrigerate for at least 15 minutes to allow the flavors to blend. Season to taste with salt, pepper, honey or more citrus. Toss in walnuts and serve.
SUMMER SHARE WEEK 1
The valley is buzzing like a hive. Everywhere tractors are moving, on the streets, in the fields, flatbeds rush out with empty crates and return loaded with greens, their leaves flailing as they’re whipped by the breeze from the truck's frantic pace. Every day as you drive down the roads it seems like you can see the plants growing steadily, some at a slow pace others in leaps and bounds. The weather has definitely stabilized for a bit and that rain this week was well received by plants and humans alike! Getting ready to seed out the next phase of planting is important to try and ensure a steady harvest.
SWISS CHARD AND EGG BAKE
Source: Swiss Chard and Egg Bake - Healthy Seasonal Recipes
This easy Swiss Chard Egg Bake is a simple breakfast casserole that is high in protein! It is a veggie-packed meal prep breakfast recipe to make when you have extra Swiss chard from the garden or Farmers’ market.
Ingredients
1 tablespoon olive oil
1 bunch chard, leaves and stems chopped and separate
1 small onion, chopped
6 large eggs
1 tablespoon chopped fresh dill
1 teaspoon Dijon mustard
1/2 teaspoon salt
1/4 teaspoon freshly ground pepper, or to taste
3 ounces cheddar cheese, shredded
Instructions
1. Preheat oven to 350 degrees F. Coat a 2 ½ quart baking dish with cooking spray.
2. Heat oil in a large skillet over medium-high heat. Add chard stems and onion and cook, stirring often until the onion and chard stems start to soften, 2 t 4 minutes. Add chard leaves and 2 to 3 tablespoons water and cook, stirring to wilt them down until they are soft and the water is evaporated. Transfer the chard mixture to the prepared baking dish.
3. Beat eggs, dill, Dijon, salt and pepper in a medium bowl. Pour over the chard.
4. Bake until the eggs are just slightly wobbly in the center, 20 to 24 minutes. Add cheese on top and continue baking until the eggs are cooked through and the cheese is melted, about 4 minutes. Let cool 5 to 10 minutes before slicing into 4 squares to serve.
SPINACH SALAD WITH BACON AND EGGS
Source: Spinach Salad with Bacon and Eggs
Author: Katie Webster
Total Time: 30 minutes; Yield: 10 cups; Diet: Gluten Free
Spinach Salad with Bacon & Eggs! Wanna know how you make an entree salad that your family will devour: Top a bunch of vibrant and crisp spinach with bacon and eggs and toss it with a rockin’ red wine vinaigrette. It’s super easy to make and it’s dairy-free, only 248 calories per serving and only 15 minutes of prep.
Ingredients
4 large eggs
4 slices bacon
1 clove garlic
1/2 teaspoon kosher salt
2 tablespoons red wine vinegar
1 tablespoon Dijon
3 Tablespoons extra-virgin olive oil
Freshly ground pepper to taste
12 cups spinach leaves
Instructions
1. To Prepare The Eggs: Place eggs in the bottom of a small saucepan, cover with cold water by several inches. Bring to a gentle boil over high heat. Boil for 10 minutes. Then remove from the heat, drain and then run cool running water over the eggs for several minutes until cool enough to handle. Peel and chop.
2. To Cook The Bacon in a Skillet: Place strips of bacon in cool large skillet. Heat over medium-high heat. Allow the fat to render out and the bacon to crisp. As the bacon cooks, reduce heat to prevent the skillet from smoking.. Turn the slices regularly so they brown evenly. Cook until the bacon is browned evenly. (Alternatively cook in the microwave, see notes below.) Transfer the crispy browned bacon to a paper towel lined plate. Cool and crumble.
Make Garlic Paste: Smash and peel garlic clove. Mince and mash with the side of a chef’s knife with the salt to form a paste. Scrape into a medium bowl.
3. Make Dressing: Whisk vinegar and Dijon into the garlic paste. Gradually whisk in oil. Season with pepper.
4. Toss Salad: Place spinach, eggs and bacon in a large salad bowl. Pour dressing over the salad and toss to combine. Serve immediately.
Notes
To Cook The Bacon in The Microwave: Lay the four slices of bacon on three sheets of paper towels on a plate. Top with another sheet of paper towels. Microwave 3 minutes.
Look to see if it is cooked. Microwave in 30 second bursts until it is done.
To Make Whole30 Compliant: If you are doing Whole30 make sure to check that your Dijon doesn’t have wine in it and that your bacon is compliant.
SPRING SHARE WEEK 13
Thank you so much for traveling together with us on our farm journey this Spring! The extreme swings in weather were a serious challenge yet we all endured and the fruits of our labor are now being seen, felt and tasted. Tender crops that need the heat of summer are being planted and embracing the warm sun and rains. The first harvest of sweet corn is looming on the horizon and cucumbers and summer squashes are setting blossoms. Fall crops are being planted and plans for winter crops are under way.
Yesterday was National Eat Your Vegetables Day but that doesn't mean we can't celebrate everyday — here are some ideas on how to accomplish that. Source: NATIONAL EAT YOUR VEGETABLES DAY - June 17, 2026 - National Day Calendar
Add veggies to your breakfast. Whether mixing spinach into your eggs or swapping out that muffin for a smoothie, you can get at least one serving in the morning.
Skip the candy bar when you're craving a snack. Instead, have some carrots, kohlrabi, or other fresh veggies to munch on.
Another great snack is veggie chips. They not only reduce calories and fats, but they taste great, too.
Swap out the French fries for a side salad at lunch or supper. If you're having a baked potato, choose a sweet potato instead.
RECIPE
Top 10 Ways to Enjoy Swiss Chard - Have A Plant
SWISS CHARD WITH GARBANZO BEANS (BIETOLE E CECI)
Source: Sautéed Swiss Chard Recipe (With Chickpeas) | The Kitchn
This simple dish takes the classic combination of beans and greens and puts an Italian spin on things. Chopped shallots and salty, richly flavored pancetta add intrigue to hearty sautéed Swiss chard and meaty chickpeas, while a pinch of red pepper flakes add just the right amount of spice. This dish makes for one wholesome lunch or light dinner all on its own, but can also play side dish to roasts or become an easy appetizer when piled on bruschetta. Leftovers also keep very well, so you can dig into it tonight and then enjoy it a few different ways over the following days.
Serves 4 to 6
Ingredients
2 pounds Swiss chard, preferably rainbow chard
2 tablespoons extra-virgin olive oil
2 ounces pancetta, cut into 1/4-inch dice (about 1/2 cup)
2 tablespoons finely chopped shallot
Pinch red pepper flakes
1 can garbanzo beans, drained and rinsed
Salt and Freshly ground black pepper
Instructions
1. Wash the chard leaves and stems well in a large sink of cold water. Lift the chard out of the water, leaving the grit at the bottom of the sink. Shake off the excess water, but do not dry the chard.
2. Tear the stems from the leaves and chop the stems crosswise into 1/2-inch pieces; set aside. Stack the leaves and coarsely chop them. Keep the stems and leaves separate.
3. Heat the oil in a large skillet over medium-high heat. Add the pancetta and cook until crisp and browned, about 3 minutes. Stir in the shallot and red pepper flakes and cook, stirring often, until the shallot softens, about 2 minutes.
4. Add the chard stems and beans. Cook, stirring occasionally, until the stems soften, about 4 minutes. Stir in the leaves a handful at a time until wilted. Cover and cook, stirring occasionally, until the chard is tender, about 5 minutes. Taste and season with salt and pepper as needed. Serve hot.
SPRING SHARE WEEK 12
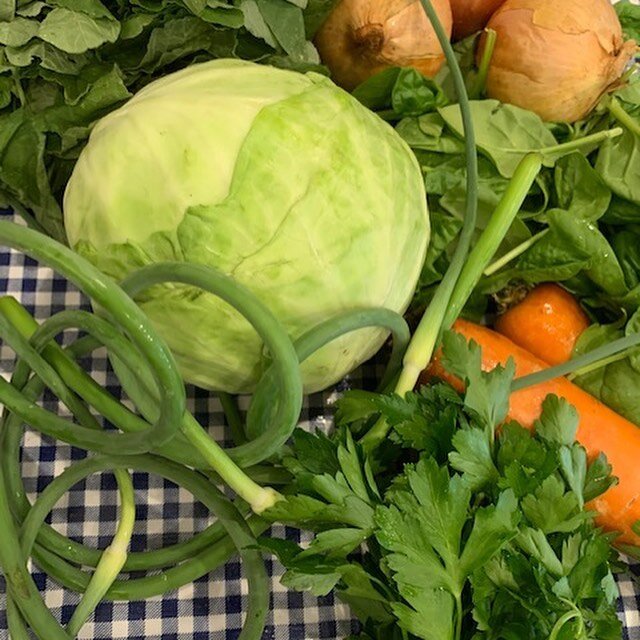
Time to harvest the garlic scapes!!!! Garlic scapes are a seasonal special treat—only available in the late spring early summer and only on hard neck garlic. They look a lot like string beans and have so many uses. The flavor is pure garlic and they can be used anywhere you want all that great sharp flavor of raw garlic. Like other garlic once cooked the sharpness mellows. As with so many culinary discoveries the scape harvest was born out of practicality. The scapes are removed to allow the plant to put its energy into producing bigger bulbs. At one time thrown to the side as useless, some intrepid soul brought them into the kitchen and began to prepare sumptuous meals. I made pesto and pickles yesterday. You also have quelites and quelites manteca today—leafy greens that only grow in the high heat of summer days. Our farmers LOVE them. They were the ones who introduced us to the outstanding flavors of these luscious greens. Combiner them with the garlic scapes for an incredible taste treat!
GRILLED GARLIC SCAPES & SUMMER SQUASH
Source: 11 Best Recipes for Garlic Scapes • Heartbeet Kitchen
Author: Amanda Paa
Garlic scapes taste like garlicky scallions and they're absolutely delicious when tossed in olive oil and grilled with zucchini and summer squash. This simple vegetarian side dish is a great addition to any weeknight meal!
Ingredients
1/2 pounds of zucchini & summer squash, ideally 5-6 inches in length and skinny
2 small bunches of garlic scapes
3 1/2 tablespoons olive oil
sea salt & pepper
fresh lemon juice
fresh parmesan
Instructions
1. Slice off the tops and bottoms of the zucchini and slice them in half lengthwise, then cut them in half lengthwise again. They should look like pickle spears. Place them all in a large bowl and coat with 1 1/2 tablespoons olive oil, and 1 teaspoon kosher salt and a few cracks of pepper.
2. Put the zucchini & squash in a grill basket.
3. Wash and dry the scapes. Break off the harder, woody ends that don’t have the bulb. Using your hands, coat garlic scapes in olive oil and 1 teaspoon kosher salt and a few cracks of black pepper.
4. Prepare your grill to medium high to heat. Toss scapes directly on the grill and put the grill basket with zucchini on next to them. Turn both sets of vegetables a few times, and remove them when they’re soft on the inside, crispy on the outside, a lighter shade of green and golden brown in parts. You want to see a nice char, this means flavor!
5. Remove from grill and finish with a big squeeze of fresh lemon over all the vegetables, and lightly toss. Finish with freshly grated parmesan if desired. Taste and adjust salt and pepper if needed.
FRIJOLES Y QUELITES WITH LAMB'S QUARTERS
Source: https://www.theintrepideater.com/frijoles-y-quelites-with-lambs-quarters/
Quelites are a group of wild greens used in Mexican cooking. Lamb’s quarters, aka goosefoot, are often used in quelites dishes and cook down similarly to spinach, nettle, or other wild greens. The flavour is nice and mild. You can substitute spinach for the quelites.
Ingredients
1 tablespoon (15ml) vegetable oil
1 large onion, chopped
2 cloves garlic, minced
1/2 teaspoon (0.5g) dried oregano, preferably Mexican
1 teaspoon (2g) chipotle chili flakes (or 1 chipotle from a can, minced)
1 teaspoon (2g) chili powder
1 teaspoon (2g) smoked paprika
1/2 teaspoon (1g) ground cumin
1/2 teaspoon (2.5g) kosher salt
8oz (250g) fresh lamb’s quarter leaves
1 can black beans, drained and rinsed
1 large tomato, chopped
1 teaspoon (6g) tomato paste*
1 cup (250ml) water or vegetable or chicken broth
1/2 cup (75g) crumbled cotija or feta cheese
Preparation
1. Be sure to soak and rinse your greens well, to avoid any insects or grit.
2. Heat oil over medium-high heat in a pot or deep skillet. Add the onions, garlic, and spices and cook, stirring often, for 2 minutes.
3. Add the lamb’s quarters and cook for another 2 minutes.
4. Add the beans, 1/2 of the tomatoes, the tomato paste, and the cup of water or broth. Simmer on medium-low for 15-20 minutes, or until the liquid has reduced and thickened.
5. Add in the other 1/2 of the tomatoes shortly before serving. Ladle onto plates or into bowls and sprinkle over the cheese to serve. Enjoy!
*Hot tip: Buy your tomato paste in tubes (like toothpaste) rather than in tin cans. This allows you to keep a tube on hand in the fridge for times where you need just a little bit of tomato paste like this!
SPRING SHARE WEEK 11
It’s really starting to feel like summer, everyone is busy planting tomato and pepper plants as well as eggplant and other summery vegetables. Dad always told me to make sure our winter squashes were planted by June 15th, some varieties can take over 100 days to grow from seeding to harvest, especially the pumpkins. The ground is finally good and warm which will enhance the germination of any seeds planted now. Another rotation of crops will also be seeded out to ensure a continuous harvest, provided we can keep the deer and woodchucks away from all that deliciousness! Potatoes are coming along nicely and more leafy greens getting ready for harvest. Planting more herbs like thyme and rosemary, cilantro is close to ready for harvesting. Soon it will be a veritable explosion of yummy goodness!!!
RADISH ASPARAGUS SALAD
Source: https://www.tasteofhome.com/recipes/radish-asparagus-salad/?
Yield: 6 servings
Ingredients
1 pound fresh asparagus, trimmed and cut into 2-inch pieces
7 radishes, thinly sliced
2 tablespoons sesame seeds
Dressing:
2 tablespoons olive oil
2 tablespoons thinly sliced green onion
1 tablespoon white wine vinegar
1 tablespoon lemon juice
2 teaspoons honey
1 teaspoon Dijon mustard
1/4 teaspoon garlic powder
1/4 teaspoon grated lemon zest
1/4 teaspoon pepper
Directions
1. In a large saucepan, bring 6 cups water to a boil. Add asparagus; cover and boil for 3 minutes. Drain and immediately place asparagus in ice water. Drain and pat dry.
2. Transfer to a large bowl; add radishes and sesame seeds. Place dressing ingredients in a jar with a tight-fitting lid; shake well. Pour over salad; toss to coat.
MEDITERRANEAN PARSLEY SALAD — TABBOULEH OR TABOULI
Source: Mediterranean Parsley Salad – Tabbouleh or Tabouli - Where Is My Spoon
Mediterranean parsley salad or tabbouleh, tabouleh, tabouli, probably the best-known Middle Eastern salad recipe, made with lots of parsley, dressed in a simple olive oil and lemon juice dressing.
Ingredients
½ cup fine or medium bulgur wheat
1 cup hot vegetable broth
4 medium plum tomatoes
1 long thin English cucumber
3-4 spring onions depending on size
3 oz fresh parsley leaves
0.7 oz fresh mint leaves
1 large lemon
5 tablespoons extra virgin olive oil
fine sea salt and pepper
Instructions
1. Prepare bulgur: Place the bulgur into a heatproof bowl and cover it with the hot vegetable broth. Let stand for 5 to 10 minutes or according to the packet's instructions. Drain well, if you notice that not all liquid has been absorbed. Place the drained bulgur into a large bowl and let cool while you prepare the rest of the ingredients.
½ cup fine or medium bulgur wheat + 1 cup hot vegetable broth
2. Prepare ingredients: Halve the tomatoes and deseed them, if necessary. Chop them very finely. Deseed the cucumber, if necessary, and chop it finely as well. Thinly slice the spring onions.
4 medium plum tomatoes + 1 long thin English cucumber + 3-4 spring onions
3. Chop herbs: Remove the stems from the parsley and mint, and weigh the leaves. Chop both kinds of herbs very finely with a sharp knife to avoid bruising them too much.
3 oz fresh parsley leaves + 0.7 oz fresh mint leaves
4. Combine salad: Add all the chopped herbs and vegetables to the bulgar bowl. Mix carefully but thoroughly and add the lemon juice and the olive oil. Adjust the taste with salt and pepper and more lemon juice, if necessary.
1 large lemon + 5 tablespoons extra virgin olive oil + fine sea salt and pepper
Notes
1. Bulgur: Read the packet's instructions. Soaking times depend on the sort (and sometimes on the brand) of the bulgur you use.
2. Plum tomatoes are firm and don't have too many seeds, that is why I don't deseed them. If using other sorts of juicier tomatoes, you should deseed them, otherwise, the tabbouleh might be too soggy.
3. Cucumber: If available, use 3-4 Persian cucumbers, depending on size. Persian cucumbers don't need to be deseeded, they are crispier and less watery.
4. Herbs: I weighed the leaves after removing the stems of the herbs. You should have about 3 oz/ 80 g parsley leaves and about 0.7 oz/ 20 g mint leaves.
SPRING SHARE WEEK 10
I never cease to be amazed by this valley I call home and how it transforms with the seasons. From dry wind swept plains almost desert like, then lush shades of green peeking up in rows that are just a soft promise of what is to be. Lettuces, cabbages, tomatoes and peppers, corn, potatoes, summer and winter squashes. The air takes over your senses with the aromas of the oils from the herbs wafting on the breeze. I find myself dreaming of past years’ favorite recipes as I troll the internet for my new favorite seed to grow and recipe to make!
PORK CHOPS WITH ROASTED MAPLE_BACON RADISHES
Source: https://www.countryliving.com/food-drinks/a39799432/pork-chops-with-roasted-maple-bacon-radishes-recipe/
An easy pan sauce flavors both the pork chops and the sweet roasted radishes. Think radishes are only for salads? Wait till you try them roasted!!
By Christopher Michel
We can't say enough good things about a pan sauce. Not only does it add just a ton of flavor to any meat that you're searing on a stove, as well as to fresh roasted veggies, but because it's made out of the leftover bits stuck to the bottom of the pan, it also makes cleanup a breeze! Liquid (in this case wine and stock) instantly melts and absorbs those stuck-on bits when the pan is still hot. So you just cook up the sauce, pour it over your pork chops, and there's no more soaking and scraping at the pan!
Ingredients
1 1/2 lb. radishes, trimmed and halved
3 Tbsp. olive oil, divided
Kosher salt and freshly ground black pepper
4 slices bacon, chopped
1 Tbsp. pure maple syrup
4 (1 1/4-inch-thick) bone-in pork chops (about 3 3/4 pounds total)
1 garlic clove, chopped
1/2 cup dry white wine, such as sauvignon blanc
3/4 cup chicken stock
3 Tbsp. cold unsalted butter, cut into pieces
1 tsp. chopped fresh thyme, plus more for garnish
Directions
Step 1: Preheat oven to 400°F. Toss together radishes and 2 tablespoons oil on a large rimmed baking sheet. Season with salt and pepper. Bake 20 minutes. Combine bacon and maple syrup in a bowl. Add to pan with radishes and bake until radishes are tender and bacon is crisp, 10 to 15 minutes.
Step 2: Meanwhile, season pork chops with salt and pepper. Heat remaining 1 tablespoon oil in a large skillet over medium heat. Cook chops, in batches if necessary, turning once, until internal temperature on an instant-read thermometer reaches 140°F, 8 to 10 minutes. Transfer to a platter and tent with foil; reserve skillet.
Step 3: Pour off all but 1 tablespoon of oil from reserved skillet. Add garlic and cook until fragrant, 1 to 2 minutes. Add wine and simmer, scraping up browned bits from the bottom of the pan, until syrupy, 2 to 4 minutes. Add stock and simmer until thickened and reduced to about 1/2 cup, 2 to 4 minutes. Remove from heat and whisk in butter, 1 tablespoon at a time, until sauce is thick and glistens. Stir in thyme. Serve chops alongside radishes garnished with thyme. Drizzle with pan sauce.
RADISH GREENS PESTO
Source: https://www.loveandlemons.com/radish-greens/
Don't toss those radish greens! I love to sauté them to make a simple side dish or blend them into this vibrant radish green pesto. Spread it onto bread, toss it with pasta, dollop it onto salads, and more!
Ingredients
½ cup pine nuts or pepitas
1 small garlic clove
¼ teaspoon sea salt
Freshly ground black pepper
2 tablespoons fresh lemon juice
1 cup radish greens
1 cup fresh basil leaves
¼ to ⅓ cup extra-virgin olive oil, plus more if desired
¼ cup grated Parmesan cheese, optional
Instructions
1. In a food processor, combine the pine nuts, garlic, salt, and pepper and pulse until well chopped. Add the lemon juice and pulse again.
2. Add the radish greens and basil and pulse until combined.
3. With the food processor running, drizzle in the olive oil and pulse until combined. Add the Parmesan cheese, if using, and pulse briefly to combine. For a smoother pesto, add more olive oil.
Notes: Makes about 1 cup
SPRING SHARE WEEK 9
Whew! Glad the last two days are over and done with. That heat was intense. We had planned on baby spinach but the heat played havoc with it and the quality was less than stellar so we pulled it. But for a great piece of news—we were able to give you asparagus this week!!! There is always some good to come from seemingly bad. The soil has still been relatively cold which means seeds being planted have been struggling to germinate, so the heat benefits the soil in warming it up and providing the warm environment seeds like and need. Combine that with the rain today ... plants and seeds should be jumping with joy!!
Asparagus
This is how my sister and I enjoy asparagus. If I don’t hide it from her she’ll eat the whole batch by herself!! Sometimes I’ll add a bit of parmesan cheese or if I’m in the mood for spice a dash of red pepper flakes!
OVEN ROASTED ASPARAGUS (Easy Recipe)
Source: https://www.wholesomeyum.com/how-to-cook-asparagus-in-the-oven/#jumptorecipe
Author: Maya Krampf from Wholesome Yum
My oven roasted asparagus recipe is perfectly tender and takes less than 20 minutes, with simple ingredients. An easy, healthy side dish!
Ingredients
1/2 lb Asparagus (woody ends trimmed)
1 tbsp Olive oil
1/4 tsp Garlic powder (optional)
Sea salt and Black pepper to taste
Instructions
1. Preheat the oven to 400 degrees F (204 degrees C). Line a baking sheet with foil, if desired.
2. Arrange the asparagus spears in a single layer on the baking sheet, all parallel.
3. Drizzle the veggies with olive oil. Sprinkle with sea salt, black pepper and garlic powder, if using.
4. Use your hands or tongs to toss and turn the pieces, so that they are evenly coated in oil and seasoning. Rearrange in a single layer.
5. Roast asparagus in the oven until crisp-tender: 8-11 minutes for thin stalks, 12-15 minutes for average stalks, or 16-20 minutes for thick stalks. (Time will depend on thickness of asparagus.)
Maya's Recipe Notes
Serving size: 1/4 lb, or 1/2 of entire recipe
1. Tips and timing: Check out my tips above on trimming asparagus, some of my general tips, and my visual chart for cook times based on thickness (see website).
2. Storage: Keep leftovers in an airtight container in the refrigerator for up to 3-4 days. The texture does change, so it's not my favorite food to eat later, but definitely edible. I don't recommend freezing, because frozen asparagus gets mushy, but it would work for my blended asparagus soup.
3. Reheating: You can eat it cold straight from the fridge, let it warm up to room temperature, or quickly reheat the roasted asparagus in the oven again. I like to use it for asparagus salad, so that I don't have to heat it. If you opt to warm it up, do so only briefly, as it gets soggy fast. The microwave is the worst option here.
Some more inspiration: 20 Asparagus Recipes Plus The Best Roasted Asparagus - What's Gaby Cooking
DANDELION GREENS RECIPE
Author: Wafa Shami
Source: Dandelion Greens Recipe - Palestine In A Dish
This dandelion greens recipe is a simple, flavorful vegan dish packed with nutrients. The greens are first boiled to reduce their natural bitterness, then sautéed with onions and olive oil. This easy recipe is traditionally served with Arabic bread (khubz) or taboon bread and a squeeze of lemon on top, adding a fresh, zesty finish that complements the earthy flavors of the greens.
Ingredients
1 bunch of dandelion cut, washed well and rinsed
2 cups of tap boiled water (or enough to cover dandelion)
1/2 medium-size chopped onion
1/4 teaspoon cumin
1 ½ tablespoons extra virgin olive oil
1/8 Sea Salt (adjust to taste)
1-2 lemons
Instructions
1. Chop the dandelion greens and wash thoroughly. Place them in a pot and cover with boiling water, leaving the pot uncovered. 2. Once it reaches a boil, reduce the heat to medium and cook for about 20 minutes, or until the leaves soften.
3. Drain the water and transfer the dandelion to a strainer to cool.
4. Once cooled, squeeze out any remaining water with your hands.
5. In a separate pot, heat olive oil and add the onions. Sauté until they turn golden brown.
6. Separate the dandelion greens with your hands, add them to the pot with onions, and stir in cumin and salt. Cover and cook for an additional 10-15 minutes.
7. Turn off the heat and serve warm or at room temperature with a squeeze of fresh lemon on top.
SPRING SHARE WEEK 8
How beautiful the valley is now, fields are slowly filling up with onion plants, rows of lettuces and other greens are sprouting everywhere you look! It's supposed to reach 90 degrees next week — that will surely help warm the soil so the new plantings will germinate and grow in leaps and bounds. Soon it will be safe to set out tender plants like tomatoes and peppers. Sweet corn will no longer be a sweet dream. And before you know it there will be frost on the pumpkin!
MELTING POTATOES
Source: Melting Potatoes - Kirbie's Cravings
Melting potatoes are a unique side dish to serve. It’s an easier versionof fondant potatoes. The potatoes are crispy on the outside, with a tender interior that almost melts in your mouth.
Ingredients
4 medium russet potatoes, washed and peeled
salt and pepper, to taste
2 tbsp vegetable oil
8 tbsp butter, divided
1- 1 ½ cup low-sodium chicken broth
4 cloves garlic, thinly sliced
2 sprigs fresh rosemary
2 sprigs fresh thyme
Instructions
1. Preheat oven to 400°F.
2. Slice off ends of the potatoes. Cut into 1-inch slices. Season both sides of the potatoes with salt and pepper.
3. Add oil and 4 tablespoons of butter to a large cast iron skillet and bring to medium high heat. Sear the potatoes on one side until golden brown. This can take a few minutes so be patient. Flip the potatoes and sear until golden. Add enough broth so that it covers about 2/3 of the potatoes. Scatter garlic slices evenly across the broth. Add in rosemary and thyme.
4. Cut remaining butter into small cubes and place on top of the potatoes. Place the skillet into the oven and cook until tender, about 30 minutes. Spoon sauce over potatoes before serving.
Notes
* Slightly adapted from Food Network.
* I highly recommend using a cast iron skillet to crisp the potatoes. It does a much better job crisping than other types of pans.
* If you don't have a cast iron skillet big enough to have all the potatoes in a single layer, you can crisp them in batches and then roast them in a roasting pan.
* I prefer fresh herbs, but you can substitute with dry herbs. You can also mix up the herbs and use other ones like oregano, basil, sage.
BRAISED POTATOES WITH LEMON AND CHIVES
Source: Braised Red Potatoes - Spoonful of Flavor
Even though this recipe calls for red potatoes, gold will work just as well!
Ingredients
1 ½ pounds baby red potatoes, halved
2 cups water
3 tablespoons unsalted butter
3 garlic cloves, peeled
3 springs fresh thyme
½ teaspoon salt
1 teaspoon lemon juice
¼ teaspoon pepper
2 tablespoons minced fresh chives
Instructions
1. Arrange potatoes in single layer, cut side down, in 12-inch nonstick skillet. Add water, butter, garlic, thyme, and salt and bring to simmer over medium-high heat. Reduce heat to medium, cover, and cook until potatoes are just tender, about 15 minutes.
2. Remove lid and use slotted spoon to transfer garlic to a cutting board; discard thyme. Increase heat to medium-high and vigorously simmer, swirling pan occasionally, until water evaporates and butter starts to sizzle, 15 to 20 minutes. When cool enough to handle, mince garlic to paste. Transfer garlic paste to a bowl and stir in lemon juice and pepper.
3. Continue to cook potatoes, swirling pan frequently, until butter browns and cut sides of potatoes turn spotty brown, 4 to 6 minutes longer. Turn off heat, add garlic mixture and chives and toss to coat.
Notes
This recipe is from Cook’s Illustrated, May/June 2013.
Store leftovers in the refrigerator for up to 2 days. Reheat leftovers or eat cold.
SPRING SHARE WEEK 7
Mother Nature can be a cruel mistress, our hearts go out to all the fruit farmers as they work to deal with the horrific losses from the freezing conditions a couple weeks ago. I’ve been talking with some of the farmers I know and am hearing stories of losses from 80% or more of their apple crop. Worries about the stone crops like peaches are also being told and still to be determined. The night of the freeze some farmers had helicopters flying over the trees as the wind helps to keep the frost from settling in. The loss of fruit is devastating not only to the farmers but other enterprises like breweries and wineries that depend on the fruit for their wines, hard ciders and more. The impact, which covers an immense region, will be felt not only this year but in time to come. Some orchards fared better than others in part due to their geographical location — being higher up is good, lower in a valley bad — that’s where the frost settles and intensifies. Some have trees of different varieties that bloom at different times staggering the exposure of the fragile buds. As a farmer this is part of our deal — abundant harvests countered with horrific losses. For now the farmers wait and seek to reinvent themselves to survive. Only time will reveal the next chapter in this horror story.
RECIPES
WATERCRESS
Source: 3 Reasons Why Watercress Is the Healthiest Vegetable | The Hospital of Central Connecticut | CT
Watercress is an underutilized green, very versatile and one of the healthiest greens. It keeps you hydrated, is a great source of vitamins A, C and K, and It can promote weight loss. With all those nutrients and almost no calories, watercress can be a great addition to your weight loss plan. One cup of chopped watercress only contains four calories. For comparison, a cup of mixed greens has 71.
Our farmers love watercress and their favorite way to eat is in a salad. This is how they do it. Gently wash water cress, chop into bite size pieces, toss with lemon juice, season to taste with salt and pepper. Here’s some more inspiration: Pinterest
DANDELION GREENS
Source: Can Eating Dandelion Greens Improve Your Health? The Benefits of Dandelions and How To Prepare Them
In addition to the many health benefits, dandelion greens offer your body a lot of nutrition in every bite. In fact, dandelion greens are one of the most nutrient-dense greens you can eat. With just 25 calories a cup, raw dandelion greens are a source of: Calcium, Folate, Iron, Potassium, Vitamin A, Vitamin C.
How to enjoy them:
Raw. If you enjoy the strong flavor, raw dandelion greens are the easiest way to eat them. You can mix them into a salad with a citrus vinaigrette.
Sauteed. Sauteeing the greens with olive oil and garlic is a good treatment for any leafy green. Boil the greens for 5 minutes, then saute them in a pan of hot olive oil and garlic for up to 5 minutes.
Baked. Similar to how you might bake kale chips, you can make dandelion leaf chips by baking them in your oven. Coat the greens evenly with a light amount of olive oil and seasonings. Place the greens in a single layer on a baking sheet. Bake at 400 degrees for up to 8 minutes or until the desired crispiness is achieved.
Soups. Dandelion greens can easily replace kale or chard in your favorite soup recipe.
Eggs. Add dandelion greens to an omelet the way you would any other leafy green.
Juicing. If you enjoy juicing, try adding a handful of dandelion greens into your juicer. Cucumbers can help water down some of their bitterness, and apples can add sweetness. Remember, the flavor is very strong, so you won't want to add too much dandelion into the mix if you are averse to their taste.
CHIVE PESTO
Margaret Bose Johnson
Chive pesto is a vibrant taste of spring. Use this pesto on pasta, chicken, or fish, grilled or roasted meats, use it as a dip, a spread for crackers, or on sandwiches or burgers. It freezes well, tooSource: Chive Pesto - and the Spring Garden - Kitchen Frau
Ingredients
4 cups (135 g) chives, cut into 1" (2.5cm) lengths, loosely packed
¾ cup (75 g) freshly grated Parmesan cheese
½ cup (60 g) slivered almonds
1 clove garlic
zest of half a lemon (about 1½ teaspoons)
juice of half a lemon (about 1½ tablespoons)
¼ teaspoon pepper
⅔ cup (160 ml) extra virgin olive oil, more if needed
Instructions
Add the chives, Parmesan cheese, almonds, garlic, lemon zest and juice, and pepper to the bowl of a food processor, and whiz until everything is coarsely chopped.
With the motor running, add the oil in a thin stream and continue processing until the pest is a homogeneous and slightly chunky paste.
If you want a looser pesto, add more olive oil, a bit at a time, until it's your desired consistency. (Note: This pesto firms up a bit as it rests, so you may need to add more olive oil to loosen it every time you use it.)
Makes about 1⅔ cups (300 ml).
Notes
Chive pesto freezes well. Put it into small jars or freezer containers, filling it ½ inch (1 cm) from the top of the jar. Smooth the top and pour on a thin layer of olive oil (to keep the top from oxidizing). Seal the jar and freeze for up to 1 year.
The pesto will keep in the fridge for up to a week. Every time you scoop some out of the jar, add a thin layer of olive oil to the top and it will keep well.
Use it on chicken or fish, or stir it into pasta (with some extra pasta cooking water and a sprinkle of salt). Serve it as a dip for veggies or an appetizer spread on crackers, layer it on burgers or on sandwiches under cheese, cold cuts, egg salad, or tuna salad. Serve it on baked potatoes or on eggs or omelets, too.
SPRING SHARE WEEK 6
How's that saying go “April showers bring May flowers.” If that’s the rule then May should be exploding with all kinds of good things. The radishes which like cool weather are barely crawling, the traditional round red ones and other similar varieties usually are ready to harvest 21-25 days after germination. We planted the first wave about 3 weeks ago but the extreme cold hasn't let the soil warm enough to spur the plants into maximum production. So we impatiently patiently wait. No spinach this week — this planting wasn’t quite ready for harvest but this weeks rain and next weeks heat will push it into production rather rapidly. Planting cilantro and other seeds today, then the frantic struggle to stay on top of keeping the weeds away. Since we don’t use chemicals all of this is done either with a tractor and implements or by hand. It definitely keeps us busy!!!
RECIPES
COMPOUND BUTTER — ideas on how to use those great herbs: https://www.loveandlemons.com/herb-compound-butter/
HERBAL VINEGAR — https://shaneandsimple.com/herb-vinegar-how-to-make-herbal-infused-vinegar/
NOT-JUST-SCALLION PANCAKES
By Natasha Pickowicz | Published on February 15, 2026
https://www.foodandwine.com/not-just-scallion-pancakes-11905904Don’t be scared off by the length of this recipe — it's a very detailed recipe on how to make these flaky, pan-fried pancakes; Build on the classic scallion version by folding in any herbs you want for additional interest and flavor.
Ingredients
1 cup water
1 cup packed fresh herbs (like scallions, basil, parsley, mint, tarragon, cilantro, sorrel, and/or dill)
2 cups all-purpose flour
1 teaspoon kosher salt
About 1/4 cup vegetable oil, for cooking and shaping
1/4 cup sesame oil
Flaky sea salt, to finish
Directions
Step 1: Pour the water into a small pot and heat until boiling. Meanwhile, finely chop the fresh herbs into confetti; measured tightly in a cup, the herbs should collapse to yield about 1/3 cup.
Step 2: Combine the flour and salt in a medium bowl. Slowly stream in the hot water, stirring with chopsticks until a loose dough forms. Once the dough is cool enough to handle, bring this shaggy mixture together by hand, kneading for a minute or two. Shape the dough into a rough ball; it will be sticky. Cover and let rest in the refrigerator to chill for at least 30 minutes and up to 8 hours.
Step 3: Using a big knife or bench scraper, divide the dough into quarters, each weighing about 4 ½ounces (125 grams). Form a hand into a claw, like you're holding an invisible baseball, then roll the dough pieces into smooth balls.
Step 4: Lightly grease a rolling pin and your work surface with vegetable oil. Roll a piece of dough into a circle about 10 inches wide.
Step 5: The dough will be very thin and sheer
Step 6: Brush the dough circle with a thin coating of sesame oil (about 1 teaspoon), and top with a heaping tablespoon of the chopped herbs.
Step 7: Starting with the bottom of the circle, roll up the dough, like a scroll or a jelly roll.
Step 8: Twist the scroll into a tight spiral, like a snail's shell, as it lies flat on your work surface. Repeat with the remaining dough. Drape a dish cloth over all the dough spirals and let rest for 30 minutes.
Step 9: Line a large baking sheet with parchment paper. Roll each dough spiral into a circle about 8 inches wide, adding a little vegetable oil to the rolling pin if the dough feels overly sticky or tears.
Step 10: Stack the circles on the lined baking sheet as you go, separating each one with a small square of parchment. The pancakes shouldn't feel overly sticky or wet, but it's okay if the herbs slightly tear the dough while you're rolling it out. (Note: Don't roll the pancakes too thinly, which would compress their flaky layers and result in more of a cracker.)
Step 11: At this point, you can partially freeze the pancakes on a baking sheet lined with parchment paper, then stack them in an airtight container in the freezer for up to 3 weeks.
Step 12: When you're ready to cook the pancakes, heat 1 tablespoon of vegetable oil in a large skillet over medium heat. Set a baking sheet lined with a dry towel nearby as a place for the pancakes to land and drain once removed from the oil.
Step 13: Fry the pancakes one at a time, 4 to 5 minutes for each pancake, flipping halfway through and replenishing the oil after each round. Transfer to the towel-lined baking sheet and sprinkle with flaky sea salt.
Step 14: Using a sharp cleaver or chef's knife, cut each pancake in half, then cut each half into 1-inch wide strips.
Make ahead: Roll and shape the pancakes up to the point of the final 8-inch circles, then freeze (separated with parchment) for up to three weeks and pan-fry straight from frozen.
SPRING SHARE WEEK 5
I usually only give out nettles once in spring time, they are a special herb that we wild forage on the farm. As their name suggests they are “stinging” nettles. Very nutritious, they must be cooked before eating. My sister loves them in tea, I turn them into pesto. Supposed to be invaluable for those who have spring allergies.
The Science of Nettles Health Benefits
Fast-forward to the modern age, and nettles are gaining attention for their truly spectacular health benefits. Modern research supports what ancient healers knew all along, nettles are more than a nutritional staple; they’re a complete health ally.
1. Allergy and Immune Support
2. Nutrient Powerhouse
3. Joint and Muscle Support
4. Hormonal and Reproductive Health
For more detailed information see: Beyond the Sting: Exploring the Benefits of Stinging Nettles
Cooking with Nettles
Fresh nettles can be sautéed like spinach, added to soups, or blended into pesto. The stinging nettle plant has been used historically in cooking and offers nutritional value and health benefits. Just make sure to blanch them first to remove the sting!
CLASSIC STINGING NETTLE SOUP
Source: Classic Stinging Nettle Soup Recipe - Forager | Chef
A rich, ultra nettley stinging nettle soup made with nettles, stock, vegetables, potato, and a splash of cream.
Author: Alan Bergo
Ingredients
Soup
4 cups chicken stock
½ cup heavy cream
2 cups diced peeled russet potato, roughly 1 large potato
2 cups diced leeks
2 medium sized shallots diced small
1 small yellow onion diced
3 tablespoons unsalted butter
1 cup diced celery
Kosher salt and white pepper to taste
8 oz stinging nettles or roughly half a paper grocery bag full This should yield about 1 heaping packed cup after blanching, shocking and mincing.
Finishing and serving
Crème fraiche
chopped dill or mint
chopped hard boiled egg optional
extra virgin olive oil to garnish, optional
Instructions
Preparing the Nettles
1. Harvest fresh nettles in the spring about 4-5 inches tall. You can also use the tender growing tips in the late spring and summer.
2. Wash the nettles in a sink of cold water, then dry them.
3. Blanch the nettles in 2-3 quarts of boiling water seasoned to taste with salt. Cook only until wilted, about 30 seconds. Shock the nettles in cold water and squeeze dry.
4. Remove a handful of nettles and finely chop them to add after the soup is pureed.
Building the soup
1. Sweat the celery, onion, shallot and leek on medium heat for 5 minutes. Add the chicken stock, potatoes, and bring the mixture to a simmer. Cook on medium-low until the vegetables are tender, about 15 minutes.
2. Add the nettles and puree the soup a blender or with an immersion blender. Work in batches if you need. Pour the pureed soup into a pot (preferably metal as it cools faster). Chill in a sink of cold water or in a bowl with ice water.
3. Add the rest of the finely chopped, reserved nettles back to the soup and stir in as a garnish if desired. Finally, whisk in the cream to loosen it. The flavor and color will improve as it sits.
Finishing
1. Assess the consistency, if you prefer your soup more thin, add a splash of stock or water until it looks good to you.
2. Double check the seasoning for salt and pepper, whisking to make sure the salt is completely dissolved before adding more. Serve, or transfer to a container and refrigerate for up to 3 days. The flavor will be at its peak if it's made the night before.
Serving
1. Serve the soup ladles into warm bowls, garnished with spoonfuls of creme fraiche or olive oil, and any other garnishes.
Notes
Harvesting
If the nettles are young I may not wear thick gloves, but I always do with older plants as the stinger intensifies as nettles grow. You can also harvest nettle tops in early summer, or buy them at a farmers market.
Extra Strong Nettle Flavor
Blanching and chopping the greens ensures a smooth texture but is optional. If your nettles are young, you can also put them directly into the blender without blanching which will cook them as it purees. Reheat the soup, season to taste and serve. It has a potent flavor almost reminiscent of oysters. The nettles can also be steamed for a stronger flavor.
RIDICULOUSLY EASY CHEDDAR CHIVE BISCUITS
Source: https://thecafesucrefarine.com/easy-cheddar-chive-biscuits/
Chris Scheuer
These tall, flaky, Ridiculously Easy Cheddar Chive Biscuits are melt-in-your-mouth-delicious. They'll have you quite smitten at the first bite!
Ingredients
1 cup cold buttermilk
8 tablespoons butter, plus one more for brushing
2 cups all-purpose flour, more for counter
1 teaspoon sugar
½ teaspoon baking soda
2 teaspoons baking powder
¾ teaspoon kosher salt
1 ¼ cups finely shredded cheddar cheese
¼ cup finely sliced fresh chives, extra for garnish, if desired
Instructions
1. Adjust oven rack to middle position and heat oven to 425°F. Line a sheet pan with parchment paper or spray a sheet pan with cooking spray.
2. Measure 1 cup of buttermilk and place the cup in the freezer while prepping other ingredients (you want it to be in the freezer about 10 minutes).
3. Place butter in a microwave-safe bowl, cover with a paper towel over the top and heat on high for 30 seconds. If not completely melted, return to microwave for 10-second intervals till melted. Set aside to cool a bit while prepping other ingredients.
4. Whisk flour, baking powder, baking soda, sugar and salt in large bowl. Add cheese and chives. Stir to combine.
5. After buttermilk has been chilled in the freezer for 10 minutes, combine it with the melted butter. Stir with a fork until butter forms small clumps or globules.
6. Add buttermilk mixture to dry ingredients and stir with a sturdy spatula just until all flour is incorporated and batter pulls away from sides of the bowl. The dough should be stiff and not super wet. If the dough is wet, add more flour 1 tablespoon at a time, stirring to combine, until dough is fairly stiff.
7. Generously spread flour over your work surface. Dump biscuit dough from bowl onto prepared work surface and turn to coat all surfaces with flour. Knead on counter 5-6 times (about 20-30 seconds). Flip over on work surface to coat with flour then pat into a 6-inch square. It should be 1 ½-2-inches in height.
8. Cut as many biscuits as you can with a biscuit cutter (this will depend on what size cutter you use). Place biscuits on the prepared sheet pan. Knead scraps a few times till they hold together, then pat into a small circle and cut more biscuits. Transfer last biscuits to the sheet pan, spacing about 1 ½ inches apart. (See Café Tips in post for an even easier cutting technique).
9. Place in oven and bake until tops are a medium golden brown and crisp, 10 to 15 minutes. Start checking after about 8 minutes, as every oven is different.
10. Melt remaining tablespoon of butter and brush tops of hot biscuits with melted butter. Sprinkle with more finely sliced fresh chives. Serve and enjoy!
Spring Share Week 4
Seed potatoes are being planted today!!! We're starting with a variety called Vivaldi. 200 pounds of seed! First we prepare the seed, bigger spuds need to be cut into pieces, Dad always taught us to have about 3 sprouts per potato, little ones we plant whole. If all goes well from 200 pounds of seed we should realize between 2000 and 3000 pounds of useable potatoes. I couldn't find this variety of seed potatoes last year so I was beyond thrilled when I found it this year. Potatoes have gotten a bad rap over the years as a "bad" vegetable. That's one of the reasons I like this one so much, Vivaldi is reportedly lower in carbs than regular varieties by about 26-38% and 33-56% fewer calories. Plus it's a beautiful potato! "Widely appreciated by British consumers for its taste and texture," Vivaldi is velvety smooth with a naturally buttery flavor and yellow skin and light-yellow flesh. So with that being said let them eat potatoes!!
I have an obsessive personality, my latest obsession is hummus — red pepper, beet, garlic, red onion, parsnip and believe it or not Jerusalem artichokes!!! Try the following for a great carrot hummus recipe
ROASTED CARROT HUMMUS
Source: Carrot Hummus Recipe | The Mediterranean Dish https://share.google/BZgj5ZmE2kSJssuDD
What is in Carrot Hummus?
This carrot hummus takes the traditional components of hummus—lemon, garlic, olive oil, tahini, and chickpeas—and turns up the flavor with sweet roasted carrots and a few of my favorite Mediterranean pantry essentials.
MAKE YOUR OWN: Check out our Homemade Harissa Recipe. (Easy Homemade Harissa (How to Make Harissa) | The Mediterranean Dish https://share.google/xiDLlvSlCdGAJpA3o )
How to Make Roasted Carrot Hummus
I like to roast the carrots until they’re deeply caramelized and perfectly sweet. Taking about 40 minutes, it’s the most time-consuming part of this easy roasted carrot recipe but it’s hands-off. The added depth of flavor is well worth the time! Here are the steps:
Swaps and Substitutions — Here are the easy substitutions:
Sumac: Lemon zest.
Pistachios: Walnuts or hazelnuts. For a nut-free option, you can skip this crunchy garnish or substitute with Roasted Pumpkin Seeds, toasted pepitas, or Crispy Quinoa.
Cumin: Coriander.
Parsley: Cilantro or dill.
Lemon juice: Lime juice.
What to Serve with Carrot Hummus — Though this spicy hummus has a big, bold flavor, it fits in with so many different recipes, from mezzes to sandwiches to bowls and beyond. Here are some ideas:
As an mezze: Serve with Pita Bread or Pita Chips and sliced vegetables and provide other snacky items like Turkish Lentil Balls, roasted grapes, and stuffed dates.
Sandwiches: Make a high-protein vegan sandwich by substituting the whipped feta for carrot hummus in this Veggie Sandwich recipe.
As an appetizer: Swap out the garlicky yogurt on this Roasted Rainbow Carrots with Dukkah recipe.
Make hummus bowls: Use as the base for my Mediterranean Quinoa Bowl, or even to start the day with these 15-Minute Mediterranean Breakfast Bowls.
Make a hummus bar: The next time you have friends and family over serve a variety of spreads and dips. Include Beet Hummus, Pumpkin Hummus, Roasted Red Pepper Hummus, and Avocado Hummus. Or top traditional hummus with fresh vegetables for Farmer’s Market Hummus, add chopped tomatoes, onions, and seasoned ground beef for Layered Hummus, or spice things up with Shoshito Peppers and Shallots. Add platters of bread and bowls of vegetables for scooping. I love sliced peppers, cucumbers, zucchini, and tomatoes, and then for bread try pita, simit or tabooli.
Ingredients
1 (15-ounce) can chickpeas
4 medium carrots, scrubbed, dried, and sliced into large pieces
Extra virgin olive oil
Kosher salt
1/3 cup tahini paste
1 garlic clove, minced
1 teaspoon sumac
1/2 teaspoon cumin
1 to 2 teaspoons harissa paste (or more to your liking)
1 lemon, juiced
Chopped parsley, for garnish
2 tablespoons pistachios, lightly crushed, for garnish
Roasted Carrot Hummus with Spicy Harissa
This roast carrot recipe is perfectly sweet, spicy, garlicky, creamy, and delicious! Serve as an appetizer everyone will love, or keep in your fridge for healthy snacking at the ready. With spicy harissa, sweet roasted carrots, warming cumin, and tart sumac, I like to think of it as classic hummus but with a sassier personality. It is SUCH a crowd-pleaser too. Serve with pita bread for game day, the holidays, and beyond. Or, stash in your fridge with sliced veggies for healthy snacks on demand.
Instructions
Step 1: Get ready. Position a rack in the center of the oven and heat to 425°F. Drain the chickpeas over a bowl to save both the chickpeas and their liquid.
Step 2: Roast the carrots. Place the carrots on a sheet pan and drizzle with a little olive oil. Season with kosher salt and toss so the carrots are well coated. Roast in the heated oven until the carrots are fork-tender and charred in some parts (about 40 minutes). Remove from the heat and set aside until cool enough to handle.
Step 3: Make the hummus. To the bowl of a large food processor, add the roasted carrots, chickpeas (without the liquid), tahini, garlic, sumac, cumin, harissa paste, and lemon juice. Season with a small pinch of kosher salt.
Step 4: Get the consistency. Close with the lid and blend, and while the processor is running, drizzle a little bit of olive oil (about 2 tablespoons) from the top opening until the mixture is smooth and creamy. (If the mixture is dry or too thick, add a little of the reserved chickpea liquid to help blend the hummus to a smooth consistency. Be very conservative as you add more liquid).
Step 5: Finish and serve. Adjust seasoning to your liking, adding more salt, pepper, harissa, and lemon to your liking. Transfer the roasted carrot hummus to a shallow bowl or plate and use the back of a spoon to spread it on the plate. Drizzle with olive oil and garnish with the parsley and pistachios.
Spring Share Week 3
They say we lose ¼ inch of soil annually due to erosion. This erosion can happen many ways - poor handling of the soil, heavy rains causing flooding, lack of rain causing drought conditions and the wind. Lately it’s been the wind, yesterday it was sweeping across the valley so fiercely that there were blackouts throughout the region. The ferocity of the wind makes me feel like the loss of soil is far more than ¼ inch. We do our best to combat this - composting, minimal tilling, keeping our drainage ditches clean, planting crops that help hold the soil in place, using no spray methods of keeping weeds and bad bugs at bay. But nature will rule and in the end all we can do is try to be the best guardians of the soil we can be!
BEST VINAIGRETTE RECIPE (WITH VARIATIONS!)
Source: Easy Homemade Vinaigrette Recipe (with Lots of Variations) - An Oregon Cottage
The best vinaigrette recipe with lots of variations is ready in just five minutes so you never have to buy boring 'Italian' dressing again.
Author: Jami Boys
Ingredients
Basic Vinaigrette:
1/3 cup apple cider or red wine vinegar
2 tablespoons Dijon mustard
2 cloves garlic minced
1 teaspoon black pepper
1/2 teaspoon salt
3/4 cup olive oil
1 teaspoon honey or maple syrup to taste optional
Balsamic variation: (replace the 1/3 cup vinegar in basic recipe with):
2 tablespoons aged Balsamic
1/4 cup cider or red wine vinegar
Lemon-Herb Variation changes & additions:
1/3 cup lemon juice -replace ALL of basic recipe vinegar with this
1 to 2 teaspoons dried herbs of choice OR 1 tablespoon fresh thyme + basil, Italian, oregano, etc.
Asian Variation changes & additions:
1/3 cup rice vinegar -replaces ALL regular vinegar in basic recipe
1 teaspoon sesame oil
1 teaspoon honey
1 teaspoon Sriracha sauce or to taste
Homemade Salad Dressing Supplies
Here are some of my go-to supplies for making homemade salad dressings:
2 cup glass measuring cup
Medium metal whisk
Small glass tablespoon measurer
Easy pour lids for mason jars (this is what I mostly use to store dressings—so easy)
Glass salad dressing jars with flip top lids
Recycled glass dressing jars – use what you have!
Instructions
Step 1. Add all the ingredients you’re using together in a 1 or 2-cup measuring glass (or add straight to a bottle to shake and store).
Step 2. Whisk by holding the whisk handle between your hands and rotating back-and-forth quickly until the ingredients are completely combined OR by using an immersion blender or regular blender (it's quicker to make it straight in the bottle, but it doesn't mix and stay combined as thoroughly as when whisked).
Recipe Mixing Tips
The main thing with homemade salad dressing recipes is that they do tend to separate (that’s why the store bought versions have emulsifiers and other ingredients).
In addition to shaking before use, there are a couple of ways to mix your dressing when you’re making it that may help it stay emulsified.
1. Manual Whisking Tip: This method is the easiest and quickest, though it may not last as long:
Add all your ingredients into a 1 or 2-cup glass measuring cup.
Center a metal whisk between two hands and then roll it back and forth quickly to create a fast whisking motion.
Voila! Perfectly emulsified dressing in seconds that will not separate immediately – without having to use any type of blender.
2. Immersion Blender or Blender Tip: This method produces a vinaigrette that will stay combined for the longest.
Add your ingredients to a wide mouth mason jar or 1-2 cup glass measuring cup.
Insert an immersion blender into jar and mix until completely combined.
OR – add all the ingredients to a blender and blend about 30 seconds.
Even more variations
Red Wine Basil Vinaigrette: Add dried or fresh basil and use only red wine vinegar.
French Vinaigrette: Add dried Herbs de Provence and use a white wine vinegar.
Southwest Vinaigrette: Add a little hot sauce to the basic recipe – use over a salad of lettuce, onions, beans, tomatoes, olives and cheese.
Raspberry Vinaigrette: Add a 1/4 cup raspberries, pureed to the basic or balsamic recipes. This works with other berries, too, like blueberries, blackberries, or cranberries.
Creamy Italian Salad Dressing: add two tablespoons of mayonnaise to the basic vinaigrette (one of my favorite easy variations).
Usage Ideas
Toss with fresh greens, roasted vegetables, or grain salads.
Use as a marinade for meats, seafood, or tofu.
Drizzle over fruit salads for a tangy-sweet accent.
By mastering the basic vinaigrette, you can easily customize flavors and create a variety of dressings to suit any salad or dish.
Spring Share Week 2
The weather today is typical spring weather, damp and rainy which is perfect spring planting weather! As we speak Benito is out in the fields transplanting onions, planting radish seeds and spinach seeds. Seed potatoes should arrive soon and we’ll get them in the ground too. Trays of seeds are bursting with new growth just waiting to go in the fields. More seeds arrive daily and as they do the anticipation of the harvest to come is palpable. Such an exciting time after farmers and fields lay dormant under the cover of winter!
Aspabroc is a very cool veg I discovered many years ago — looks like broccoli tastes like asparagus. Also known as sweet baby broccoli, often marketed as Broccolini®. It’s a hybrid vegetable, a cross between broccoli and Chinese kale (gai lan). This breeding results in longer, thinner stalks, smaller florets, and a milder, sweeter taste compared to traditional broccoli. Its entire stalk is edible, offering a greater yield and less waste.
Seasoning and Serving Suggestions
Sweet baby broccoli pairs well with a wide range of flavors. Consider these seasoning and serving suggestions:
Simple Seasoning: Olive oil, salt, pepper, and a squeeze of lemon juice.
Garlic and Ginger: Sauté or stir-fry with minced garlic and ginger for an Asian-inspired flavor.
Chili Flakes: Add a pinch of red pepper flakes for a touch of heat.
Parmesan Cheese: Sprinkle with grated Parmesan cheese after roasting or steaming.
Toasted Almonds: Top with toasted slivered almonds for added texture and flavor.
Lemon-Garlic Butter Sauce: Drizzle with a flavorful lemon-garlic butter sauce.
Serve as a Side Dish: Accompany grilled chicken, fish, or steak.
Add to Stir-Fries: Incorporate blanched or sautéed broccoli into your favorite stir-fry recipes.
Include in Salads: Add blanched broccoli to salads for a vibrant and healthy addition.
Source: How to Cook Sweet Baby Broccoli? - Chef's Resource
Turnips: For me turnips are another sign of spring, sprouting their crowns of leafy greens, they are proof that yes we can — we can make it through winter and embrace the new.
SIMPLE ROASTED TURNIPS RECIPE
This recipe is also a great way to combine the aspabroc with turnips for a spring roast!
Source: Simple Roasted Turnips - Healthy Seasonal Recipes
Author: Katie Webster
Simple Roasted Turnips! A lower starch vegetable side dish, only 9g net carbs! A great alternative to roasted potatoes, and Whole30 and paleo approved. For just 83 calories per cup they’re quite filling and nutritious.
Ingredients
7 cups turnips peeled and cut into 1 1/2 -inch chunks (about 6 medium)
1 tablespoon avocado oil
1/2 teaspoon salt
Freshly ground black pepper
1/2 teaspoon dried oregano
1/2 teaspoon dry thyme
Generous pinch garlic powder
Instructions
Step 1: Preheat oven to 425 degrees F.
Step 2: Toss turnips, oil, salt and pepper in a large bowl. Spread out on a large, rimmed baking sheet. Transfer to the oven. Roast, stirring once or twice, for 30 minutes.
Step 3: Mix oregano, thyme and garlic in a small dish. Remove the turnips from the oven. Sprinkle the turnips with the herb mixture and toss them with a spatula to coat.
Step 4: Return to the oven and roast, until the turnips are tender when pierced with a fork, and browned in spots, about 5 minutes longer. Serve warm.
Notes
– Store any leftovers in an airtight container in the fridge up to 5 days.
– Add the seasonings only for the last five minutes so they will not burn and become bitter.
– Feel free to use other spice mixes!
– Turnips are cooked when a fork or paring knife slips easily into the flesh without resistance and then out again.
Spring Share Week 1
Dreams — I have come to believe that dreaming is a big part of farming. Dreaming of the perfect tomato, head of lettuce, sweet carrot, a bug-free, weed-free field. Heck I’ll take a bad bug-free, weed-free bed in a field any day!!! I was telling my sister this morning how I dream of creating the perfect farm — redolent in herbs, flavorful and colorful vegetables, perky flowers, wild edibles spilling over ditch banks, crunchy sweet carrots, juicy crisp lettuces, sugar snap peas that really do snap when you pick them, tomato juice running down your chin when you bite into that just-picked, sun-ripened tomato. The crunchy sound of sweet peppers and corn as you nibble them while standing under the shade of the stalks. Watching CSA members and Farmers Market customers faces glow when they talk about their favorite vegetable, or how they were reminded of something their Mom or Grandma used to make. Yes these are the things dreams are made of!
Recipe: A vegetable, sexy? Oh yes — the spectacular potato has been elevated to this realm. Thank you to Bob for sharing this NY Times article about “Jacket Potatoes.” What Are Jacket Potatoes, and Why Are the English Waiting Hours for Them? The heavily topped tubers, a British classic, are having a culinary comeback thanks to social media.
Source: NYTimes Article: https://www.nytimes.com/2026/03/20/dining/jacket-potatoes-uk-food-trend-social-media.html
We perhaps are more familiar with the “loaded Potato,” you know it — typically a russet potato, baked till tender in your oven, wrapped in foil on a grill. Then topped with whatever captures your imagination and taste buds at that moment in time. It could be as simple as butter, salt and pepper or elaborate as roasted chicken, chili, cheddar cheese, caramelized onion, frank'n'beans. Even go sweet with an apple onion marmalade. For those who need a recipe to follow check out this one:
LOADED BAKED POTATOES
Source: Loaded Baked Potatoes
By: Holly Nilsson; Servings: 8 potato halves
Prep Time: 15 minutes; Cook Time: 1hour 15 minutes; Cool Time: 20 minutes; Total Time: 1 hour 50 minutes
Equipment: Baking Sheet with parchment paper
These Loaded Baked Potatoes are perfect when serving guests. Make a DIY topping bar and let everyone dig in!
Ingredients
4 medium baking potatoes scrubbed
1 teaspoon olive oil
½ teaspoon salt
½ teaspoon black pepper
¼ cup sour cream
2 tablespoons melted butter
½ teaspoon garlic powder
½ cup shredded cheddar cheese for topping
Add-Ins
½ cup shredded cheddar cheese
¼ cup shredded Parmesan cheese
2 green onions thinly sliced
4 slices bacon cooked and crumbled
Instructions
1. Preheat oven to 375°F.
2. Poke holes in the potatoes with a fork. Coat the outside of each potato with olive oil and salt to taste. Bake directly on the middle rack for 50-60 minutes. (see notes for air fryer or microwave directions).
3. Remove from the oven and cool about 20 minutes.
4. Cut each potato in ½ lengthwise and use a spoon to scoop out the flesh leaving a ⅛-inch shell.
5. Combine the scooped potato with sour cream, butter, garlic powder, salt and pepper. Mash until smooth.
6. Stir in the add-ins to combine. Spoon filling into each potato skin and top with cheddar cheese.
7. Place on a baking sheet with parchment paper for 15-20 minutes or until heated through and cheese is melted.
Notes
Potatoes: If using thin-skinned potatoes (red potatoes or Yukon gold) leave a ¼-inch thick skin when scooping out the flesh so they hold their shape.
Baking Potatoes: *Be sure to poke holes in the potatoes with a fork before baking, otherwise, they could explode in the oven!
Baked Potatoes can be cooked in the microwave or air fryer if desired.
Level Up: If you’d like to add roasted garlic to the filling. cut ½ inch off the top of a whole head of garlic. Drizzle generously with olive oil and wrap in foil. Bake along with the potatoes until tender and golden. Squeeze out the cloves and chop or mash to add to the filling.
Filling: Bake an extra potato if you’d like them to be overstuffed. The filling can be spooned in or piped with a piping bag.
Make Ahead/Freezing: Potatoes can be prepared and frozen before baking. To bake from frozen, cook at 350°F for 35-40 minutes.
Winter Share Week 11
Here we are on the last official day of winter. We cannot thank you enough for joining us on this past frigid journey, knowing you are out there sharing with us in the cold and snow is what keeps us going. One of my markets shut down completely for the winter, said it was just too much. We had a committee meeting the other night for our home town market and someone reported that one of our vendors just looked demoralized. The rest of us are waiting with baited breath — for this season of mud to dry. Ditch diggers are getting their spring tuneups, seed potatoes and baby onion plants are getting delivered, greenhouses are filling up with starts. Farmers are grinning with excitement knowing that soon we will be out their in that rich fertile soil and the valley will be lush and green again.
Recipes
A member of the sunflower family, sunchokes — also called Jerusalem artichokes — are tubers that have no actual relation to artichokes, or Jerusalem for that matter, and are commonly grown in North America. They have rough skin, which ranges in colors from dark brown to light tan, and an interior that is similar in texture to a potato. Source: https://www.allrecipes.com/article/what-are-jerusalem-artichokes/
Sometimes jokingly referred to as "fartichokes," Jerusalem artichokes can cause gas, bloating and other gastrointestinal issues. They are high in inulin, an indigestible fiber and prebiotic, which can cause digestive trouble in some. It happens more often when Jerusalem artichokes are served raw, so take it slow when you first start enjoying this veggie uncooked. Jerusalem artichokes have a mildly nutty taste — think water chestnut when raw and take on an artichoke heart flavor when cooked.
ROASTED JERUSALEM ARTICHOKES (OR SUNCHOKES)
Source: Roasted Jerusalem Artichokes (or Sunchokes) Recipe
Prep Time: 10 mins; Cook Time: 35 mins; Total Time: 45 mins
Servings: 2
This recipe for Jerusalem artichokes is a super-easy way to cook these vegetables if you've never tried them before. They are by far my favorite. Jerusalem artichokes, or sunchokes, are starchy tubers like potatoes and turnips. When roasted, the skin becomes flaky and the flesh becomes tender, but the taste of a sunchoke is slightly nutty and sweet. Cooked sunchokes are best when eaten within 2 days. When raw, they store well in your fridge's vegetable bin, wrapped loosely in a paper towel.
Ingredients
1/2 pound Jerusalem artichokes (sunchokes)
½ cup olive oil
1 tablespoons dried thyme
1/2 tablespoon minced garlic
sea salt to taste
Directions
Step 1. Preheat the oven to 350 degrees F (175 degrees C).
Step 2. Scrub artichoke tubers and cut out eyes.
Step 3. Cut tubers into 1-inch pieces.
Step 4. Mix olive oil, thyme, garlic, and sea salt together in a large bowl; add Jerusalem artichoke pieces and toss to coat. Arrange coated pieces in one evenly-spaced layer on a baking sheet.
Step 5. Roast in the preheated oven until tender, 35 to 45 minutes.
VEGAN RAW SUNCHOKE SALAD WITH APPLES
Source: Vegan Raw Sunchoke Salad with Apples Recipe
You can eat sunchokes or Jerusalem artichokes raw and you don't even need to peel them. Just make sure you wash them well and then slice them really thinly, ideally with a mandoline.
Yield: 3 servings
Ingredients
1 ½ cups thinly sliced sunchokes
1 ¾ cups thinly sliced peeled apples
½ cup olive oil
¼ cup orange juice
salt and freshly ground black pepper to taste
2 pinches white sugar
Instructions
Step 1. Arrange sliced sunchokes and apples on a serving platter.
Step 2. Combine olive oil, orange juice, salt, pepper, and sugar in a blender; blend until creamy. Drizzle over sunchoke-apple mixture.
BUTTERNUT SQUASH SOUP WITH FROZEN SQUASH
Source: Butternut Squash Soup with Frozen Squash - Salt & Sprinkles
Today we provided frozen squash from last falls harvest - use it in the following recipe as a great way to bridge the last winter cold with spring early warmth. —Farmer Cheryl
Butternut Squash Soup with frozen squash is a delightful and comforting dish that warms the soul on chilly days. This recipe offers a convenient twist by using frozen butternut squash, making it a time-saving option without compromising on flavor. The velvety texture and rich, earthy taste of the butternut squash blend seamlessly with aromatic spices, creating a savory and satisfying soup.
Ingredients
1 tablespoon coconut oil
1 tablespoon butter
1 medium yellow onion diced
2 cloves garlic minced
2 tablespoons Thai red curry paste
20 ounces frozen cubed butternut squash
3 cups vegetable broth or chicken broth
1 bay leaf
1 can full fat coconut milk
1 lime juiced
1 teaspoon smoked paprika
1 teaspoon salt
1/2 teaspoon pepper
Instructions
Step 1. Saute the onions and then add ingredients. Heat coconut oil and butter in a large Dutch oven or heavy-bottomed pot over medium heat. Add the onions and cook, stirring occasionally for 5 minutes or until the onions are translucent and soft. Next, add the garlic and Thai red curry paste and cook until fragrant, about 1 minute. Add the butternut squash, broth, and bay leaf.
Step 2. Bring the soup to a boil. Bring the soup to a boil and then reduce the heat to a simmer, stirring occasionally, until the butternut squash is tender, about 15 minutes. Remove the bay leaf and add 1 can of full fat coconut milk. Puree the soup using an immersion blender or carefully transfer the soup to a blender and blend until smooth and creamy.
Step 3. Serve. Stir in the lime juice. Add smoked paprika, salt, and pepper. Serve hot. Store any leftover soup in an airtight container in the fridge for up to three days.
Winter Share Week 10
Winter just doesn’t want to let go — chance of snow today and maybe a snow storm on the horizon next week. One thing seems for certain — we are moving into the season of mud which is the intermediary between spring and winter. If that remains true in a very short time we will be advancing VERY rapidly into summer. Benito is coming in Monday so we can take a look at the Kubota and make sure it’s all set to go for spring plowing. It seems to be very cranky but i know how cranky I was after a full day in the cold, LOL. I am getting so anxious to get the seeds into the fields — brassicas, lettuces, onions, radishes, pea and beans — I couldn’t possibly begin to name all the varieties.
Was thinking of St. Patricks Day when we picked out the vegetables for this week. That honkin' big yellow and purple root is a rutabaga. Known by many monikers — swede, yellow turnip — the unique flavor profile of raw rutabagas boasts earthy notes with a subtle peppery undertone, reminiscent of their turnip family ties. When cooked, they transform into a buttery, savory, and mildly sweet delight. Rutabagas are a powerhouse of fiber, nutrients, and health benefits. A single serving provides over 100% of your daily vitamin C intake, making them an excellent choice for weight management and anti-aging. With half the calories of potatoes, these veggies are a guilt-free addition to any meal.
SIMPLE SPIRALIZED RUTABAGA RECIPE
Source: Simple Spiralized Rutabaga Recipe - Bites of Wellness
Servings: 4
Simple spiralized rutabaga noodles are a quick and easy side dish that everyone will love! Ready in just 10 minutes and only 4 ingredients, rutabaga noodles are going to become your new go-to dish on busy weeknights!
Ingredients
2 large rutabagas (about 3 pounds)
2 tablespoons avocado oil (or olive oil)
1 teaspoon garlic powder
1 teaspoon salt (to taste)
Instructions
1. Peel the rutabaga.
2. Preheat a cast iron skillet over medium heat 3-4 minutes until hot.
3. Be sure the spiralizer is properly suctioned to the counter top. Choose the appropriate blade to create fettuccine like noodles.
4. Place the rutabaga on the spiralizer and spiralize.
5. Cut the spiralized rutabaga noodles down with scissors or use your hand to break them up, as they are quite long and hard to work with.
6. Add 1 tablespoon of avocado oil to the preheated pan. Add 1/2 of the rutabaga noodles and cover the pan. Cook 6 minutes.
7. After 6 minutes, remove the lid and add 1/2 teaspoon garlic powder and 1/2 teaspoon of salt.
8. Cook an additional 2 minutes uncovered, stirring occasionally.
9. Repeat with the steps 6-8 above to cook the second batch of noodles.
10. Serve hot or at room temperature
SWEDE SOUP (RUTABAGA SOUP)
Source: Roasted Swede Soup (Rutabaga Soup) - Little Sunny Kitchen
Servings: 4
Healthy roasted swede soup made in under half an hour. This soup contains your 3 a day, and it's made with very simple ingredients. It's a wonderful winter warmer! So creamy, tasty, and cozy.
Ingredients
2 cups roasted swede
2 carrots diced
1 onion diced
1 clove garlic minced
¼ teaspoon ground nutmeg
1 teaspoon baharat optional (but strongly recommended)
½ teaspoon thyme
½ teaspoon smoked paprika
¼ teaspoon ground black pepper
½ teaspoon salt
4 cups (1 liter) vegetable stock low sodium (or water)
Instructions
1. Prepare the vegetables, then heat 1 tbsp of olive or canola oil in a pot and saute the onion until it's soft and translucent.
2. Add the garlic, and cook for 1 minute or until it's fragrant. Add the rest of the vegetables, vegetable stock and spices/seasonings. Simmer until the vegetables are soft.
3. Turn off the heat, and using a hand blender, blend until the soup is smooth.
Notes:
– Store in the fridge in an airtight container for up to 7 days.
– This soup is great for freezing since it’s dairy-free! Freeze it in individual servings, and store for up to 6 months.
– If you choose to freeze the soup, then I strongly recommend that you freeze it within 2 hours of cooking covered in an airtight container.
– Frozen swede soup can last for 3-4 days after it has been thawed in the fridge. If it has been thawed in the microwave, then it needs to be eaten immediately after thawing.
– Serve with crusty bread, bread twists, sourdough croutons, focaccia or flatbread!
– For garnish, use cream (I used coconut cream to keep my soup vegan) to create pretty swirls, and sprinkle with pumpkin seeds.
Winter Share Week 9
Hmmm, I think we’re all sighing in relief at the weather now. Even though it’s cold and today is bringing the promise of more snow, it's a more “normal” feeling. This is how we expect winter to be. Not the fierce angry bitterness of the last couple months. You can feel the anticipation in the valley as spring’s warmth creeps in. Seeds are slowly germinating. We can visualize the delicate colors and textures that are slowly making their presence felt. Spring tastes, well, green. Wild herbs will soon be ready for harvesting — ramps, nettles, wild garlic, watercress, perennials like chives and leafy greens like lettuces and arugula. We all sigh in relief as the sun caresses our faces as we lift them catching the glowing rays to warm our bodies and erase the remnants of the bitter cold that reached deep to our bones and beyond.
ROOT VEGETABLE HASH WITH EGGS
Source: Root Vegetable Hash with Eggs - It's a Veg World After All®
Prep: 15 minutes; Cook Time: 20 minutes; Servings: 2
For a delicious way to eat vegetables at breakfast, try this Root Vegetable Hash with Eggs! Touted as a vegetarian breakfast, I enjoy food like this for dinner too!! The recipe features beets, potatoes, rutabaga, and celeriac (celery root) diced into small cubes and cooked in a single skillet. You can use any root vegetables in this delicious dish! Topped with eggs, fresh herbs, and grated parmesan cheese.
Ingredients
2 tablespoon olive oil
½ yellow onion - diced
1 small potato - diced
1 celeriac - peeled and diced
1 rutabaga - peeled and diced
1 beet - peeled and diced
1 tablespoon fresh herbs - thyme, sage, rosemary or a mix
Salt and Freshly ground black pepper - to taste
4 eggs - more as needed; can fit up to six
¼ cup freshly grated parmesan cheese
Instructions
1. Heat oil in a large skillet over medium heat. Add the diced onion,
potato, celeriac, rutabaga, and beets. Cook for 8 to 10 minutes,
stirring frequently until the veggies start to soften.
2. Pour ¼ cup water into the skillet, cover, and let the veggies steam for 3 minutes. If the veggies are still firm, let them steam for another couple minutes. Remove the lid, and cook off any excess water.
3. Season the veggies with salt, pepper, and fresh herbs. Use a spoon to move around the veggies and make four wells for the eggs. Crack an egg into each well, cover, and let them cook to your liking.
4. Remove from heat, and serve with the parmesan cheese.
Notes
– Be sure to cut the veggies into small cubes. The smaller, the better.
– You can substitute any root veggies you have on hand in this recipe. Aim to have about 6 cups of chopped veggies total.
– This dish is best enjoyed right away, but you can store the cooked vegetables in an airtight container in the fridge for a few days. Reheat them with a little oil in a skillet before cracking fresh eggs on top.
HASSELBACK POTATOES
Source: Hasselback Potatoes - I Am Homesteader
Prep Time: 15 minutes; Cook Time: 1 hour 5 minutes
Hasselback Potatoes are russet potatoes cut into thin, fanned-out slices that are baked coated in melted butter and seasoned with salt and pepper.
Ingredients
4 large russet potatoes, washed and patted dry
4 tablespoons unsalted butter, melted, divided
1 teaspoon kosher salt
½ teaspoon pepper
salt and pepper, to taste
Instructions
1. Arrange a rack in the middle position of the oven and preheat to 425°F. Set aside an unlined baking sheet.
2. Position one potato in between two chopsticks or skewers.
3. Cut vertical slits (⅛ inch apart) in the potatoes, cutting straight down until your knife hits the chopstick, leaving the bottom intact. (The chopsticks' placement should prevent cutting too low.) Repeat this cutting process for the remaining potatoes.
4. Place the potatoes on the unlined baking dish. Use a basting brush to coat about half the melted butter all over the potatoes, including the insides of the slits.
5. Season the potatoes with salt and pepper.
6. Bake for 30 minutes. After the potatoes have baked for 30 minutes, use a knife to gently pull the layers apart. Brush on the remaining melted butter.
7. Bake 30-35 more minutes, or until the potatoes are crispy on the outside and tender on the inside. (Cooking times may vary depending on the size of the potatoes you are using.)
8. Serve warm. Add salt and pepper to taste.
Winter Share Week 8
Benito popped in the other day. He’s so anxious to get started on field and greenhouse work. While I’ve been dabbling at planting some seeds holding my breath as the cold chill surrounds us, the real work is yet to begin. We went through a wish list of what seeds to start now. Lettuces, kales, spinach, beets, onions, scallions, cabbages, broccoli, cauliflower, early tomatoes, radishes, Swiss chard ... and he reminded me about the arugula! Herbs like edible flowers, cilantro and parsley. We need to check the progress of seeds we planted in the field last fall like leafy greens and garlic. The snow has acted as an insulator and actually served to protect the tender shoots as they break ground. Spring is such an exciting time and I know officially it’s not here yet but last week you could smell it in the air and now almost feel it wrap it’s warm arms around you as we get ready for the grand adventure awaiting all of us.
WINTER VEGETABLE PAPRIKA STEW
Source: Paprika Winter Vegetable Stew: Easy Vegetarian Recipe
Ingredients
30g (2 tbsp) butter
2 tbsp olive oil
2 red onions (chopped into large chunks)
2 onions (chopped into large chunks) - see note 1
1 small chili pepper (finely chopped)
1 tsp minced garlic
250g (8¾ oz) carrots (chopped into thick slices)
250g (8¾ oz) swede (chopped into chunks) {swede = rutabaga}
150g (5¼ oz) parsnip (chopped into small chunks)
800g (28 oz) potatoes (cut into large chunks)
400g (14 oz) tinned (canned) chopped tomatoes
¼ tsp cinnamon
2 tbsp ground paprika
1 tsp oregano
sea salt (to taste)
ground black pepper (to taste)
1 tbsp wine (optional)
1 litre (4¼ cups) water (or stock)
sprinkling of fresh herbs (optional)
Instructions
1. Add the butter and oil to a large pan.
2. Cook the onions and chilli pepper until soft.
3. Add the garlic and cook for a minute or two.
4. Add the cinnamon, paprika and oregano, sea salt and black pepper.
5. Add the wine (if using) and cook until it evaporates (only a minute or two).
6. Add the tomatoes and water / stock.
7. Stir so that everything is well mixed and leave to cook for a couple of hours on a slow heat. The stew is ready when the sauce thickens and the vegetables are cooked through.
8. Serve immediately with a sprinkling of fresh herbs and a good helping of bread. Enjoy!
Notes
I have converted grams to cups/ounces/tablespoons using online converters. Although I have no reason to believe they are inaccurate, please be aware that I have not made this recipe using imperial measurements.
1. Onions refer to what North Americans would call yellow onions.
2. The measurements for the vegetables are approximate, so use them as a rough guide (neither the ingredients nor the quantities need to be exact).
3. The vegetables are cut into different sizes, depending on how quickly they cook. This means that they should all be cooked at pretty much the same time.
CREAMY TURNIP SOUP
Source: Creamy Turnip Soup (Ready in 30 Minutes!) - Spend With Pennies
Prep Time: 10 minutes; Cook Time: 20 minutes; Total Time: 30 minutes
Author Holly Nilsson
Hearty & delicious, this creamy turnip soup is the perfect soup for lunch or dinner!
Ingredients
1/2 tablespoon olive oil
1 small onion diced
¾ pounds turnips peeled
1 small potato peeled
1 small granny smith apple peeled
1 cup chicken broth or vegetable broth
1/4 teaspoon Kosher salt or to taste
¼ teaspoon curry powder
1/4 cup light cream
Instructions
1. Combine olive oil and onion in a medium saucepan and cook over medium heat until onion is tender.
2. Meanwhile, dice turnips, potato, and apple into 1" cubes.
3. Add all ingredients except cream to the saucepan. Bring to a boil, reduce heat to simmer and cook covered 12-14 minutes or until all vegetables are very tender.
4. Using a hand blender or a regular blender*, blend until smooth (see notes for regular blender).
5. Stir in cream and heat through for 2-3 minutes.
6. Garnish with herbs and croutons if desired.
Notes
*If blending in a regular blender, be sure not to seal tightly. The steam and build up and it can burst open.
Serving Tip
Ladle soup into bowls and add a small drizzle of heavy cream. Swirl the cream slightly with a toothpick or skewer to make pretty designs in the soup. Garnish and serve.
Winter Share Week 7
I feel like the pot o’gold was discovered yesterday. There definitely was a golden vibe with the vegetables we picked out, golden beets, golden fingerling potatoes, orange carrots and while not golden, the celeriac does have a soft ivory color which complements the golden veggies. Celeriac is a fun vegetable, and definitely not something we grew up with. Related to celery, in the summer it has gorgeous green leaves that look and taste like celery. The base, a gnarly, knobby round ball shaped root has a delicate sweet celery flavor. Prized in France for a remoulade (fancy word for coleslaw). And the golden beets, I love these, they have a pretty color, and if you choose the right variety, (I prefer Golden Detroit, an heirloom related to Detroit Red) great flavor and bonus, they don’t bleed like the red varieties. They aren’t grown by a lot of farmers due to their poor germination, but I do think they’re worth the investment like most delicious vegetables!! Most farmers grow the modern introductions but they tend to be golden outside and white inside and have a flavor leaning to bitterness that the golden heirloom doesn’t. And the golden fingerling potato — features a rich, buttery flavor and firm texture within its golden flesh that just melts when sauteed — I love this variety sauteed with Swiss chard leaves melting in garlic oil and a hunk of goats milk cheese melting into it! Baby spinach and kale will work if chard isn’t available.
CLASSIC FRENCH CELERY ROOT REMOULADE
Source: https://www.pardonyourfrench.com/classic-french-celery-root-remoulade/
Ingredients
1 medium Celery Root (500-600g)
1 tbsp (15ml) lemon juice
¼ cup (62.5ml) mayonnaise
2 tbsp Dijon Mustard
5-6 French cornichons, diced (or gherkins)
1 tsp salt
½ tsp freshly ground black pepper
Optional: 1 tbsp capers
Instructions
Step 1 – Peel the celery root and julienne/grate it into 1/8-inch thin long strips similar to matchsticks. Place sticks in a bowl and sprinkle with lemon juice as you grate so the celery root doesn’t turn brown.
Step 2 – In a large bowl, combine the mayonnaise, Dijon mustard, diced cornichons, salt and pepper (and optional: 1 tbsp capers). Whisk with a fork to combine.
Step 3 – Add the celery root and toss until evenly combined. Cover bowl with plastic film and chill for at least 2 hours before enjoying. The Celery Root Remoulade gets better as it sits, as it allows the celery root to soften and absorb flavours.
AIR FRYER POTATOES
While I have an air fryer function in my oven I have yet to use it. Knowing some of you may use an air fryer a lot, I found this recipe which sounds so simple yet so yummy!!!!! —Cheryl
By Lauren Miyashiro; Verified/Approved by the Delish Test Kitchen
Ingredients
1/2 lb. baby potatoes, halved
1/2 Tbsp. extra-virgin olive oil
1/2 tsp. garlic powder
1/2 tsp. Italian seasoning
1/2 tsp. Cajun seasoning (optional)
Kosher salt
Freshly ground black pepper
Lemon wedge, for serving
Freshly chopped parsley, for garnish
Directions
Step 1: In a large bowl, toss potatoes with oil, garlic powder, Italian seasoning, and Cajun seasoning, if using. Season with salt and pepper.
Step 2: Place potatoes in basket of air fryer and cook at 400° for 10 minutes. Shake basket and stir potatoes and cook until potatoes are golden and tender, 8 to 10 minutes more.
Step 3: Squeeze lemon juice over cooked potatoes and garnish with parsley before serving.
Winter Share Week 6
The fierce wind combined with the bitter cold has been brutal — exposed skin feels like it’s been scraped with heavy duty sandpaper. The weather alerts keep warning about how exposure for more than 10–15 minutes brings on the risk of frostbite and other skin damage. I think what I dread the most is going out during the night to check the heaters in the greenhouse, if they go down we’re in serious trouble. At least the path between house and greenhouse is relatively short and the wind has scoured the bulk of the snow into snowbanks leaving mostly clear paths behind. The first fall of pristine, sparkling white snow is now almost as black as the soil in the fields. Plow trucks are scouring the roads multiple times to try and keep the drifts at abeyance. But here we are almost in the middle of February, only a couple more weeks to go and it will be March ... Then in another couple months it will be so hot we’ll be talking about that!!!
VEGETABLES TODAY: PARSNIPS, BEETS
PARSNIPS are cream-colored root vegetables with a sweet, nutty, and slightly spicy flavor, while carrots are typically orange, crunchy, and have a more earthy, sweet taste. Parsnips are higher in fiber, potassium, and folate, making them more filling, whereas carrots are better for raw consumption and higher in Vitamin A. Both are excellent roasted, but parsnips are preferred for mashing. Source: AI Generated
I often refer to parsnips as the elegant carrot! It can be used like carrots — in cake, muffins, mashed, with stews and roasts. Perhaps the best method of serving parsnips is to simply roast at high heat. You can mix various root crops for a more complex mash — potatoes and or sweet potatoes, carrots, and parsnips blended together work very well for this.
GARLICKY PARSNIP CHEDDAR CHEESE BISQUE
Source: Garlicky Cheddar Cheese Bisque Recipe: How to Make It
Ingredients
1 tablespoon butter
1 tablespoon canola oil
1 medium leek (white portion only), sliced
1/2 cup chopped carrot
1/2 cup chopped celery
1/2 cup chopped peeled parsnip
1 teaspoon salt
1/2 teaspoon pepper
6 garlic cloves, minced
2 cans (14-1/2 ounces each) chicken broth (You can substitute vegetable broth)
2/3 cup dry white wine
2 tablespoons cornstarch
1/4 cup cold water
1 can (12 ounces) evaporated milk
2 cups shredded sharp white cheddar cheese
Crushed baked pita chips
Minced fresh parsley
Directions
1. In a large saucepan, heat butter and oil over medium heat. Add vegetables, salt and pepper; cook and stir 7-8 minutes or until vegetables are crisp-tender. Add garlic; cook 1-2 minutes longer.
2. Stir in broth and wine; bring to a boil. Reduce heat; simmer, uncovered, 15-20 minutes or until vegetables are tender. Remove from heat; cool slightly. Meanwhile, in a small bowl, mix cornstarch and water until smooth.
3. Process soup in batches in a food processor until smooth. Return all to pan. Stir in evaporated milk and cornstarch mixture; bring to a boil. Reduce heat; simmer, uncovered, until thickened and bubbly, stirring frequently. Add cheese; cook and stir until cheese is blended. Top servings with crushed pita chips and parsley.
BEETS
Beets aka beetroot is a close relative of spinach and chard. To cook whole, wash but don't peel, then cut the stalks to 2.5cm and leave the root at the bottom; if either are trimmed too much, the beetroot's colour will bleed. Bake in a low oven for 2-3 hrs, either wrapped in foil or in a little water in a lidded casserole dish. Alternatively, prepare it in the same way, then simmer for around 1 hr.
Source: https://www.bbcgoodfood.com/glossary/beetroot-glossary
You can also eat beetroot raw, peeled and grated into salads and slaws, or finely shaved as a 'carpaccio.' While most familiar to us as the key ingredient in Borscht or Beet Soup, beets are also a delightful component in this salad of carpaccio beets:
MARINATED BEETROOT WITH GRILLED GOAT'S CHEESE
Source: https://www.bbcgoodfood.com/recipes/marinated-beetroot-grilled-goats-cheese
Earthy beetroot works perfectly with creamy goat's cheese for an easy but impressive starter.
Ingredients
3 tbsp olive oil plus extra for greasing
1.5 tbsp red wine vinegar
½ tsp sugar
1/2 tsp thyme leaves
2 raw beetroot peeled and very thinly sliced on a mandoline or with a food processor slicing attachment
100g vegetarian goat's cheese rounds with rind, halved horizontally
2 handfuls of rocket or spinach or mesclun
Method
Step 1: Mix the oil, vinegar, sugar and thyme in a shallow dish and season
well. Add the sliced beetroot and marinate for at least 1 hr or overnight, if you like.
Step 2: Heat grill to high. Season the goat’s cheese slices, then place on an oiled baking tray and grill for 2-3 mins until golden and melting.
Step 3: Lift out the beetroot, reserving the marinade, and divide between 4 plates. Top with the rocket, a round of goat’s cheese and a little more rocket. Drizzle with the marinade and serve.
Winter Share Week 5
I always say that you have to be fierce to be a farmer — drought, flood, locusts, weeds and extreme heat and cold just to mention a few of the things that beset us. All out of our control but we manage as best we can, choosing varieties that are more tolerant of those aforementioned conditions, perhaps breeding our own varieties suitable to our personal microclimates and soil conditions. In truth, conditions agriculturists have endured for millenia. Still we plow forward, always hoping and dreaming. It is also said that as long as a farmer has hope they will succeed and live to farm another day!
GARLIC CONFIT RECIPE
Source: Garlic Confit Recipe | The Mediterranean Dish
Prep – 10 minutes; Cook – 2 hours; Total – 2 hours hrs 10 minutesIn this simple Garlic Confit recipe, whole garlic cloves are slowly cooked in olive oil with herbs until they become soft, sweet, and spreadable. The infused oil is just as delicious—perfect for drizzling over roasted vegetables, swirling into pasta, or using in dressings. This is one of the tools in my arsenal and I keep a mason jar close at hand to use whenever I feel that sweet garlic flavor is needed.
Ingredients
2 cups (12 ounces) whole garlic cloves
1 cup extra virgin olive oil
1 teaspoon kosher salt
1/4 teaspoons whole black peppercorns
2 sprigs fresh thyme (optional)
1 sprig fresh rosemary (optional)
Instructions
1. Prep the garlic. Use a paring knife to trim the stem end of each clove. Peel the garlic by placing the cloves, in batches, in a stainless steel prep bowl. Overturn a second bowl of the same or similar size on top and pinch the edges of the bowls together to make a capsule. Shake vigorously, pausing every ten shakes or so to remove peeled cloves. Repeat as necessary until all garlic is peeled.
2. Get ready. Preheat your oven to 250°F. Add peeled garlic, olive oil, salt, and peppercorns to a 8×8 baking dish or loaf pan. If using, tuck the herbs down into the oil so they’re submerged. It’s ok if the garlic floats and the cloves are not completely submerged. Let cool completely, then store in an airtight container in the refrigerator.
3. Confit the garlic. Bake the garlic, uncovered, for 2 hours. For the first hour, it will appear that little is happening, but in the second hour you’ll see the oil bubbling gently. It's ready once the garlic cloves are lightly browned and completely tender. Let cool completely, then store in an airtight container in the fridge.
Notes
To Use Dried Herbs: Feel free to use 1/2 teaspoon each of dried thyme leaves or rosemary in dried form
Slow cooker method: Add garlic, olive oil, herbs, salt, and peppercorns to the bowl of a slow cooker. Cook on low for 3 to 4 hours, until the garlic is completely soft and spreadable.
How to Store Garlic Confit:
– Garlic confit must be stored in the refrigerator in a clean container. The olive oil will solidify slightly; bring it to room temperature to use, and it will re-liquefy.
– It will keep for up to 1 week in the refrigerator.
– You can freeze it for longer storage, just remember to thaw it in the refrigerator before using. (Ice cube trays are perfect for this - once solid pop cubes into ziploc bags and use as you like)
– Do not store it on the countertop due to the risk of bacterial growth.
GARLIC MASHED POTATOES
Source: Creamy Garlic Mashed Potatoes - Creme De La CrumbBy Tiffany Azure
Everyone's going to ask to please pass the potatoes over and over again over these buttery, garlicky, creamy, smooth, deeeelicious garlic mashed potatoes!
Ingredients
3 pounds red potatoes, peeled if desired (see note)
4 tablespoons butter
8 ounces sour cream
½ cup whole milk
1 tablespoon minced garlic
1-2 teaspoons garlic powder, to taste
1-2 teaspoons salt, to taste
¼ teaspoon cracked black pepper, or 1/8 teaspoon ground black pepper
Instructions
1. Cook the potatoes (see directions for stovetop or Instant Pot methods below).
2. In a large bowl combine hot (drained) potatoes, butter, milk, sour cream, garlic, garlic powder, salt, and pepper.
3. Use a potato masher OR use your hand mixer (my favorite method!) to mix your potatoes just until all ingredients are combined – your potatoes should still have a few lumps, do not over-mix!
4. Taste, add salt and pepper if needed. Serve and enjoy!
Potatoes – Stovetop Method
1. Cut the potatoes into quarters. Place in a large pot and cover with water (water should come 1 inch above potatoes. Bring to a boil over HIGH heat, once boiling reduce heat to medium-high. Boil for 10-12 minutes until potatoes are easily pierced to the center by a fork. Drain the water and transfer potatoes to a large bowl.
Potatoes – Instant Pot Method
1. Place metal rack in the bottom of your pressure cooker. Add 1 cup water, then place potatoes on metal rack. Cover, set vent to SEAL position. Set to PRESSURE COOK or MANUAL for 8 minutes. Once cook time is up, quick release by turning knob to the VENT position. Once the float valve has dropped, remove lid, drain pot, and transfer potatoes to a large bowl.
Notes
The potatoes: these are my FAVORITE mashed potatoes – I always use red potatoes and I never peel them. This is the way my mother always made mashed potatoes and I absolutely love them. The red skins are so soft and delicious, there’s no need to peel them – BUT if you just can’t get past the skins go ahead and peel them first, either way this recipe is amazing!
The garlic: If you want stronger garlic flavor I recommend 1 1/2–2 teaspoons garlic powder.
From Cheryl: I put a tiny pinch of cayenne pepper in my mashed potatoes!
Winter Share Week 4
It's 8:00 AM and it’s –2 degrees real temp with no wind chill. Don’t even want to know what the “feel like” temps are at this point and tomorrow is supposed to be even colder. Heaters are running wherever pipes might freeze. Keeping my crew at home for the next few so they won’t get frostbitten, our house cats are staying close inside and I’m building a home for the couple of ferals that live outside. Going to start sorting the seeds that have started to trickle in the mail. I’ll pull the hardiest varieties from those that I selected for cold weather planting and get them started. Some lettuces, spinaches, artichokes, radishes, some herbs. and alliums like: onions, scallions, shallots, leeks and others. With the support of grow mats — which are heated pads that go under the seed trays — and some other heat sources, we should be able to get some seeds germinating and fingers and toes crossed for an early jump on Spring which really isn’t that far away!!!!
EASY VEGETABLE SOUP
Author: Joanne Gallagher; 4 to 6 Servings (8 cups)
PREP: 10 mins; COOK: 30 mins; TOTAL: 40 mins
This hearty vegetable soup recipe is healthy, easy to make, and tastes amazing. It’s also vegan when you use vegetable broth. Since vegetables vary by seasonality, swap or add different vegetables for the veggies listed below. Kale or spinach, for example, is an excellent substitute for cabbage.
Ingredients
3 tablespoons olive oil
2 cups chopped onion, 1 large
1 ½ cups chopped carrot, 3 to 4 carrots
1 ½ cups chopped celery, 2 to 3 stalks
2 tablespoons tomato paste
4 teaspoons minced garlic, 4 cloves
¾ teaspoon ground fennel seed
½ teaspoon ground black pepper
½ teaspoon fine sea salt, plus more to taste
⅛ to ¼ teaspoon crushed red pepper flakes, optional for heat
1 (15oz) can diced tomatoes with their liquid
6 cups stock or broth, see our veggie broth or chicken stock (1.42L)
2 cups chopped potato, 2 medium
3 to 4 heaped cups chopped or shredded cabbage
2 bay leaves
1 cup frozen peas
½ teaspoon apple cider vinegar or fresh lemon juice, optional
Directions
1. Sauté the vegetables: Heat the olive oil in a large Dutch oven or pot over medium heat. Add the onions, carrots, celery, and tomato paste. Cook, stirring often, until the vegetables have softened and the onions are translucent, 8 to 10 minutes.
2. Add aromatics: Stir in the garlic, fennel, black pepper, ½ teaspoon of salt, and the red pepper flakes. Cook, while stirring, for one minute.
3. Build the soup base: Pour in the canned tomatoes and their juices and the stock/broth. Add the potatoes, cabbage, and bay leaves. Raise the heat to medium-high and bring the soup to a boil. Partially cover the pot with a lid, then reduce the heat to maintain a low simmer.
4. Simmer: Simmer for 20 minutes or until the potatoes and other vegetables are tender. Add the frozen peas and cook for five more minutes.
5. To finish: Remove the pot from the heat and remove the bay leaves. Stir in the cider vinegar (or use lemon juice). Taste and season with more salt, pepper, or vinegar. Serve.
Adam and Joanne's Tips
Storing: Homemade vegetable soup lasts in an airtight container in the fridge for up to 4 days or in the freezer for up to 3 months. I love freezing individual servings of this soup. To thaw, leave it in the refrigerator overnight and gently reheat the next day.
Fresh tomatoes: Substitute about 1 pound (5 to 6 tomatoes) for one 15-ounce can of diced tomatoes.
The nutrition facts provided below are estimates. Calculations included vegetable broth.
Nutrition Per Serving Serving Size 1 cup / Calories 137 / Total Fat 5.7g / Saturated Fat 0.8g / Cholesterol 0mg / Sodium 677.5mg / Carbohydrate 20.3g / Dietary Fiber 4.9g / Total Sugars 7.5g / Protein 3.2g
KALE SALAD
Source: https://www.loveandlemons.com/kale-salad/#wprm-recipe-container-44769
Serves 4; This fresh, hearty kale salad recipe is packed with colorful vegetables, crispy chickpeas, avocado, cranberries, and pepitas. Great for lunch!
Ingredients
Carrot Ginger Dressing (See notes)
¾ cup chopped carrots
⅓ to ½ cup water
¼ cup extra-virgin olive oil, plus more for drizzling
2 tablespoons rice vinegar
2 teaspoons minced fresh ginger
¼ teaspoon sea salt, plus more for sprinkling
Salad
1 recipe Roasted Chickpeas
1 bunch curly kale, stems removed, leaves torn into bite-sized pieces
1 teaspoon fresh lemon juice
½ teaspoon extra-virgin olive oil
1 small carrot, grated
1 small red beet, grated
½ watermelon radish, very thinly sliced
1 avocado, cubed
2 tablespoons dried cranberries
¼ cup pepitas, toasted
1 teaspoon sesame seeds
Sea salt and freshly ground black pepper
Instructions
1. Make the dressing: Preheat the oven to 400°F and line two baking sheets with parchment paper. Place the carrots on one of the baking sheets. Drizzle with olive oil, sprinkle with salt, and toss to coat. Spread evenly on the baking sheet and roast for 20 to 25 minutes, or until soft. Transfer the carrots to a blender and add the water, olive oil, rice vinegar, ginger, and salt. Blend the dressing until smooth and chill in the fridge until ready to use.
2. On the second baking sheet, prepare the roasted chickpeas according to this recipe.
3. Place the kale leaves in a large bowl and add the lemon juice, olive oil, and a few pinches of salt. Use your hands to massage the leaves until they become soft and wilted and reduce in the bowl by about half.
4. Add the carrot, beet, watermelon radish, half of the cubed avocado, cranberries, pepitas, a few more pinches of salt, and a few grinds of pepper. Toss to combine. Drizzle generously with the carrot ginger dressing. Top with the remaining avocado, more dressing, and the roasted chickpeas and sprinkle with the sesame seeds. Season to taste and serve.
Notes
- Make the dressing ahead so it has time to chill in the fridge before adding to the salad.
Winter Share Week 3
We hope you are enduring this bitter, bitter cold. It has been severely challenging us on the farm. Vegetables and pipes have been freezing. Fortunately we have been able to keep heat in different areas — not 80 degree temps mind you but fervently working on keeping the greenhouse up to 50-55. Our markets are all closing temporarily as we can’t keep produce and baked goods from freezing on the tables and forget about keeping our staff warm — even with heavy duty Carhartts on and hand-warmers stuffed in our gloves and boots it is a struggle to not become popsicles. The threat of frostbite is all too real right now! When the temperatures are plummeting as they have been I keep my staff home and work the markets solo, I can’t ask my crew to endure these conditions. So with all this in mind we tried to curate a share this week that we hope will feed you warmly. We were at risk of losing the baby spinach so we gave you a double portion this week, the potatoes are russets and you get to choose if you would prefer a bunch of kale or collards today. Stay safe, stay warm and see you you next week!
Russet potatoes are a great potato to keep around - Wether double stuffed or used a thickener for a hearty soup - they fit the bill!
FONDANT POTATOES WITH RUSSET TYPE POTATOES
Source: Fondant Potatoes Recipe with Russet Idaho® Potatoes - Eating European
Fondant Potatoes, or Pommes Fondant, is an amazing recipe using russet potatoes which are cut into cylinders and seared to golden perfection. They're then cooked in a rich stock with garlic, butter and herbs, to ensure a smooth creamy texture inside, with an amazing aroma.
Ingredients
4 russet type potatoes peeled and cut into cylinders
4 tablespoon butter unsalted
1 tablespoon olive oil
pinch of salt and pepper on potatoes
2 cloves garlic peeled and crushed
5 sprigs thyme fresh
1 sprig rosemary fresh
1 1/2 cup chicken stock or vegetable stock
salt and pepper to taste
Instructions
1. In order to achieve crispy crust on the outside of the potatoes, and a soft creamy consistency on the inside, place your potatoes in a bowl of water for 10-15 minutes to remove excess starch. Then pat them dry. You may season them now with salt and pepper, or do it later, once they’re cooking in the skillet.
2. Preheat your oven to 425ºF. Heat up a heavy bottom skillet on a medium heat on the stovetop (e.g., cast iron, which can be transferred into the oven), add the butter and oil (See recipe notes below). Add potatoes, flat side down, and cook them for about 5 minutes on the first side, until golden brown. Season with salt and pepper, if you haven't done so yet. Then flip and season on the other side.
3. Add peeled and crushed garlic and fresh herbs; let them cook for 4-5 minutes.
4. Pour over the stock and transfer the skillet to the 425ºF hot oven. Bake the potatoes for about 30-35 minutes – until most of the liquid has evaporated and the potatoes are tender inside. (Be very careful when taking the skillet out of the oven, it will be super hot so don't accidentally grab the handle. Also, you’ll want to end up with about 2 tablespoons of sauce to spoon over the potatoes. See recipe notes below what to do if you have more liquid.)
5. Garnish the potatoes with some fresh herbs and serve with your favorite protein.
Recipe Tips:
– The butter will give the potatoes a nice sear and taste, but it can burn easily. Adding some olive oil can help prevent that.
– If you still end up with a lot of liquid in your skillet, remove the potatoes onto a serving plate and loosely cover them with a foil. Turn the heat on under the skillet and cook the sauce until reduced to about 2 tablespoons. Spoon the remaining sauce over the potatoes.
LEMON SAUTÉED SPINACH
Ingredients
1 bag of baby spinach
¼ cup of pine nuts
3 cloves of chopped garlic
1 tbsp of olive oil
1 lemon
Salt and pepper to taste
Instructions
– Pre-heat medium saute pan over medium heat for 2-3 minutes.
Add olive oil.
– Add a portion of the baby spinach to the pan(the whole bag may not fit in the saute pan but as it cooks, it will shrink).
– Stir frequently continuing to add spinach until entire bag is added. Cook spinach until soft and limp.
– Add chopped garlic and pine nuts. Stir spinach, garlic and pine nuts in pan until garlic and pine nuts are slightly browned.
– Salt and pepper to taste
– Squeeze a bit of fresh lemon juice over spinach before serving
QUICK KETO SPINACH SHAKSHUKA RECIPE (Low Carb)
Source: https://www.youtube.com/watch?v=RuuO3jiExls
Ingredients
3 Tablespoon Olive oil
1/2 medium onion minced
1 medium jalapeno
2 teaspoon garlic minced
3/4 teaspoon coriander ground
16 ounce spinach (frozen) Thawed
2 Tablespoon Harrissa
1/2 cup vegetable broth
pam spray or olive oil
8 large eggs
Parsley
Red Pepper
Instructions
– Preheat oven until 350
– Heat Olive Oil in Saute Pan. Use an oven proof pan.
– Add minced onion saute until fragrant. Stir together well and let cook for another 1-2 minutes
– Season to taste with salt and pepper. Stir together well and let cook for another 1-2 minutes
– Add thawed spinach, stir together and cook for another 2-3 minutes
– Add Harrissa, stir together and cook for another 2-3 minutes
– Transfer seasoned spinach mixture to a food processor. Pulse until coarse.
– Add Vegetable broth. Pulse until smooth.
– Wipe out saute pan. Spray lightly with pan spray or a light drizzle of olive oil.
– Using the back of a spoon make a depression in the spinach for each of the eggs Gently crack each egg into a depression.
– Place saute pan in oven at 350 degrees about 20-25 until whites are set and yolks are just runny.
– Sprinkle with parsley and crushed red pepper to taste.
Winter Share Week 2
Every year someone decides what the color of the year shall be. This also happens in the world of vegetables with cabbage making a strong presence this go-around. Fast becoming a staple in various recipes, this is one vegetable we grew up on. I enjoy it for breakfast simply with onions and eggs, lunch as a salad booster, and dinner stuffed with meat and rice or roasted and glazed with the juices from other vegetables I may have roasted it with or a drizzle of olive oil! With recipes like kimchi dumplings and cabbage alfredo gaining popularity, cabbage is sure to be a mainstay for many years to come!! The trend is expected to be driven by a shift in cultural preferences, with Boomers and Gen X moving away from cauliflower and embracing cabbage as a new favorite. According to Pinterest's predictions for 2026, "Boomers and Gen X will say goodbye to their cauliflower obsession and crown cabbage the new kitchen champ." Searches for cabbage meals have been spiking from September 2024 to August 2025 on the platform: "Cabbage dumplings" saw a 110 per cent spike; "Golumpki soup," referring to a Polish dish with stuffed cabbage rolls, rose by 95 per cent (We grew up on Golumpki — my Dad used to call them stuffed pigeons); "Cabbage alfredo" grew by 45 per cent; "Fermented cabbage" increased by 35 per cent. TikTok has also been rife with recipes using cabbage in recent months. From a creamy butter garlic cabbage dish to a cheap and easy cabbage pancake meal, users have been loving this vegetable. One video posted in August showing a viral cabbage boil recipe has since been viewed more than 28 million times on the platform. So I hope you discover a cabbage recipe that will become your favorite and that it’s not just coleslaw!!!! Sources: Will 2026 be the year of cabbage? Here's why a food blogger wants more people to cook with this underrated 'versatile vegetable' - Yahoo Style Canada; vegetable of the year 2025 cabbage - Search
CREAMY GARLIC ALFREDO WITH TENDER CABBAGE
By lina Carter
This Creamy Garlic Alfredo with Tender Cabbage Perfection offers a delicious twist on traditional Alfredo by incorporating tender, lightly caramelized cabbage. It’s a comforting, flavorful dish that’s perfect as a side or a light main course.
Ingredients
1 medium head of cabbage, thinly sliced
2 tbsp olive oil or butter
1 small onion, thinly sliced
2 cloves garlic, minced
1 cup heavy cream
1/2 cup grated Parmesan cheese
1/4 tsp ground nutmeg
Salt and pepper to taste
Optional: 1/4 cup chopped parsley for garnish
Instructions
Step 1: Heat olive oil or butter in a large skillet over medium heat. Add the sliced onion and sauté until softened, about 3-4 minutes.
Step 2: Stir in the minced garlic and cook for 1 minute until fragrant.
Step 3: Add the sliced cabbage to the skillet and sauté for 6-8 minutes, stirring occasionally, until the cabbage becomes tender and lightly caramelized.
Step 4: Reduce the heat to low and pour in the heavy cream. Stir to coat the cabbage evenly.
Step 5: Sprinkle the Parmesan cheese into the skillet and mix until the cheese has melted and the sauce is creamy.
Step 6: Add nutmeg, salt, and pepper to taste. Adjust seasoning as needed.
Step 7: Let the mixture simmer gently for 2-3 minutes to thicken the sauce.
Step 8: Remove from heat, garnish with parsley if desired, and serve warm as a side dish or a light main course.
Tips & Variations
Use butter instead of olive oil for a richer flavor.
Try adding cooked chicken or shrimp to make this dish more filling.
Freshly grated Parmesan works best for melting smoothly into the sauce. For a lighter version, substitute half-and-half for heavy cream.
Storage
Store leftovers in an airtight container in the refrigerator for up to 3 days. Reheat gently in a skillet over low heat, adding a splash of cream or milk if the sauce thickens too much.
FAQs
Can I use a different type of cheese?
Parmesan is ideal for its melting quality and flavor, but you can substitute with Pecorino Romano or Asiago for a similar taste profile.
Is this dish gluten-free?
Yes, this recipe is naturally gluten-free as it contains no wheat or gluten ingredients.
Diet: Vegetarian
APPLE CINNAMON STUFFED SWEET POTATO
Source: https://www.masteringdiabetes.org/apple-cinnamon-stuffed-sweet-potato/
In my quest for healthier recipes I found this sweet potato one which while sweet from the dates has no sugar added. I’ve enjoyed it as an entree by adding a salad and some soft goat cheese, I think a feta or perhaps some blue cheese would also go nicely!!! It also can be a great dessert option!
Ingredients
3 cups Sweet Potato
3/4 cup Water
3 cups Apple - Chopped
1/3 cup Pitted Dates - Chopped
1 1/2 tsps Cinnamon
1 1/2 tbsps Almond Butter
1 tbsp Hemp Seeds - Optional
Instructions
1. Preheat the oven to 400ºF and line a baking sheet with parchment paper. Place the sweet potato on the baking sheet and pierce a few times all over with a fork. Place in the oven to bake for 45 to 50 minutes, until cooked through.
2. Meanwhile, heat a small saucepan over medium-low heat. Add the water and then the apple, dates, and cinnamon and sauté, stirring often until softened, about 8 to 10 minutes
3. Slice the sweet potato open down the middle and add the apple date mixture. Add the almond butter and hemp seeds, if using. Enjoy!
Notes
1. Nut-Free: Use sunflower seed butter or tahini instead.
2. Leftovers: Refrigerate in an airtight container for up to three days.
Winter Share Week 1
On the 21st of December the winter solstice passed by almost whispering to us, this astronomical event results in the shortest period of daylight and the longest night of the year, it is said by some to symbolize the rebirth of the Sun. The winter solstice marks a turning point in the seasonal cycle, heralding the gradual return of longer days and the eventual arrival of spring. As a farmer it is a signal that Spring will be here oh so soon and to enjoy the rest while you can! We’ve been getting ready, getting the mechanic on line to tune up our equipment. Cleaning out the greenhouse, researching seeds and recipes, dreaming of the layout of the farm, companion plants, the colors and aromas of all the great veggies, herbs and flowers hidden in those innocuous seed packets and bags. I can sense it all already!!!
ROASTED ROOT VEGETABLES
Source: Roasted Root Vegetables Recipe - Love and Lemons
I’ll turn a dish like this into a main course with a big dollop of goat cheese and maybe a slice or two of toasted crostini to sop up the juices. A nice hefty slice of focaccia will also get the job done!!! - Cheryl
Serves 4 to 6
These oven roasted root vegetables are a delicious side dish! I top the tender, caramelized veggies with a fragrant sage oil and crispy sage leaves for rich, earthy depth of flavor. We love to serve this recipe as a holiday side dish, but it would be a great addition to any fall or winter meal. Vegan and gluten-free.
Ingredients
2 beets, preferably 1 red and 1 golden, peeled and chopped into 1-inch chunks
1 large carrot, roll cut into 1-inch chunks
3 parsnips, chopped into 1-inch chunks
1 medium sweet potato, chopped into 1-inch chunks
1 turnip, chopped into 1-inch chunks
Extra-virgin olive oil, for drizzling
1 tablespoon chopped fresh rosemary
1 tablespoon chopped fresh sage leaves
1 tablespoon fresh thyme leaves
Sea salt and freshly ground black pepper
Crispy Sage and Sage Oil
2 tablespoons extra-virgin olive oil
10 fresh sage leaves
Instructions
1. Preheat the oven to 425°F and line two baking sheets with parchment paper.
2. Place the beets and carrots on one baking sheet and the parsnips, sweet potato, and turnip on the other. Drizzle the vegetables with olive oil and sprinkle with the rosemary, sage, thyme, pinches of salt, and several grinds of pepper. Toss to coat and spread evenly on the baking sheets. Roast for 25 to 50 minutes, or until tender and browned around the edges. The parsnips, sweet potato, and turnip will bake for less time. The beet and carrot will roast longer.
3. Make the crispy sage: Line a plate with paper towels. Heat the olive oil in a small saucepan until bubbling, add the sage leaves, stir, and cook until crisp, about 1 minute. Remove the leaves from the oil and transfer to the prepared plate to drain. Reserve the oil for serving with the vegetables.
4. Remove the vegetables from the oven and toss with 1 tablespoon of the sage oil. Transfer to a platter and top with the crispy sage leaves.
VEGAN SOUTHERN STYLE COLLARD GREENS
Source: Vegan Southern Collard Greens – Carla Hall
Ingredients
½ Cup olive oil
2 medium onions, diced
1/2 cup cloves garlic, thinly sliced
2 teaspoons red pepper flakes
2 tablespoons smoked paprika
2 tablespoons apple cider vinegar
2 cups water
5 pounds collard greens
1½ tablespoons kosher salt
Directions
For the pot likker:
1. In a large pot, sauté onions until translucent, then add garlic and red pepper flakes.
2. Season with salt and cook for another two minutes.
3. Add smoked paprika and cook for an additional 2 minutes.
4. Add vinegar and water then bring to a boil. Reduce heat and simmer for at least 20 minutes.
For the greens:
1. While the potlikker simmers, prep the greens by stacking one bunch of greens at a time like cards; roll the stack tightly into a cigar shape then cut the greens lengthwise ¾ of the way down (keeping the stems and base of the greens intact); then cut into 1/4-inch wide pieces.
2. Wash the greens.
3. Add sliced greens to the pot and simmer until tender, about 45 minutes, stirring occasionally.
4. Add more liquid, if necessary.
5. Season to taste with salt and pepper.
6. Serve hot.
Fall Share Week 12
So hard to reconcile the calendar with the passing of time. Seems a few weeks ago we were sweating and harvesting late summer veggies. Now we’re staring down root crops and wintry veggies. No spinach this week, it froze in spite of our best efforts. But we have rutabagas!!!! Some call them wax turnip, swedes or turnip. A beautiful golden color inside. The flavor is said to be in between turnip and cabbage which makes it a hearty potato substitute or add-in in dishes like mashes, fries, soups, and stews. The frozen corn is from last summers/autumn harvest. And yes there is always that one. Vegetable. This season for us it was winter squash. I’m hoping you’re not too tired of it. This is frozen butternut. Should keep for up to 6 months frozen. It’s cleaned and ready to go — roast it for hummus, soup, and yes even salads. And reindeer carrots???? Yes reindeer carrots, I don’t like to let carrots grow this big, My Dad called them horse carrots. But hey the reindeer have to eat too right? They are good for human consumption just might not be as sweet and require a bit longer to cook. Thank you for your support over a great fall season and wishing you all the best for a safe, joyous holiday however you celebrate it! See you in 2 weeks!!!
ROASTED RUTABAGA WITH BROWN BUTTER
Source: Recipe: Roasted Rutabaga with Brown Butter | The Kitchn, Serves 4
Ingredients
1 large rutabaga, about 1 1/2 pounds
4 tablespoons unsalted butter
Flaky salt and freshly ground black pepper
Juice of 1/2 lemon
2 tablespoons finely chopped parsley
Instructions
1. Heat the oven to 450°F. Peel the rutabaga with a vegetable peeler and cut into 1/2-inch to 3/4-inch cubes.
2. Melt the butter in a saucepan over medium heat and cook for about 5 minutes, until the butter foams then browns into a nutty, toasty-smelling liquid.
3. Toss the rutabaga with the browned butter and season with salt and pepper. Transfer the rutabaga to a large baking sheet and spread into a single layer. Roast for 25 to 40 minutes or until browned and tender. Remove from the baking sheet and toss with lemon juice and parsley.
ONE POT MEAL — CABBAGE, KEILBASA, RUTABAGA & MORE
Source: One Pot Meal - Cabbage, Kielbasa, Rutabaga & More | Just A Pinch Recipes
Ingredients
1-2 teaspoon olive oil, extra virgin
1 large jalapeno pepper
2 medium shallots
2 cloves garlic
4-5 - carrots
1 - rutabaga, med-lg size
5-6 small red potatoes
1 medium head cabbage
1-2 package kielbasa, 12oz each, depends how much meat you like
- salt and pepper, to taste. personally, i do not add salt.
How To Make one pot meal - cabbage, kielbasa, rutabaga & more
Step 1: Before getting started, clean and pare vegetables. Shallot, garlic and jalapeno small dice. Cut the carrots in thirds, *rutabaga in bite sized chunks, small red potatoes can be quartered.
*NOTE: Rutabaga is very hard. When cutting into chunks, it is easier to start cutting on one side, rather than dead center. I like to cut into wide slices, then lay flat and cut into chunks.
Step 2: In a large Dutch oven, over med heat, add the 2 teaspoons of olive oil. To the heated olive oil, add the diced shallot, garlic and jalapeno, cook until the shallot is silvery looking, 3-4mins.
Step 3: Add to the pot, carrot and rutabaga chunks, stir to combine and let cook until they start to soften, about 10 mins.
Step 4: Add the quartered red potatoes, stir to combine and let cook, maybe 5mins. Stirring often to keep vegetables from sticking. If need be, add about 1/2 cup of water, or broth if desired.
Step 5: For the Kielbasa; you can cut the links any way you like. For this recipe I cut each link in 4 chunks. Add Kielbasa to the pot and stir to combine.
Step 6: For the cabbage; it can be cut in any way you like. For this application I sliced it in wide ribbons, however it can be cut into fourths, if you prefer. Place cabbage on top of vegetables and kielbasa. Season with pepper, and salt if desired, to taste.
Step 7: Add about 1 cup of water to pot, place a vented lid on top of pot, turn burner to med low. Simmer, until vegetables are tender, and the kielbasa is nicely cooked through. Making sure the pot does not cook dry, continue to add water or broth as needed.
Step 8: Serve this meal with a nice skillet of hot out of the oven cornbread, with butter. Enjoy!
Fall Share Week 11
Brrrr! It certainly is cold out there and that mini snow storm yesterday had us all scrambling for salt and shovels. The farmers picked out an assortment of squashes to bring down and worked through that miserable weather to get you the kale and last of the broccoli. Nice thing about the greens now is how sweet they are. Benito has been busy building new tables in the greenhouse so we can start planting seeds in January and February!!!
Recipes Today:
I seem to always be trolling Instagram which is where I found this recipe—only downside is there are no quantities. I’ve searched all over for a recipe with exact amounts but no luck. So use your own judgement as to how much and what. You can swap out cauliflower for cabbage for example.
IMMUNITY WINTER SALAD
Source: https://www.instagram.com/wellnessbygeorgie
This salad is packed full of immunity boosting ingredients like turmeric and broccoli, provided a healthy dose of vitamin C which will help keep those winter colds at bay! My immunity salad is high in fibre and contains over 10 different plant points, helping to keep your gut bugs happy.
Ingredients
You’ll need: Cauliflower, Broccoli, Chickpeas, Extra virgin olive oil, Kale, puy lentils (French style green lentils), Turmeric, Smoked paprika, Sea salt, Mixed seeds (again use your discretion—sesame, sunflower, flax, pepitas the possibilities are endless. You can omit them too if you prefer!)
For the dressing:
1tbs tahini, 1tsp miso paste, a generous glug of apple cider vinegar
Method:
Coat the chickpeas in the olive oil and sea salt and roast for around 35 mins. Chop the cauliflower and broccoli into bite size pieces, coat in the olive oil, turmeric and paprika and roast for around 20 mins. Whilst your veggies are in the oven make your dressing, add your tahini, miso and ACV to a jar and shake until combined, set aside. Add your puy lentils to a large serving bowl, add your roasted veggies, kale and chickpeas. Drizzle over the dressing and give everything a good mix until combined, finish with a sprinkle of mixed seeds for extra crunch and plant points! Enjoy #healthyfood #healthyrecipes #wintersalad #wellnessjourney #wellnessblogger
BAKED KALE SALAD WITH CRISPY QUINOA
Source: Baked Kale Salad with Crispy Quinoa - Justine Doiron
When hot salad season starts (and yes, it's a thing) this Baked Kale Salad with Crispy Quinoa is the only one I want. All the vegetables are roasted in the oven, and the quinoa is toasted to a crispy perfection. It's the perfect balance of flavors and a great way to pack vegetables into your meal.
Prep Time: 20 minutes; Cook Time: 40 minutes; Total Time: 1 hour 15 minutes
Ingredients
12 stalks kale
1 small head of green cabbage
3/4 cup uncooked quinoa
1 small red onion
2 sage sprigs
1 rosemary sprig
1/4 cup honey
2 tablespoons water
1/4 cup red wine vinegar
2 tablespoons chili oil of choice I like Calabrian chili oil, Brightland’s chili oil or Momofuku chili crunch
Olive oil as needed
Salt & pepper to taste
Instructions
1. Preheat the oven to 450°F. Cook your quinoa per package instructions, or in a rice cooker with a 2:1 ratio of water to quinoa.
2. Remove the core from the cabbage, then thinly slice the cabbage and kale. Spread them out evenly on separate baking sheets, one for cabbage, one for the kale.
3. Drizzle both the kale and cabbage with avocado oil and season with salt and pepper. Roast the cabbage at 450°F for 20-23 minutes or until golden and slightly crisp. For the last 5-7 minutes of baking, add in the kale to bake. Remove both vegetables from the oven and turn the oven down to 375°F.
4. Add the quinoa to a baking sheet and cover with chili oil. Season with salt to taste and toss. Roast this for 20 minutes, stirring halfway through until the quinoa is slightly golden and lightly crisp.
5. While the quinoa is baking, make the agrodolce dressing. Thinly slice the red onion and place it in a bowl. Whisk together the honey and water. Put a pan or small pot on medium heat and add a small splash of oil. Add in the sage leaves and the rosemary sprig. Pour in the honey mixture (it should slightly fizz), and stir until it thickens, about 1 minute. Add a pinch of salt and the vinegar. Stir again and let the mixture simmer slightly for 1-2 minutes. Remove the sage and rosemary and pour this over the red onion. Stir to combine.
6. Toss together the kale, cabbage and red onion agrodolce. Pile this generously into a bowl.
7. When the quinoa is out of the oven, sprinkle it liberally on top of the salad and serve warm!
Fall Share Week 10
Hope you enjoyed a festive and gustatory holiday! I cooked for my family which for me is such a great joy. I love to feed people and that includes you!! It seems like I am always on the hunt for varieties of vegetables, it might be a new one to me or simply a new way to cook it or discovering that the entire plant is edible! Lately I’ve been playing with the spice cardamom and while looking up recipes that include that spice I stumbled on a summer squash out of Northern Mexico and Southern Texas. Supposed to be perfect for the grill, once I started googling it I couldn't get over how prolific that squash is in that part of the world. Commonly known as Tatume it has now been added to our wish list of veggies to grow next year!
SLOW-ROASTED SWEET POTATOES IN TOMATO, LIME & CARDAMOM SAUCE (adapted from Joanne’s blog)
Source: SLOW-ROASTED SWEET POTATOES IN TOMATO, LIME AND CARDAMON SAUCE | Bewitching Kitchen
Ingredients
for potatoes:
3 large sweet potatoes, cut crosswise into 1-inch thick rounds
olive oil to rub potatoes
salt and pepper to taste
for the sauce:
5 tbsp olive oil
2 jalapeno peppers, finely chopped
2 shallots, finely chopped
14 oz whole peeled tomatoes, blended until smooth
1 tbsp tomato paste
1 tsp sugar
1.5 tsp cardamom
1 tsp ground cumin
zest of 1 lime
1 tbsp lime juice
1 cup water
2 tsp finely chopped dill
Instructions
- For the sweet potatoes. Heat the oven to 300F. Rub them with oil, season lightly with salt and pepper, and slow roast for 60 to 90 minutes until tender. Set aside to cool, peel the skin off and slice it into 1 inch thick rounds to proceed with the recipe (can be made a couple of days in advance).
- Make the sauce. Combine the olive oil, jalapenos, shallots, and a pinch of salt in a large saute pan over medium heat, cook for a few minutes. Add the tomatoes, tomato paste, sugar, cardamom, cumin, lime zest, and 1 tsp salt. Cook for 5 minutes so the flavors can combine, stirring frequently. Add 1 cup of water and bring to a simmer. Cook for 5 minutes.
- Increase oven temperature to 425F. Add the sauce to a shallow baking dish that can hold all the potato slices in a single layer, if possible. Place the slow-roasted potatoes on top of the sauce and place in the oven for 20 minutes. Close to the end of roasting time, sprinkle dill on top. If you like a little more color development, use the broiler.
Comments: This was absolutely delicious, and if you spread the preparation by roasting the potatoes the day before, it is a breeze to put together. I actually find myself slow-roasting sweet potatoes and saving them, still with the skin, for all sorts of uses later. Cardamon and lime in the tomato sauce? Winner combination. I intend to make a roasted tomato soup pretty soon with those basic flavors.
Fall Share Week 9
It’s almost always a surprise when you go down to the fields each morning. Scouting to see what happened overnight — did the deer eat more produce, did the insects you didn’t spy yesterday evolve to a freaky level of being out of control, that patch of weeds you thought was manageable is massive now, the naked beds begin showing signs of seeds germinating and rows are suddenly popping up everywhere, buds poking through the leaves beginning to slowly unfurl showing off their soft pastels and brilliant colors like a dancing girl flashing her skirts. For this and so much more we are so very grateful here at the farm. For each of you sharing in our farm life, for our farmers who fearlessly tackle the daily challenges, and for all the folks who touch our lives every day. THANK YOU and Happy Thanksgiving!
Arugula — this is field-grown and so sweet if you can say that about arugula. Sugar is the natural antifreeze in a plant and as the temperatures have dropped the sugar levels have risen. We’ve left the roots on as the whole plant is edible. Most folks tend to think of arugula as a salad green.
SAUTEED ARUGULA
Source: Sauteed Arugula Recipe - Alphafoodie
Put the spinach aside and tell kale to take a hike! This season's hottest side dish is sauteed arugula, packed with goodness, and just as delicious.
Ingredients
7 oz arugula 1 pack
2 garlic cloves
2 Tbsp olive oil
2 Tbsp lemon juice from 1/2 a lemon
1/2 tsp salt or to taste
1/4 tsp black pepper or to taste
1 Tbsp pine nuts optional (You could substitute walnuts for pignolis)
Instructions
1. Wash the arugula well under running water. Pat dry or use a salad spinner to dry it. Also, peel and thinly slice the garlic.
2. Heat the oil in a skillet. On low to medium heat, add the garlic and fry until golden (1-2 minutes). Carefully scoop it out and set it aside.
3. Using the same oil, fry the pine nuts until golden. This won't take long (just 1-2 minutes) – pine nuts tend to burn easily, so keep an eye on them. Remove the pine nuts from the pan and set aside.
4. Add the arugula to the skillet for a few minutes. Cook until it's wilted, this happens quickly (just about 2-3 minutes). But keep an eye on it so it doesn't burn or wilt too much. Use tongs to stir.
5. Remove the sauteed arugula from the pan and transfer it into a serving dish. Serve with a squeeze of lemon juice, then add salt and pepper to taste. Top with the toasted garlic and pine nuts. Enjoy!
STEAMED BROCCOLI LEAF "CAESAR"
Source: https://foragerchef.com/broccoli-leaves/
Steamed broccoli greens or kale with anchovy vinaigrette and parmesan will remind you of Caesar salad, but lighter. Perfect for a light meal with something grilled alongside.
Ingredients
8 oz broccoli leaves, ribs removed and cut into large squares
2 Tablespoons Anchovy vinaigrette or to taste (recipe below)
High quality parmesan grated, peeled, shaved--your choice
Fresh ground black pepper for serving
Instructions
1. Put the trimmed broccoli leaves into a pot with a steamer basket, turn the heat to high, cover and cook for 30 seconds, or until the leaves are just barely tender.
2. The leaves should be bright green and vibrant. I like them a little crunchy still and full of life.
3. Remove the steamed leaves to a salad bowl and toss with some of the dressing to taste, or serve in small salad bowls and let guests dress the leaves to their taste. Pass the parmesan and fresh black pepper alongside.cooked edible broccoli leaves in a wooden bowl on wood background lemon wedge.
BASIC ANCHOVY VINAIGRETTE
Source: https://foragerchef.com/anchovy-vinaigrette/#recipe
Makes a generous cup
Ingredients
1 tablespoon (30 grams) anchovy paste
2 oz ¼ cup fresh lemon juice *See notes
6 oz ¾ cup blended olive oil *See notes
¼ teaspoon kosher salt
¼ teaspoon fresh ground black pepper
1 small clove garlic
1 teaspoon Dijon mustard
1 tablespoon cold water
Instructions
1. Grate, press, or mince the garlic and combine with the lemon juice, anchovy paste, Dijon, salt and pepper in the bowl of a blender or food processor.
2. Drizzle in the oil slowly, along with the tablespoon of water, running the machine on medium-high, until you get a creamy emulsion.
Store in a pint jar in the fridge and shake before using.
Notes
Substitutions
– Instead of anchovy paste, you can use the same amount of drained anchovy fillets. 30 grams will be about half of a small 2 oz tin of anchovies.
– Only fresh garlic should be used here.
Oil
I use a mixture of half extra virgin olive oil and half other mild oil, such as canola or grapeseed. If you use all EVOO the dressing will become firm as it chills and will need to come to room temperature before using.
Lemon juice and vinegar The best flavor is a combination of half fresh lemon juice and half red wine vinegar. If you only have one or the other it will still taste good.
BROCCOLI LEAVES WITH GARLIC AND LEMON
Source: https://foragerchef.com/broccoli-leaves/#recipe
Ingredients
8 oz (8 cups) Broccoli leaves stems removed, leaves cut into 1 inch strips, rinsed and dried
Kosher salt to taste
Fresh wedges of lemon to taste
3 tablespoons virgin olive oil plus more for finishing
Crushed red pepper flakes to taste (optional)
2 large cloves of garlic thinly sliced
1 tablespoon of water or dry white wine optional
Instructions
1. Warm the garlic and oil in a 10 inch or larger saute pan or cast iron skillet and cook on low heat, stirring occasionally until the garlic is aromatic, nutty smelling, and light brown.
2. Add the crushed red pepper and greens to the pan along with the tablespoon of water or wine and cover with a tight fitting lid and cook for 2-3 minutes.
3. Remove the lid and stir the leaves to evenly wilt them, season to taste with salt, then put the lid back on and cook a few minutes more until they're as tender as you'd like.
4. If the pan looks dry, add another spoonful of water to prevent it from drying out. When the leaves are tender, double check the seasoning and adjust as needed, then remove with tongs or a slotted spoon to prevent juice from leaking onto your plate.Serve with lemon wedges and more olive oil for drizzling alongside.
Notes
The only thing to know about cooking these is that you need to remove the stem. Just like collard greens and kale, they require a gentle braise.
Fall Share Week 8
I’m already dreaming of Spring planting. Like What??? Yes so true!!! Someone approached me at our market in Warwick Sunday. Wanted to know if I would be interested in a couple of skylights. I jumped at the chance to get them. We can turn them into planter boxes and use them for overwintering some leafy greens, starting early seeds in February for field planting. The possibilities are almost endless. And while I haven’t received any seed catalogues, I have been receiving emails and texts about new seed varieties and about old ones that are going to be discontinued. I can only imagine this is what Monet felt like choosing colors and flavors that will create a magnificent palette that will charm all the senses.
CHIPOTLE BLACK BEAN STUFFED SWEET POTATOES
Source: https://www.babaganosh.org/chipotle-black-bean-stuffed-sweet-potatoes/
These Sweet Potatoes stuffed with Chipotle-spiced Black Beans, fresh tomato, and cheese, are the perfect vegetarian dinner. Hearty, tasty, and filling. Serves 4.
Ingredients
2 sweet potatoes (medium), scrubbed clean
1 14-oz can black beans, drained and rinsed
1 tomato (medium), diced
⅛- ¼ tsp ground chipotle powder (to taste)
¼ tsp salt
¼ tsp garlic powder
1 tbsp lime juice (from 1/2 lime)
1 tbsp cilantro leaves, chopped
½ cup shredded cheddar cheese (or a Mexican cheese blend)
Instructions
1. Preheat oven to 400F. Pierce the sweet potatoes with a fork a few times and bake 45-55 min at 400F until fully cooked and fork-tender. Baking time will vary depending on the size of your sweet potatoes. Remove from oven and allow to cool while you prepare the filling.
2. In a medium bowl, combined the rinsed black beans, diced tomato, chipotle powder, salt, garlic powder, lime juice, and cilantro. Mix well.
3. When the sweet potatoes are cooked, carefully carve out a canoe-shaped hole in the sweet potato, scooping out the flesh with a fork (the potato will be steaming hot! Be very careful!). Use two forks to pull at the sides to 'widen' the potato a bit to make more space for the filling.
4. Spread the bean mixture equally between the 4 sweet potatoes. Top each with 1/4 of the shredded cheese. Bake at 400F for 3-5 minutes, or until the cheese is melted. Allow to cool for a few minutes before serving.
THE SWEET POTATO SOUP
Source: https://www.recipetineats.com/sweet-potato-soup/
Author: Nagi; Prep: 10 minutes; Cook: 30 minutes
Serve with a shower of something crunchy – croutons, nuts, crispy shallots. I used pistachios and flatbread ribbons, fried for speed, but they can be baked – Note 3.
Ingredients
2 tbsp extra virgin olive oil
30g / 2 tbsp unsalted butter – or more oil
2 onions, diced
2 leeks, white and pale green part only, quartered, cut into 1cm / 1/2″ slices (Note 1)
2 garlic cloves, chopped
1 kg/ 2 lb sweet potato, peeled, quartered lengthwise, cut into 2cm / 0.8″ chunks
1 tbsp cumin powder
1.25 litre / 1.25 quarts chicken or vegetable stock, low sodium (Note 2)
1.5 tsp cooking / kosher salt
1 tsp black pepper
1/3 cup cream (any type) or an extra knob of butter
Garnishes (Note 3)
Something to drizzle / dollop – extra virgin olive oil, cream, yogurt, sour cream. Something crunchy – flatbread strips (pictured, Note 3), croutons, pistachios, pepitas, crispy fried shallots.
Instructions
1. Sauté aromatics – Heat the oil and melt the butter in a large heavy based pot over medium heat. Cook the onion, leek and garlic for 5 minutes until softened.
2. Add the sweet potato and cumin, cook for another 3 minutes, stirring regularly.
3. Simmer 20 minutes – Add the stock, salt and pepper. Bring to a simmer, then cook for 20 minutes at a gentle simmer until the sweet potato is very tender (no lid).
4. Blitz – Remove the pot from the stove. Blitz with a hand-held stick until smooth. (Note 4 for blender) Stir in cream.
5. Garnish – Ladle into bowls. Drizzle with yogurt, cream or olive oil with a sprinkle of something crunchy – pictured with pistachios and crispy flatbread strips (Note 3).
Recipe Notes:
1. Leeks washing (video 0.09 sec) – Chop the reedy dark green part off, only use the soft white & pale green part. Cut in quarters lengthwise but keep the root intact (for gripping). The cut part of the leek will splay out like tassles / cheerleader pom poms! Hold the root part and wash the cut part of the leek under a running tap. Shake excess water off well, then chop.
2. Stock – I really do prefer this made with chicken rather than veg stock because it gives it a deeper flavour. But veg stock is a close 2nd I freely use to keep this vegetarian.
3. Garnishes – Something drizzled and something crunchy is my standard soup baseline. I used crispy flatbread strips in a nod to the vaguely reminiscent Moroccan flavours in this (I say that only because of the cumin!).
CRISPY FLATBREAD STRIPS – Cut 1cm / 0.4″ strips. Scrunch in hand (to curl) then fry in 3cm / 1″ 180°C/350°F oil for 20 seconds until light golden. Sprinkle immediately with salt while hot (so it sticks).
BAKED OPTION – Coat strips generously with olive oil spray, sprinkle with salt, bake at 180°C/350°F (160°C fan) for 10 to 13 minutes or until golden and crisp, tossing once or twice. Exact time will depend on thickness of flatbread.
Croutons – Cut any bread (crustless) into 0.75 cm / ⅓” cubes. Toss in a little olive oil to coat, sprinkle with a pinch of salt. Bake at 180°C/350°F for 10 min, tossing halfway, until golden and crunchy. Cool fully on tray before using.
4. Blender option – Allow soup to cool for 10 minutes then transfer half into a blender. Remove the lid of the feeder tube (it might blow-off due to the heat inside!), then put the lid on. Use a folded tea towel to cover the hole then blitz until smooth. Transfer to a separate pot. Repeat with remaining soup. (Stick blender really is easier!)
Silky smooth soup – You’ll need a high powered blender like a Vitamix or Blendtec. Note: soups as is might look a bit lumpy but it tastes smooth.
5. Leftovers will keep for 4 days in the fridge. Great for freezing too!
Fall Share Week 7
Holy Cow! The wind last night was just howling through the valley. Branches coming down, containers flying across the yard and street. And now it's quiet. The county is replacing a culvert that runs across the road a little ways down from us. This has forced the road to be closed for about 3 weeks while they get it done. It’s amazing how much noise is generated by all the trucks, tractors and just traffic in general. We’re enjoying the temporary stillness and planning for when the lull breaks. I told you about the garlic last week. Tomorrow Benito will be planting it and then we’ll all cross our fingers for a good season and harvest.
PARMESAN CRUSTED CRUSHED TURNIP RECIPE
By Carol | From A Chef’s Kitchen
Source: Parmesan Crusted Smashed Turnips - From A Chef's Kitchen
Ingredients
12 small to medium turnips, peeled
Salt
2 tablespoons olive oil
3 cloves garlic, minced
Freshly ground black pepper
1 cup freshly grated Parmesan cheese, or as needed
Chopped fresh chives
Instructions
1. Place peeled turnips in a pot of salted water to cover. Bring to a boil. Cook 20 to 30 minutes or until turnips can be pierced easily with a paring knife. Drain. Let cool slightly.
2. Preheat oven to 375 degrees.
3. Place the turnips on a clean kitchen towel or double layer of paper towels. Gently press each one down until it’s approximately 1/2-inch high. Let them drain for 15 minutes then carefully flip them over onto a dry section of the towel or onto fresh paper towels so the other side drains and dries a bit.
4. Combine garlic, olive oil and salt and black pepper, to taste in a small bowl.
5. Line a baking sheet with parchment paper or nonstick aluminum foil. Place the flattened turnips on the lined baking sheet. Brush each turnip with a little of the olive oil and garlic combination. Sprinkle Parmesan cheese over each turnip, gently pressing it down.
6. Carefully and quickly flip each turnip over. Repeat with the remaining olive oil and garlic combination and cheese.
7. Bake for 20 to 25 minutes. Flip each turnip and bake an additional 15 minutes. Garnish with chopped fresh chives and serve.
Notes
SUBSTITUTIONS: Use any hard, dry cheese such as Asiago, Romano, or Manchego instead of Parmesan.
TIP: Let physics be your friend. Flip the crushed turnips with the Parmesan cheese quickly. Not overcooking the turnips is also important.
INSTANT POT INSTRUCTIONS FOR COOKING THE TURNIPS:
– Place the rack inside your 6-quart Instant Pot and add 1 1/2 cups water. If using the 8-quart, use 2 cups.
– Peel the turnips and place them on the rack.
– Close and lock the lid.
– Using the “Steam” setting, steam whole medium turnips for 5-6 minutes with natural release, small turnips for 3-5 minutes with natural release. THE COOKING TIME WILL DEPEND UPON THE SIZE OF THE TURNIPS.
MAKE AHEAD: The turnips can be boiled and crushed a day in advance. Leave on the towel and refrigerate
You can supplement turnips with potatoes and squash!
HOW TO POP CORN RIGHT ON THE EAR!| Spoor Farms
Youtube video on how to cook popcorn on the cob!
https://youtu.be/V3DAPJgo_Vo?si=qzN8-ECEMQ9C9its
Transcript (EDITED):
Hey popcorn lovers you guys ready for this today ... we're gonna have a showdown. I picked this bad boy up at Ace Hardware ... I'm excited to try it I grew these I'm a popcorn farmer if you're just now tuning in we're gonna see how they compete against each other it looks like I need to cut this one open so I'm gonna grab my scissors here I can't do this with both my hands taken so I'll be right back. folded over three times we're going to microwave for two minutes or whenever they slow to two to three seconds apart heading into microwave. Now the fun begins slowing no it's still going I wanna make sure it's going to pop as possible we're gonna stop it in a minute and a half still going we got look at that okay! That looks good here's a few that are just starting to get burnt over all that stuff really well not a lot of color to it but pretty good. Get yourself some bags I like that same thing fold over three times toss it there in the microwave you do it. Here we go all right now we wait I hear the sound of popcorn keep it fair I'm popping them both for a minute and a half just keep everything even look at that that is beautiful okay now comes the fun part compare and contrast. Fun fact if you ever wonder why the kernels on the end don't pop that's because a microwave cooks from the inside out so you can make those pop if you want but they're gonna burn.
Fall Share Week 6
The potatoes today are russets — the ultimate baking potato. It is also one of the best for thickening a soup without adding heavy cream and/or flour and makes for a pretty handsome double stuffed potato too!
Gave the farmers the day off today — not a ton of field work and even though they could be shelling beans in the greenhouse, they need some down time. Benito has gotten the field ready for the garlic. In our area, garlic should be planted in the fall. You can do it in springtime but the opportunity for bigger bulbs at harvest time is to plant now. In order to plant, aside from prepping the soil, the bulbs need to be separated into individual cloves. This is another rainy day job and can be therapeutic as you peel away the outer shell and break each head into individual cloves. On the hunt for other varieties of vegetables that can be planted now and let over-winter to get a jump on spring planting/harvesting. Years ago I had discovered carrots that took a year to ripen — it seemed they were predominantly grown in England. I found the whole concept fascinating. Maybe now is the time to try them out!!!
Recipes Today: Don’t know if you read the NY Times but in this week's email for the cooking section there’s a great butternut squash pasta recipe and below that a pumpkin soup recipe.
BUTTERNUT SQUASH PASTA WITH BACON AND PARMESAN
Source: https://cooking.nytimes.com/recipes/1021510-butternut-squash-pasta-with-bacon-and-parmesan?smid=share-url
By Yossy Arefi, Published Oct. 29, 2020; Yield: 4 to 6 servings
In this cozy weeknight meal, roasted butternut squash and Parmesan are combined for a dish that’s flavorful but not too heavy. A bit of thick-cut bacon adds crunch and smokiness. If you don’t have thick-cut on hand, you can certainly use thin-cut, but keep an eye on it, as it will cook through faster. Be prepared to pluck it from the oven once crisp and allow the vegetables to finish cooking at their own pace. A handful of chopped fresh herbs added just before serving gives this comforting dish a bit of brightness.
Ingredients
2 pounds butternut squash, peeled and cut into ¾-inch pieces (about 4 cups)
3 tablespoons olive oil
Pinch of red-pepper flakes
Kosher salt and black pepper
1 medium red onion, cut into 1-inch dice
5 slices thick-cut bacon (about 5 ounces)
12 ounces short, twisty pasta, like campanelle or cavatappi
¾ cup finely grated Parmesan (about 1½ ounces)
2 tablespoons chopped fresh chives
2 tablespoons chopped fresh parsley
Preparation
Step 1: Set a rack in the center of the oven and heat to 375 degrees.
Step 2: Add the butternut squash to a large baking sheet. Drizzle 2 tablespoons of olive oil over the top and season with red-pepper flakes, salt and pepper. Toss to combine, then spread the squash into an even layer and bake for 15 minutes.
Step 3: While the butternut squash bakes, in a small bowl, toss the red onion with the remaining 1 tablespoon olive oil.
Step 4: After the squash has cooked for 15 minutes, give it a stir and push it to one side of the baking sheet to make room for the onion and bacon, trying to keep the squash in one layer. Add the red onion to the pan, then lay the strips of bacon in a single layer next to the onion.
Step 5: Return the baking sheet to the oven for another 30 minutes and cook, stirring the squash and onion after about 15 minute. The bacon should be crisp and the vegetables cooked through and beginning to caramelize at the edges. (They don’t have to be super golden brown, but a little color is nice.)
Step 6: Just before the vegetables and bacon are done, bring a large pot of salted water to a boil and cook the pasta until al dente according to package instructions. Reserve 1 cup pasta water, then drain the pasta and return it to the pot to keep warm if necessary.
Step 7: When the vegetables are tender and the bacon crispy, take the baking sheet out of the oven and carefully transfer the bacon to a cutting board. Coarsely chop the bacon.
Step 8: Add the butternut squash, onions and any bacon fat to the pot with the pasta. Add about ½ cup Parmesan and ½ cup pasta water to the pot and stir everything until well combined. You want the squash to break down a bit and coat the pasta; add more pasta water as necessary to coat the pasta with the squash and cheese.
Step 9: Stir in half the chopped bacon, then season with salt and pepper to taste. Divide the pasta among bowls or plates. Top with chives, parsley, black pepper and the remaining Parmesan and bacon. Serve immediately.
PUMPKIN SOUP
By Lidey Heuck, Updated Aug. 1, 2024
Source: https://cooking.nytimes.com/recipes/1021618-pumpkin-soup?campaign_id=58&emc=edit_ck_20251029&instance_id=165367&nl=cooking®i_id=139016779&segment_id=209552&user_id=51159d3a7c19df6483561b1ebd617c10 Yield: 6 servings
This recipe turns canned pumpkin purée into a sublimely creamy, aromatic soup that makes for an elegant first course or a satisfying lunch on a cold day. While the combination of pumpkin and fall spices can easily veer in the direction of dessert, the addition of fresh rosemary, garlic, caramelized onions and curry powder plants this soup firmly in the savory camp. Finally, to make this recipe vegan, substitute olive oil for the butter, full-fat coconut milk for the heavy cream, and vegetable broth for the chicken broth. If time and availability allow, consider roasting your own sugar pumpkin for this recipe: The soup will have a deeper, more complex flavor (see Tip) Featured in: This Is Not Your Average Pumpkin Soup
Ingredients
3 tablespoons unsalted butter
2 medium yellow onions, halved and thinly sliced
2 tablespoons coarsely chopped fresh rosemary (or 2 teaspoons dried rosemary)
2 tablespoons maple syrup
4 garlic cloves, coarsely chopped
½ cup fresh apple cider (or ¾ cup apple juice)
4 cups low-sodium chicken or vegetable broth, plus more as needed
2 (15-ounce) cans pumpkin purée (not pumpkin pie filling), or 3 cups homemade pumpkin purée (see Tip)
1 teaspoon mild curry powder
½ teaspoon ground nutmeg, plus more for serving
Pinch of ground cloves
1½ teaspoons kosher salt, plus more as needed
½ teaspoon black pepper, plus more as needed
⅓ cup heavy cream, plus more for serving
For the Fried Sage Topping (optional)
2 tablespoons unsalted butter
12 fresh sage leaves
Preparation
Step 1: In a large Dutch oven or other heavy-bottomed pot, melt the butter over medium heat. Add the onions and rosemary and cook, stirring occasionally, until the onions are lightly caramelized, about 15 to 20 minutes. If the onions begin browning too quickly, turn the heat to low.
Step 2: Add the maple syrup and garlic and cook, stirring occasionally, until the onions have darkened in color, 3 to 5 minutes. Add the cider and cook, scraping up any bits from the bottom of the pan, until the liquid is reduced by about half.
Step 3: Add the broth, pumpkin purée, curry powder, nutmeg, cloves, salt and pepper, stir to combine, and bring to a boil. Turn the heat to medium-low and cook at a full simmer for 10 minutes, stirring occasionally and scraping the bottom of the pot to prevent scorching.
Step 4: Working in batches, purée the soup in a blender or food processor and return to the pot (or use an immersion blender). Bring back to a simmer over medium heat, then turn off the heat and stir in the cream. Season with salt and pepper to taste and add more broth if the soup is too thick.
Step 5: To make the optional fried sage topping, melt the butter in a small or medium skillet set over medium-high heat. Add the sage leaves and fry until just crisp, 1 to 2 minutes. Using a slotted spoon or a fork, transfer the sage leaves to a paper towel-lined plate, reserving the butter left behind in the pan.
Step 6: To serve, spoon the soup into individual bowls. Top each serving with 2 fried sage leaves and a drizzle of the reserved butter (if using), or a swirl of cream and pinch of nutmeg. Serve hot.
Tip: To make your own pumpkin purée, heat oven to 425 degrees. Trim the stem from a 4- to 5-pound sugar or “pie” pumpkin, then cut the pumpkin in half through the stem. Scoop out the pulp and seeds and discard. (Or rinse and dry the seeds, drizzle with olive oil, sprinkle with salt, and roast on a sheet pan in 375-degree oven for 10 to 15 minutes.) Carefully slice the pumpkin into 1½-inch-thick wedges. Place the wedges on a sheet pan lined with parchment paper, drizzle generously with olive oil and sprinkle with salt. Roast for 35 to 40 minutes, flipping halfway through, until the pumpkin flesh is very tender when pierced with a fork. Set aside until cool enough to handle, then spoon the flesh into a large bowl, discarding the skins. Mash with a fork until mostly smooth.
Fall Share Week 5
Beans of Love — there’s a special story behind these. I began growing dried beans over 20 years ago, ever searching for something to add to the production of the farm, something to provide work for our farmers at a time when it was pretty lean and soon in winter there would be no work at all. The essence of the black beans which started out as cocoa, jet and turtle gradually blended together as we saved our own seeds and overtime the beans became acclimated to our soil and environment. This partricular project was a success. Then near disaster hit - in August 2011 Hurricane Irene visited with a vengeance. She was our Hurricane Sandy. At the time I had over 85 acres planted and harvesting. All those crops were under water for over 2 weeks and consequently destroyed. I thought our seed stock was gone as well. When she heard what was happening, one of my chefs, Dona, came to me with a bucket of beans that she had been saving for her to cook with in the farm kitchen. Thanks to her the legacy lives on, and the legacy of the Beans of Love continues on today.
Recipe Today:
The beans were just harvested and I find I don’t soak them. Some folks still do as they can have a hard shell.
CHILI IN A PUMPKIN
Source: Chili In A Pumpkin - The Daring Gourmet
By Kimberly Killebrew
Ingredients
1 large 10-12 pound pumpkin or smaller individual pumpkins, "lids" cut off and insides removed and scraped clean
1 pound ground beef
1 large onion, diced
16 oz bag of dried kidney beans, soaked overnight, rinsed and drained
2 14 oz cans tomato sauce
2 14 oz cans petite diced tomatoes
1 1/2 cups water
1 batch Homemade Chili Seasoning Mix
sour cream, green onions, and shredded Cheddar cheese for serving
Instructions
1. Heat some oil in a large Dutch oven and brown the ground beef, adding the onions while the beef is still a little pink. Cook until the onions are tender and transparent, 5-7 minutes. Add the Homemade Chili Seasoning Mix and cook for another minute or two.
2. Add the remaining ingredients, bring to a boil, reduce the heat to low, cover and cook for about an hour until the beans are tender, stirring occasionally to prevent bottom from burning. Add more chili powder and salt to taste.
3. Chili can be made in advance and refrigerated or frozen until ready to use.
4. Preheat the oven to 350 degrees F.
5. Place the pumpkin on a baking sheet with sides or in a casserole dish in case the pumpkin leeks. Ladle the chili into the pumpkin and place the pumpkin "lid" on top. Bake the pumpkin for about an hour, depending on the size. The pumpkin is done when a fork can be easily inserted into the flesh of the pumpkin.
6. Serve the Chili In A Pumpkin in the dish it was baked in. Be very careful if trying to transfer it to a serving dish or the bottom of the pumpkin might fall out! (This is more likely to happen the bigger the pumpkin is, less likely with smaller, individual pumpkins)
7. For serving, scoop some chili out along with some of the pumpkin flesh from the sides and top with sour cream, Cheddar cheese and green onions.
Fall Share Week 4
**There’s a couple different kinds of squashes - Robins koganut, honey nut, butternut. The koganut and honey nut seeds were all sourced from Dan Barbers seed company and are a special treat this time of year — extremely flavorful, edible skin — use as you would butternut.
The weather feels like a pendulum swinging. Yesterday a beautiful warm day, today a chilly crisp autumn day. The farmers were busy in the fields stripping the tender plants of everything they could. Eggplant and yellow tomatoes are making their last appearance this year. The eggplant size is small, but it was either harvest or lose it. Same with the yellow pear tomatoes, some may show green — give them a few days and they’ll turn a deeper yellow. You can use them for an easy roasted tomato sauce. No Swiss chard for a while — the freeze killed it and the bok choy too. Hardier greens like kale and broccoli raab soaked in the cold have become sweeter. 50 Pound sacks (from onions) that were full of dry beans have been dumped out on the wire tables and strategically placed in the greenhouse with fans blowing on the mountains of beans helping them to dry. Soon we’ll have those for you and shortly broccoli and cauliflower will be coming your way too!
Recipes Today: ROASTED GARLIC; CARAMELIZED ONIONS
Especially this time of year there are a few things I love to keep on hand for a quick throw together meal. Roasted Garlic is always available in my kitchen.
ROASTED GARLIC
This is one way I make mine. Take a small saucepan and throw in a couple handfuls of peeled cloves of garlic. Cover with Olive Oil. Bring to a simmer, occasionally stirring. Once you start seeing golden spots on the garlic remove from heat, let cool. I put mine in a canning jar in the fridge, I use the garlic infused oil and the cloves to add flavor to most any savory dishes.
I know I’ve provided instructions on how to caramelize onions in the past but thought today would be a good time to revisit this tasty condiment. I keep a bowl of these on hand and will use them to add flavor to eggs, a sauteed filet of fish or meat, add a kick to a soup or stew. There are so many places the not so lowly onion can give a rich umami lift to.
HOW TO CARAMELIZE ONIONS
Source: https://jessicainthekitchen.com/how-to-caramelize-onions-easy-and-life-changing/#recipe
Servings: 6 servings; Prep Time: 15 minutes; Cook Time: 45 minutes; Total Time: 1 hour
Here's how to caramelize onions for real! No rushing the process, no shortcuts—with a little patience, you'll get the best caramelized
onions.
Ingredients
2-3 tablespoons oil
1 lb onions, about 5 large yellow onions, sliced
½ teaspoon sea salt
water, see instructions
2 tablespoons red wine vinegar or red wine, optional
Instructions
1. In a large pan over medium heat, heat the oil.
2. Add the onion slices and stir together to ensure the onions are fully coated. Add a pinch of salt and stir again.
3. Saute the onions for about 5-8 minutes until the onions begin to slowly become translucent. Reduce the heat to medium low.
4. Continue to stir onions every now and then. If/when the onions begin to get dry, add a splash of water (about 2 tablespoons of water a time) to deglaze the pan and ensure onions don’t stick.
5. While stirring, ensure you’re always scraping the fond off the bottom and swirling it back into the onions! This gives it beautiful flavour. Continue to scrape for about 30 more minutes until the onions are the colour and texture you desire.
6. In the last few minutes, add a splash of red wine vinegar for a flavour burst, swirling it into the onions. Remove from the stove and allow to cool.
7. Serve immediately or store in a Tupperware container in your fridge for up to a week. Enjoy!
Notes
I personally love making these in a cast iron pan or pot, such as your regular cast iron pan or a Le Creuset! It’s way easier to get the fond off the bottom that way!
How to Store: Store caramelized onions in an airtight container in the refrigerator for up to a week.
How to Freeze: Freeze caramelized onions for up to 3 months in a freezer bag or in an airtight container. Let them thaw in the refrigerator before using.
Fall Share Week 3
Ethiopian Kale is more tender and sweeter in flavor than other kales and mustard greens. It’s quickly becoming one of my new favorite kales!!! Use as you would other leafy greens.
It’s 5:30 AM. I've already been up for a couple of hours, sipping my coffee and staring out the window. Watching and listening to the gentle patter of rain fall, then suddenly WHOOSH a deluge comes pouring out of the sky. Lasted about 15 minutes, but while it’s happening I’m frantically thinking how to shift gears, the farmers can’t go out in this outpouring from the heavens above. Ok we’ve got chilies to dry, beans to clean, orders to pack, CSA distribution to prepare so we migrate to indoor tasks, cleaning out the greenhouse to make room for winter storage and gulp, yes get ready for spring planting!
BUTTERNUT SQUASH AND APPLE SOUP RECIPE
Written by Palmetto Bluff
Source: From the Kitchen: Butternut Squash and Apple Soup Recipe - Palmetto Bluff
Ingredients
1 Tbsp Extra virgin olive oil
1 Butternut squash, large, roasted (flesh and seeds removed)
½ gallo Vegetable Stock
1 Fuji apple, peeled, cored, and chopped
Kosher salt to taste
Instructions
1. Preheat your oven to 325 degrees. Cut butternut squash in half lengthwise and remove the seeds.
2. Roast the butternut squash on a baking sheet, skin side up, for 40 – 50 minutes(add a little oil to the top of the skin before roasting). Allow to cool then remove flesh.
3. Add the vegetable stock to a large pot. Bring to medium high heat/bring to a simmer. Once warm, add the butternut squash flesh.
4. Add the chopped apple then allow everything to simmer until the apples are soft.
5. Use an immersion blender to puree the soup. Strain the soup if desired. Garnish with cremé de fraiche or sour cream, balsamic reduction, or additional chopped apple and chives. Serve in a deseeded and roasted acorn squash if desired.
BUTTERNUT SQUASH SALAD — with BEETS
Source: BEST Butternut Squash Salad - With Roasted Beets - Pinch Me Good
Author: Amy Estes; Total Time: 35 minutes; Yield: 6 servings
This is the BEST Butternut Squash Salad. Spicy arugula, roasted beets, and butternut squash mixed with crunchy walnuts, and creamy goat cheese. All drizzled with an incredible Orange Vinaigrette dressing! Simple lunch recipe, dinner salad or quick pick me up for those cold winter days.
Ingredients
1.5 cups beets – peeled and cubed (about 2–3 beets)
2–3 cups butternut squash – peeled and cubed
2 tablespoons olive oil – divided
½ teaspoon kosher salt
¼ teaspoon ground black pepper
6 cups arugula
¼ cup chopped walnuts
¼ cup crumbled goat cheese
¼ cup pomegranate seeds
For the dressing
¼ cup orange juice (or the juice of a large orange)
2 tablespoons apple cider vinegar
2 tablespoons pure maple syrup
1 tablespoon dijon mustard
salt and pepper (to taste)
⅓ cup olive oil
Instructions
Roast the beets and squash
1. Preheat the oven to 425 ° F and line a baking sheet with parchment paper for easy cleanup.
2. Place the cubed butternut squash onto the baking sheet in an even layer, leaving some room for the beets. Then add the beets to the pan with the squash. Drizzle the beets and squash with 1-2 tablespoons olive oil and some salt and pepper and toss to coat.
3. Then roast the beets and squash in the oven for about 20-25 minutes, turning the beets and squash over halfway through. Watch the beets since they may not take as long as the squash to cook. Remove and set aside to cool for a few minutes. Note: I cut mine all the same size so they cook within the same amount of time.
Make the dressing
1. Add all of the dressing ingredients to a medium bowl and whisk well to emulsify. You can also add all of the ingredients to a mason jar fitted with a lid and shake well.
Assemble the salad
1. Arrange the salad ingredients – arugula, squash, beets, goat cheese, walnuts, and pomegranate seeds in a large bowl.
2. Pour the dressing over the salad and toss.
3. Serve and enjoy!
Fall Share Week 2
Today the beans are a blend of colors. The sweet pepper this week is a bell type, I don’t remember the variety, some may be showing a blush of color. It takes a long time for peppers to show their “true colors,” usually sweeter when in full color and higher in Vitamin C. There’s an assortment of squashes to choose from — spaghetti, butternut or acorn.
Applefest — If any of you feel like taking a ride on Sunday it’s Applefest in Warwick. Over 30-40,000 folks descend on the Village of Warwick. Pure chaos reigns for the day, food and craft vendors abound, some vendors from our hometown market will attend. Surrounding the Warwick Village there’s orchards and farms to go apple and pumpkin picking, there’s quite a few breweries and wineries too. Leaves have begun turning and the onion harvest is getting close to the end. Not sure if any B and B’s still have space available but it’s only about an hour ride from NYC. Link for more info: Warwick Applefest – Orange County's Largest Festival
Here we are at the beginning of October, already, I just cannot fathom how this year flew by. As the song goes to everything there is a season, and now the season of corn has come to an end. This is the last of the fresh corn until next year. Yesterday Lupe and her daughter Cristal cleaned and packaged hundreds of pounds of corn. It’s chilling in the freezers now waiting for some snowy, chilly days of winter to be made into chowders and stews!! Benito has shelled over a hundred pounds of black beans and is still not finished, and then there’s the white and cranberry beans to harvest and shell. Will have to decide what I will freeze next hot or sweet peppers. Yesterday I made a vat of tomatillo jam and started a huge kettle of corn chowder. Today I’m thinking of pickled green tomatoes, pickled peppers or perhaps some dilly beans...
GREEN TOMATO BREAD Delicious End of Season Quick Bread
Source: Green Tomato Bread Delicious End of Season Quick Bread
Green tomatoes hold the potential for a delicious and unique treat: Green Tomato Bread. Yes, it is similar in taste and texture to a zucchini bread and is a healthier alternative to Fried Green Tomatoes. The key to this recipe is to use unripe tomatoes.
Ingredients
¼ cup vegetable or canola oil
¼ cup low or non fat yogurt
1 egg
⅓ cup sugar (or honey)
½ teaspoon vanilla
1 cup green tomatoes (diced into small chunks)
1 cup all purpose flour
½ cup whole wheat flour (or use all-purpose flour)
½ teaspoon baking powder
¼ teaspoon baking soda
½ cup nuts (chopped)
½ cup raisins (optional)
Instructions
1. Preheat oven to 350°F. Grease an 8x4 inch loaf pan.
2. In a large bowl combine oil, yogurt, eggs, sugar (or honey), vanilla and tomatoes.
3. Add flour, baking powder and baking soda and mix until all ingredients are wet. Stir in nuts and raisins. Pour into prepared loaf pan.
4. Bake for approximately 40-45 minutes until toothpick inserted in the center comes out clean. Let cool on a baking rack.
BOK CHOY — Also known as pac choi, pak choy, and Chinese white cabbage, bok choy is a member of the mustard family. It’s related to vegetables like turnips, napa cabbage, and broccoli rabe, which you can tell from its mild, mustardy flavor.
SAUTÉED BABY BOK CHOYSource: How to Cook Bok Choy Recipe - Love and Lemons
Ingredients
1 tablespoon tamari or soy sauce
1 tablespoons water
½ tablespoon rice vinegar
1 teaspoon mirin, or ½ teaspoon honey
¼ teaspoon toasted sesame oil
1 garlic clove, chopped
Red pepper flakes
2 teaspoons avocado oil, plus more as needed
1 pound baby bok choy, 3 to 4, halved or quartered
Sesame seeds, for sprinkling
Instructions
1. In a small bowl, stir together the tamari, water, rice vinegar, mirin, sesame oil, garlic,and a pinch of red pepper flakes.
2. Heat the avocado oil in a large skillet over medium-high heat. Add half the bok choy, cut side down, and sear until browned on each side, 1 to 2 minutes per side. Remove, add more oil to the pan, if necessary, and add the remaining bok choy and repeat.
3. Add all of the bok choy back to the pan along with the sauce. Toss, then cover and cook 1 to 2 more minutes, or until the bok choy is tender.
4. Transfer to a platter, sprinkle with sesame seeds, and serve.
Fall Share Week 1
Today the beans are a blend of purple and yellow. The hot pepper this week is Chile de arbol, deceptively small but they pack a punch!!! A small thin Mexican chili pepper, also known as “birds beak”. It has a heat level of 15,000 to 30,000 Scoville units, a smoky, grassy flavor, and is a staple in Mexican cuisine, used dried or powdered in sauces and dishes. We will be laying them out on tables in the greenhouse so they can dry. They can also make a spicy vinegar as a great base for a vinaigrette. Today's tomato is the Yellow Pear tomato. The first recorded yellow pear tomatoes were grown in Europe in 1805. In 1825 the Hudson's Bay Company, Fort Vancouver, once the headquarters of the fur trade in the Northwest, operated a seven-acre farm filled with flowers, herbs, vegetables, and fruits, among which was the yellow pear tomato. In 2001 the Smithsonian Institution in Washington, D.C. completed their heirloom gardens surrounding the National Museum of American History; in this garden, pear tomatoes are featured. Source: Wikipedia
Rain, blessed rain. Finally the thirsty crops are receiving a welcome drink. The ground has been so dry of late. I was speaking with the school's agricultural advisor the other day. Nancy had taken the kids out to the school gardens to take soil samples, she said they went 4 inches deep before they encountered any moisture in the soil. The challenge now is for the soil to absorb the rain and not just let it run off because the ground is impermeable now.
Recipes Today: The following were generated by AI when I googled yellow pear tomato recipes:
Salads and appetizers
- Caprese Salad with Bocconcini: Combine halved yellow pear tomatoes with small fresh mozzarella balls (bocconcini) and fresh basil leaves. Drizzle with olive oil, balsamic glaze, and season with salt and pepper.
- Watermelon and Tomato Salad with Feta: Pair yellow pear tomatoes with fresh watermelon and crumbled feta cheese. Drizzle with orange-infused olive oil and garnish with fresh thyme and sea salt.
- Roasted Tomatoes with Fontina: Halve the tomatoes and toss them in a baking dish with garlic, fresh thyme, and olive oil. Roast until the tomatoes are softened and then add cubes of fontina cheese. Return to the oven until the cheese is melted and bubbly. Serve with crusty bread.
Sauces
- Simple Yellow Tomato Pasta Sauce: Sauté garlic and crushed red pepper flakes in olive oil. Add halved yellow pear tomatoes, basil, and salt, and simmer until the tomatoes have reduced. Blend for a smooth sauce and use it for pasta or pizza.
- Roasted Yellow Tomato Sauce: For a rich, deeper flavor, roast yellow tomatoes, onion, and garlic with olive oil until tender. Puree the ingredients for a smooth sauce that can be used immediately or frozen for later.
Salsa
- Yellow Pear Tomato Salsa: Use yellow pear tomatoes for a mild, sweet salsa. Combine diced tomatoes with red onion, jalapeños, cilantro, and lime juice.
- Peach and Yellow Pear Tomato Salsa: For a unique twist, dice yellow pear tomatoes and mix with peaches, red onion, bell pepper, and cilantro. This salsa pairs well with grilled meats or tortilla chips.
CHILE DE ARBOL SALSA
Source: Chile de Arbol Salsa - Isabel Eats {Easy Mexican Recipes}
By: Isabel Orozco-Moore Made with only 5 ingredients, this Chile de Arbol Salsa is the perfect taco salsa. It's spicy, goes well with Mexican favorites like tacos, tostadas, and gorditas and is even freezer friendly!
Total: 18 minutes; Servings: 20 tablespoons (makes 1 1/4 cup total)
Ingredients
1 ounce árbol chiles, rinsed and stemmed
water, as needed
2 large plum tomatoes, halved
2 cloves garlic
1 teaspoon kosher salt
Instructions
In a medium pot, add the chiles de arbol and enough water to completely cover them. Bring to a boil over high heat.
Remove the pot from the heat, cover, and let the chiles soak for 10 minutes to soften.
Using a slotted spoon, transfer the softened chiles to a blender. Add ¾ cup of fresh water, the tomatoes, garlic, and salt. Blend until completely smooth.
Taste and add more salt as needed.
Summer Share Week 12
We here at the farm wanted to take a moment to say how much we appreciate you traveling this farm life journey with us. Your support means so much and gives us the courage to continue on when it seems as though nature will get the best of us!! Monday marks the ending of summer and the beginning of the Autumn Solstice. Already you can see leaves turning color and showers of them are coating lawns and pathways. Many homes have begun to display their Halloween spirit with blow-up figures and scarecrows galore. As much as I love this time of year I also find it to be bittersweet. Still haven't eaten my fill of summer vegetables, never mind putting up produce for the winter months. Did get a small start on preserving some tomatoes, have to get busy on the beans and corn. Will put most of it up in the freezer. These frozen vegetables will be made available to the Winter CSA when we’re all looking for warm reminders of summer and fall. The farmers have been busy harvesting shell beans and laying them out to dry. If all goes well we’ll have cranberry, white and black beans. This week we provided spaghetti squash even though it is commonly referred to as a winter squash, I think of it more for summer due to its short storage life. I used to tease my Mom that she had scarred me for life the first time she cooked it for us. This was another one of those “new” vegetables Dad started to grow and Mom had to figure out what to do with it. She roasted it and then dumped a jarred sauce from the supermarket over it. I still remember how awful I thought it was and at first wouldn’t ever eat it again. But then I was determined to figure out a way to enjoy this funky vegetable and found that it was quite delicious with fresh tomatoes, or some butter and parmesan cheese. The burrito recipe below is pretty tasty, so if you haven’t had spaghetti squash before I hope you give it a chance and find it as tasty as I do now!!!!
HOW TO COOK SPAGHETTI SQUASH
Source: How to Cook Spaghetti Squash - Recipes by Love and Lemons
Spaghetti squash is such a fun, underrated vegetable! Here is my favorite way to cook it, along with a few tips and recipes
Recipe Tip: If your squash is too hard to cut, soften it slightly in the oven or microwave before slicing it in half.
Option 1: Roast the squash whole. Prick it all over with a fork and bake at 400°F for 10 minutes to make it easier to cut.
Option 2: Microwave the squash. Prick it all over with a fork and microwave in 1-minute bursts until it’s soft enough to cut.
Then, cut the squash in half and proceed with the recipe!
After you slice the squash in half, use a spoon to scoop out the seeds.
Next, drizzle the insides lightly with olive oil and sprinkle with salt and pepper. I find that adding too much oil and too much salt at this stage makes the squash a bit watery, so a light drizzle and a light sprinkle will do.
Then, place the squash halves cut side down on a baking sheet. Poke a few holes in the skin of the squash with a fork, and pop it in a pre-heated 400°F oven.
Once it’s roasted and cool enough to touch, use a fork to scrape the strands. I like to start from the outside and work my way in, fluffing them up as I go.
That’s it! Season it with more salt and pepper and serve it as a simple veggie side dish.
More Spaghetti Squash Recipes
You can also use the cooked squash in your favorite spaghetti squash recipes. Here are two of mine:
Spaghetti Squash with Chickpeas and Kale
Lemon Pesto Spaghetti Squash
BURRITO SPAGHETTI SQUASH BOATS
Source: Best Burrito Spaghetti Squash Boats Recipe - How To Make Burrito Spaghetti Squash Boats
By Lena Abraham
Ingredients
For spaghetti squash:
2 medium spaghetti squash, halved, seeds removed
1 Tbsp. extra-virgin olive oil
Kosher salt
1/2 tsp. chili powder
1/2 tsp. cumin
For filling:
1 Tbsp. extra-virgin olive oil
1/2 onion, chopped
2 cloves garlic, minced
1 lb. ground beef
1 Tbsp. taco seasoning mix
Kosher salt
Freshly ground black pepper
1 (15-oz.) can black beans
1 1/2 cups chopped cherry tomatoes
1 cup corn, canned and drained or frozen
1 cup shredded Monterey jack
1/2 cup shredded cheddar
2 Tbsp. freshly chopped cilantro (optional)
Directions
Step 1: Preheat oven to 400°. Drizzle cut sides of spaghetti squash with oil and season with salt, chili powder, and cumin. Place cut side down on a large, rimmed baking sheet. Roast until tender, 30 to 35 minutes. Let cool slightly. Using a fork, break up squash strands.
Step 2: Meanwhile, make filling: In a large skillet over medium heat, heat olive oil. Add onion and cook until soft, about 5 minutes. Stir in garlic and cook until fragrant, about 1 minute more. Add ground beef, breaking up the meat with a wooden spoon. Cook until beef is no longer pink, about 6 minutes. Drain fat.
Step 3: Stir in taco seasoning, then season to taste with salt and pepper. Stir in black beans, cherry tomatoes, and corn.
Step 4: Fill each spaghetti squash with beef mixture and top with cheeses. Return to oven to melt cheese, 5 minutes. Garnish with cilantro and serve.
Summer Share Week 11
Hope you’ve been enjoying the corn. Unless we experience frost there’s only about 2–3 weeks of that harvest left. Which when frost does make its appearance will be killed off along with most everything summery like the fresh beans, tomatoes, peppers and eggplants. The cooler nights while most welcome are definitely showing their impact on the vegetables, kale is loving it, eggplants and peppers not so much. Lupe was complaining about how slow everything is growing due to the chill in the air.
There’s Cherokee Purple tomatoes today — a rich deep mahogany color whose green shoulders are typical of this heirloom. Some describe this tomato as having a smokey flavor. On the less acidic side it’s considered to be one of the best for tomato sandwiches, sauces and salads!
SUMMER HARVEST VEGGIE SOUP
Source: Summer Harvest Soup With Corn, Zucchini, & Tomatoes « Clean & Delicious; Author: Dani Spies; Makes 4-6 servings.
I think this recipe is one that can be used as a guide for so many variations. Sub frozen for fresh in the winter if needed, winter squash for summer squash, rosemary or sage for basil
Ingredients
1 tbsp. extra virgin olive oil
1 chopped onion
2 cups of peeled diced tomatoes (fresh or canned)
2 medium zucchini chopped
2 cloves garlic minced
4 cups organic low sodium chicken broth
4 ears of corn kernels cut off the cob
1/2 cup fresh basil chopped
1/4 cup grated Parmesan cheese optional
Instructions
1. Heat oil in a large pot over a medium high heat. Add in chopped onion along with a kiss of salt and saut for 5 minutes or until onion is fragrant and translucent.
2. Stir in tomatoes, zucchini, and garlic with one more kiss of salt and some black pepper and cool for 5 minutes. Add in chicken broth, crank up the heat, and let everything come to a boil.
3. Once you have your boil, reduce heat down to a simmer and stir in corn, basil and parmesan cheese (optional). Cook another 3-5 minutes until the zucchini is fork tender and corn still has its fresh pop. Serve and enjoy!!
SOUTHERN TOMATO CRACKER SALAD
Source: https://www.lanascooking.com/southern-tomato-cracker-salad/
If you like a southern tomato sandwich, then you'll fall head over heels for this 15-minute Southern Tomato Cracker Salad recipe!
Author: Lana Stuart; Servings: 4 servings
Ingredients
3 very ripe medium tomatoes
1 cup mayonnaise
1/2 shallot finely minced
40 saltine crackers (1 sleeve)
2 tablespoons chives finely chopped
Kosher salt and ground black pepper to taste
Instructions
1. Start by removing the core, or stem end) of the tomatoes and then cut each in half through the middle or “waist.”
2. Working over a medium bowl or into the sink, press each tomato half gently to get rid of most of the seeds and juice.
3. Dice the tomatoes. Place the diced tomatoes in a large mixing bowl and sprinkle lightly with salt. Remove a few tablespoons of diced tomatoes for garnish and set them aside.
4. Into the bowl with the diced tomatoes, add the minced shallot, half of the chives, black pepper, and mayonnaise. Fold together gently to combine.
5. Crumble the crackers creating mostly large pieces for the best texture.
6. Add the broken saltine crackers to the bowl with the tomato mixture and fold gently to combine.
7. Taste for seasoning and adjust if necessary.
8. Garnish with the reserved tomatoes and remaining chives.
9. Serve immediately.
Notes
This salad is best mixed and served immediately. Leftovers do not store well.
When preparing the tomatoes, try to extract most of the juice to keep the salad from being soggy. It also helps to leave the tomato halves to drain with the cut side down on a paper towel for a few minutes.
Make sure that the pieces of crumbled crackers are fairly large to keep the best texture in the salad. Crumbling them too small will result in a mushy salad.
Look for medium sized tomatoes that are completely ripe. They should be very bright in color but with no bruising or soft spots. I often use Romas for this recipe because they’re less “juicy” than other varieties. Heirloom tomato varieties make a beautiful salad.
Ritz crackers could be subbed giving a rich buttery flavor.
Summer Share Week 10
We gave you an assortment of winter squashes this week — without rain the summer squash was a little too small to harvest. Hopefully we’ll have some other leafy greens soon. The weather is just being a real pill and the plants are feeling the stress. Sweet corn this week is white or yellow. As appropriate for this time of year the corn is exceptionally sweet. If you have the space, the yellow one is good for putting up in the freezer so you can enjoy it later in the cold days of winter! Just strip it off the cob, pop in a zip lock bag and freeze! Tomatoes include the cocktail variety from last week and a small Roma variety called Juliet. I started growing Juliet years ago in homage of my Babcia (Grandmother) whose name was Julia. Babcia was 5 foot tall and a power house! She drove tractor trailers for my Grampa in their trucking business, wearing her chauffeur's cap, leather gloves and a silk scarf made from a parachute used in WWII. She taught me how to pick beans faster than any of the farm workers, bake a great birthday cake and how to treat folks with good old Polish hospitality. Her birthday is coming up, Sept 28th which is also her wedding anniversary — 16 years old and my Grandpa was 18. She always spoke of how the weather was so stormy that day and according to Polish folklore as the weather went so would the marriage, and for Babci and Grampy this was true. As fierce as their arguments were, so was the love that conquered all.
Dragon Tongue Beans aka Dragon Beans, considered a Romano style bean, are uniquely colored with distinctive purple streaks and specks with a cream-colored background. Their pods are edible and they don't have strings like many other beans. They can be eaten raw or cooked. They have a nut-like flavor and are subtly sweet.
DRAGON TONGUE BEAN SALAD RECIPE WITH SPICY HONEY-MUSTARD
Valentina K. Wein
Source: Dragon Tongue Bean Salad Recipe | Cooking On The Weekends
This pretty salad is the perfect summer side dish for barbecues or a vegan main course. Dragon beans are unique and fun to work with. Please note that when steamed, though you'll still see bits of color, the purple will fade significantly.
Ingredients
For the dressing
2 tablespoons sherry vinegar
1 tablespoon Dijon mustard
2 teaspoons honey
1½ teaspoons chili paste
¼ teaspoon salt
a few turns of freshly ground black pepper
3 tablespoons extra virgin olive oil
For the salad
1 pound Dragon Tongue beans, washed and dried, root ends trimmed
2 cups loosely packed mixed micro greens, washed and dried
a few red Thai chile peppers for garnish and added heat if desired
Instructions
For the dressing
1. Add the vinegar, mustard, honey, chili paste, salt and pepper to a small bowl. Whisk until smooth. Gradually add the oil while still whisking. Once it's smooth, set aside. Alternately, put all of the ingredients in a jar and shake.
For the salad
1. Prepare a large mixing bowl with ice water and set it aside.
2. Place a steamer rack into a pot with the water level just below it. Over high heat, bring the water to a boil and then add the beans to the rack, sprinkle lightly with salt and cover. Steam just until they're about 50% more tender, about 3 minutes.
3. Immediately drain and add the beans to the bowl of ice water -- this will help preserve any bits of purple still remaining. Let them sit in the ice water until they're cold, then drain, dry them, and add them to a large mixing bowl.
4. Toss the beans with the micro greens and the dressing.
5. Wash, dry, and slice the red chile peppers in half for garnish (and added heat), if desired. Serve!
ROASTED STUFFED ROMA TOMATOES
Source: Roasted Stuffed Roma Tomatoes : Jawns I Cooked
This recipe reminds me of one of our first tomato harvest festivals. You can use the Juliets and cocktail tomatoes in this weeks share. The recipe also works well with larger roma (plum style) tomatoes.
Ingredients
10-12 small to medium Roma tomatoes
1 cup plain Panko breadcrumbs
3 scallions, thinly sliced
½ teaspoon fresh thyme
½ cup grated parmesan cheese
3 tablespoon olive oil, plus more for drizzling
½ teaspoon garlic powder
¼ teaspoon crushed red pepper flakes
Instructions
1. Preheat oven to 350 degrees.
2. Spray a large ceramic or metal baking dish with cooking spray.
3. Slice the tomatoes in half lengthwise, and remove the seeds and pulp from the center of each with a spoon. Discard seeds and pulp.
4. Lay the tomatoes cut side up in the prepared baking dish.
5. Mix together breadcrumbs, scallions, thyme, parmesan cheese, olive oil, garlic powder and crushed red pepper flakes in a medium bowl.
6. Spoon the breadcrumb filling into each tomato.
7. Drizzle stuffed tomatoes with olive oil.
8. Bake for 30 minutes.
Summer Share Week 9
What a difference a week makes the weather is definitely feeling more fall like with each passing day. The air not only feels different but smells different. Cool nights and warm days have me thinking back to being a kid and how the local farm suppliers would host open houses with fresh pressed cider and cider donuts. Peak harvest would be about now when we’re still harvesting summer crops and the squashes of fall are making their presence known. In this new modern age of farming we are also planting. Gambling that these new plantings will grow in time to be harvested and survive the colder temps of late fall early winter. The sweet corn this week is white, commonly referred to as silver queen. It is a prized corn with a sweetness yet rich corn flavor that rivals most other corn. Historically grown in New Jersey this white corn is also a harbinger of the ending of summer and beginning of fall
CORN SALSA RECIPE
Source: https://www.skinnytaste.com/corn-salsa-with-lime/#recipe
This easy corn salsa made with lime, cilantro and tomatoes are perfect with chips or served over your favorite tacos or burrito bowls!
Ingredients
2 cups cooked sweet yellow corn kernels, cut off the cob, from 3 cobs*
2 small vine ripe tomatoes, seeded and diced
1/2 cup red onion, diced
1 scallion, diced
1 jalapeño, diced (remove seeds for mild)
2 tbsp chopped cilantro
1 fresh lime, juice of
kosher salt and fresh pepper to taste
Instructions
Combine all the ingredients and refrigerate for about an hour. Makes about 3 cups.
Notes
*If using frozen, thaw first.
To boil the corn, place peeled ears of corn in boiling water and cook 5 minutes, then drain and cool.
To microwave the corn, place a wet paper towel around each ear of corn and microwave about 3 to 4 minutes, until the corn is tender.
To grill the corn, place peeled ears of corn on the grill over medium heat and cook, turning until charred, about 10 minutes.
CHARD AND SWEET CORN GRATIN
By Martha Rose Shulman
Source: https://cooking.nytimes.com/recipes/1017637-chard-and-sweet-corn-gratin
Yield: 6 servings
This is the template that I use for most of my main-dish vegetable gratins. I like gratins hot, warm or at room temperature. I fold the aromatic vegetable filling into a mixture of eggs beaten with milk, salt, pepper and cheese, usually Gruyère, and then add rice or, in this case, corn.
Ingredients
Extra-virgin olive oil
1 generous bunch (¾ to 1 pound) Swiss or rainbow chard, stemmed and washed
Salt
2 large garlic cloves, minced
1 teaspoon chopped fresh rosemary
1 teaspoon fresh thyme leaves
Black pepper
3 eggs
½ cup milk
2 to 3 ounces Gruyère, grated (½ to ¾ cup), to taste
Kernels from 2 cooked ears sweet corn (1½ to 2 cups)
1 ounce Parmesan, grated (¼ cup)
Preparation
Step 1: Heat oven to 375 degrees. Oil a 2-quart baking dish or gratin.
Step 2: Blanch chard: Bring a large pot of water to a boil while you stem and wash the chard leaves. When the water comes to a boil, salt generously and add chard leaves. (Set aside stems for another use, or discard.) Blanch 1 to 2 minutes, until tender but still bright. Transfer to a bowl of cold water, then drain thoroughly and squeeze out excess water; chop medium-fine.
Step 3: Heat 1 tablespoon olive oil in a medium skillet and add garlic. Cook, stirring, until fragrant, 30 seconds to a minute, then stir in rosemary, thyme and chopped blanched chard. Season with salt and pepper and stir over medium heat until chard is nicely coated with oil, about 1 minute. Remove from heat.
Step 4: In a large bowl, beat together eggs, milk and ½ teaspoon salt. Stir in chard mixture and Gruyère. Stir in corn and mix well. Scrape into prepared baking dish. Sprinkle Parmesan over top and drizzle with olive oil.
Step 5: Bake 35 to 40 minutes, until nicely browned on the top and sides. Allow to sit for at least 10 minutes before serving.
Tip: Blanched chard and cooked corn will keep up to 4 days in the refrigerator, and cooked gratin will keep for 3 to 4 days.
Summer Share Week 8
So grateful for the current rainfall, a little bit heavy at times but with a breather in between showers so the ground hopefully has a chance to soak in all that goodness. Next we’ll begin another wave of planting, there’s still time for leafy greens, beets and other cool-weather loving vegetables. Very happy for the veggies we harvested this week for you including tomatillos, shishito peppers, cocktail tomatoes and snap beans! The tomatillos are from our own seed that we save on the farm, Lupe was saying how sweet they are! If you’re not familiar with shishito peppers they are a treat! Originating in Japan, these “sweeties” are less hot than a jalapeño for the most part but every one in ten or so packs a wallop! The tomatoes are slightly larger than the standard cherry tomato, referred to as a “cocktail” tomato. This variety called Glacier has good sweetness and a nice level of acidity. And the snap beans a new to us variety called Celine gorgeous purple color with a golden inside! My hometown colorsI used to always grow Royal Burgundy which the kids called Magic Beans because they turn green when you cook them! Haven’t tried them yet so you’ll have to let us know if you think they’re magic beans too!
SHISHITO PEPPERS RECIPE
Source: Shishito Peppers | The Modern Proper; By Holly Erickson & Natalie Mortimer
Only slightly more work than opening a bag of chips, and 1,000 times more exciting, these blistered shishito peppers are the salty, (sometimes) spicy nibble you need in your life.
Ingredients
2 tablespoons extra-virgin olive oil
12 ounces shishito peppers
2 teaspoons lemon zest
2 teaspoons flaky salt
Method
1. Heat the oil in a large skillet over high heat. Once the oil is glistening, add the peppers in a single layer and cook undisturbed until they begin to blister, about 2 minutes. Using tongs, carefully turn the peppers. Cook for 2-3 more minutes, or until softened and blistered all over.
2. Transfer the peppers to a plate and sprinkle with the lemon zest and flaky salt. Serve warm.
Note: It is estimated that one in ten shishito peppers carry a little extra heat. We like to think this is the roulette of the snacking world.
ROASTED CHERRY TOMATOES
Source: Roasted Cherry Tomatoes - Healthy Recipes Blog; Author: Vered DeLeeuw
These sweet-and-tangy roasted cherry tomatoes make a delicious side dish. They are as lovely for brunch as for dinner!
Ingredients
1 pint cherry tomatoes - 2 cups
1 tablespoon fresh garlic - minced
2 tablespoons olive oil - extra-virgin
1 tablespoon balsamic vinegar
½ teaspoon Diamond Crystal kosher salt - see notes below
¼ teaspoon black pepper
½ teaspoon dried thyme
Optional: 2 tablespoons parsley - chopped, for garnish, or cilantro
Instructions
1. Preheat the oven to 425°F.
2. Place the tomatoes in a medium bowl. Add the garlic, olive oil, vinegar, salt, pepper, and dried thyme. Stir to coat.
3. Transfer the tomatoes to a small, 1-quart baking dish.
4. Roast the tomatoes until they are soft and beginning to burst, about 20 minutes. Let them rest for 5-10 minutes, garnish with chopped parsley (if using), and serve.
Notes
* If using any salt other than Diamond Crystal Kosher Salt, including Morton kosher salt, use half the amount listed.
* There's no need to peel and/or slice the tomatoes before cooking them.
* The tomatoes taste better after they've had a chance to rest. So, while it's OK to serve them immediately, it's best to let them rest for 5-10 minutes before serving. You can also serve them after they've cooled to room temperature.
* The leftovers keep well in the fridge, in an airtight container, for 3-4 days. Gently reheat them, covered, in the microwave or serve them cold like antipasti.
BLANCHED PURPLE BEANS WITH AROMATIC GINGER SOY SAUCE 姜蓉豆角
Source: https://theplantbasedwok.com/blanched-purple-green-beans-with-fragrant-ginger-soy-dressing/; Author: Hannah
Tender, delicate green beans seasoned with a simple and aromatic Cantonese soy sauce with ginger and sesame oil. A beautifully understated Chinese dish that works best as a cold appetizer or starter.
Ingredients
10 ounces (280 grams) slender purple beans, yellow wax beans, or green beans, ends trimmed
1 ½ tablespoons vegetable oil, divided
2 tablespoons minced ginger
For the sauce:
2 tablespoons soy sauce
1 tablespoon Shaoxing cooking wine, or water
½ teaspoon sugar
¼ teaspoon MSG, or ½ teaspoon mushroom bouillon powder
½ teaspoon ground sand ginger (optional)*
¼ teaspoon ground white pepper
½ teaspoon sesame oil
Fresh red chile, thinly sliced, for garnish
Instructions
1. Prepare a bowl of ice water. Bring a large pot of water to a boil, then add a generous amount of salt and drizzle in ½ tablespoon of the oil. Blanch the green beans for 50 to 60 seconds, until they turn a vivid color and are crisp-tender. Transfer immediately to the ice water to stop the cooking process and preserve color and crispness. Drain the beans well and pat dry with a clean towel. Arrange the beans in a neat stack on a serving dish. Trim with a sharp knife so that they’re the same length, and discard or eat the ends.
2. In a small saucepan over medium heat, heat the remaining 1 tablespoon oil until shimmering. Add the minced ginger and fry until fragrant and just beginning to brown, about 1-2 minutes. Reduce to low heat and add the soy sauce, Shaoxing wine or water, sugar, MSG, ground sand ginger powder, white pepper, and sesame oil. Bring to a boil and allow to simmer for 1 minute until the sugar is fully dissolved.
3. Pour the sauce on top of the green beans, so that the ginger stays on top and the sauce pools to the bottom. Garnish with a few threads of red chile before serving.
Summer Share Week 7
We did it!!! Finally we harvested some red tomatoes!!! It’s agony waiting for that first harvest to come in!!! I swear the anticipation beats any suspense moment in a movie. I told the farmers to pick anything with color so it’s a pretty random mix that we brought down today. There’s also a mix of frying peppers (the pale yellowish green ones) and sweet bells (glossy green) — just be careful I think a couple jalapenos (the smallest and darkest green ones) snuck their way into the crate! This all screams summer salads to me. I for one am so grateful for the harvest we are bringing in now. Quite a few farmers are lamenting their lack of production. The weather conditions from Spring and early summer seem to have had the greatest impact on the vegetable farmers. A friend of mine cancelled his markets this past weekend because he didn’t have enough produce to supply all of them. Such is the life of a farmer — and we are so grateful you have chosen to travel this journey with us!
CORN SALAD
Source: Summer Corn Salad - Tastes Better From Scratch
This Summer Corn Salad recipe is beautiful and easy, made with fresh or frozen grilled corn, tons of colorful veg and a fresh, light dressing.
Ingredients
6-8 ears corn on the cob
2 Tablespoons olive oil
1/4 red onion, diced
1/2 red or green bell pepper, chopped
1 avocado
Dressing:
1/4 cup olive oil
1/3 cup apple cider vinegar
1 teaspoon sugar
1 teaspoon dijon mustard
salt and pepper
1 small lime, juice from
Instructions
1. Whisk dressing ingredients together and set aside.
2. Cook corn: Add 1-2 inches of water to a large skillet. Bring to a boil. Add corn and cook for 3-4 minutes, rotating to cook on all sides. Drain. Heat grill on medium-high heat. Brush corn lightly with olive oil and grill for a few minutes, rotating it as it cooks, until golden on all sides.
3. Allow corn to cool and then cut corn off of the cob and add to a bowl.
4. Assemble: Add salad ingredients to a bowl and drizzle with desired amount of dressing. Toss to combine.
Notes
Make Ahead Instructions: Make dressing up to 1 week ahead. Chop veggies (excluding avocado) 1-2 day in advance, stored in the fridge with a paper towel under them to absorb excess moisture. Grill corn and cut from the cob up to a day ahead of time, stored in the fridge.
To use frozen corn: Thaw frozen corn and then cook in a skillet on high, until lightly charred.
CREAMY DILL POTATO SALAD
Source: Creamy Dill Potato Salad - Spend With Pennies
Author: Holly Nilsson
This potato salad with the fresh summery flavor of dill is the perfect side for any gathering!
Ingredients
1 pounds red potatoes or yellow potatoes
½ cups diced celery
1 green onions thinly sliced
¼ - ½ cup mayonnaise
¼ - ⅓ cup sour cream
1 tablespoon fresh lemon juice
2 tablespoons chopped fresh dill
1 teaspoon Dijon mustard
Instructions
1. Boil the potatoes until tender (approx. 15-20 minutes). Cool and cut into bite sized pieces.
2. In a large bowl, mix all ingredients except the potatoes.
3. Combine cooled potatoes with dill mixture and refrigerate at least one hour.
CHARD AND SWEET CORN GRATIN
Source: Chard and Sweet Corn Gratin Recipe
By Martha Rose Shulman; Yield: 6 servings
Ingredients
Extra-virgin olive oil
1 bunch (½ to ¾ pound) Swiss or rainbow chard, stemmed and washed
Salt
2 large garlic cloves, minced
1 teaspoon chopped fresh rosemary
1 teaspoon fresh thyme leaves
Black pepper
3 eggs
½ cup milk
2 to 3 ounces Gruyère, grated (½ to ¾ cup), to taste
Kernels from 2 cooked ears sweet corn (1½ to 2 cups)
1 ounce Parmesan, grated (¼ cup)
Preparation
Step 1: Heat oven to 375 degrees. Oil a 2-quart baking dish or gratin.
Step 2: Blanch chard: Bring a large pot of water to a boil while you stem and wash the chard leaves. When the water comes to a boil, salt generously and add chard leaves. (Set aside stems for another use, or discard.) Blanch 1 to 2 minutes, until tender but still bright. Transfer to a bowl of cold water, then drain thoroughly and squeeze out excess water; chop medium-fine.
Step 3: Heat 1 tablespoon olive oil in a medium skillet and add garlic. Cook, stirring, until fragrant, 30 seconds to a minute, then stir in rosemary, thyme and chopped blanched chard. Season with salt and pepper and stir over medium heat until chard is nicely coated with oil, about 1 minute. Remove from heat.
Step 4: In a large bowl, beat together eggs, milk and ½ teaspoon salt. Stir in chard mixture and Gruyère. Stir in corn and mix well. Scrape into prepared baking dish. Sprinkle Parmesan over top and drizzle with olive oil.
Step 5: Bake 35 to 40 minutes, until nicely browned on the top and sides. Allow to sit for at least 10 minutes before serving.
Tip: Blanched chard and cooked corn will keep up to 4 days in the refrigerator, and cooked gratin will keep for 3 to 4 days.
Summer Share Week 6
The weather has been like a breath of fresh air these past few days. The other morning around 3 or 4 AM I had gone out to the greenhouse and the air had that chilly feel to it like when frost is on the way. I shivered a bit as this felt like an omen of what's to come. Noooo ... I thought it’s way too early ... It's only the beginning of August! We’ve barely begun harvesting the crops of summer! I think it was just the break from the fierce heat we have all been enduring, the drop in temps and the heavy dew, even the scent of the air gave a totally different “feel” to the early morning vibe. The cold has slowed down some of the production. I thought for sure we were going to have cherry tomatoes this week but not yet. We do have green tomatoes to get us started and some pretty spectacular eggplant. I made fried green tomatoes with a remoulade sauce for dinner the other night and a batch of ratatouille is planned for tonight. Tomorrow corn is on the menu, I’m thinking of a custard, gelato, and a batch of chowder. Some of this will head to the freezer for a quick dinner in late fall/winter when we need the warm memories of summer to get us through the cold winter nights!
FRIED GREEN TOMATOES WITH REMOULADE
Source: https://tammycirceo.com/fried-green-tomatoes-with-remoulade/#recipe by Tammy Circeo
Fried Green Tomatoes are a southern specialty and yet one more way to use everything from the garden at the end of the season! Serving them with a Remoulade Sauce is the perfect way to serve them as an appetizer, but they do double duty as a side dish for a full Southern meal. Farmer Cheryl: the comments in parenthesis are my revisions — I tend cook with what I have readily available
Ingredients
FOR THE REMOULADE
½ cup mayonnaise
1 Tablespoon Dijon mustard
2 Tablespoons lemon juice
¼ cup dill pickles chopped small (I used our garlic dills)
1 Tablespoon parsley chopped
½ teaspoon paprika (only had smoked paprika so used that)
½ teaspoon garlic powder
½ teaspoon hot sauce like Tabasco (Always have Cholula around, used that)
FOR THE FRIED GREEN TOMATOES
3 large unripe green tomatoes 1-1½ pounds
salt
½ cup flour I use cassava flour as a gluten-free, grain-free option.
1½ teaspoons sea salt
½ teaspoon smoked paprika
½ teaspoon garlic powder
¼ teaspoon freshly ground black pepper
½ cup buttermilk
large egg
½ teaspoon hot sauce
¾ cup fresh bread crumbs, I use homemade sourdough crumbs, but you can use fresh store bought (not dried), or panko. (I didn’t have any bread crumbs or stale bread but I did have graham crackers so I subbed those)
¾ cup medium grind yellow cornmeal very important to use corn meal NOT corn flour
oil for frying (I used a blend of olive oil and sunflower seed oil)
Instructions
1. Make the Remoulade Sauce by stirring all the ingredients together. Store in the refrigerator while frying the green tomatoes.
2. Using a sharp knife, slice the green tomatoes into ⅜-½ inch thick. Place them in one layer on a baking sheet or large platter and sprinkle them with salt. Let them sit for about 30 minutes to draw out some moisture. If you don't have time to do this, it's fine, but it helps the coating to stick better. Gently pat dry with paper towels before coating and frying.
3. Set up your "coating station" using three separate shallow plates. These can be soup plates, pie plates, or dinner plates, or platters.
4. In the first platter, put the flour, smoked paprika, garlic powder, salt, and freshly ground black pepper.
5. In the second platter, put the buttermilk, egg, and hot sauce and mix with a fork or whisk.
6. In the third platter, put the breadcrumbs and fine grind cornmeal.
7. After patting the tomato slices dry with paper towels, place them first in the flour platter, then in the buttermilk platter, and finally in the breadcrumbs and cornmeal mixture.
8. Heat oil in a large skillet over medium-medium high heat. Carefully lay the coated green tomato slices into the heated oil. Fry on the first side 4-6 minutes until golden. Turn once only, and fry on the other side 4-6 minutes. If they are browning too quickly or if the oil starts to smoke, turn the temperature down. It should be about 350°F.
9. Work in batches and remove the fried tomato slices to a paper towel lined cooling rack that is set over a baking sheet.
10. Serve on a bed of lettuces with the Remoulade Sauce.
Farmer Cheryl's Notes: As usual I made too many for dinner so we had the leftovers with eggs for breakfast. When we used to do breakfast on the farm one of our most popular items was fried green tomatoes benedict - substitute the fried green tomato for the english muffin and you’ll never go back to english muffins!!!
MINI EGGPLANT PARMESAN
Source: https://www.foodnetwork.com/recipes/giada-de-laurentiis/mini-eggplant-parmesan-recipe-2063049
Ingredients
Sauce:
1 large clove garlic, peeled and smashed
1 shallot, chopped
1/4 teaspoon kosher salt
1 cup jarred tomato-basil sauce, such as Giada De Laurentiis for Target
1/4 cup finely chopped fresh basil
1 teaspoon dried oregano
1/8 teaspoon dried crushed red pepper flakes
1/4 teaspoon balsamic vinegar
Eggplant:
1/2 cup all-purpose flour
1/4 teaspoon freshly ground black pepper
1 cup panko breadcrumbs
2 large egg whites
2 Japanese eggplants, sliced diagonally into 1/4-inch-thick slices
2/3 cup olive oil
1/2 cup (packed) coarsely grated whole-milk mozzarella
1/2 cup finely grated Parmesan
Small fresh basil leaves, to garnish
Directions
1. For the sauce: Heat the oil in a heavy medium saucepan over medium. Add the garlic, shallots and salt. Stir until fragrant, about 2 minutes. Add the tomato sauce, basil, oregano and crushed red pepper. Simmer the sauce until the flavors blend and the sauce thickens, stirring often, about 5 minutes. Mix in the vinegar.
2. For the eggplant: Mix the flour, salt and pepper in a shallow bowl. Place the panko breadcrumbs in another shallow bowl. Whisk the egg whites in a medium bowl until frothy. Dip each eggplant slice in the flour mixture, then into the beaten egg whites, and then into the panko breadcrumbs to coat completely.
3. Heat the oil in a heavy medium skillet over medium-high heat until hot (the surface will appear to be shimmering), 2 to 3 minutes. Add half of the eggplant slices. Cook until deep golden brown, 1 to 2 minutes per side. Transfer the eggplant to a paper-towel-lined plate. Fry the remaining eggplant. (Can be made 1 hour ahead. Let stand at room temperature.)
4. Preheat a broiler. Toss the mozzarella and Parmesan in a small bowl until well blended. Spread 1 generous teaspoon of the sauce over each eggplant slice. Top with a rounded teaspoon of the cheese mixture; spread out to cover and press lightly to adhere. Transfer the eggplant slices to a rimmed baking sheet. Broil until the cheese has melted, 1 to 2 minutes. Transfer the mini eggplant parmesans to a platter and garnish each with small basil leaf. Let stand 2 to 3 minutes before serving.
Cook’s Note
For a smoother consistency, the sauce can be pureed in a blender or food processor.
Summer Share Week 5
Finally getting some desperately needed rain. It’s been a rough and tumble kind of growing season. Remember back in the Spring we were all crying about how wet it was? So wet we couldn't plant and now we see the consequences of that. Vegetables like sweet corn need to be planted every 7-10 days to ensure a steady harvest now. The current lack of rain has caused our leafy greens to struggle and the early spring conditions of too much rain set our planting cycles behind. A true juggling act of the finest skills! Enjoy the scapes. This is the last until next year! The tomato crop is slowly coming in, our fingers are crossed that we’ll be harvesting cherry tomatoes next week. We picked about a dozen slicing tomatoes the other day.
MARRY ME ZUCCHINI
Source: Marry Me Zucchini
Ingredients
4 medium zucchini, cut into 1-inch half-moons (about 8 cups)
½ teaspoon salt, divided
3 tablespoons oil from sun-dried tomato jar, divided
⅔ cup drained julienne-cut sun-dried tomatoes in oil
1 large shallot, finely chopped (about ⅓ cup)
3 large cloves garlic, finely chopped (about 1½ tablespoons)
1 teaspoon Italian seasoning
½ teaspoon crushed red pepper, plus more for garnish
½ teaspoon smoked paprika
1¼ cups lower-sodium vegetable broth
¼ cup heavy cream
2 ounces cream cheese, at room temperature
½ cup chopped fresh basil, plus more for garnish
2 tablespoons grated Parmesan cheese
Directions
Step 1: Line a large rimmed baking sheet with paper towels. Arrange sliced zucchini, flat-side down, on the prepared baking sheet. Sprinkle with ¼ teaspoon salt; let stand until water leaches out, about 10 minutes. Pat dry with paper towels.
Step 2: Heat 1 tablespoon sun-dried tomato oil in a large skillet over medium heat. Add 4 cups of the zucchini, flat-side down; cook, undisturbed, until browned, about 4 minutes. Flip and cook, undisturbed, until browned on the other side, about 2 minutes. Stir and continue to cook, stirring occasionally, until tender, 2 to 4 more minutes. Transfer to a large plate. Repeat the process with 1 tablespoon sun-dried tomato oil and the remaining 4 cups zucchini. Do not wipe the skillet clean.
Step 3: Heat the remaining 1 tablespoon sun-dried tomato oil in the skillet. Add ⅔ cup sun-dried tomatoes, the chopped shallot and the remaining ¼ teaspoon salt; cook, stirring constantly, until slightly softened, 2 to 3 minutes. Add the chopped garlic, 1 teaspoon Italian seasoning, ½ teaspoon crushed red pepper and ½ teaspoon smoked paprika; cook, stirring constantly, until fragrant, about 1 minute.
Step 4: Stir 1¼ cups broth into the tomato mixture. Bring to a lively simmer and cook, stirring occasionally, until slightly reduced, about 3 minutes. Stir in ¼ cup cream. Return to a lively simmer; stir in 2 ounces cream cheese until melted and combined, about 2 minutes. Remove from heat; stir in ½ cup basil and the cooked zucchini. Sprinkle with 2 tablespoons Parmesan. Garnish with additional crushed red pepper and basil, if desired.
ZUCCHINI BREAD RECIPE
Source: Best Zucchini Bread Recipe - Preppy Kitchen
Author: John Kanell
Try this delicious zucchini bread if you need a quick, simple snack for busy mornings or as an afternoon treat. This recipe makes 2 loaves, so you can freeze one for later!
Prep Time: 10 minutes; Cook Time: 1 hour hour; Cool Time: 5 minutes; Total Time: 1hour, 15 minutes
Servings: 16 servings (2 loaves); Calories: 375kcal
Equipment: (2) 4×8-inch loaf pans; Parchment paper
Ingredients
3 cups all-purpose flour (360g)
1 teaspoon baking soda
1 teaspoon baking powder
1 teaspoon salt
2 teaspoons cinnamon
3 large eggs
1 cup packed light or dark brown sugar (220g)
½ cup granulated sugar (100g)
1 cup vegetable oil (240mL)
4 teaspoons vanilla extract
3 cups grated zucchini (390g)
1½ cups chopped walnuts (180g)
Instructions
1. Preheat oven to 350°F. Line two 8×4-inch loaf pans with parchment paper or spray them with nonstick baking spray.
2. In a large bowl, whisk to combine the flour, salt, baking soda, baking powder, and cinnamon. (I always sift my dry ingredients, but it is not a must-do for this recipe.)
3. In a medium bowl, beat the eggs and both sugars until smooth and lightened in color. Add the oil and vanilla and whisk to combine. Fold in the grated zucchini.
4. Pour the wet mixture into the dry, then stir until only a few dry streaks of flour remain. Add the chopped walnuts and stir gently just until no dry streaks of flour remain.
5. Divide the batter evenly between the two loaf pans and spread it into an even layer. Bake for 55 to 60 minutes, or until a skewer inserted into the center of each loaf comes out clean.
6. Let the loaves cool in the pan for 5 to 10 minutes. Then, turn them out onto a cooling rack to cool completely.
Notes
Zucchini bread is delicious and served warm, but make sure you still allow time for it to cool! If you’re like me and find it hard to wait for the bread to cool completely, be sure to let the bread cool for at least 30 minutes before slicing. If you slice a hot loaf straight from the oven, you can actually smash the crumb texture inside, and it will feel a bit gummy. The loaves need time to release some steam and heat. Once sliced, spread some softened butter on a warm slice for the perfect snack!
Summer Share Week 4
The weather, how it cycles! Too wet, too dry, too hot, too cold. It seems that very few are the just right days, there have been some of them these last couple weeks — light refreshing breezes, sun — not too hot, finished off with some showers in the late afternoon. Right now the fields are dry and we’re keeping a watchful eye on the recently planted crops as they grow. Today the farmers are harvesting onions and potatoes, we need to get them out of the ground while they're dry and before the fall rains settle in.
ELOTE RECIPE
Source: https://tastesbetterfromscratch.com/elote/
Elote, commonly called Mexican Street Corn, is grilled corn smothered in a creamy mayo sauce and topped with chili powder, cheese and lime. Serve it as a snack or side dish for summer BBQ's and potlucks.
Ingredients
4 ears corn, husked
2 Tablespoons mayonnaise
2 Tablespoons Mexican crema, or sour cream
½ cup Cotija cheese , freshly grated, or queso fresco
chili powder, or tajin, to taste
1 lime, quartered
fresh chopped cilantro, for garnish, optional
Instructions
1. Bring a large pot of salted water to a boil over medium-high heat. Add the ears of corn and cook until tender, about 10 minutes (or cook them in the instant pot).
2. (Optional step): Brush corn with melted butter and grill corn on medium heat until slightly charred.
3. Mix the mayonnaise and Mexican crema together and spread a thin layer all around the corn ears.
4. Sprinkle generously with cotija cheese and then desired amount of chili powder. Serve garnished with cilantro, and with a lime wedge on the side for squeezing on top.
5. Enjoy immediately.
PURSLANE (VERDOLAGA) & CORN SALAD
Source: https://lillystable.com/food/recipe/purslane-and-corn-salad
An easy dressing is tossed with the succulent leaves of purslane and sweet kernels of corn. Also called verdolaga, purslane is a common weed gaining culinary popularity at sustainable farms. If you cannot find purslane, baby spinach or watercress will work well instead. Serving Size: 2 People
Ingredients
2 cups purslane
2 ears corn
1 tablespoon lemon juice, or half the amount of white wine vinegar instead
1 teaspoon honey, optional, if your corn is not sweet
¼ teaspoon salt
1 pinch black pepper, to taste
3 tablespoons extra-virgin olive oil
Preparation Instructions
1. Wash and dry the purslane, remove any thick wooden stems although the tiny, delicate stems are tender and tasty.
2. If your ears of corn are not cooked, follow this grilled corn recipe
3. To remove the kernels, stand the corn upright on a cutting board and slice down alongside to cut off the kernels.
4. Whisk together the lemon juice or vinegar, honey, if using, salt, pepper and olive oil.
5. Toss the corn with the dressing first. Fold in the purslane. This can be made in advance since the purslane is a hearty green that stays beautiful even when dressed ahead.
BABY BOK CHOY AND COCONUT CORN
Source: https://wickedkitchen.com/baby-bok-choy-and-coconut-corn/
Today we’re creating a dish packed with bok choy and corn, which is spiked with Thai flavors like coconut, ginger, lime and chili peppers to create a fresh and satisfying meal that’s ready in 30 minutes! We believe that food has the ability to nourish both body and soul, and this dish is a perfect example of that! You can use fresh or frozen corn for this recipe.
Ingredients
1 T plant-based butter
1 medium onion, diced
1 T sliced garlic (about 3 cloves)
1 T ginger, minced
3/4 lb baby bok choy, rinsed and chopped
2 lb corn, fresh or frozen, thawed
1/4 C water chestnuts, sliced
5 oz. coconut cream
2 T sesame oil
2 t coarse salt
2 t black pepper
5 -6 chili peppers (chopped or whole)
1/2 Lime, juiced over top when complete
to garnish (optional)
cilantro
lime wedges
mint
Instructions
1. Preheat oven to 400.
2. On stove top heat saute pan on high heat. Add buttah, onion, garlic and ginger and sauté for 3 minutes.
3. Remove from the heat and set aside.
4. In a large bowl, add bok choy, corn and the rest of the ingredients.
5. Toss to coat, then pour the onion-butter mixture over it and gently toss again.
6. Transfer the mixture to an oven-safe dish, cover with foil, and bake for 15 minutes.
7. Remove the foil, stir and bake for an additional 5 minutes.
8. Serve warm, garnished with cilantro, lime and mint, if desired.
Summer Share Week 3
Every year I obsess over a particular vegetable — this year it seems to be onions. Onions are such an important vegetable, especially in our region. Known as the onion producing capital of the world in the 1920s–30s, our soil is especially productive for onions in particular. When I was a young girl the valley was filled with thousands of acres of onions, the aroma of the green onions and then the ripe ones ready for harvest permeated the air. It seems like Spring was just here and the Valley was filled with workers frantically planting onion plants. Every day was like a tidal wave of green spreading across the rich dark soil, and here we are at harvest time. Everywhere onion harvesters are getting a final tuneup to get the crop in before the fall rains come. Long days become even longer as the work continues into the night. Some farmers have huge floodlights illuminating their fields so they can get their other crops in as well. The harvest waits for no man or woman.
Recipes Today
Onions: I use so many onions when I cook but I can’t help myself. The flavor they bring to a dish is amazing! The onions we sent you today are a yellow onion. You can use the whole plant — sub the green tops for scallions.
Potatoes: We dug these this morning! The flavor of a newly dug potato is beyond comparison. Keep them simple so their flavor shines through — roasted in some olive oil, salt and pepper. If you have access to a grill they are amazing cooked that way! Sheet of tin foil, drizzle of olive oil, sprinkle of salt and pepper.
HOW TO CARAMELIZE ONIONS
Source: How to Caramelize Onions
By Elise BauerCaramelizing onions slowly is the key to bringing out the deep, sweet flavors of their natural sugars. Quantities depend on how much caramelized onions you wish to make. In this example, 5 large raw onions yielded about 2 cups caramelized onions.
Ingredients
Several medium or large onions, yellow, white, or red
Extra virgin olive oil
Butter, optional
Kosher salt
Sugar, optional
Balsamic vinegar, optional
Method
1. Cut the onions root to tip:
Slice 1/2-inch off the stem ends of the onions and the roots off of the root end. Place the onions cut side down on the cutting board. Cut them in half through the root end. Peel back the peels from the onions.
Lay the onions cut side down and make angled cuts into each onion, aimed at the center, cutting almost all the way, but not completely through the root end. Make the cuts to your desired level of thickness.
The root end will help hold the onion together as you cut it, making it easier to cut. Then cut a V in the root end to cut out the tough root holding the slices together.
2. Heat the olive oil and add the onion:
Use a wide, thick-bottomed sauté pan for maximum pan contact with the onions. Coat the bottom of the pan with olive oil, or a mixture of olive oil and butter, if using (about 1 teaspoon per onion).
Heat the pan on medium high heat until the oil is shimmering. Add the onion slices and stir to coat the onions with the oil. Spread the onions out evenly over the pan and let cook, stirring occasionally.
Depending on how strong your stovetop burner is you may need to reduce the heat to medium or medium low to prevent the onions from burning or drying out.
After 10 minutes, sprinkle some salt over the onions, and if you want, you can add some sugar to help with the caramelization process. (I add only about a teaspoon of sugar for 5 onions, you can add more.) One trick to keeping the onions from drying out as they cook is to add a little water to the pan.
3. Stir the onions every few minutes:
Let the onions cook for 30 minutes to 1 hour more, stirring every few minutes. As soon as the onions start sticking to the pan, let them stick a little and brown, but then stir them before they burn.
The trick is to leave them alone enough to brown (if you stir them too often, they won't brown), but not so long so that they burn. After the first 20 to 30 minutes you may want to lower the stove temperature a little, and add a little more oil, if you find the onions are verging on burning.
A metal spatula will help you scrape up the browned bits from the bottom of the pan as the caramelization proceeds. As the onions cook down, you may find you need to scrape the pan every minute, instead of every few minutes.
Continue to cook and scrape, cook and scrape, until the onions are a rich, browned color. At the end of the cooking process you might want to add a little balsamic vinegar or wine to help deglaze the pan and bring some additional flavor to the onions.
Store refrigerated for several days in an air-tight container.
Summer Share Week 2
Hope you all had a great holiday!!! The farm is finally starting to look like a farm! It has been a truly rough spring. I’ve been chatting with farmer friends of mine and to quote Vinny “I DON’T like this year” — the weather has been so unforgiving. I had planned on carrots for you this week but once we harvested them, I didn’t like the way they looked so I pulled them from the delivery. There’s a lot of leafy greens this week, they have been responding well to the prevailing weather conditions. Based on what I’m seeing in the fields we should have cucumbers and zucchini for you next week. New potatoes should be ready pretty soon too. Sweet corn has about 3 weeks or more to go, not sure on how soon tomatoes will be ready. How’s that saying go? Slow and steady wins the race — and if that holds true, we are in the lead!!!!
Dill not just for pickles - 41 Fresh Dill Recipes That Are Dill-iscious | Taste of Home
RECIPE FOR VERDOLAGA (aka Purslane)
Source: Verdolaga, Purslane: The Best Cooked Greens - Adán Medrano
One of our farmers favorite dishes!! Verdolaga (purslane) is cooked with three classic ingredients, tomato, onion and chile.
Ingredients (serves 4)
1 lb Verdolaga, washed and trimmed
1/4 Onion, peeled, sliced thinly, (makes 1/3 cup)
1 Garlic clove, minced
6 cups water
1 Roma Tomato, cut into large cubes
1 Green Chile Serrano, cut into thin slices
1 Tbl Canola Oil
1/4 tsp Salt or to taste
Generous grinding of Black Pepper
Method
1. Wash the verdolaga well and trim away any brown leaves and knotty stems. Place in a saucepan, cover with water and bring to a boil. Cook for 20-25 minutes until the stems are completely soft. After they are cooked, use a slotted spoon to remove the greens, and place them in a strainer to drain. Set the water aside. It is a delicious broth and also makes a great stock.
2. In a skillet, heat the oil, then add the onion, garlic, tomato and chile. Cook for about 3 minutes until the onion becomes translucent.
3. Place the verdolaga on a cutting board and cut it into 2″ lengths.
4. Add the verdolaga to the skillet and cook for a minute. Add 1 1/2 cups of the verdolaga broth, bring to a boil and cook for another 5 minutes. Taste and correct the salt. Add a generous grinding of black pepper.
Serve hot.
NOTE: Sometimes you’ll want to serve it as a soup, so add all of the broth in step #4.
¡Buen Provecho!
Some other resources: 20 Purslane Recipes You Never Knew You Needed - Insanely Good
Our farmers absolutely love this green. I think Lupe took home 2 five gallon buckets of it yesterday. Her niece is coming up to visit from the city and she wanted to treat her to a special dish!
MEXICAN-STYLE SAUTEED GREENS
Source: Mexican-style Sauteed Greens Recipe - Pamela Salzman
Servings: 4
Ingredients
▢1 Tablespoon unrefined, cold-pressed, extra-virgin olive oil
▢½ onion, finely diced
▢1 jalapenño, thinly sliced (remove seeds to make it milder)
▢1 cup cherry tomatoes, halved
▢1 pound kale, stems removed and leaves cut into strips or 10 ounces baby greens such as baby kale, Swiss chard and spinach
▢Sea salt and freshly ground black pepper to taste
▢1 Tablespoon fresh lemon juice
Instructions
1. In a large sauté pan, heat the oil over medium heat. Add the onion and jalapeno and cook until onion is tender and translucent, about 3 minutes.
2. Add tomatoes and cook for another 2 minutes, or until tomatoes just start to lose their shape.
3. Add the greens and a sprinkle of sea salt and black pepper. Cook, stirring frequently, until greens are wilted and just tender. Sturdier greens will take longer than baby greens.
4. Pour lemon juice on top and taste for seasoning. Serve immediately.
Summer Share Week 1
The weather this week really rocked us, the sweltering temperatures took a toll on people and field. I wouldn’t have the farmers work on the worst days, those kinds of conditions drain you to your soul. On the less bad days we started around 5 am and quit around noon. But thankfully this was a temporary blip and today we’re back to cooler, less humid conditions. We can transplant with more confidence that the plants will survive the trauma of being moved from their little pots to the big fields outdoors.
COLESLAW RECIPE
Source: Best Coleslaw Recipe (with the Perfect Dressing) | The Kitchn
This recipe reminded me of how my Mom used to make her coleslaw.
Ingredients
For the coleslaw:
10 cups finely shredded green or red cabbage (from 1 small cabbage, about 2 to 2 1/2 pounds), or a combination
1 tablespoon kosher salt (optional)
3 large carrots, peeled and grated on the large holes of a box grater (about 3 cups)
1 medium bunch scallions, thinly sliced (about 1 1/2 cups) (optional)
For the dressing:
1/2 cup mayonnaise
1/2 cup buttermilk
2 tablespoons apple cider vinegar
1 to 2 tablespoons honey or granulated sugar
2 teaspoons Dijon or coarse ground mustard
1/2 teaspoon celery seeds
1/2 teaspoon kosher salt, plus more as needed
1/4 teaspoon freshly ground black pepper, plus more as neede
Instructions
1. Place 10 cups shredded cabbage in a large bowl. Alternatively, salt the cabbage (optional, but it helps it stay crisp a little longer): Transfer the cabbage to a colander, sprinkle with 1 tablespoon kosher salt, and toss to combine. Place the colander on a plate or in the sink and let the cabbage sit for 30 to 60 minutes. Squeeze as much moisture as you can from the cabbage with your hands, then transfer to a large bowl.
2. Add 3 peeled and grated large carrots and 1 medium bunch thinly sliced scallions (if using) to the bowl of cabbage.
3. Place 1/2 cup mayonnaise, 1/2 cup buttermilk, 2 tablespoons apple cider vinegar, 1 tablespoon honey or granulated sugar, 2 teaspoons Dijon or coarse ground mustard, 1/2 teaspoon celery seeds, 1/2 teaspoon kosher salt, and 1/4 teaspoon black pepper in a medium bowl and whisk to combine.
4. Add the dressing to the cabbage mixture and toss to coat. Taste and season with more salt, pepper, and up to 1 tablespoon more granulated sugar or honey as needed. Serve immediately or cover and refrigerate for up to 3 hours before serving.
Recipe Notes
Coleslaw mix: About 13 cups coleslaw mix can be substituted for the cabbage and carrots.
Make ahead: The vegetables and dressing can be prepared and refrigerated in separate airtight containers for up to 1 day ahead. Alternatively, the coleslaw can be dressed, covered, and refrigerated for up to 3 hours before serving.
Storage: Leftovers can be refrigerated in an airtight container for up to 3 days.
CABBAGE PANCAKES (OKONOMIYAKI)
Source: Cabbage Pancakes (Okonomiyaki) - Healthy Recipes Blog
These savory cabbage pancakes are served with a delightfully spicy dipping sauce.
Ingredients
Dipping Sauce:
4 tablespoons sour cream
1 tablespoon reduced sodium soy sauce - or a gluten-free alternative
1 teaspoon hot sauc
Pancakes:
8 ounces cabbage - shredded
4 scallions - large, sliced; ½ cup
½ cup superfine almond flour - or ¼ cup of all-purpose flour if you don't mind the carbs/gluten.
4 large eggs
1 tablespoon reduced sodium soy sauce - or a gluten-free alternative
¼ teaspoon black pepper
1 tablespoon fresh garlic - minced
2 tablespoons avocado oil - for frying
Instructions
1. Prepare the dipping sauce by mixing its ingredients (sour cream, soy sauce, and hot sauce) in a small bowl. Set aside.
2. In a large mixing bowl, mix together the raw cabbage, scallions, and almond flour.
3. In a small bowl, whisk together the eggs, soy sauce, black pepper, and garlic.
4. Stir the egg mixture into the cabbage mixture. Mix well.
5. Heat a nonstick double burner griddle or two large nonstick skillets over medium-high heat for 2-3 minutes. Add 1 tablespoon of oil to each skillet and brush to coat.
6. Scoop the mixture onto the griddle using a 4-tablespoon scoop (or measuring cup) per pancake. Flatten with a spatula.
7. Cook the pancakes until browned on both sides, about 3 minutes per side.
8. Serve immediately with the dipping sauce.
Notes
* It's fine to use a pre-shredded coleslaw mix rather than chop a whole cabbage. I do recommend giving the mix an extra quick chop, especially if it's coarsely shredded. You want fairly fine shreds in this recipe.
* These pancakes make an excellent appetizer or side dish, but they are also hearty enough to serve as a meatless main dish if you serve four per person instead of two. Sometimes, I serve them with fried eggs for a delicious meatless meal.
* The spicy dipping sauce is phenomenal. Please make it and use it! Without it, the pancakes are very good. With it, they are amazing.
* You can keep the leftovers in an airtight container in the fridge for 3-4 days. I reheat them in the microwave or eat them cold. You can also freeze them in freezer bags, separating layers with wax paper.
Spring Share Week 13
Finally the weather seems to be behaving in a more seasonal pattern. Had the farmers come in super early today so they will be able to get out super early as well. The heat in the fields can get pretty fierce, I often wonder which is hotter the line in the kitchen or the beds in the fields. Either way it’s HOT!!! Lots of water, broad brimmed hats and fresh fruits are on call for the day. The weeds are equally fierce in part because we don’t spray and that hiccup with the tractor earlier put a strain on the fields, but there is one thing we can count on: the weeds will thrive and survive!!! Thank you for sharing this spring harvest with us, we are so looking forward to summer and fall!!!
Some new vegetables today:
This might be the last of asparagus due to the extremely warm weather. But we are very excited for the Teenage lettuce and garlic scapes!
Garlic scapes are the long, seed stalk that grows from the top of hardneck garlic. When it comes to cooking with garlic scapes, they make a great substitute for green beans in stir-fries. Use them in omelets, frittatas, homemade pesto, vinaigrettes, on pizzas, or mixed in a compound butter for a touch of mild garlicky flavor. Some even prefer them sautéed with a little butter or grilled (as you would with green onions) for a simple, garlicky side.
How to Store Garlic Scapes
Like green onions, garlic scapes will last for several weeks in the crisper drawer of your fridge. Store them loosely in a plastic bag that's slightly open.
PASTA WITH GARLIC SCAPES
Source: https://www.allrecipes.com/recipe/259160/pasta-with-garlic-scapes/ Original recipe (1X) yields 2 servings
Ingredients
1 (8 ounce) package dried spaghetti
½ cup extra-virgin olive oil
4 garlic scapes, tops trimmed and stems finely chopped
3 tablespoons chopped fresh parsley (Optional)
salt and ground black pepper to taste
1 tablespoon freshly grated Parmesan cheese
Directions
Step 1: Fill a large pot with lightly salted water and bring to a rolling boil. Stir in spaghetti and return to a boil. Cook uncovered, occasionally stirring, until tender yet firm to the bite, 9 to 11 minutes. Drain.
Step 2: Heat olive oil in a deep skillet until hot. Remove from heat and add garlic scapes; let stand for 3 minutes. Mix in parsley. Season with salt and pepper. Serve over drained spaghetti sprinkled with Parmesan cheese.
CSA VEGETABLE SOUP WITH KALE, CHARD, AND GARLIC SCAPES
Source: https://www.allrecipes.com/recipe/274253/csa-vegetable-soup-with-kale-chard-and-garlic-scapes/
A nutritious soup made from the seasonal vegetables in our CSA bag. When veggies are overly abundant we make them into soups and sauces so as to not waste any of these fresh and wonderful foods.
Original recipe (1X) yields 8 servings
Ingredients
6 green onions, chopped
2 garlic scapes, chopped
½ cup olive oil
1 head lettuce, separated into leaves
1 bunch rainbow chard, trimmed and rinsed
1 bunch kale, stems removed
2 cups vegetable broth
1 tablespoon dried savory
1 tablespoon dried marjoram
salt and ground black pepper to taste
Topping:
1 cup Greek yogurt
1 tablespoon Italian seasoning
Directions
Step 1: Puree green onions and garlic scapes in a food processor.
Step 2: Heat oil in a large soup pot over low heat. Add the onion-garlic mixture and cook until it starts to dry out, 2 to 3 minutes.
Step 3: Puree lettuce, chard, and kale in the food processor. Add to the pot and cook for 4 to 5 minutes. Pour in vegetable broth; season with savory, marjoram, salt, and pepper. Simmer until kale and chard are softened, 40 to 45 minutes.
Step 4: Mix Greek yogurt and Italian seasoning together. Serve soup in individual bowls; garnish each with a generous dollop of the topping.
Cook's Notes:
* You can substitute 4 cloves fresh garlic for the garlic scapes.
* Use any broth you prefer.
* Substitute any seasoning blend for the Italian as desired.
Spring Share Week 12
The farmers are frantically weeding — it seems like we no sooner clear a row of weeds than it's covered again. Crops like onions need a lot of TLC as their leaf structure isn’t capable of crowding out weeds and protecting the plants we want. Plants like potatoes and tomatoes are so large and bushy once we clear the weeds one or two times they’ll take care of themselves. And then of course cucumbers and squashes — those creeping vines will quickly suffocate any unwanted intruders in the beds! Wish you could join us on a day like today. Yes, it’s a bit steamy and toasty, and as the weather forecaster called it a “beachy day,” but the warm air feels like summer and in the heat I swear you can see and hear the plants growing.
Some new greens today: Garnet Giant Mustard Flowers are tender and sweet in stir-fries! An ancient variety first cultivated for seed in northwest Asia with a spicy mustard flavor. Red Lace Mustard Greens are aromatic and flavorful, a beautiful salad green. Cilantro Macho is often used in Latino and Asian cooking for its bold, vibrant flavor and ability to withstand heat. Kale may be curly or Red Russian.
MUSTARD GREEN SALAD RECIPE
Source: https://www.tastingtable.com/1248360/mustard-green-salad-recipe/
Add some variety to your usual salad lineup with this recipe for mustard green salad that uses chopped apple, fresh dill, and a lemony dressing.
Ingredients
1 bunch mustard greens
1 green apple
½ cup fresh dill
1 lemon, divided
½ teaspoon salt, divided
3 tablespoons olive oil
2 tablespoons apple cider vinegar
1 tablespoon maple syrup
1 teaspoon Dijon mustard
¼ teaspoon pepper
Directions
1. Strip the mustard greens from their stems. Wash them and lay them in a colander to drain. Chop the mustard greens, then lay a paper towel or tea towel in a large bowl and place the greens on top. Dry them off with the towel. Squeeze half the lemon over the greens and add ¼ teaspoon salt. Massage the greens with your hands for a minute or two.
2. Chop the apple and dill and set aside.
3. In a small bowl, whisk together the other half of the lemon, the remaining salt, olive oil, vinegar, maple syrup, mustard, and pepper.
4. Now add the apple and dill to the greens and toss with dressing. The mustard green salad is ready to serve.
BARLEY SALAD WITH GREEN GARLIC AND SNAP PEAS
Source: Barley Salad With Green Garlic and Snap Peas | The Kitchn
Serves 4-6
Ingredients
1 cup hulled barley
3 cups water
2 stalks green garlic (white and light green parts only), cut into 1-inch pieces* or 1 bulb baby
2 tablespoons toasted almonds
1/4 cup extra virgin olive oil
2 teaspoons lemon juice
1 teaspoon lemon zest
Coarse kosher salt
8 ounces sugar snap peas
2 tablespoons torn mint leaves
Instructions
1. Cook and cool barley: Combine barley and water in a saucepan and bring to a boil. Cover, reduce heat, and simmer until tender, about 1 to 1 1/2 hours. Cool completely.
2. Make green garlic sauce: Blend green garlic, almonds, olive oil, lemon juice and zest, and 1 teaspoon salt in a food processor or blender until smooth. If the mixture is very thick or dry, mix in 1-2 tablespoons of water.
3. Blanch sugar snap peas: Have ready a large bowl of ice water, a slotted spoon, and a plate lined with a cloth or paper towel. Bring a pan of water to boil over high heat. Add a tablespoon of salt and the snap peas and boil just until bright green and crisp, about 30 seconds to 1 minute. Quickly remove the snap peas with a slotted spoon and plunge them into the ice bath. When the peas are completely cool, remove them from the ice bath and drain on the towel-lined plate. Cut the snap peas lengthwise on the diagonal.
4. Assemble salad: In a large bowl, combine barley and green garlic sauce. Then mix in snap peas and mint. Season to taste and serve immediately or keep covered in the refrigerator.
*Note: Green garlic is much more mild than mature garlic and we like it just fine raw. However, if you prefer, it can be blanched first to mellow out the flavor.
Spring Share Week 11
No spinach this week, the weather finally caught up with us and wrecked the crop. Insane amounts of rain combined with temperatures reeling like a roller coaster were more than some of the vegetables could handle. Last week by Saturday morning the fields were flooding, the ditches were overflowing and by Monday, as if in a crime scene, the water was flowing away leaving faint ribbons of glimmering trails that provided evidence of what was. On a positive note we now have good conditions to transplant peppers and tomatoes in the fields. Lupe and Benito are putting out hundreds of plants today. It’s a bit warm but that’s temporary and with more rain on the way the transplants should set themselves up well for a good growing season. "Mmmm ..." I can already taste the ripe delicious tomatoes that are soon to be.
KALE STEM PESTO from The CSA Cookbook
Source: Vegan Kale Stem Pesto from The CSA Cookbook - Healthy Slow Cooking
Yield: 6 servings; Prep Time: 10 minutes; Total Time: 10 minutes
How many kale recipes have you come across in which the directions tell you to reserve the stems for “another use” or even discard them altogether? Well, friends, this is your other use. Those rigid stems and ribs we often remove are the star of the show here, and they’re every bit as fresh and earthy as their leafy counterparts. Used raw, they’re a great pairing for the tangy lemon in this pesto. You’re not solely limited to kale stems, either; try this with your other neglected stems, such as collards, cauliflower, or broccoli.
Ingredients
1 cup chopped kale stems
1/2 cup packed fresh parsley with stems
1/2 cup toasted walnuts
3 garlic cloves
1/2 teaspoon kosher salt
1/4 teaspoon red pepper flakes
Zest of 1 lemon
Juice of 1/2 lemon
1/4 to 1/2 cup olive oil
Instructions
1. Add all the ingredients except the oil to a food processor and pulse until crumbly, scraping down the sides of the bowl with a rubber spatula as needed.
2. Continue pulsing and add the oil in a slow, steady stream until well blended. Some people like their pesto super smooth, but I prefer a bit of texture, so process to your liking.
3. For a thick paste that you can spread onto sandwiches and pizzas, use only ¼ cup of oil. For a thin sauce that you can stir into pastas and soups, use a full ½ cup.
RADISH HUMMUS
Source: https://mollyshomeguide.com/fresh-radish-hummus-57141/
Ingredients
2 cups sliced radishes
1/2 tablespoon tahini
Juice from half a lemon
1 garlic clove
1/4 teaspoon sea salt
1/3 cup olive oil
Instructions
Step 1: Prepare the Radishes for Roasting
Preheat your oven to 400 degrees Fahrenheit to get it ready for roasting. Remove any stalks from the radishes and arrange them evenly across a shallow baking tray. Drizzle the radishes with a little olive oil to ensure they roast well.
Step 2: Roast the Radishes
Place the baking tray with radishes into the preheated oven. Roast them for about 20 minutes or until they become tender.
This roasting process will enhance the flavor of the radishes and prepare them for blending.
Step 3: Blend the Ingredients
Once the radishes are roasted to perfection, transfer them to a food processor. Add tahini, lemon juice, garlic, and a bit more oil to the processor. Blend all of these ingredients together until the mixture is thick and creamy, ensuring everything is well combined.
Step 4: Season and Adjust the Texture
Taste the blended mixture and season it to your liking with salt and pepper. If you prefer a thinner texture, gradually add more oil and continue blending until it reaches your desired consistency. Taste again and adjust the seasoning if necessary.
Step 5: Serve and Garnish
Transfer the creamy mixture to a serving dish. Optionally, you can drizzle it with extra oil for added richness and sprinkle with sesame seeds for a touch of crunch and visual appeal.
Enjoy your delicious roasted radish dip!
Spring Share Week 10
Finally we got the tractor tire back and the mechanic installed it. Looks great!! Now begins the frantic scramble to get the field work caught up. The weeds have been growing steadily without the tools to keep them in check and we fell behind in planting as we couldn’t properly prepare the ground and mark rows for the seeds. On a positive note the weather conditions haven’t been exactly stellar so the reality is that we aren’t that far behind. With the moisture in the soil from all the rain, some warmer weather soon we won’t know which direction to turn with all the harvesting to do!! Head lettuces, mustard greens, leaf lettuces are all progressing nicely and we expect them to be ready in the next couple weeks!
Frequently Asked Questions
Source: Sautéed Asparagus with Sugar Snap Peas Recipe
How much of the asparagus stalk is edible?
All of an asparagus stalk is technically edible, but trimming off the bottom inch or so safeguards against encountering any unpleasant woodiness in the finished dish, especially for thicker stalks. If you're concerned the skin will be tough, you may also want to peel the bottom halves of the stalks, though this isn't necessary.
Do you have to peel sugar snap peas?
The beauty of sugar snap peas is that there's virtually no prep required beyond giving them a rinse. The whole pod can be eaten, but feel free to cut off the stem end and remove the string from the side to ensure your finished dish doesn't contain any fibrous bits, especially if the sugar snap peas are to be eaten raw.
ASPARAGUS SALAD WITH RADISH AND SUGAR PEAS
Source: https://www.wyseguide.com/asparagus-radish-snap-pea-salad/#wprm-recipe-container-37627
Filled with asparagus, radish and sugar pea, this salad is full of fresh spring-time flavors. A homemade vinaigrette completes the vibrant flavors in this salad.
Ingredients
For the vinaigrette
1 cloves garlic minced
1/2 tsp kosher salt
1/4 tsp freshly ground black pepper
1 1/2 tbsp fresh lemon juice
1 tbsp white wine vinegar
1 tbsp Dijon mustard
3 tbsp olive oil
For the salad
1/2 lb asparagus
1/2 lb sugar peas
1/2 lb radish
¼ cup minced fresh dill
¼ cup chopped fresh parsley
Instructions
Step 1: Prepare the vinaigrette by adding the minced garlic to a bowl with the salt, black pepper, lemon juice, vinegar, and Dijon mustard. Whisk to combine and slowly add the olive oil, whisking until fully incorporated. Set aside.
Step 2: Bring 6 quarts of water to a boil and add 1 tablespoon kosher salt.
Step 3: Cut rinsed asparagus spears into thirds or fourths and cut sugar peas in half or thirds, making them bite-size.
Step 4: Prepare a large bowl of ice water and set aside.
Step 5: Blanch prepared asparagus and sugar peas in the boiling water for 2 minutes or until the vegetables are just slightly softened but still crunchy. Remove from water and immediately put in prepared ice water.
Step 6: While chilling, slice the radish, mince the dill, and chop the parsley.
Step 7: Drain the asparagus and sugar peas. It helps to lightly dry with a kitchen towel to ensure the vinaigrette adheres.
Step 8: Pour the drained vegetables in a large bowl along with the radish, dill and parsley.
Step 9: Pour the prepared vinaigrette over salad and stir.
SUGAR SNAP PEAS WITH SIZZLED SCALLION OIL AND LEMONY YOGURT
Source: Sugar Snap Peas with Sizzled Scallion Oil and Lemony Yogurt - Carol Bee Cooks
Servings: 4
Crispy-tender sugar snap peas are layered over lemony Greek yogurt and finished with a garlicky scallion chili oil and plenty of fresh herbs. This vibrant, veggie-forward recipe works as an appetizer, snack, or refreshing side dish. Serve with pita bread, pita chips, or alongside your favorite protein.
Ingredients
Sizzled Scallion Oil
1/3 cup Olive Oil, plus a drizzle for sautéing the sugar snap peas
2 cloves Garlic, minced
1/2 tsp Red Pepper Flakes
1/2 tsp Gochugaru , see note 1
2 Scallions, thinly sliced (top and bottom parts divided)
Other Ingredients
8 oz Sugar Snap Peas, see note 2
2 cups Full Fat Greek Yogurt, see note 3
1 tbsp Lemon Juice, adjust to taste
1 tbsp Lemon Zest, adjust to taste
1/4 cup Fresh Herbs, more or less to taste; I used a combination of chopped fresh basil and mint
1/4 tsp Sumac, optional
Kosher Salt & Black Pepper, to taste
Instructions
1. Add the olive oil, minced garlic, red pepper flakes, gochugaru, and the thinly sliced lighter green bottom section of the scallions to a small pot. Reserve the darker green top section of the scallions for serving.
2. Heat the pot over medium-low heat and cook, stirring every couple of minutes, until the garlic, chili flakes, and scallions start to sizzle. The oil should turn a bright orange-red color. Be careful not to let the garlic burn. Once fragrant and sizzling, remove from heat and let cool slightly. Season with Kosher salt and black pepper to taste.
3. Meanwhile, heat a drizzle of olive oil in a large pan over medium-high heat. Add the sugar snap peas and cook, stirring occasionally, for about 3 minutes, until they’re bright green, slightly tender, but still crisp.
4. In a bowl, mix the Greek yogurt with about 1 tablespoon of lemon juice and a pinch of Kosher salt. Taste and adjust with more lemon juice and salt as needed, until the yogurt is bright and well-seasoned.
5. Spread a thick layer of the Greek yogurt onto a shallow bowl or plate. Spoon about half of the scallion chili oil over the yogurt. Arrange the sautéed sugar snap peas in an even layer on top. Drizzle the remaining scallion oil over the peas, then finish with lemon zest, chopped fresh herbs, the thinly sliced darker green tops of the scallions, and a sprinkle of sumac, if using.
6. Pair with pita bread, pita chips, or the dipper of your choice if serving as an appetizer or snack. Alternatively, serve alongside your favorite protein.
Note 1: I used 1/2 tsp red pepper flakes and 1/2 tsp gochugaru. I find red pepper flakes are spicier, while gochugaru provides a subtle heat, additional flavor, and a pop of bright red color. If you don’t have gochugaru, you can substitute aleppo pepper for a similar effect.
Note 2: Snap off the stem end of each sugar snap pea and remove the string that runs along the side of the pod by pulling it off. This ensures a smoother texture and easier eating. Additionally, if you are serving this as a dip, you can slice the sugar snap peas in half or into even smaller pieces for more bite-sized pieces. If you are serving as a side dish, you can leave the sugar snap peas whole or cut in half if desired.
Note 3: I used full-fat Greek yogurt for its creamy texture and rich flavor. Labneh, a thick, creamy Middle Eastern strained yogurt is another great option. You can use any other yogurt you prefer, but keep in mind that the consistency and taste will vary slightly depending on the choice.
Spring Share Week 9
Fingers crossed — the tire place promised us the tire for the tractor would be ready today. It’s taken almost two weeks to get all the parts and do the modifications so the mechanic can install the tire on the tractor and we can push up the field work. The weeds are growing like crazy and threatening to outpace the vegetables. Once we have the tractor back in service we’ll be able to use our mechanical weeders, the multivator and tillivator, to clear out the furrows in between the rows. Then the farmers can focus on the weeds in between the plants. Without the tractor we’ve had to use hand hoes and our hands much more intensively. Having mechanical tools in use will take so much pressure off the farmers and the plants will be less stressed too.
SPICY COLLARD GREENS WITH BOK CHOY
Source: Spicy Collard Greens with Bok Choy Original recipe yields 6 servings
These kicky, smoky vegetarian collards cook low and slow and have some bok choy mixed in for a fresh twist. Be sure to serve them with their flavorful juices, known as potlikker.
Ingredients
2 tablespoons butter
8 ounces bok choy, sliced 1/2 inch
⅔ cup chopped onion
1 - 2 jalapeños, seeded and finely chopped
1 teaspoon liquid smoke
1 teaspoon hot sauce
1 bunch collard greens, stemmed, cleaned and sliced (4 cups)
2 cups water
1 tablespoon vegetarian chicken-flavor bouillon granules or base
1 teaspoon granulated garlic
½ teaspoon black pepper
Directions
Step 1: In a large saucepan, melt butter over medium. Add bok choy, onion and jalapeño. Cook and stir until tender, 5 to 8 minutes. Add liquid smoke and hot sauce, stirring to scrape up any browned bits from bottom of the pan.
Step 2: Add collard greens, the water, bouillon granules, granulated garlic and black pepper. Bring to a boil; reduce heat. Simmer, covered, until greens are fork-tender, stirring occasionally, 1 to 1 1/4 hours.
SOUR CREAM AND CHIVE (ONION) DROP BISCUITS
Source: https://cooking.nytimes.com/recipes/1026431-sour-cream-and-onion-drop-biscuits
Ingredients
2½cups / 345 grams all-purpose flour
1 tablespoon baking powder
1 tablespoon sugar
2 teaspoons kosher salt
¾cup / 173 grams cold unsalted butter, cut into ½-inch pieces
2 ounces finely grated Parmesan (about 1½ lightly packed cups)
½ cup thinly sliced chives
1 cup / 240 milliliters cold, vigorously shaken buttermilk
Preparation
Step 1: Heat the oven to 400 degrees. Line two large (13-by-18-inch) baking sheets with parchment paper and set aside.
Step 2: Whisk together the flour, baking powder, sugar and salt in a large bowl. Add the butter, then, using a pastry cutter or large fork, cut the butter into the flour to form pea-size pieces. Alternatively, use your hands to quickly pinch the butter into the flour mixture until the mixture resembles coarse crumbs.
Step 3: Add the Parmesan and chives and toss to combine.
Step 4: Drizzle in the buttermilk and stir with a flexible spatula until the dough is combined. The dough should look moist but still very lumpy.
Step 5: Scoop the dough into 10 equal portions (about ⅓ cup each) and place onto the prepared baking sheets, spacing them apart evenly.
Step 6: Bake until golden brown, 23 to 24 minutes. Let cool slightly on the baking sheets before serving. The biscuits are best enjoyed while they are still warm.
Spring Share Week 8
Ugh! 3 inches of rain Friday, silver ribbons of rainfall fill the furrows and basements become wading pools. Some of the crops on other farms in the valley are starting to die — I know of one farmer who lost their spinach crop. This was due in part to their use of chemicals in their operation. Spray that was put out on Wednesday washed down into the soil and the roots soaked up all that liquid. By Monday the plants were mush. This is where I am so thankful we don’t use those kinds of practices on our farm, our spinach is thriving and I swear that from one day to the next it’s nearly doubling in size!
RAPINI RIPASSATI (GARLICKY TWICE-COOKED BROCCOLI RABE)
This recipe was developed by Liz Mervosh; the text was written by Cheryl Slocum
Published on April 16, 2025 Food and Wine
Simmer rapini (also known as broccoli rabe) in garlicky olive oil for a stunning side dish. The twice-cooked vegetable becomes the definition of tender, and the method brings out its sweet notes.
The concept of this dish is revealed in its name, ripassati, which translates from Italian to “over again” and refers to the twice-cooked stalks of broccoli rabe that are first boiled until tender and then further cooked in an emulsion of chicken stock and garlic-infused olive oil. Don’t be shy about essentially overcooking the broccoli rabe; their characteristic bitterness is tamed slightly from the longer cook time, and the softened vegetable is able to absorb more sauce. Start with bunches of broccoli rabe with firm stems and dark green florets and leaves — the freshest you can find — so they will hold up under the two-stage cooking process. In addition to broccoli rabe, you can cook any sturdy vegetable this way, from cauliflower to beet greens, romanesco, and broccoli.
Ingredients
1/3 cup olive oil
6 garlic cloves, thinly sliced (about 2 tablespoons)
1/4 teaspoon crushed red pepper
1/4 cup unsalted chicken stock can sub vegetable stock
1 pound broccoli rabe, woody ends trimmed
1/4 teaspoon kosher salt, plus more to taste
Directions
1. Bring a medium pot of salted water to a boil over high.
2. Meanwhile, combine oil and garlic in a large skillet over medium, and cook, swirling skillet often, until garlic turns light golden brown, 4 to 5 minutes. Stir in crushed red pepper; cook, swirling skillet constantly, until red pepper blooms, about 15 seconds. Remove from heat, and stir in chicken stock.
3. Add broccoli rabe to boiling water in pot; cook, stirring occasionally, until a paring knife easily pierces the thickest portion of stems, 3 to 4 minutes.
4. Remove broccoli rabe from water using a slotted spoon or a spider, and hold over pot for a few seconds to drain as much water as possible. Transfer broccoli rabe to oil mixture in skillet; return to heat over medium-high. Add salt; cook, stirring occasionally, until liquid is reduced and broccoli rabe is very tender and coated in oil mixture, 4 to 8 minutes. Season to taste with additional salt. Transfer broccoli rabe to a platter; drizzle with oil in skillet.”
Note: I really enjoy this as a sauce over polenta or pasta toss with some freshly grated parm, a slice of crusty bread and I’ll even enjoy it for breakfast with a poached egg or two!!! It’s also yummy with a savory Italian sausage on the side!
Spring Share Week 7
The whole region is looking like a lush rainforest. Along with the vegetables come the weeds. Still waiting on parts for the pto so we can use the multivator and tillivator. These tools make quick work of the weeds, we still have to get in between the plants with our hands and hoes but the furrows are readily dispatched of unwanted growth with the use of machines. Potatoes and onions are being planted in the fields and cauliflower and broccoli are being seeded out in the greenhouse. So much depends on timing, first planting, second planting, third, fourth and so on. Some crops like winter squashes and potatoes are one shot wonders, you get one chance to plant so you better get it right the first time and hope and pray that Mother Nature smiles kindly on us all.
BEET RISOTTO WITH SEARED BABY BOK CHOY
Source: https://theveganette.blogspot.com/2011/04/beet-risotto-with-seared-baby-bok-choy.html
BEET RISOTTO
Ingredients
8 cups vegetable stock, heated
2 Tbs olive oil
2 Tbs margarine
2 medium yellow onions (diced finely)
4 cloves garlic (diced finely)
2 1/2 cups arborio rice
1 cup dry white wine
5 Tbs. fresh parsley (chopped)
1 Tbs. dried basil
5-6 small/medium-sized beets (peeled and grated)
3 cups chopped greens (any kind- kale or beet work well)
zest of 1 lemon
juice of 1 lemon
Instructions
Heat up the stock and keep it over low heat on a back burner. Heat up the margarine and oil in a large soup pot over low heat. Add the onion and saute for 5 minutes. Add the garlic, and stir for 2 more minutes. Add the rice and toast for a minute or so, stirring constantly. Add the wine and stir till absorbed. Add the parsley, basil, beets, and greens alongside a few cups of stock. Simmer till absorbed. Add the rest of the stock slowly over the next 20-30 minutes, stirring often and making sure not to burn. Add more stock or water if necessary. Add salt to taste. Once the rice is soft and delicious, remove the pot from heat and add the fresh ground pepper and lemon zest and juice. Garnish with fresh parsley and serve!
BOK CHOY
Ingredients
6-8 baby bok choy (split, lengthwise)
1/2 yellow onion (very thinly sliced)
1 tsp fresh grated ginger
2 cloves fresh garlic (diced finely)
2 Tbs olive oil
Instructions
Heat a wok or large skillet over high heat until very hot. Add the oil and then the onion, ginger, and garlic. Saute quickly for 30 seconds, stirring constantly. Add the bok choy, and heat until slightly browned and the leaves are just barely wilted. Top with sesame seeds.
Spring Share Week 6
Things are hopping and popping!!! We should have asparagus and radishes in the next week or so, the seeds we’ve been planting are germinating — lettuces and all sorts of leafy greens. It’s such a breath of fresh air as you watch the fields slowly green up. Finally the mechanic came and took a look at our Kubota and clued me into a shear pin in the PTO that might be the cause of our troubles there. Hope so as that is a relatively easy fix!!! The Kubota just needs a new valve stem for one of the tires and a good old fashioned tune up — change filters and fluids. The real challenge so far has been locating the filters. I had trouble sourcing them last year and the year before and this year is the worst so far. I feel like purchasing extras and putting them in the garage so we have them for next year! I was talking with Lupe about Cinco de Mayo which is Monday (how can it be already?) We wanted to give you something to add to your festivities. She absolutely loves watercress or berro as she calls it and really wanted to share it with you all. I went digging through a couple of my cookbooks that survived the fire and found a Salsa Verde recipe that I can’t wait to try. I always thought salsa verde was made with tomatillos so it was a pleasant surprise to find this one made with watercress! It looks like a great sauce to drizzle over eggs or vegetables for a tantalizing side. I would even try it on pasta — but that’s me!!!!
SALSA VERDE
By Anne Somerville
Source: Fields of Greens: New Vegetarian Recipes from the Celebrated Greens Restaurant: A Cookbook
Ingredients
½ cup extra virgin olive oil
1 scallion, white and green parts, coarsely chopped
1 small garlic clove chopped
1 packed cup parsley sprigs
1 cup packed watercress sprigs
½ teaspoon salt
2-3 pinches black pepper
½ tablespoon fresh lemon juice
1 teaspoon champagne vinegar
½ teaspoon drained capers, rinsed
Directions
Place olive oil in a blender, add remaining ingredients and blend until smooth. Serve freshly made!
QUICK COLLARD GREENS
Author: Cookie and Kate
Source: Quick Collard Greens Recipe - Cookie and Kate
Prep Time: 8 minutes; Cook Time: 7 minutes; Total Time: 15 minutes; Yield: 2 servings 1x
These collard greens are cooked in the Brazilian style—quickly in hot oil, with some garlic and chili flakes. In Brazil, these collards frequently accompany the national dish, called “feijoada,” which is a rich black bean stew cooked with pork, and rice on the side. If you’re vegetarian or vegan, take note that these collard greens would go great with black beans and rice.
Ingredients
1 bunch collard greens
1 ½ tablespoons extra-virgin olive oil
¼ teaspoon fine sea salt
2 medium cloves garlic, pressed or minced
Pinch of red pepper flakes (optional, scale back or omit if sensitive to spice)
A couple lemon wedges, for serving
Instructions
1. To prepare the collards: Cut out the thick center rib out of each collard green. Stack the rib-less greens and roll them up into a cigar-like shape. Slice over the “cigar” as thinly as possible (⅛″ to ¼″) to make long strands. Shake up the greens and give them a few chops so the strands aren’t so long.
2. Heat a large, heavy-bottomed skillet over medium-high heat, then add the olive oil. Once the oil is shimmering, add all of the collard greens and the salt
3. Stir until all of the greens are lightly coated in oil, then let them cook for about 30 seconds before stirring again. Continue stirring in 30-second intervals until the greens are wilted, dark green, and some are starting to turn brown on the edges (this is delicious). This will take between 3 to 6 minutes.
4. Once the collards are just about done, add the garlic and red pepper flakes (if using). Stir to break up the garlic and cook until it’s fragrant, about 30 seconds. Remove the pan from the heat.
5. Immediately divide the cooked collards onto plates, and serve with a lemon wedge each.
Notes: Recipe adapted from my lemony collard greens pasta.
Spring Share Week 5
The soil is gradually warming up. Spent most of the day yesterday in the fields with Benito and Lupe. We’re in major clean up mode around the farm, we have to do it now as in another couple of weeks the field work will consume us all. I couldn’t get over the carpet of weeds that was already making its presence known and we’ve barely started. The weather of late is generating perfect growing conditions — heat, sun, gentle rain. In spite of this, as farmers are setting out transplants the irrigation systems are at full throttle working to keep the tender young plants hydrated. Celery requires a tremendous amount of water to ensure a good crop with no bitter flavors. While the onions can hold their own. The only real worry I have right now is that the winds go easy on us. They can and have, a few times in the past, gotten so fierce that they will tear tender young onion plants right out of their beds. The chives and nettles have more than doubled in size in just two weeks. Light purple buds are already peaking through the bright green foliage of the chives.
Chives — not just a pretty garnish they are a great addition to eggs, dressings and more. Just remember to add at the last moment as their flavor is delicate and easily lost if cooked for too long!
SCRAMBLED EGGS WITH SPINACH AND CHIVES
Source: Scrambled Eggs with Spinach and Chives | Tasty Kitchen: A Happy Recipe Community! The perfect breakfast for one or two.
Ingredients
2 whole Eggs
¼ cups Baby Spinach, Chopped
⅛ cups Chives, Chopped
⅛ cups Cheddar Cheese, Shredded
1 Tablespoon Half-and-half
Salt And Pepper, to taste
Olive Oil, For Cooking Eggs
Preparation
– Whisk all ingredients together in a small bowl.
– Heat olive oil over medium heat and add egg mixture.
– Using a spatula, stir the egg mixture constantly until no longer runny. Make sure you don’t overcook the eggs or they will be dry.
– Remove eggs immediately from the skillet and serve with toast.
GREEN GODDESS SALAD DRESSING
Source: Green Goddess Salad Dressing – Kalyn's Kitchen
Prep Time 15 minutes Total Time 15 minutes
Green Goddess Salad Dressing is one of my long-time favorite dressings, and I make this every spring when French Tarragon starts to show up in the stores.
Ingredients
1/4 cup fresh chives or green onions (packed into measuring cup)
1/4 cup fresh tarragon (packed into measuring cup, see notes)
1/4 cup fresh parsley (packed into measuring cup, I used flat-leaf Italian parsley)
1 T fresh-squeezed lemon juice
1 T white wine vinegar
1 tsp. anchovy paste (or more, depending on how much you like anchovies)
1 C mayo
1/2 C sour cream
salt and freshly-ground black pepper to taste
Instructions
1. Measure 1/4 cup each of chives (or green onions), tarragon, and parsley, and add to food processor. Pulse processor until the fresh herbs are finely chopped.
2. Then add lemon juice, white wine vinegar, and anchovy paste (or canned anchovies) and pulse a few times more.
3. Add mayonnaise, sour cream, salt, and freshly-ground black pepper and run the food processor about 20-30 seconds, or until ingredients are well combined.
4. Chill at least a few hours before serving.
5. This will keep in the fridge for at least a week, although it probably won’t stay around for that long!
Notes
– Fresh Tarragon is optional but if you like tarragon it’s really good in this dressing. I would use a bit more parsley if you're not using the tarragon.
– I used a Food Processor to make this, but if you don’t have one you can finely chop the herbs with a chef’s knife and then stir the ingredients together in a bowl.
– Nutritional information is based on 2 T serving size, but if you love this like I do you might want more dressing than that!
Recipe adapted slightly from Green Goddess Dressing from Hedonia, who adapted it from the original recipe from The Palace Restaurant in San Francisco.
Spring Share Week 4
" ... Mmmm ..." The warmth of the sun feels like it reaches deep into my soul. The ground is still cold and bitter winds will frequently sweep across the valley. I always pray that the winds will be kind in spite of themselves and not rip seeds and tender young plants out of the soil as they may want to do when they are especially brutal as they have been of late. The soil while not frost laden is still quite cold which causes a slower germination of seeds that are planted directly in the fields. Cooler crops like lettuces and cabbage don’t mind having “cold feet” but crops like tomatoes and peppers do not appreciate the chill in the ground and are much happier when the soil warms up, typically around May.
BOK CHOY CHICKEN SOUP
Source: The Spruce Eats
Prep: 5 mins; Cook: 10 mins; Total: 15 mins
Servings: 3 to 4 servings; Yield: 4 cups
It’s hard to believe how good this soup is considering it’s made with only six ingredients. The bok choy simmered in chicken broth with Asian flavors is outstanding. The heat added by the addition of red pepper flakes creates a warming, satisfying bowl of soup.—Joan Velush
Ingredients
■ 4 cups chicken broth
■ 1/4 teaspoon crushed red pepper flakes, more to taste
■ 2 teaspoons soy sauce
■ 2 teaspoons Asian sesame oil
■ 1 large garlic clove, finely chopped
■ 10 leaves bok choy, thinly sliced crosswise
Instructions
1. Gather the ingredients.
2. Bring the 4 cups chicken broth to a boil in a medium saucepan.
3. Stir in the 1/4 teaspoon crushed red pepper flakes, 2 teaspoons soy sauce, 2 teaspoons Asian sesame oil, and 1 large garlic clove (finely chopped).
4. Add 10 bok choy leaves (thinly sliced crosswise). Simmer for up to 10 minutes, until the bok choy leaves turn dark green and are wilted and tender.
5. Divide between bowls and serve.
JALAPEÑO-LIME QUINOA AND BOK CHOY
Source: Jalapeño-Lime Quinoa and Bok Choy Recipe | Food Network Kitchen | Food Network
Ingredients
1 tablespoon olive oil
1 each minced garlic clove and Jalapeño
1 1/4 cups water
3/4 cup tricolor quinoa
1/2 teaspoon kosher salt
1 pound thinly sliced baby bok choy
zest and juice of 1/2 lime.
Directions
1. Heat 1 tablespoon olive oil in a medium saucepan over
medium-high heat.
2. Add 1 each minced garlic clove and jalapeño; cook 1 minute.
3. Add 1 1/4 cups water, 3/4 cup tricolor quinoa and 1/2 teaspoon kosher salt. Bring to a boil, reduce to a simmer, cover and cook until tender, 12 to 15 minutes.
4. Remove from the heat and set aside, covered, 10 minutes.
5. Stir in 1 pound thinly sliced baby bok choy and the zest and juice of 1/2 lime.
Spring Share Week 3
The seriously cold nights have us all scrambling to keep our greenhouses warm. We all have fragile plants like tomatoes, eggplants, and peppers started. These babies do not like extreme cold. Yesterday morning we were in the 20s, this morning temps almost rose to freezing. By midafternoon yesterday inside the greenhouse the temp hit around 80 and that’s without the furnace running! I think that’s one of my favorite times and places to be when it’s cold outside. The aromas from the plant oils and soft shades of green as the leaves unfurl and stretch, it’s like an oasis when the wind is howling outside. Enjoy the watercress now with the forecast of 60s for next week. I don't think we’ll harvest it for a bit. Watercress or Berro as my farmers call it likes to chill. The high temps predicted will send it into blossom so we’ll let it take a rest.
GLAZED CARROTS WITH WATERCRESS
Source: Glazed carrots with watercress and ramp leaves
Serves 2-4, Author: Alan Bergo
Ingredients
10 oz (2 large) carrots
4 oz 2 very generous handfuls watercress, trimmed into small clusters
3 tablespoons unsalted butter
1 oz a handful chopped ramp leaves or a few sliced green onions
1 tablespoon maple syrup or a couple pinches of sugar
1 inch piece of fresh ginger finely grated (optional)
1 cup chicken stock or water
½ teaspoon kosher salt plus more to taste
Instructions
1. Peel the carrots and cut them on the diagonal into ¼ inch thick coins. If your carrots are large, cut them in half the long way, then cut on the diagonal into half-moons.
2. Put the carrots, stock or water, ginger, butter, salt and sugar in a wide pan, like a 12 inch skillet, cover and bring to a boil. Remove the lid and continue cooking.
3. When the liquid gets thick and syrupy and the carrots are tender, reduce the heat, making sure the pan doesn’t dry out, Add the watercress and ramp or green onions if using, cover the pan to wilt it for a few moments, then toss, taste and adjust the seasoning again, and serve. It should be buttery, seasoned with salt, with just a hint of sweetness.
SAUTÉED CARROTS AND SPINACH
Source: Sautéed Carrots and Spinach - The Nessy Kitchen
Prep Time: 10 minutes; Cook Time: 10 minutes; Total Time: 20 minutes
Servings: 2
Ingredients
4 oz fresh spinach about 4 cups lightly packed
1 large carrots 1 cups sliced
1 clove garlic
½ tablespoon avocado oil
⅛ teaspoon sea salt
⅛ teaspoon pepper
Instructions
1. Heat oil in a large skillet over medium heat, add the carrots and cover with a lid.
2. Cook for 2-3 minutes, reduce heat to medium-low and then stir in the garlic. Cover and continue for cook for 2-4 additional minutes until the carrots are softened. (If you prefer your vegetables more on the crisp side, cook for less time.)
3. Add the spinach, a few handfuls at a time, covering and allowing to wilt between additions until it has all been added. Stir to mix with the carrots.
4. Stir in the salt, pepper and any additional seasonings. Remove from heat.
5. Serve.
Spring Share Week 2
This rain has been welcomed in so many ways — all the transplants are benefitting from a good soaking to help get those roots going. The seeds will germinate quicker and if we get some warm weather on top of the wet — Bam! — the fields will come alive with the sound of music, not really but definitely the sounds of growing. Already the green is spreading across the valley floor like a tidal wave. It is quite the sight to see.
Today's Vegetable: It’s all about the cress!
TIPS FOR USING WATERCRESS
Choose fresh watercress: Look for vibrant green leaves and firm stems.
Wash thoroughly: Rinse watercress under cold water and pat it dry before using.
Remove thick stems: If the stems are very thick, you may want to remove them before using the watercress raw.
Store properly: Store watercress in the refrigerator with the base of the stems in a bowl of water to prolong its freshness.
Pair with other ingredients: Watercress pairs well with a variety of ingredients, including citrus fruits, nuts, seeds, and cheeses.
RAW
Salads: Watercress makes a fantastic base or addition to salads, providing a peppery kick and vibrant color.
Sandwiches: Use it as a replacement for lettuce or as a flavorful addition to sandwiches.
Garnish: Sprigs of watercress can be used to garnish dishes for a fresh, elegant touch.
Smoothies: Blend it into smoothies for a nutritional boost and a subtle peppery flavor.
Dips and Sauces: Chop watercress and add it to dips or sauces for a fresh, flavorful twist.
Pesto: Create a watercress pesto to use on pasta, toast, or as a dip.
COOKED
Soups: Add watercress to soups for a unique flavor and nutritional boost.
Stir-fries: Stir-fry watercress with garlic and soy sauce for a quick and healthy meal.
Sauces: Blend watercress into sauces or use it as a base for a sauce.
Omelets: Fold watercress into the center of an omelet for a flavorful and healthy twist.
Risotto: Add watercress to risotto for a fresh and flavorful dish.
Baked Dishes: Incorporate watercress into baked dishes like quiche or stuffed vegetables.
Watercress, or Xi Yang Cai (西洋菜), literally means “Western Vegetable” in Chinese. It is said that the vegetable was brought to China from Portugal, and then became quite popular in Cantonese cuisine. The vegetable is low in calories, but packed with vitamins C, K, and A, and calcium and Manganese. It is antioxidant-rich, which helps improve heart
WATERCRESS STIR FRY (炒西洋菜) By Maggie Zhu
Source: https://omnivorescookbook.com/watercress-stir-fry/
Watercress stir fry is a quick and easy side dish that is rich in flavor and full of nutrients. Spend 10 minutes to make this dish and complete your dinner! {Vegetarian Adaptable, Gluten-Free Adaptable} To make the dish gluten free, use tamari instead of soy sauce, and make sure to use a gluten-free vegetarian oyster sauce.
Ingredients
½ lb / 225 g watercress
½ teaspoon oyster sauce (or vegetarian oyster sauce)
½ teaspoon soy sauce
½ tablespoon peanut oil (or vegetable oil)
2 cloves garlic , sliced
1/16 teaspoon sugar
Salt to taste (Optional)
Instructions
STEP 1: Soak the watercress in cold tap water for 2 to 3 minutes while preparing other ingredients. Then drain thoroughly and set aside.
STEP 2: Mix the oyster sauce and soy sauce together in a small bowl.
STEP 3: Heat oil in a wok or large skillet over medium-high heat until hot. Add the garlic. Stir a few times to release fragrance.
STEP 4: Add the watercress. Stir and cook a few times to mix well with the oil.
STEP 5: Pour in the oyster sauce and soy sauce mixture. Sprinkle evenly with the sugar. Continue to stir as you cook, to mix the seasoning evenly. When the watercress turns tender but is still crisp, transfer everything to a plate. Turn to low heat and taste the sauce. Sprinkle with a small pinch of salt if needed (*Footnote 1). Serve hot as a side dish.
Ingredient Substitution Guide
Notes
*I usually do not add salt to my watercress stir fry. However, you might want to adjust the seasoning if you are using a bigger bunch of watercress.
Spring Share Week 1
Finally the weather is changing in our favor. The farmers and onion plants are arriving weekly now. Slowly like a tidal wave the fields are turning green with onion plants. The precision of the planting is like little soldiers lined up in orderly rows. As the boxes of tender young plants are emptied mountains of wirebound boxes pile up on the ends of the fields. Once the onion producing capital of the world, our region is still renowned for the incredible savory orb of gold that comes from our deep muck soils.
Dandelion Greens
One of the bitter greens of Spring with notes of black pepper like arugula. Are quite popular in many cuisines. Like other bitter greens, dandelion greens taste best when balanced with plenty of fat, like extra virgin olive oil or bacon fat, and acids like lemon juice or vinegar.
SAUTEED DANDELION GREENS ROMAN STYLE (cicoria alla romana)
Source: https://philosokitchen.com/sauteed-dandelion-greens/
Sauteed dandelion greens are a very important ingredient of Roman cuisine. For centuries the most poor Roman families used to harvest wild dandelion greens aside the suburbs streets of the Italian capital, and cook them with simple ingredients. The farmers used to bring sauteed dandelion greens with them, eating this vegetable as lunch along with simple homemade bread. This vegetable is both tasty and healthy! I love to cook dandelion greens in many ways, but today I propose the most traditional way to cook the dandelion. The chili pepper pairs perfectly with the amazing bitter taste of these greens! Serve the dandelion as a tasty salad, or aside cheeses, eggs or roasted meats.
Ingredients
1/3 Lb (150 g) dandelion greens
1 cloves of garlic
1 tbsp extra virgin olive oil
1 small chili pepper
to taste table salt
Instructions
Garlic and Chili Pepper
1. Pour the olive oil into a saucepan and place the pan over minimum flame. Peel and crush the cloves of garlic, then cut the chili pepper in two half.
2. If fresh chili is not available, use ½ tsp of chili flakes.
3. Cook the pepper and garlic very slow until ready to cook the dandelion greens. Go easy on the chili pepper as it can get spicy and you can always add more but not take it out.
Steam (or Boil) Dandelion Greens
1. Wash and rinse the dandelion greens as times as needed to eliminate any trace of dirt.
2. Steam or boil the dandelion greens for 5 minutes.
3. If possible, save the water used to steam or boil the vegetables: it is great to prepare soups or risotto recipes!
Sauté Dandelion Greens
1. Sauté the vegetable, until almost all the liquid is evaporated. Add salt as needed a couple of minutes before ready.
2. Once cooked, the vegetables should be juicy, but not washy.
3. Serve the sauteéed dandelion greens hot or warm. Is possible to prepare the sauteéed dandelion greens up to a couple days in advance.
4. Conserve the vegetables covered in the fridge.
5. 10 minutes before serving, reheat the dandelion into a pan along with a couple of tbsp of water.to taste table saltNote: You can add other greens to the dandelion like kale and spinach if you wish.
Other ways to enjoy dandelion greens:
Source: Dandelion Greens Recipe: How to Sauté Dandelion Greens - 2025 - MasterClass
1. Dandelion salad: Dandelion greens are a classic component of the Provençal salad mixture called mesclun, which consists of lettuce and other greens like dandelion greens, mustard greens, and/or radicchio. Add bacon fat and balsamic vinegar dressing to cut through the greens' bitterness.
2. Greens and beans side dish: Naturally sweet, creamy white beans (or chickpeas or lentils) make the perfect foil for sharp, bitter dandelion greens. Add chopped dandelion greens to a pot of simmering beans and finish with a glug of olive oil and a pinch of red pepper flakes.
3. Dandelion pesto: If you need to use up dandelion greens, blanch the greens, drain them well, and blend them with pine nuts, parmesan, garlic, and plenty of olive oil to make a pesto sauce.
Winter Share Week 11
Welcome to the first day of spring!!! As we bid farewell to winter, I wanted to say thank you for journeying this past winter together with us. The brutal cold and fierce winds made it quite a test of endurance. We’re not totally out of the woods yet as far as wintry weather conditions go but the days are way warmer and sunnier than they have been. The hours of daylight are getting longer each passing day and the moon has been so beautiful to view. The fields are a bit sloppy from all the rain and I’m hoping to get the excavator next week so I can clean out the drainage ditches. Starting to plant in the greenhouse and leafy greens are popping up everywhere. I get so excited just thinking about it.
BUTTERNUT SQUASH AND KALE
By Ree Drummond
Source: https://www.thepioneerwoman.com/food-cooking/recipes/a11870/butternut-squash-and-kale/
Ingredients
1/2 whole Butternut Squash; Peeled, Seeded and Cubed
2 Tbsp. Butter
1 Tbsp. Olive Oil
1/2 tsp. Kosher Salt
Black Pepper To Taste
1/4 tsp. Chili Powder (more to taste)
1 bunch Kale, Leaves Torn,
Stalks Discarded
Directions
– Heat 1 tablespoon butter and olive oil in a large skillet over high heat.
– Add squash and sprinkle with salt, pepper, and chili powder.
– Cook for several minutes, turning gently with a spatula, until squash is deep golden brown and tender (but not falling apart.)
– Remove to a plate and set aside.
– In the same skillet, melt 1 tablespoon of butter over medium-high heat and add in the kale. Toss it around with tongs and cook it for 3 to 4 minutes.
– Add in the cooked squash and gently toss together.
– Serve as a side dish with chicken or beef, as a main veggie dish, or as a filling for quesadillas or sandwiches.
POTATO SQUASH KALE SHEET PAN DINNER
Source: Potato Squash Kale Sheet Pan Dinner
Ingredients
2 medium red potatoes, cut into 1 1/2-inch chunks
2 cups butternut 1 1/2-inch squash chunks
1 tablespoon olive oil
2 cups kale cut up
1 cup vegetable broth
1/2 teaspoon Italian Seasoning
1/4 teaspoon smoked salt
1/4 teaspoon granulated garlic
1/4 cup roasted red peppers, sliced
Instructions
– Place potatoes and squash in a resealable bag. Add oil, seasoning, salt and garlic. Shake.
– Spread into a single layer on a foil lined sheet pan. Bake at 350 for 15 minutes.
– While the vegetables bake, bring kale and vegetable broth to a boil in a large fry pan. Cook for about 2 minutes until kale begins to soften.
– Add kale to vegetables at the 15 minute mark and continue cooking until vegetables are crispy outside and tender inside.
– Remove and add peppers. Toss and serve.
Winter Share Week 10
Signs of Spring — even though it is not yet officially Spring, there are signs everywhere. The animals are breaking hibernation — so far I’ve seen raccoons, opossums, and skunks, but I still haven’t seen a robin. My Dad would often get bragging rights as he usually would be the first one to see those red-breasted birds. I’ve seen some geese around but I think those wintered over as I have yet to see any V-formations in the sky. One other sure sign is the sprouting of leafy greens from the storage crops. Those pretty green leaves sprouting from the turnips are totally edible and add a nice flavor to soups and stews.
In honor of Saint Patrick's Day I’ve been looking at Irish-themed recipes:
EASY CABBAGE WITH BACON
Source: https://www.sugarandsoul.co/irish-fried-cabbage-bacon-recipe/
Irish Fried Cabbage and Bacon is a simple recipe that’s pan-fried in bacon grease and loaded up with bacon pieces and onion and seasoned with brown sugar, salt, and pepper.
Ingredients
6 ounces thick bacon and drippings
½ small onion diced
½ head green cabbage shredded
1 tablespoon light brown sugar packed
¼ teaspoon salt
¼ teaspoon ground black pepper
Instructions
1. Cook bacon in a deep cast iron skillet over medium-high heat until crisp, about 4 to 6 minutes. Use a slotted spatula to remove the bacon pieces and transfer to a paper towel-lined plate.
2. Add the diced onion to the bacon drippings and cook until translucent, about 1 to 2 minutes.
3. Add shredded cabbage to the pan and toss to coat. Add in brown sugar, salt, and pepper and cook until cabbage is tender, about 5 to 7 minutes.
4. Add the bacon back to the cabbage and cook for another 2 to 3 minutes. Serve hot and season with additional salt and pepper if desired.
Notes
– Brown sugar can be left out.
– Leftover boiled cabbage can also be used, reduce cooking time.
– This recipe is common in many regions with many variations, this one is mine.
VEGETARIAN IRISH STEW
Source: https://www.food.com/recipe/vegetarian-irish-stew-212784
Ingredients
2 medium onions
1⁄4 cup unbleached flour
4 cups water
2 cups mushrooms, thickly sliced
1 cup parsnip, sliced
1 cup turnips
1 cup celery, diced
1⁄2 cup split red lentils
1⁄2 cup fresh parsley
1⁄4 cup Braggs liquid aminos or 1/4 cup soy sauce
3 vegetable bouillon cubes
1 bay leaf
2 teaspoons marmite
1 teaspoon sugar
1⁄4 teaspoon thyme
1⁄4 teaspoon rosemary
1⁄4 teaspoon marjoram
pepper
1 cup textured vegetable protein, chunks
Directions
1. In a large, lightly oiled pot steam fry the onion until it begins to soften [that means cook it in a bit of water] Add flour and stir around completely.
2. Add the remaining ingredients, mix well, bring to boil. Cover and simmer on low for 30 minutes or until vegetables are done.
3. Taste and season.
4. Note: The turnips should be large dice. The carrots round sliced. You may use other yeast extract than marmite.
5. Also look in specialty or finer food stores for the Marmite. It is a British product. I find mine in Wegmans in PA/NY.
6. What can you substitute for marmite? (per Google Search)
Substitutes for marmite miso paste, nutritional yeast, or even soy sauce
Winter Share Week 9
Crop-rotation, sustainable agriculture, heirloom, biological controls, biodiversity — how many ways are there to describe not what we do but who we are as farmers, stewards of the land. I’ve felt for so long that we, my family, were farming regeneratively before it became a “thing.” Dad grew up farming “organically” in part because back then there were no synthetic chemicals as we know them now. I remember collecting and spreading horse manure for fertilizer, saving our own onion seeds. Minimally tilling the soil. Carefully plowing so as not to go too deep and bring up too much peat from below. Rotating crops to minimize insects and diseases, planting herbs and flowers to attract beneficial insects. Regenerative agriculture not only focuses on reducing the impact of production on the land, but actively works to improve soil health ensuring a future of a healthy global food supply.
Sources:
Regenerative agriculture | Definition, History, Examples, & Facts | Britannica
Regenerative agriculture can help feed the world. What is it? | World Economic Forum
SWEET POTATO BEET SALAD WITH FETA
Source: https://www.sunglowkitchen.com/sweet-potato-beet-salad/#recipe
This Sweet Potato Beet Salad is full of color, flavor, and texture! Feta cheese, crunchy walnuts, and caramelized onions take it to the next level, while the honey balsamic dressing brings it all together!
Ingredients
Salad
1 medium sweet potato, cubed
1 medium beet, cubed
1 medium red onion, sliced
1 tablespoon olive oil
¼ teaspoon salt
Freshly cracked black pepper
¼ teaspoon ground cinnamon (optional)
½ teaspoon ground coriander (optional)
1 cup raw walnuts , roughly chopped (or sub with seeds to make it nut-free)
4 cups greens of choice (we use arugula)
⅓ cup crumbled feta cheese (use vegan if needed)
Balsamic Vinaigrette
2 tbsp olive oil
1 tablespoon balsamic vinegar
1 tablespoon honey or maple syrup
1 teaspoon dijon mustard
¼ teaspoon salt
Freshly cracked black pepper
Instructions
1. Pre-heat oven to 350F (180C). Layer a piece of parchment paper onto a baking sheet. Add the cubed sweet potato, beet, and red onion. Drizzle with olive oil and season with salt, black pepper, cinnamon (optional), and ground coriander (optional). Toss to combine and bake for 25-30 minutes, stirring halfway through.
2. After 30 minutes, take the vegetables out of the oven and add to them the chopped walnuts. Bake for 10 more minutes, or until the walnuts are toasted, and the vegetables are soft. Set aside to cool.
3. In the meantime, prepare the dressing. To a small bowl, add all of the ingredients- olive oil, balsamic vinegar, honey or maple syrup, mustard, salt, and black pepper. Mix until well combined.
4. To a salad plate, add your greens of choice and toss with ⅔ of the dressing. Add the cooled vegetables and walnuts on top, followed by the crumbled feta cheese. Drizzle the remaining dressing all over and serve right away!
Storage
Fridge: You can prepare the vegetables and dressing 4 days in advance. Once the salad is assembled and dressed, It will keep for a maximum of 24 hours.
Freezer: This recipe is not freezer-friendly.
HEALTHY GREEN BEETROOT SMOOTHIE {Vegan, Whole 30, Paleo}
Source: https://fussfreeflavours.com/recipe-berry-beetroot-smoothie/
Servings: 2 glasses; Author: Helen Best-Shaw
This vibrant beetroot smoothie with added kale is so easy to make – simply pop all the ingredients into a power blender and whizz and go. A nutrition packed power breakfast! Delicious with earthy notes and a vibrant colour from the beetroot. Vegan, Whole 30 and Paleo Friendly.
Ingredients
200 ml apple juice ((or water, yogurt or milk))
2 frozen banana ((peel and chop before freezing))
1 tbs linseed or flax seeds
1 beetroot ((peeled and roughly chopped))
50 g Kale
100 g Mixed berries ((I like to use frozen))
Instructions
Place all the ingredients into the jug of a high powered blender and whizz until smooth. Serve immediately.
Winter Share Week 8
As I’m writing this note to you I keep staring out the window. The weather is really taking us for a ride lately. I know that’s all I seem to talk about — but it is what governs my life. Keep watching for signs that the fields are getting dry enough for us to start plowing and yet at the same time holding my breath and praying “Just a little more time please, we are still not ready.” In truth I don’t know if we are ever truly ready, there’s always one more thing to be done, one more new project or monkey wrench that needs attending to. And all that is a piece of the energy that keeps us going, always fascinated, always learning, always hopeful.
FROZEN BUTTERNUT SQUASH (WINTER SQUASH)
Source: https://simplesidedishes.com/frozen-butternut-squash/
This quick and easy recipe will give you perfectly seasoned and irresistibly delicious frozen butternut squash every time. A tasty side dish. The link to the original source of the recipe includes lots of great information regarding frozen butternut squash — give it a look!!!
Ingredients
1 (10 ounce) package frozen butternut squash
1 Tablespoon olive oil
1 teaspoon paprika
1 teaspoon garlic powder
pinch of Cayenne pepper (1/8 teaspoon)
Salt and Pepper to taste
Instructions
1. Preheat oven to 400*F and line a baking sheet with parchment paper or a silicone baking mat.
2. Put the frozen butternut squash into a mixing bowl.
3. Drizzle olive oil over the squash and mix until evenly coated.
4. Add paprika, garlic powder, cayenne pepper, salt and pepper to the squash and mix well.
5. Spread the seasoned squash evenly over the baking sheet.
6. Put in the oven for 35 minutes.
7. At the 35 minute mark, mix the squash so the pieces get evenly browned.
8. Put back in the oven for another 15-20 minutes, or until brown and crispy.
9. Remove and enjoy!
ITALIAN LACINATO KALE RECIPE (TUSCAN)
Source: https://alwaysfromscratch.com/lacinato-kale-recipe/#recipe
by Vincent DelGiudice
A bright and delicious kale recipe perfect as a side dish to pair with any chicken, steak, or fish. This Kale is combined with cherry tomatoes, garlic, and lemon for a simple and delicious dish.
Prep Time: 15 minutes; Cook Time: 15 minutes
4 servings
Ingredients
1 head lacinato kale
1 cup cherry tomatoes, halve
1 lemon
3 cloves garlic
½ cup water
1 tablespoon butter
2 tablespoon olive oil
½ teaspoon Salt
¼ teaspoon black pepper
Instructions
1. Prepare the kale by washing and then cutting the kale in half. In a dutch oven on medium heat, add olive oil and wait until shimmering. Stir in the garlic until fragrant, about 1 and a half minutes. Keep an eye on it will go from golden brown to burnt in a heartbeat. Add the cherry tomatoes and juice from the whole lemon. Stir occasionally until the cherry tomatoes begin to break down slightly about 3 to 5 minutes. Add salt and pepper.
2. Once the cherry tomatoes have begun to break down, add in the kale and ¼ cup of water. Save a ¼ cup for later. Cover the pot and let the kale braise for 15 minutes, stirring once at the halfway point. If when you open the pot at the halfway point, there is no liquid, add the rest of the water.
3. Open the dutch oven and add the pat of butter. Stir until it is completely melted throughout the sauce. Remove the kale from the dutch oven and serve.
**Notes
1. No cherry tomatoes? Sub sun dried tomatoes or a small can of fire roasted chopped tomatoes. Juice and all!
2. I’ll often use this as a base to which I will add sausages that I have removed from their casing, broke it into bite sized pieces and browned. You can use Sweet or hot Italian sausage, chorizo or even kielbasa! I will also add a can of beans liquid and all — my preferred bean is the large butter bean but I also use garbanzos, cannellini with great success. Let this all simmer for about 20 minutes and serve up with a crusty slice of bread or focaccia. Leave out the meat and use the vegetables as a topping for roasted baked potatoes. Even use it as a topping for the roasted winter squash recipe above. The combinations are limitless!!!
Winter Share Week 7
Kind of creepy how time really does have wings. I used to laugh when I was younger at my elders and how they would talk about time flying as you got older and now I find myself in that same mental place. In less than ten days, two months will be erased from 2025. The energy is slowly but surely building throughout the valley as farmers are busy repairing and prepping equipment as we get ready for the excited chaos that ensues once Spring arrives. I find myself watching the sky looking at the patterns the birds are forming, casually looking at trees for the first blush of buds, watching for the first snow drops to break way through the crusty ground and icy coverings, even though I know it's way too early, Watching for animals breaking hibernation, all signs of things to come, but this frigid winter is keeping the advance of Spring to a slow crawl. Seed orders are arriving weekly and gradually, on paper at least, the dream of what the farm will look like this year is slowly coming to life.
ROASTED BEETS AND CARROTS By: Jenné Claiborne
Source: https://sweetpotatosoul.com/roasted-beets-and-carrots/
Tender Roasted Beets and Carrots make a flavorful and nutritious side dish. Made with common ingredients in a few simple steps, they're perfect for weeknight meals, Sunday suppers, and Thanksgiving feasts.
Servings: 4 Servings
Ingredients
2 medium beets, peeled and cubed
2 medium carrots, scrubbed, peeled, and sliced on the bias into ½” rounds
1-2 tbsp avocado oil, or extra virgin olive oil
1 tsp cumin seeds or caraway seeds
1 tsp sea salt
1 tsp freshly ground black pepper
½ cup chopped fresh parsley, for garnish
1 lemon, zested and juiced, optional for garnish
Instructions1. Preheat the oven to 375°F.2. Place the sliced beets and carrots in a mixing bowl. Drizzle them with the oil and sprinkle with the caraway or cumin seeds, salt, and black pepper. Toss until well combined.
3. Transfer the vegetables to a 12×9” rimmed baking sheet or large roasting pan and spread them out evenly.
4. Bake for 40 minutes or until the vegetables are fork-tender. If they appear to cook unevenly, turn them in the pan halfway through the cooking time.
5. Season to taste with more salt and better, and serve with fresh chopped parsley. If desired, kick it up a notch with a squeeze of lemon and a pinch of lemon zest.
NOTES
Storage Directions
Leftover oven roasted beets and carrots keep covered in an airtight container in the refrigerator for up to 5 days. Reheat them in the microwave for 1-minute intervals, stirring between each, until hot. I do not recommend freezing, as the texture can change upon defrosting.
Recipe Pro-Tips (These are great tips that apply so well to most food prep)
– Cut the vegetables into similar sizes. For even roasting and texture, cut the beets and carrots into uniform pieces. I recommend carrots sliced on the bias into 1/2-inch pieces and beets cubed into 1/2-inch pieces.
– Use a large pan. Roasting in a large pan allows the steam from the vegetables to evaporate, making them tender and caramelized. Without this room, they can get soggy.
– Turn during cooking. Keep an eye on the carrots and beets as they roast. Turn them halfway through the cooking time if they appear to cook unevenly. You can also rotate the baking sheet.
– Cook until fork-tender. You will know the vegetables are done when you can pierce them with a fork. If needed, add extra cooking time in 5-minute intervals.
LENTIL, QUINOA, AND KALE SOUP Author: Krista
Source: https://www.destinationdelish.com/lentil-quinoa-kale-soup/
Serves: 6 servings
Years ago I used to frequent Panera and found this soup to be one of my favorites. I liked it with the hard boiled egg option and could happily eat it any time of day! Please read the notes section and don’t let this recipe intimidate you with the list of ingredients and the food prep. It really does come together quite easily.
Ingredients
1 onion, cut into large chunks
2 cloves garlic
2 stalks celery, cut into large chunks
3 carrots, cut into large chunks
3 roma tomatoes, cut in half - I will substitute canned fire roasted tomatoes
1 teaspoon oil
salt and pepper
2 teaspoons Bouquet Garni herb blend (or ¼ tsp each of dried rosemary, thyme, and parsley)
¼ cup soy sauce
1 can (14.5 ounces) diced tomatoes
½ cup uncooked lentils
½ cup uncooked quinoa
4 cups vegetable broth
6 cups water
3 cups roughly chopped kale
3 cups fresh spinach
juice of 1 lemon
4 hard boiled eggs (optional)
2 cups cooked, chopped chicken (optional)
Instructions
1. Place the onion, garlic, celery, carrots, and tomatoes in a food processor, blender, or Nutribullet. Blend until a puree forms.
2. Heat oil in a large stock pot over medium heat. Once heated, add the vegetable puree. Sprinkle with salt and pepper. Add the herbs. Cook the mixture for about 5 minutes, stirring occasionally. Add the soy sauce, diced tomatoes, lentils, and quinoa. Stir to combine.
3. Add the vegetable broth and water and stir. Bring the mixture to a boil. Then, reduce to a simmer.
4. Cover the pot and let the soup simmer for about 15 minutes. At the 15 minute mark, give the lentils a taste. If they're still a little firm, let the soup simmer for a few more minutes until the lentils are tender.
5. Uncover the pot and add the kale, spinach, and lemon juice. Stir until combined. Give the soup a taste and add salt, pepper, and/or additional lemon juice to taste.
6. Ladle soup into bowls and top with a hard boiled egg and/or chicken, if desired.
Notes - Serving size: 2 cups
1. Panera’s version also contains brown rice. I had no brown rice so the quinoa stands alone.
2. The list of ingredients in this soup is impressive, extensive, and completely random. For example, Korean broth and molasses made the list -two ingredients I’d never think to pair together. I didn’t even come close to having all of the ingredients so I made up my own combo based on fridge staples.
3. At Panera, you could order this dish with chicken or hard boiled eggs. I ordered the chicken, and it was a great choice. But for this recreation, I kept those ingredients as optional. There’s enough filling protein from the lentils and quinoa.
4. For the soup base, I blended the tomatoes, carrots, celery, onion, and garlic into a quick puree. By doing this, the veggies cook down quickly and they dissolve right into the broth, allowing the lentils and quinoa to shine.
5. The lentils and quinoa cook together right in the broth. No need to pre-cook them!
Winter Share Week 6
Oye! More yucky weather. I keep telling myself to have patience, as soon enough the workload will be so fierce and intense we’ll be longing for the “quieter” days of winter. So as I spend time researching recipes I use those deep dives to think about what to grow. I’m always on the lookout for something new and customers are always asking what’s exciting. Sometimes it’s not so much a new vegetable or variety as it is the style of presentation, or a new method of growing or cooking. And sometimes it is just different combinations of flavor profiles that make the dish so incredibly fresh and new. And then again the old tried and true cannot be forgotten as there is definitely a great comfort in the familiar recipes we all grew up on.
CELERIAC AND FINGERLING POTATO MASH
Source: https://lainesrecipebox.blogspot.com/2010/12/celeriac-and-fingerling-potato-mash.html?m=1
serves 6 to 8
Ingredients
2 pounds fingerling potatoes, scrubbed and halved or quartered (depending on size) I prefer not to peel them!!
1 pound celeriac (celery root), peeled and cut into pieces roughly the same size of the potatoes
4 tablespoons unsalted butter
1/2 cup milk, half-and-half or cream
2 teaspoons prepared horseradish
Kosher salt
Freshly ground black pepper
Instructions
1. Bring a large pot of water to a boil. Add potatoes and celery root and cook until tender, 18 to 22 minutes. Drain thoroughly, return to pot and mash to desired texture.
2. Add butter, milk and horseradish and stir to combine. Season to taste with salt and pepper and serve warm.
ROASTED FINGERLING POTATOES WITH HOT HONEY YOGURT RANCH
Source: https://www.goodmoodfood.news/p/roasted-fingerling-potatoes-with
You will have extra hot honey ranch in this recipe, so definitely save it for later! I haven’t tried this yet but I am hoping to this weekend. I’m thinking the dressing would be pretty yummy over some roasted cabbage!!
Ingredients
1 lb fingerling potatoes
1 tbsp olive oil
1 tsp onion powder
1 tsp garlic powder
1 tsp smoked paprika
Salt & pepper
Optional: grated Parmesan, to top
Hot Honey Ranch
Ingredients
1/2 cup olive oil
1/4 cup red chili flakes
2 cloves garlic, minced
1 tbsp onion powder
1 tsp garlic powder
1 tsp dried parsley
1 tbsp dried dill
1/2 tsp salt
1 cup Greek yogurt
3 tbsp honey
3 tbsp fresh dill, roughly chopped
Instructions
1. Preheat oven to 425 F and line a baking sheet with parchment paper. Slice potatoes in half lengthwise. Add potatoes to a medium bowl. Toss with 1 tbsp olive oil, onion powder, garlic powder, smoked paprika, and a pinch of salt and pepper. Add the potatoes face down on the baking sheet, and transfer to the oven. Bake for 25-30 minutes until potatoes are golden and crispy.
2. While potatoes are roasting, prepare the hot honey ranch. Heat up olive oil in a small pot on medium heat until very hot. Add red chili flakes and garlic to a medium bowl, and pour the hot oil over the chili flakes and garlic. Mix together, and set aside for a few minutes.
3. In a small bowl, combine the onion powder, garlic powder, dried parsley, dried dill, and salt. Mix that into the oil mixture along with Greek yogurt, honey, and 2 tbsp fresh dill. Taste, and season with more salt, if desired.
4. Spread some of the hot honey ranch onto a plate (I used a little less than half) and top with the potatoes. Finish off with grated Parmesan cheese and the remaining fresh dill. Serve immediately.
Winter Share Week 5
Slowly it progresses, February that is. I always say how it’s the shortest month and the hardest to endure. While I’m writing this update the ice is falling from the sky and coating everything with a shimmery glaze. Was working on more seed orders earlier this morning, it’s a little chilling to see how many items are already sold out. As I do my ordering I keep thinking about the perfect crop plan and what varieties to grow to create this dream of mine. Then I laugh at myself as there is no “perfect” crop plan. You never know what will happen. There is so much out of our control all you can do is visualize and hope that Mother Nature will bless you and therein is the miracle that it really is perfect — perfectly imperfect and full of discoveries as we figure out our way through it all.
CARROT AND TURNIP SOUP
Source: https://itsavegworldafterall.com/carrot-and-turnip-soup/Author: Lizzie Streit, MS, RDN
For more info: How to Cook Turnips
Carrots, turnips, leeks, and apples combine for a wonderful flavor in this creamy vegan soup. It's the perfect way to use winter vegetables!
Ingredients
2 tablespoons extra virgin olive oil
1 large leek - white and light green parts sliced, about 2 cups
4 large carrots - peeled and sliced, about 2 cups
2 medium turnips - peeled and cubed, about 3 cups
2 small apples - cubed, about 3 cups; preferably 1 green and 1 red
3 cloves garlic - minced
¾ teaspoon salt - less is using regular (not low sodium) broth
¾ teaspoon cinnamon
¾ teaspoon ground cumin
½ teaspoon ground ginger
2 cups low sodium vegetable broth
13.5 ounces unsweetened coconut milk - canned, full-fat
Toppings of choice - herbs, apples, croutons, granola, chickpeas
Instructions
1. Warm olive oil in a soup pot over medium heat. Add the leeks and cook for 3 to 5 minutes until tender.
2. Add the carrots, turnips, and apples to the pot. Cook for 5 more minutes, stirring occasionally, until they start to soften.
3. Stir the garlic, salt, cinnamon, cumin, and ginger into the pot. Cook for 1 minute until fragrant.
4. Pour the vegetable broth and coconut milk into the pot. Increase heat to bring to a boil, then reduce heat to maintain a simmer, cover, and cook for 15 to 20 minutes until the turnips are easily mashed with a fork.
5. Remove from heat. Use an immersion (handheld) blender to blend the soup right in the pot until smooth. See notes for using an upright blender.
6. Ladle the soup into bowls, add toppings of choice (optional), and enjoy!
Notes
Turnips: You can use purple top or Hakurei/Japanese turnips for this recipe. Japanese turnips tend to be milder and smaller, so be sure to pick up a couple extra to have enough for 3 cups cubed.
Upright blender instructions: Transfer the soup in batches to an upright blender. Leave the lid of the blender slightly cracked or remove the plastic cap from the center of the lid and cover loosely with a dish towel. This allows steam to escape. Carefully blend until smooth, pour into a bowl, and repeat until all of the soup is blended.
Storage and reheating: Keep in an airtight container in the fridge for up to 5 to 7 days. Reheat on the stovetop or in the microwave. To freeze, let the soup cool completely then transfer to freezer-safe containers. Leave an inch of headspace, seal tightly, label, and store for up to 6 months. Thaw in the fridge before reheating or reheat straight from frozen. Be sure to stir frequently to prevent scorching.
PARMESAN KALE CHIPS
Source: Parmesan Kale Chips - It's a Veg World After All®
Author: Lizzie Streit, MS, RDN
Crispy flavored kale chips are an easy-to-make healthy snack! Learn how to bake them to perfection in the oven without burning or ruining the taste.
Ingredients
1 bunch curly kale
1 to 2 tablespoons extra virgin olive oil
½ teaspoon cumin
½ teaspoon smoked paprika
½ teaspoon garlic powder
½ cup shredded parmesan cheese
Instructions
1. Preheat the oven to 300 degrees F/149 degrees C.
2. Wash the leaves under running water. Pat them dry with paper towels or a clean dish towel to remove as much water as possible. You don't want any excess moisture left on the leaves, since this can contribute to the kale steaming itself instead of getting crispy.
3. Use a knife or your hands to slice or tear the leaves off of the stem. Discard the stems. Then, tear or cut the kale into smaller pieces of similar sizes, roughly 2 inches wide. You don't want them to be too small because they will shrink up in the oven.
4. In a large mixing bowl, whisk together the olive oil, cumin, paprika, and garlic powder. Add the leaves and use tongs to toss them in the oil mixture until they are lightly coated. I like to use about 1.5 tablespoons of oil to achieve this level of coating. If you have a bunch of kale that's on the smaller side, start with 1 tablespoon and see if you need more.
5. Spread the kale leaves out on at least 2 baking sheets. Make sure they aren't overcrowded, since being too close together can also prevent the kale from getting crispy. Use 3 baking sheets if you need to. If you don't have multiple baking sheets, bake the chips in batches instead.
6. Place the baking sheets in the oven and bake for 8 minutes to start. Then, rotate the baking sheets. Bake for about 5 more minutes until the leaves are slightly crispy and have shrunk down. Remove the baking sheets and push the leaves closer together towards the center of the baking sheets without overlapping. Sprinkle the parmesan cheese over them. Return to the oven for 2 to 3 minutes until the cheese is melted to your liking.
Important: Keep a close eye on the chips to prevent burning. Cooking time will vary depending on your oven type and age, position of the oven racks (that's why it's good to rotate the pans), and material/color of your baking sheets (lighter colored baking sheets will cook the kale more evenly than darker colored ones that will cook faster and less even). You may need to bake the chips for less than 5 minutes after rotating. Once they feel crispy and are darker green in color (but not brown), it's time to add the cheese. If the chips get too brown in spots, they will taste bitter or burnt. Occasional brown spots are OK.
7. When the cheese is melted, remove the baking sheets from the oven. Let the chips cool for a few minutes, then dig in and enjoy! It's helpful to use a spatula turner to take the chips off the baking sheets, so that you can scrape up any parmesan that melted on the pan instead of the chips too.
Notes
* Kale chips are best eaten fresh, but you can keep them in an airtight container at room temperature for 2 to 3 days. Reheat in the oven on a baking sheet for a few minutes at 300 degrees F.
* It's not necessary to line the baking sheets with parchment paper, but you can if you want an easier cleanup. I think the chips get crispier without it though.
SAUTÉED KALE STEMS
Source: Sweet and Spicy Sautéed Kale Stems - The Endless Meal®
If you've ever wondered what to do with leftover kale stems, this recipe is for you! In under 15 minutes, kale stems are transformed into a delicious sweet and spicy side dish. Using a handful of pantry ingredients, the stems become not just edible but enjoyable.
Ingredients
2 teaspoons olive oil
10-12 kale stems (picked clean of the leaves and chopped into 1-inch pieces)
2 tablespoons finely minced onion
1 tablespoon honey or maple syrup
½ teaspoon soy sauce (can use reduced sodium)
½ teaspoon sriracha
1 pinch chili flakes
1 pinch sea salt
Instructions
1. Heat the oil in a medium-sized frying pan over medium-high heat. Add the kale stems and onion and sauté for 5-7 minutes, or until the kale stems have softened but still have a little crunch.
2. Remove from the heat and stir in the honey, soy sauce, sriracha, chili flakes, and season to taste with sea salt.
Winter Share Week 4
Vegetables, root vegetables especially, shouldn’t be relegated to the side of your dinner plate. So many of them make the most excellent desserts! A few years ago my sister wouldn’t tell me what kind of birthday cake she wanted so I figured I’d play a joke and made a parsnip cake for her. Well it turned out to be one of my all time bests!!! If you like carrot cake you’re sure to enjoy this one — I provided two different recipes below. Then there’s sweet potato cake, cocoa beet cake, celeriac cake, I mean really how can you go wrong…Here’s a great link to check out — Recipes That Prove Root Vegetables Are Anything but Boring
PARSNIP CAKE WITH ORANGE WHIPPED CREAM
A delicious treat made with parsnips. If you're not so sure, think carrot cake; they are quite similar.
Ingredients
Liquid Ingredients
5 eggs
3/4 cups butter softened
3/4 cups pure maple syrup
Dry Ingredients
2 1/2 cups whole wheat pastry flour*
1/2 teaspoon sea salt
1 tablespoon baking soda
1 teaspoon nutmeg
2 teaspoons cinnamon
Remaining Cake Ingredients
3/4 cups raisins
3/4 cups chopped walnuts**
2 1/2 cups freshly grated parsnips these oxidize quickly so do not grate them until ready to use ***
For the Whipped Cream Frosting
1 1/2 cups heavy whipped cream cold
4 tablespoons maple syrup cold
2 - 3 drops orange essential oil
Instructions
For the Cake
Preheat oven to 325°F.
Cream the liquid ingredients.
Mix together the liquid and dry ingredients.
Stir in the remaining ingredients.
Bake in a greased 9” x 13” pan for 30 – 35 minutes.
Allow to cool completely before frosting.
For the Frosting
Add 2 – 3 drops of orange essential oil to the heavy cream.
Refrigerate for at least ½ hour.
While the cream and orange oil is infusing, place your mixing beaters and the bowl you will use to whip the cream in the freezer. The key to perfect whipped cream is to have all ingredients very cold. Add 1 tablespoon cold, pure maple syrup to the cream and whip until the cream forms peaks. If you are serving the cake immediately, frost the entire cake. Otherwise, frost each piece as it is served, keeping both the cake and the whipped cream refrigerated.
Notes
*For easier digestion and fantastic flavor, soak and dry the nuts ahead of time. Place 3/4 cups of nuts in a bowl. Add 1/2 t of sea salt and cover the nuts with water. Stir to dissolve the salt. Allow to sit for 6 – 8 hours. Drain and dry in a dehydrator or in your oven at just under 150 degrees for 8 – 12 hours, or until completely dry and crisp. Tip: This is just enough nuts for the cake, but go ahead and double or triple the batch, so that you have nuts for other recipes.
** All purpose flour can be subbed for whole wheat - texture will be different
***You can blend parsnips and carrots together for a different taste treat!
PARSNIP CAKE WITH CREAM CHEESE FROSTING
Source: Recipe: Parsnip Cake with Cream Cheese Frosting | The Kitchn
Reprinted with permission from The New Sugar & Spice: A Recipe for Bolder Baking by Samantha Seneviratne, copyright (c) 2015. Published by Ten Speed Press.
Makes 1 loaf
Ingredients
10 tablespoons (1 1/4 sticks) unsalted butter, melted and cooled slightly, plus more for greasing the pan
1 1/2 cups (6 3/4 ounces) all-purpose flour, plus more for dusting the pan
1 tablespoon ground cinnamon
1 tablespoon ground ginger
1 1/2 teaspoons freshly ground cardamom
1 1/2 teaspoons baking powder
3/4 teaspoon kosher salt
1/2 teaspoon baking soda
6 tablespoons packed dark brown sugar
6 tablespoons granulated sugar
2 large eggs
1 1/2 cups peeled, grated parsnips (about 2 medium)
2 tablespoons (1 ounce) peeled, finely grated fresh ginger
2 ounces chopped pecans (about 1/2 cup), optional
1/4 cup whole milk
2 teaspoons pure vanilla extract
For the frosting:
4 ounces cream cheese, at room temperature
1 to 2 tablespoons confectioners' sugar
2 tablespoons whole milk, warmed
Instructions
1. Preheat the oven to 350°F. Butter and flour an 8 1/2-inch by 4 1/2-inch loaf pan.
2. To prepare the cake: In a medium bowl, whisk together the flour, cinnamon, ground ginger, cardamom, baking powder, salt, and baking soda.
3. In a large bowl, with a wooden spoon, stir together the butter, brown sugar, and granulated sugar. Add eggs, one at a time, and stir to combine. Stir in the parsnip, fresh ginger, pecans, milk, and vanilla. With a rubber spatula, fold the flour mixture into the butter mixture. Do not overmix the batter; a few streaks of flour are fine.
4. Spoon the batter into the prepared pan and bake until a skewer inserted into the center comes out with moist crumbs attached, about 45 to 50 minutes. Let cool on a rack for 15 minutes, then flip the loaf out of the pan, turn it right-side up, and let it cool completely.
5. To prepare the frosting, with a wooden spoon, stir together the cream cheese and confectioners' sugar in a small bowl. Add the warm milk and whisk until smooth. Spread an even layer of frosting on top of the cake.
6. Store leftovers in an airtight container at room temperature for up to 3 days or frozen (without frosting) for up to 1 month.
SIMPLE ROOT VEGETABLE SLAW
Source: Simple Root Vegetable Slaw | eggs on sunday
Ingredients
2 pounds mixed root vegetables, such as turnips, carrots, parsnips, rutabagas, celery root, golden beets (if using red beets, keep them separate and mix in only at the end)
2/3 cup good quality extra-virgin olive oil
3 tablespoons apple cider vinegar
1 tablespoon minced shallot
1 tablespoon dijon mustard (I like whole-grain)
1 tablespoon honey
1/2 teaspoon sea salt, plus more to taste
freshly ground black pepper, to taste
Directions
1. Peel the skins off of your root vegetables and shred them either by hand or with the shredding blade of a food processor. Place all the shredded vegetables in a large bowl.
2. Make your vinaigrette: in a medium bowl, whisk together the minced shallot, mustard, vinegar, salt and honey. Whisking all the while, stream in the olive oil and keep whisking until you have an emulsion. Season to taste with a little more sea salt and pepper, as you like.
3. Pour the vinaigrette over the shredded vegetables and toss thoroughly. Taste and season with more sea salt and freshly ground black pepper, according to your taste. Let sit for 10-30 minutes to allow the flavors to blend.
Winter Share Week 3
Arrgh -12 degrees and counting. But inside the greenhouse feels like 40-50 degrees, absolutely balmy ha ha!!! I just keep filling the heater with fuel and fervently pray it will keep humming. At least the wind is not quite so fierce. I hope that Sunday is the day I get to spend inside the greenhouse cleaning and organizing to get ready to start seeding. February is the time to plant onions, leeks, shallots and all things allium so they will be ready to go into the fields as soon as the weather is right. It is so hard to believe that January is almost done already with only one week to go. The anticipation of what’s to come is filling the air with excitement!!!
About Celeriac
Considered a root vegetable, Celeriac can be eaten raw or cooked and clean the skin well and this too can be eaten. Raw, the flavor notes are similar to celery with a light crunchy texture. Cooked celeriac can be subbed for a low carb alternative for potatoes. Celeriac has a thick outer skin that is often crusted with soil. Keep it in the crisper drawer of your fridge until you want to prep it for cooking. Kept cold and uncut, celeriac can last for a couple of weeks in your fridge.
QUICK CELERIAC REMOULADE
Source: https://www.bbcgoodfood.com/recipes/quick-celeriac-remoulade
Barney Desmazery
Preparation and cooking time: 20 mins; Serves 4
The all-time classic way of serving celeriac, this starter is super healthy and requires no cooking for a couple of weeks in your fridge.
Ingredients
7 tbsp good quality mayonnaise
3 tbsp Dijon mustard
1 lemon juice only
1 small celeriac about 650g/1lb 7oz
toast and watercress to serve
Method
step 1: In a large bowl, mix the mayonnaise, mustard and lemon juice together thoroughly with a generous sprinkling of salt and some freshly ground black pepper, so it all becomes one sauce.
step 2: Peel and quarter the celeriac, then, working quickly, coarsely grate it and stir into the sauce until evenly coated. Serve the celeriac remoulade with lots of toast and some dressed watercress. It will keep in the fridge for up to 2 days.
WHOLE ROASTED CELERIAC
Source: Herb-baked celeriac recipe | Good Food
Barney Desmazery
Prep:15 mins; Cook: 2 hrs – 2 hrs and 30 mins
Easy; Serves 4
Serve this novel side dish alongside a roast dinner or other meaty main course. Rosemary, thyme, bay and garlic flavour the creamy flesh
Ingredients
1 celeriac
1 tbsp olive oil
4 rosemary sprigs
4 thyme sprigs
3 bay leaves
1 garlic bulb, broken into cloves
50g butter
Method
step 1: Heat oven to 180C/160C fan/gas 4. If the celeriac has a green sprouting top, cut it off and discard. Scrub off any dirt and trim away any frilly bits of root. Rub the celeriac all over with the oil and place on a large sheet of foil, root-side down. Scatter with the garlic, herbs and seasoning. Wrap the foil tightly and place on a tray and roast on the bottom of the oven for 2 hrs. Check after 2 hrs that the top is very tender – if not give it 30 mins more.
step 2: To serve, unwrap the celeriac and cut off the top. Loosen and mash the middle with the butter, some seasoning and squeezed out softened garlic, if you like. Serve the celeriac with a spoon sticking out of it for everyone to help themselves to.
Winter Share Week 2
Among the many things I enjoy about farming is growing new vegetables, trying them out in the kitchen and of course sharing them with you! For me one of the newer vegetables I’ve been learning about over the last few years is sunchokes or as some know them Jerusalem artichokes. Being a member of the sunflower family they resemble them quite a bit. Long, leggy stems with miniature sunflower looking blossoms on top. Unlike sunflowers, of which the tops are edible, we eat the roots of the sunchokes. Knobby and gnarly looking they are a real pain to clean the grit out of all the nooks and crannies. I’ve been researching different varieties and have been working to find less gnarly root styles. The peels are edible so you don’t have to worry about that tedious job. I must issue a word of caution in regard to a potential side effect when eating sunchokes. For some folks, they are notorious for producing “windy” conditions. For more info: What Are Sunchokes
How To Prepare Sunchokes
Sunchokes can be boiled, braised, roasted, steamed, sautéed, or even eaten raw. You don't need to peel them; you can just scrub them clean and cook them. However, if you wish, you can peel them first.
If you wish to neutralize the inulin in Jerusalem artichokes (it's the chemical that causes the bloating or gas that everyone is talking about), you can boil them in water with added lemon juice or vinegar. The acid hydrolyzes the inulin and turns it into sugars.
SUNCHOKE SOUP
Source: https://www.simplyrecipes.com/recipes/jerusalem_artichoke_soup/
4 servings
Ingredients
2 tablespoons unsalted butter
1 cup chopped onion
2 stalks celery, chopped
2 large cloves garlic, chopped
Kosher salt, to taste
2 pounds sunchokes, peeled and cut into chunks
1 quart chicken stock (use vegetable stock for vegetarian option, and gluten-free stock if cooking gluten-free)
Freshly ground black pepper, to taste
Method
1. Sauté the onions, celery, then garlic:
Heat the butter in a soup pot over medium-high heat until melted. Add the onions and celery and cook until soft, about 5 minutes. Do not brown them. Add the garlic and sauté for 1 minute. Sprinkle with salt.
2. Add the sunchokes and stock:Add the sunchokes and your choice of stock to the pot and bring to a simmer. Reduce the heat to low, and simmer, covered, until the sunchokes begin to break down, 45 minutes to an hour.
3. Purée the soup and serve:
Using an immersion blender or upright blender, purée the soup. If using an upright blender, fill the blender bowl up only to a third of capacity at a time, if the soup is hot. Hold down the lid while blending. Alternatively, you can push the soup through the finest grate on a food mill, or push it through a sturdy sieve. Add more salt to taste.
Sprinkle with freshly ground black pepper before serving.
How To Store Leftover Soup
Cooked sunchokes will only keep for a couple of days in the fridge. The same goes for the leftover soup. Elise says she freezes this soup all of the time and it freezes great. She also likes to add a little pesto to it if she has it.
ROASTED SUNCHOKES WITH BROWN BUTTER–CIDER VINAIGRETTE
Source: Roasted Sunchokes Brown Butter-Cider Vinaigrette - Jamie MaloneChef Jamie Malone makes a tangy, lush and slightly spicy vinaigrette that is delicious on sweet sunchokes and fresh spinach.
Ingredients
1 pound sunchokes (Jerusalem artichokes), scrubbed and cut into 1-inch pieces
1/8 cup extra-virgin olive oil
2 thyme sprigs
4 garlic cloves, crushed
Kosher salt
1/8 cup apple cider vinegar
2 tablespoons minced shallots
1/4 teaspoon crushed red pepper
1/2 teaspoon honey
1 tablespoons unsalted butter
Black pepper
1 cups fresh spinach leaves
1/8 cup chopped chives
Directions
Step 1: Preheat the oven to 375°. On a baking sheet, toss the sunchokes, oil, thyme sprigs and garlic and season with salt. Roast for about 1 hour, stirring occasionally, until golden and tender. Discard the thyme sprigs and garlic. Transfer the sunchokes to a large bowl.
Step 2: Meanwhile, in a saucepan, cook the vinegar over moderate heat until reduced to 1 tablespoon, 3 minutes. Transfer to a bowl. Stir in the shallots, crushed red pepper and honey.
Step 3: Wipe out the saucepan. Add the butter and cook over moderate heat until golden brown, 2 to 3 minutes. Whisk the butter into the vinegar mixture and season with salt and pepper.
Step 4: Add the spinach, chives and vinaigrette to the sunchokes; season with salt and pepper and toss to coat. Serve warm.
Winter Share Week 1
Hello!!! Hope your holidays were wonderful and full of joy! For us January 3rd marked one year since the fire happened and we are ever so grateful to be back home. Still have kinks to work out but that’s ok we’re learning how to live in our “new” abode. Our gratitude is immense. We have difficulty finding words to say thank you to all of you for your support as we traverse this journey. So with that being said - 'tis the season of roots. I’ve been working on seed orders and as they start to arrive we’ll soon begin planting in the greenhouse. 'Soon' as in by the end of January if all goes well. I’ve been holding off a bit to start seeding as the weather has been a serious challenge. Yesterday morning at around 5:00 AM the winds sounded like a freight train from hell was powering through the valley and in the afternoon they scoured across the fields creating blackout-like conditions on some of the roads. Sometimes it seems like the heater in the greenhouse never shuts off as it valiantly tries to keep everything inside from freezing. But this too shall pass and soon enough we’ll be commenting on how hot it is!!
ROASTED ROOT VEGETABLES WITH GOAT CHEESE POLENTA
Source: Originally appeared, EatingWell.com, April 2017, By Sylvia Fountaine, M.A. | Updated on April 22, 2024
This is true healthy comfort food--a bowl of soft, creamy polenta topped with warm roasted vegetables infused with garlic and sage.
Ingredients
Polenta
2 cups low-sodium vegetable or chicken broth
½ cup polenta fine cornmeal or corn grits
¼ cup goat cheese
1 tablespoon extra-virgin olive oil or butter
¼ teaspoon kosher salt
¼ teaspoon ground pepper
Vegetables
1 tablespoon extra-virgin olive oil or butter
1 clove garlic, smashed
2 cups roasted root vegetables (See Recipe Below)
1 tablespoon torn fresh sage (can substitute dried)
2 teaspoons prepared pesto
Fresh parsley for garnish
Directions
Step 1
To prepare polenta: Bring broth to a boil in a medium saucepan. Reduce heat to low and gradually add polenta (or cornmeal or grits), whisking vigorously to avoid clumping. Cover and cook for 10 minutes. Stir, cover and continue cooking until thickened and creamy, about 10 minutes more. Stir in goat cheese, oil (or butter), salt and pepper.
Step 2
Meanwhile, to prepare vegetables: Heat oil (or butter) in a medium skillet over medium heat. Add garlic and cook, stirring, until fragrant, about 1 minute. Add roasted vegetables and cook, stirring often, until heated through, 2 to 4 minutes. Stir in sage and cook until fragrant, about 1 minute more.
Step 3
Serve the vegetables over the polenta, topped with pesto. Garnish with parsley, if desired.
ROASTED VEGETABLES
Originally posted: Sheet-Pan Roasted Root Vegetables
The key to success here is high heat!!!
Ingredients
Various Roots, Potatoes, Sweet Potatoes and Onions
3 tablespoons extra-virgin olive oil
1 ½ tablespoons apple cider vinegar or balsamic vinegar
1 tablespoon fresh herbs, such as thyme, rosemary or sage
kosher salt and ground pepper to taste
Directions
1. Position racks in upper and lower thirds of oven; preheat to 425°F. Line 2 large rimmed baking sheets with parchment paper.
2. Cut long roots into 1/2-inch-thick slices on a diagonal, then cut into half moons. Cut round roots into 1/2-inch-thick wedges. Cut roots like potatoes and winter squashes into 3/4-inch cubes. You should have about 12 cups raw vegetables.
3. Toss the vegetables with oil, vinegar, herbs, salt and pepper in a large bowl until well coated. Divide between the prepared baking sheets, spreading into a single layer.
4. Roast the vegetables, rotating the baking sheets top to bottom halfway through, until fork-tender, 30 to 40 minutes.
Fall Share Week 12
So hard to believe that 12 weeks have gone by and only 2 weeks left in this year. And what a year it has been!!! From our home burning down to enduring the crazy environmental conditions of our world as we now know it, it has been a journey of trust, faith and love. As I have said before we made it through because of your support and knowing you were right there with us. So as we wind this season and year down we are so very grateful for each of you. We wish you the best for wonderful holidays, times of joy and love and a peaceful and harmonious beginning of the New Year!!! See you in January!!!!!
GLAZED CARROTS
Source: https://www.dinneratthezoo.com/glazed-carrots/
These glazed carrots are tender carrot coins simmered in a mixture of brown sugar and butter and topped with a sprinkling of parsley. An easy and inexpensive side dish that’s perfect for a holiday meal or an everyday dinner.
Ingredients
▢1 1/2 lbs carrots peeled and cut into 1/2 inch thick slices
▢1/4 cup butter
▢1/4 cup brown sugar
▢1/4 teaspoon salt
▢1 tablespoon chopped parsley optional
Instructions
1. Place the carrots in a large pan and add 1 1/2 cups of water. Bring the carrots to a simmer
2. Cook for 8-10 minutes or until carrots are tender. Drain off any excess water.
3. Add the butter, brown sugar and salt to the pan. Stir to coat the carrots.
4. Cook for an additional 4-5 minutes, stirring occasionally, until a sauce has formed.
5. Sprinkle with parsley if desired, then serve.
Flavor Variations
This is a simple recipe that is easy to customize to suit your tastes.
Sweetener: You can substitute honey or maple syrup for the brown sugar if needed.
Vegetables: I sometimes add other root vegetables to this dish such as parsnips, thinly sliced sweet potatoes and even yellow beets.
Toppings: Finish your carrots with a sprinkle of nuts such as chopped pecans or toasted sliced almonds.
Add-Ins: Feel free to add other flavors such as a pinch of cinnamon or nutmeg, 1/2 teaspoon of fresh grated ginger, a squeeze of lemon juice or even a dash of vanilla extract.
CARROT PATTIES
Source: https://www.allrecipes.com/recipe/15183/carrot-patties/
Looking for shredded carrot recipes? These delightful carrot patties can be served either as a main dish or as a side. They're always a favorite.
Ingredients
1 pound carrots, grated
4 eggs
¼ cup all-purpose flour
¼ cup bread crumbs
1 clove garlic, minced
½ teaspoon salt
1 pinch ground black pepper
2 tablespoons vegetable oil
Instructions
Step 1: Mix grated carrots, eggs, flour, bread crumbs, garlic, salt, and pepper together in a medium mixing bowl until well combined. Form into patties.
Step 2: Heat oil in a frying pan over medium-high heat. Add patties and fry until golden brown on each side.
Recipe Tip
You can use matzo meal instead of bread crumbs if desired.
Fall Share Week 11
Wow this weather!!! Temps dropping like crazy from the 60s to 30s all in the space of a few hours. Watching the fields flood with rain as it pours down , and so very grateful not to be out there in it. Time to focus on cleaning out the greenhouse and prep for planting. Onion seeds need to be planted in January/February so we have transplants ready to go in the field in Spring. Peppers and tomatoes need to be started around February/March. The pace is pretty relentless and yet so exciting all at the same time. I think that’s one of the miracles of farming, you always have hope. To plant those tiny seeds and watch them germinate and grow into those big plants and then generate those delicious fruits and vegetables, how can you not have hope! I’ve been looking at varieties that can hold up better to the high heat of summer as well as having good flavor and higher nutritional values. Everyone's soil is different so I’ll have to do some analyzing once the crops come in. I’ve been looking at refractometers. I lost mine in the fire. A refractometer is like a microscope that can be held in your hands. It measures the brix. Brix is the sugar level found in fruits and vegetables. It’s fun and exciting to see the levels in our produce and see how the levels match up to what the seed producer promises! Can’t wait for Spring!!!
Recipes Today: the Pain d’epices recipe produces a great tea loaf that my sister and I enjoy for breakfast! French recipes by Florence from www.zestoffrance.com
PUMPKIN SOUP WITH CARAMELIZED GINGERBREAD CROUTONS
Source: https://zestoffrance.com/pumpkin-soup-with-gingerbread-croutons/
Quick and easy smooth squash soups with a twist: croutons of pain d’épices aka honey and gingerbread spices, previously pan fried in butter to become caramelized. Comforting and delicious. Pan fry cubed gingerbread with butter. Prepare the soup, cook vegetables and mix. Dress soup in bowls with gingerbread croutons, cream and parmesan.
Ingredients
800 gr pumpkin or other squash you like, butternut for example
1 onion
parmesan
4 thick slices gingerbread pain d’épices recipe see below
2 tablespoons olive oil or butter or your usual oil
1/2 liter water
10 cl cream / crème fraîche or milk or vegetal milk
salted butter or unsalted butter + pinch of salt
salt
Pepper
Instructions
Prepare the soup
1. Prepare vegetables: remove seeds and skin of pumpkin, cut slices or cubes. Peel and mince onion.
2. Heat olive oil in a large saucepan. Fry onion for a few minutes. Add pumpkin, salt and pepper. Cook over medium heat for about 10 minutes stirring occasionally.
3. Add water to 2/3rd of the height and cook for another 10 minutes.
Prepare gingerbread croutons
1. While the soup is cooking, caramelize gingerbread croutons.
2. Heat salted butter in a frying pan.
3. Meanwhile, cut gingerbread into cubes.
4. Pan fry gingerbread over medium heat to get golden croutons then set aside.
Mix the soup
1. When vegetables are well cooked, remove a bit of cooking water but don’t throw it away. Mix in the blender or with a hand mixer.
2. Add crème fraîche, taste and adjust seasoning. Depending on the consistency you get, if it’s too thick, pour back in some cooking water you removed earlier and mix again.
Dress
Serve the soup with gingerbread croutons, grated parmesan and additional crème fraîche aside or dress individual bowls : Pour soup in, dizzle crème fraîche (or not ;-) ), add a few gingerbread croutons, grate parmesan and / or any other topping you like.
SPICES AND HONEY GINGERBREAD
Source: https://zestoffrance.com/spices-and-honey-gingerbread/#recipe
French gingerbread is more like a honey and spices gingerbread, with lots of different spices. The recipe is very simple and doesn't contain any butter nor egg. Mix all dry ingredients together. Heat milk, dissolve honey in it and add citrus juice and zests. Mix everything together then bake.
Equipment: Cake tin
Ingredients
250 gr flour ideally all-purpose flour ±2 cups
150 gr sugar a little less than ½ cup
1 teaspoon baking powder or baking soda
250 ml milk 1 cup
2 tablespoons honey large tablespoons
½ lemon for its juice
lemon and/or orange zest quarter of a fruit
Spices
1 teaspoon nutmeg
1 teaspoon cinnamon
1 teaspoon gingerpepper a few turns of mill
cloves optional
Instructions
1. Preheat the oven to 180°C (350°F).
2. Sift the flour. Add the sugar and the baking powder and mix.
3. Then add the spices and mix. As spices are added in dry ingredients, it’s easy to make sure that when you mix, spices are spread all over the preparation and that the entire flour-sugar mix is completely impregnated with spices.
4. Take off the peels of your citrus (may it be orange or lemon). Finely chop the zests. Add the zests and the lemon juice to the preparation.
5. Heat the milk and add two generous spoons of honey. Thus, the honey dissolves in hot milk and will be well spread homogeneously in the preparation.
6. Add the milk and honey mixture to the preparation and mix vigorously until you get a nice dough, without lumps.
7. Grease and flour a mold, preferably a cake tin, or use a silicone mold. Pour the dough in and bake for 45 minutes.
8. Spices and honey gingerbreads are served for breakfast or as snack (it’s in my family enjoyed with salted butter), with creamy or fruit desserts.
9. Spices and honey gingerbreads are also tasty with some savory dishes: some gingerbread croutons in a pumpkin soup or foie gras on gingerbread toasts with fig jam.
Fall Share Week 10
Hope your holiday was exceptionally delicious!!! I cooked for my family — our first celebration in the rebuilt kitchen after the fire. For us it was a great day — mostly because we were together for the first time in a long long while. And today back to work — water was frozen so it was difficult to wash produce. A miscommunication between Lupe and myself resulted in her not showing up for work so I did all the harvesting and packing out myself. She’ll be back on duty next week for which I am very grateful. As I sit writing this I’m looking out at a light dusting of snow covering the valley, sunlight reflecting off the flakes, watching the tree boughs bending in the building breeze. Thinking about all the projects I want to work on, the crop planning for next year, the recipes I want to make, it just doesn’t get any better!!!!
CURRIED ROOT VEGETABLE SOUP
Source: https://www.crowdedkitchen.com/curried-root-vegetable-soup/
This is such a flavorful, creamy soup - perfect for a cozy autumn evening! I have found myself fascinated with curry lately and plan on making this soup for us this weekend.
Ingredients
1-2 tablespoon coconut or olive oil
1 large yellow onion, diced
2 garlic cloves, minced
6-8 carrots, peeled and roughly chopped
1 cup butternut squash, peeled, deseeded and roughly chopped
1 large sweet potato, peeled and chopped
4-6 cups of veggie broth (enough to cover the veggies in the pot)
1 tsp sea salt
1⁄2 tsp pepper
1 ½-2 tablespoon curry powder
1 tsp cumin
1 tsp turmeric powder
½ tsp cinnamon
2 tsp maple syrup
Instructions
1. In a large pot over medium heat, sauté onion and garlic until translucent & softened.
2. Add in rest of ingredients. Bring to boil, then reduce heat to medium.
3. Cover and simmer until veggies are softened (approx 45 minutes).
4. At this point, add in hemp seeds and maca powder if using.
5. Use either an immersion blender or regular blender to puree soup until smooth. (If using a blender, be careful when transferring soup to blender and vice versa! You may have to do this in two batches.) Taste and adjust spices as desired.
6. Serve topped with crunchy lentils, a dollop of plain yogurt or coconut milk and fresh herbs. For a more filling dinner, you can also serve over cooked lentils, rice and/or quinoa.
A link to a primer on types of curries.
https://www.ispiceyou.com/blogs/news/the-difference-between-garam-masala-and-curry-powder#:~:text=Garam%20Masala%3A%20Garam%20Masala%20is,to%20the%20presence%20of%20turmeric.
ROASTED BRUSSELS SPROUTS & PARSNIPS
Source: https://www.allrecipes.com/recipe/240025/roasted-brussels-sprouts-and-parsnips/
I liken parsnips to an elegant carrot. They have become one of my personal favorite vegetables.
Ingredients
⅓ cup balsamic vinaigrette salad dressing
1 tablespoon brown sugar
1 tablespoon chopped fresh thyme
1 pound Brussels sprouts, halved
1 pound parsnips, peeled
1 large red onion, thickly sliced
Directions
1. Preheat oven to 400 degrees F (200 degrees C).
2. Mix salad dressing, brown sugar, and thyme together in a small bowl.
3. Mix Brussels sprouts, parsnips, and red onion together in a 13x9-inch baking dish. Drizzle dressing mixture over the vegetables and toss to coat.
4. Bake in preheated oven until vegetables are tender, about 40 minutes.
Fall Share Week 9
November — already almost a memory but still a week left on the calendar. Finally rain started to fall around 1 AM this morning. I feel like I forgot what it felt like, even smelled like. Bruiser, one of my cats came in to huddle on my lap for a while. The two of us sat on the back steps staring out the open doorway taking it all in. The soft patter of raindrops permeated the earth dampening the dust and washing away the quiet film of soil that clings to vehicles and us. The forecast is calling for snow north and west of the City which means our area! I don’t foresee the temps dropping enough to put us in that range but stranger things have happened. I wouldn’t be surprised if the higher elevations will be the recipients of some early white precip. So Thanksgiving is just a week away and so so much to be grateful for! Beginning January 3 with the fire and now we have begun to slowly move back home! So grateful that you have been a part of our lives and traveled this journey with us. Without you and your support we would not be able to persevere. THANK YOU! We hope your table and hearts are full not only on Thanksgiving but throughout the year as well!!!!
CHOCOLATE CHIP BUTTERNUT SQUASH CAKE
Source: Chocolate Chunk Butternut Squash Cake - Veggie Desserts
This Chocolate Chip Butternut Squash Cake is a cozy dessert that’s moist, spiced, and studded with chocolate chips. See note.
Ingredients
250 g peeled and deseeded butternut squash, cubed (1 ¼ cups (1 cup of puree))
175 g unsalted butter, softened (¾ cup)
125 g granulated sugar (⅔ cup)
2 large free-range egg
2 teaspoon vanilla
175 g plain (all purpose) flour (1 ½ cups)
1 ½ teaspoon baking powder
1 teaspoon ground cinnamon
½ teaspoon ground nutmeg
½ teaspoon ground ginger
½ teaspoon salt
100 g chocolate chips (3.5oz/ ½ cup)
Instructions
1. Preheat oven to 180°C/350°F. Lightly grease and line an 8x8 inch baking pan
2. Steam the butternut squash over a pan of simmering water until soft. Drain well and puree with a hand blender, potato masher or food processor. Set aside to cool slightly. You should have 1 cup of puree.
3. In a large bowl or stand mixer, beat the butter and sugar until light and fluffy. Add the eggs, one at a time and beat each one in well. Add the vanilla and cooled squash puree and combine.
4. Sift in the flour, baking powder, spices and salt and gently mix. Fold in the chocolate.
5. Spread the mixture evenly into the baking tray and bake for 30-35 minutes or until an inserted skewer or toothpick comes out clean. Allow to cool in the pan and then turn out and cut into squares.
Note: Other squashes can be substituted for butternut - Robins koganut, kabocha, honey nut, honey patch are some of the varieties that will work well and of course you can also substitute sweet potato.
TURNIP AND BEET GRATIN WITH GRUYERE
Source: Turnip and Beet Gratin with Gruyere - It's a Veg World After All®
Ingredients
1 pound beets
1 turnips
½ shallot - diced
3 tablespoon olive oil - divided
1 tablespoon butter
1/2 tablespoon fresh thyme - more to taste
½ cup vegetable stock
¼ cup gruyere cheese - freshly grated
Instructions
1. Preheat the oven to 400 degrees F. Grease a 12-inch cast iron skillet.
2. Prepare the beets and turnips by trimming and scrubbing them (you can also peel them if you'd like). Use a mandoline to make thin slices. Layer the vegetables in the cast iron skillet (or other oven-proof skillet or 9x13 baking dish) by starting with a layer of turnips, followed by a layer of beets, and so on.
3. In another large skillet, heat 1 tablespoon olive oil over medium heat. Add the diced shallots and cook for 3 to 4 minutes. Remove from heat and stir in the other 2 tablespoon of olive oil and 1 tablespoon of butter until melted. Add the chopped thyme and vegetable stock. This is your gratin sauce.
4. Pour the sauce over your layered vegetables. Wrap foil over the skillet and bake for 45 minutes. Remove from oven, take off the foil, and sprinkle the shredded gruyere cheese over the vegetables. Bake uncovered for another 15 minutes or until the cheese is bubbling and slightly brown.
5. Garnish with fresh thyme sprigs. Serve warm and enjoy!
Notes
* You can use larger beets for this recipe if you can't find baby ones.
* When layering the gratin, try to make each consecutive layer further away from the edge of the skillet than the one before it. This will make for a really pretty dish, but you can also just make flat layers, as you would with a scalloped potato dish.
* If you are making this in advance, you can reheat the entire gratin in its skillet, covered with foil, for 10 to 15 minutes at 350 to 400 degrees F. But it does taste best fresh out of the oven.
* If you don't have a mandoline, you can try using a sharp knife, but it will take longer.
Fall Share Week 8
Keep thinking of our friends, relatives and the first responders over in Greenwood Lake. The fire has taken such a toll. I drove over after the market on Sunday and delivered a bunch of baked goods for the responders. As you crossed over Mt. Peter the smoke was horrific. I only went as far as the first fire house not wanting to impede the progress of the fighters. So far over 5,000 acres are gone and the firefighters continue their valiant efforts. Sending caring thoughts to the family of the young firefighter who died. In the meanwhile we continue to carry on at the farm. The fierce winds continue to beat us all up and erode away the soil. Were we to plant cover crops now would be of no use as without moisture the seeds aren’t able to germinate. So we continue to plan for Spring and hope for the best!!!
MAPLE-ROASTED PARSNIPS AND BRUSSELS SPROUTS
Source: Maple-Roasted Parsnips and Brussels Sprouts - Today's Parent
Ingredients
1/2 lb parsnips, peeled and quartered
1/2 lb Brussels sprouts, ends trimmed, halved
1 ½ tbsp olive oil
1/2 tsp salt
1 tsp maple syrup
1/2 tbsp chopped thyme
Instructions
1. Preheat oven to 425F. Toss parsnips and Brussels sprouts with oil on a baking sheet.
2. Roast 20 min or until tender and lightly browned. Toss vegetables with syrup and thyme and roast 10 min more. Serve warm.
Tip: For crunch, add a handful of pecans to the tray for the last 10 min of roasting. Or make this recipe into something else entirely: Once veggies are roasted—but before adding maple syrup and thyme—purée them with chicken stock to make a silky, hearty soup (this trick works well with pretty much any tray of roasted veg). Drizzle with maple syrup and garnish with fresh thyme to serve.
MINESTRONE SOUP WITH PESTO
The point of this minestrone soup is to make use of your favorite fall & winter veggies, or just use up what you have on-hand. It's very flexible, letting you use any of the following:
Butternut squash, or your favorite winter squash
Carrots or parsnips
Sweet potatoes, regular potatoes, or celeriac
Spinach, kale, or shredded brussels sprouts
The amount of each vegetable is also very flexible. The recipe provides some guidelines, but you can easily stray from them. Below the recipe is a guide on the different vegetables you can choose from, how to make ahead, store leftovers, and additional nutrition info.
Ingredients
Aromatics
2 tablespoon bacon fat (or butter, see note)
1 yellow onion
3 stalks celery
4 cloves garlic
Soup ingredients
6 medium carrots (or parsnips)
½ butternut squash, peeled (or about 1 lb of any winter squash)
1 medium sweet potato, peeled (or regular potato, or celeriac)
4 sprigs fresh thyme (or substitute 1½ teaspoon dried)
1 teaspoon salt (more or less depening on sodium level of broth)
1 teaspoon black pepper (or red pepper if preferred)
1 parmesan rind (optional)
2 bay leaves
26 oz can of diced tomatoes
6-8 cups chicken broth
15 oz can of cannellini beans rinsed and drained
½ - ¾ cups dry small pasta, like ditalini (see note for small pasta types and measurements)
Finishing touches
8 oz spinach (or kale or shredded brussels sprouts)
½ cup dry white wine (any non-sweet white wine or vermouth you would drink)
2-3 tablespoon pesto
Instructions
Prep produce: Cut the onion and celery into a small dice, and finely chop the garlic. Cut the carrots, butternut squash, and sweet potato into bite-sized pieces for soup. Roughly chop spinach (or kale, stems and ribs removed).
Make the soup. Cook aromatics, about 10 minutes: Heat 2 tablespoon bacon grease (or butter) in a large soup pot (minimum of 6 quarts, see note). Add the diced onion and celery, cook until it smells good and the onions turn translucent (about 6-8 minutes). Add the garlic, thyme, and 1 teaspoon salt and 1 teaspoon pepper. Cook 2-3 more minutes until it smells good. (The oils in thyme are fat soluable, so cooking them in fat before broth is added intensifies the flavor).
Add more vegetables & broth, cook 20 minutes: Add the diced carrots, butternut squash, sweet potato, can of diced tomatoes, 6 cups of broth, Parmesan rind (optional), and bay leaves. Bring to a boil, reduce heat and simmer for 20 minutes, or until the vegetables are almost soft (they will continue to cook after adding the pasta). Taste, add salt as needed, remove herbs & Parmesan. At this point, give it a taste and add salt if needed. Remove the thyme sprigs, bay leaves, and Parmesan rind.
Add beans & pasta, cook 8-10 minutes: Add the can of beans and dry pasta. Cook as long as pasta package indicates.
Thick vs thin soup: at this point, the soup is probably pretty thick. Add more broth if you want a thinner soup.
Almost done! Add finishing touches
Add spinach & wine: cook until the spinach is wilted, about 2 minutes. Add pesto to the pot or add about 1 teaspoon to each bowl when served.
Notes
Butter or bacon grease: I usually buy bacon and cook it the night before, saving the bacon fat for this soup. It adds depth but doesn't add a noticeable bacon flavor. If you don't want the fuss, butter is a good substitute, followed by olive oil.
Pasta: you want about 2 cups of cooked pasta in the end (give or take, based on your preferences). You can cook the pasta in a separate pot if you're worried about measurements. I like to cook it in one pot to save on dishes. Below is a list of the approximate amount of dried pasta needed to make 2 cups cooked. Ditalini or tubetti (my favorite for this soup): ½ cup dry
Elbows: just shy of 1 cup dry
Orzo: about ¾ cup dry
Soup pot: the standard dutch oven size is 6 quarts. This recipe will fill it to about 1-2 inches from the top, so anything smaller won't work.
Fall Share Week 7
The fields are so dry and windswept right now it feels like a desert out there. The extraordinary warm days are great in allowing us to get more field work done in preparation for spring. But it is worrisome as even the drainage ditches are pretty dry leaving little opportunity for irrigating any new plantings. Debating whether to get the excavator and clean the ditches now. But I think I'll wait till spring as the ditches will only fill back up again with soil as the winds scour the valley. In the meantime I’m working on getting a tire fixed and the pto shaft replaced on the Kabota, two tires on the disc harrow. Trying to find a mechanic to help me get the cub and ACG up and running for Spring time. Seed companies are tantalizing me with early bird offers so I’m creating a wish list for late winter early spring of what to grow. Lots to do!!!!
EASY, CLASSIC ROASTED ROOT VEGETABLES
Source: Roasted Root Vegetables | The Kitchn
Ingredients
3 pounds root vegetables, such as carrots, parsnips, sweet potatoes, and beets
1 small red onion
1/4 cup olive oil
1 1/2 teaspoons kosher salt
1/4 teaspoon freshly ground black pepper
2 tablespoons coarsely chopped fresh rosemary leaves
Instructions
1. Arrange a rack in the middle of the oven and heat the oven to 425°F.
2. Peel 3 pounds root vegetables, if desired, then cut them into rough 1-inch chunks. Cut 1 small red onion into 1-inch chunks. Place the root vegetables and red onion on a rimmed baking sheet. Drizzle with 1/4 cup olive oil, sprinkle with 1 1/2 teaspoons kosher salt and 1/4 teaspoon ground black pepper, and toss to evenly coat. Spread out in an even layer.
3. Roast for 30 minutes. Meanwhile, chop until you have 2 tablespoons coarsely chopped rosemary leaves.
4. Remove the baking sheet from the oven, sprinkle the vegetables with the rosemary, and toss to combine. Spread back out in an even layer. Continue to roast until the vegetables are tender and caramelized, 10 to 15 minutes more.
MASHED ROOT VEGETABLES
Mashed potatoes are well known, as are mashed sweet potatoes (often sweetened with brown sugar). Other root vegetables like rutabagas, parsnips, turnips, and celery root are also delicious mashed, either on their own or mixed in with the more traditional potato.
Instructions
1. Peel root vegetables and cut into large, even chunks. Put them in a pot and cover with cold water.
2. Bring to a boil. Add salt. Cook until vegetables are very tender, about 20 minutes.
3. Drain thoroughly; return vegetables to pot over heat; shake the pot to cook off any excess liquid, about 5 minutes.
4. Put vegetables through a ricer or mash with a large fork or masher.
5. Add cream, butter, milk, and/or buttermilk and salt and pepper to taste. Serve hot.
CHEESY ROOT VEGETABLE GRATIN
Source: Cheesy Root Vegetable Gratin | Spoon Fork Bacon
This beautiful Cheesy Root Vegetable Gratin is as beautiful as it is tasty. Sweet Potatoes, beets, and parsnips with cream and garlic baked to perfection. We love this side dish for special occasions like Thanksgiving.
Ingredients
1 tablespoon unsalted butter softened
1-2 long sweet potatoes (about 2 inches thick), peeled
3-4 large parsnips, ends trimmed and peeled
3-5 small beets, peeled
14 tablespoons heavy cream, divided (whole milk is fine, but mixture won't thicken as much or be as creamy)
4 ounces grated Parmesan, divided
1 tablespoon fresh minced thyme, divided plus more for garnish
1 garlic clove, minced
1 ounce shredded gruyere
salt and pepper to taste
Instructions
1. Preheat oven to 400˚F. Grease a 3 quart baking dish with butter.
2. Slice sweet potato, parsnips and beets into very thin rounds (using a mandoline is easiest) and transfer each vegetable to its own bowl.
3. Pour 4 tablespoons cream over each sweet potatoes and parsnips, and 2 tablespoons cream over beets. Top each bowl of sliced vegetables with ½ ounce grated Parmesan and 1 teaspoon minced thyme. Season each bowl generously with salt and pepper and toss together until all vegetable slices are well coated.
4. Pour remaining 1/4 cup cream into the bottom of a 3 quart (oval) baking dish and sprinkle with ½ ounce of Parmesan and minced garlic.
5. Grab a stack of sweet potatoes and line them standing up on a bias, at the top of the baking dish. Follow the sweet potato with a row of parsnips, followed by a row of beets. Repeat with the remaining sweet potatoes, parsnips and beets, creating 6 rows of root vegetables.
6. Season top of gratin with salt, pepper and sprinkle of remaining Parmesan.
7. Cover with foil and bake for 30 minutes or until vegetables are soft.
8. Uncover gratin and top with shredded gruyere.
9. Place gratin back into oven, uncovered, and continue to bake for an additional 18 to 20 minutes or until vegetables are fork tender, cheese has melted and the top has lightly browned.
10. Finish with a sprinkle of fresh thyme leaves. Serve.
MIXED BEANS AND ROOT VEGETABLE STEW
Source: Mixed Beans and Root Vegetable Stew - Forks Over Knives
This is almost a chili—except that there are more root vegetables than beans. If you want to make it into a chili, just cut down on the vegetables and up the beans. Serve as is or with cooked grains, tortilla chips, or baked potatoes.
Ingredients
1 onion, cut into ¼-inch dice
1 rutabaga, peeled and cut into ½-inch dice
2 parsnips, peeled and cut into ½-inch dice
1 carrot, peeled and cut into ½-inch dice
5 ounces mushrooms, cut into ½-inch dice
1 tablespoon minced garlic
1 tablespoon dried oregano
4 cups vegetable broth
2 (15-ounce) cans kidney beans, rinsed and drained
1 (15-ounce) can cannellini beans, rinsed and drained
2 tomatoes, cut into ½-inch dice
¼ cup tomato paste
2 chipotle chilies (whole pods)
1 tablespoon nutritional yeast
¼ teaspoon cinnamon
¼ cup lemon juice
sea salt
ground black pepper
2 tablespoons parsley, finely chopped, divided
Directions
1. Place the onion, rutabaga, parsnips, carrot, mushrooms, garlic, and oregano into a stockpot. Add ¼ cup of water and cook over medium heat for 10 minutes, stirring occasionally, until the onions are translucent. Add 1 to 2 tablespoons of water, if needed, to prevent the vegetables from sticking to the pot.
2. Add the broth, beans, tomatoes, tomato paste, chili pods, nutritional yeast, and cinnamon. Bring to a boil, reduce heat to medium, cover and simmer until the vegetables are well cooked, about 20 minutes.
3. Add the lemon juice, salt, pepper, and half of the parsley. Taste and adjust seasoning. Cook for another 5 to 10 minutes until the stew is creamy.
4. Remove the chili pods before serving. Garnish with remaining parsley and serve hot.
Fall Share Week 6
'Tis the season of greens! Fall is one of the best times of the year for leafy greens, spring being the other. I know it can get overwhelming as the flavor notes tend to be more on the bitter side and not appreciated by many. Even though I grew up on the farm we were not accustomed to the greens of fall except for cabbage. One of our, well two family favorites were sauerkraut and galombki (stuffed cabbage). Sauerkraut wasn't one of my personal faves until I was older but now I look forward to fall and fermenting. It's been a personal quest for me to find recipes to help use fall greens in ways that folks will hopefully find appealing. Some have fared better than others (people and recipes). The farm is in transition from an overabundance of leafy greens to heartier crops of late fall and winter, like Brussels sprouts, turnips, parsnips and more. Next week you'll start to see more of these types of vegetables, the farmers are busy shelling dry beans now!!! I am so looking forward to sharing the next season of flavors with you all!!!
CHICKEN & BOK CHOY SOUP WITH GINGER & MUSHROOMS
Source: https://www.eatingwell.com/recipe/252321/chicken-bok-choy-soup-with-ginger-mushrooms/ By Bruce Aidells
This healthy and nourishing chicken and vegetable soup is the perfect winter meal. Servings: 8
Ingredients
1/2 ounce (about 1/2 cup) dried shiitake or mixed dried mushrooms
3 cups boiling water
1 tablespoon peanut oil or canola oil
2 cups diced onion
3 cloves garlic, thinly sliced
6 1/8-inch-thick slices peeled fresh ginger
6 cups reduced-sodium chicken broth
¼ cup reduced-sodium soy sauce
1 2-to-3-inch cinnamon stick
1 whole star anise
1 teaspoon freshly ground pepper
2 pounds boneless, skinless chicken thighs, trimmed and cut into 1-inch pieces
1 bulb fennel, cored and cut into 1-inch pieces
8 scallions, whites cut into 2-inch pieces and greens chopped, divided
1 pound bok choy, preferably baby bok choy, white stems sliced lengthwise and greens chopped, divided
2 cups (4 ounces) mung bean sprouts (see Note)
½ cup chopped fresh cilantro
2 teaspoons toasted sesame oil
Lime wedges for garnish
Directions
Step 1: Place mushrooms in a heatproof measuring cup and cover with boiling water. Soak for at least 30 minutes or up to several hours. Remove the mushrooms from the water, remove and discard stems (if any) and cut into 1/8-inch slices; set aside. Strain the soaking liquid and reserve.
Step 2: Heat oil in a large soup pot or Dutch oven over medium heat. Add onion, garlic and ginger and cook, stirring, for 5 minutes. Pour in the reserved mushroom liquid, broth, soy sauce, cinnamon stick, star anise and pepper. Bring to a boil. Reduce to a simmer and stir in chicken. Simmer for 20 minutes.
Step 3: Stir in fennel, scallion whites and the reserved mushrooms and cook for 5 minutes. Add bok choy stems, return to a simmer and cook for 3 minutes more. Stir in bok choy greens and bean sprouts. Cook until the greens are just wilted, about 2 minutes more
Step 4: Discard the cinnamon stick and star anise. Ladle the soup into bowls. Garnish each bowl with scallion greens, cilantro and a 1/4-teaspoon drizzle of sesame oil. Serve with lime wedges, if desired.
Notes
– Mung bean sprouts (germinated mung beans), often simply labeled "bean sprouts," are white with a light yellow tip.
– People with celiac disease or gluten sensitivity should use soy sauces that are labeled "gluten-free," as soy sauce may contain wheat or other gluten-containing sweeteners and flavors.
Originally appeared: EatingWell Magazine, March/April 2010; updated November 2022
ROASTED BROCCOLINI WITH TAHINI SAUCE (OTTOLENGHI RECIPE)
Source: https://www.recipetineats.com/roasted-broccolini-with-tahini-sauce-ottolenghi-recipe/#wprm-recipe-container-48993
Ingredients
500g/1 lb broccolini, ends trimmed
1 tbsp extra virgin olive oil
1/4 tsp each salt and pepper
1 garlic clove , finely minced
Tahini Sauce:
1/4 cup tahini
2.5 tbsp water
1.5 tsp honey
1 tbsp lemon juice
1/2 garlic clove , pressed through garlic crusher or grated using microplan (to make sauce smooth)
1/4 tsp each salt and pepper
Garnish:
1/4 cup flaked almonds, pine nuts or pistachios , toasted (Note 2)
Instructions
1. Preheat oven to 220°C/425°F (200°C fan).
2. Sauce: Mix Tahini Sauce ingredients until combined. It should be loose enough so it can be drizzled, but not too runny. Set aside 15 minutes.
3. Toss broccolini: Pile broccolini on tray, drizzle with oil, sprinkle with salt, pepper and garlic.
4. Roast for 12 - 15 minutes until the broccolini floret ends are dark brown and crunchy (the best part!), and the broccolini stem is just tender. (But if you want it really soft, lower temp to 180C/350F and cook 20 min).
5. Plate up: Transfer to serving plate, allow to cool until warm. Drizzle over tahini sauce, sprinkle with almonds or pine nuts and serve! Excellent served warm OR at room temp.
Variations:
1. The Tahini Sauce goes brilliantly with other roasted vegetables too, including: carrots, cauliflower, broccoli, green beans and asparagus.
Recipe Notes:
1. Broccolini preparation - rinse and trim the woody tips off, then it's ready to cook! Leaves and flowers can be eaten.
2. Tahini - sesame sauce used in hummus. Use hulled, not unhulled (more bitter). Do not substitute with Chinese sesame paste or sauce which you might have (I always have it for Dan Dan Noodles, made that mistake once - flavour is way too intense). Tahini oil separates in the jar so give it a really good mix with a butter knife before using. If it's hard to mix together (some brands are better than others - I like Mayver's) you can also give it a quick zap in the microwave for 20 seconds to warm it up, makes it much easier to mix.
3. How to serve this dish:
– Plain roasted broccolini (ie without tahini sauce) - as a side dish for "anything" With sauce - as an impressive side dish, particularly great with anything Middle Eastern/Arabic/Turkish (like these Koftas)
– As a meal - really great as part of a lunch spread of salad options which is how I've served it multiple times. See in post for ideas for other salads to add to the menu!
4. Source: This recipe comes to you via Yotam Ottolenghi - except I found I needed to adjust the salt way down and adjust the sauce quantities to make it drizzle-able (is that a word?).
SAUTÉED SPIGARELLO WITH GARLIC AND RED PEPPER
Because spigarello is kin to broccoli rabe, it can be used like it. You can sauté it, put it into soups, or bake it in casseroles. But since it does not have the bitterness of broccoli rabe, it can also be used in salads without sending the bitter part of the taste belt on your tongue into orbit. So, here is my favorite (and the most classic) recipe for broccoli rabe (which appears in Vegetarian Italian: Traditions, Volume 1), prepared with spigarello. Thanks to Linda for providing the clue.
Ingredients
3 tablespoons olive oil
2 large garlic cloves, thinly sliced
Crushed red pepper to taste
1 pound spigarello (or broccoli rabe)
½ teaspoon salt, plus more to taste
Directions
In a large pot, combine the oil, garlic, and red pepper and sauté over medium heat until the garlic is well browned, about 3 to 5 minutes.
– Meanwhile, cut the stems off the spigarello, and remove any blackened or yellowed leaves. Cut large pieces into edible lengths.
– Add the spigarello, salt, and ½ cup water to the pot and stir. Continue cooking until the spigarello is tender, about 10 to 15 minutes. If it gets dry, add a little more water. Transfer the spigarello and the juices to a serving platter. Season with more salt, if desired.
Fall Share Week 5
Brrr... it was chilly out in the fields for a couple of days. The frost was so heavy you only saw white, all the leafy greens were obscured by glittery shards. So beautiful as they glinted like diamonds in the early morning sunlight. Makes you wonder what winter will be like this year? Supposedly La Nina is headed our way, a weather pattern which could bring wetter, snowier weather. From what I’ve been reading it doesn't sound as though La Nina will be very strong this season and not have too much of an impact on us. If that remains true I am hoping we’ll be able to get some plantings done for overwintering and early spring harvests. I know it doesn't seem right that this year still has to be put to bed and I’m thinking of spring already! Meanwhile out to the fields to bring in the last of the winter squash and finish digging the potatoes!
CILANTRO LIME RICE
Source: https://www.loveandlemons.com/cilantro-lime-rice/#wprm-recipe-container-43197
This easy cilantro lime rice recipe is a great side dish for Asian or Mexican-inspired meals. Of course, we also love it in homemade burrito bowls!
Ingredients
1 cup long-grain jasmine rice, rinsed well and drained
1½ cups water
3 teaspoons extra-virgin olive oil
1 small garlic clove, finely minced
2 scallions, finely chopped
1 teaspoon lime zest
¼ to ½ teaspoon sea salt
1½ tablespoons fresh lime juice
½ cup finely chopped fresh cilantro
Pinch red pepper flakes, or ¼ diced jalapeño, optional
Instructions
1. Combine the rice, water, and 1 teaspoon of the olive oil in a medium saucepan with a lid. Bring to a boil, cover, and reduce to a simmer. Simmer for 20 minutes (or check the time listed on the package of your rice).
2. Uncover and fluff with a fork. Add the garlic, scallions, and lime zest and stir to combine. Let cool for 1 minute, then add the remaining 2 teaspoons of olive oil, ¼ teaspoon salt, lime juice, cilantro, and red pepper flakes or jalapeño, if using. Stir to combine and season to taste.
EASY BROCCOLINI AND BEANS PASTA SALAD RECIPE
Source: https://cookingwithourcsa.com/easy-broccolini-beans-pasta-salad/#recipe
Ready in 30 minutes, this is a balanced pasta salad that hits all the right umami notes for a dinner idea that's packed with flavor.
Ingredients
Roasted Broccolini
1 pound broccolini
1 teaspoon kosher salt
1/2 teaspoon ground black pepper
Pinch of crushed red pepper flakes
3 to 4 tablespoons extra virgin olive oil
Salad Base Ingredients
1 bunch broccoli greens stems removed and leaves chopped
1/2 lemon + 1 tablespoon olive oil to tenderize broccoli leaves
1 cup uncooked orzo pasta
2 tablespoons chopped Sun-dried tomatoes
1 cup cooked cannellini beans
Crispy Breadcrumbs
3/4 cup bread crumbs crisped up with olive oil and
1/2 teaspoon dried oregano
1/2 teaspoon dried basil
1/2 teaspoon dried thyme
Pinch of crushed red pepper flakes
Kosher salt and pepper to taste
Lemon Parmesan Dressing
1 tablespoon lemon juice
1 tablespoon white wine vinegar
1/2 teaspoon dijon mustard
1 teaspoon maple syrup or honey
1/4 cup olive oil
3 tablespoons grated parmesan
Instructions
Roast Broccolini
1. Preheat oven to 350 degrees Fahrenheit. Wash and trim broccolini to remove hardy stems and arrange evenly on a rimmed baking sheet. Drizzle with olive oil and season with kosher salt, black pepper, and red pepper flakes. Toss together to coat broccolini in oil and seasonings. Roast for 20 minutes, until edges are slightly charred and veggies are soft.
2. Once the broccolini is roasted and edges are slightly crisp, remove from oven and allow to cool slightly before giving the broccolini a rough chop. Add broccolini to the large bowl with the tenderized broccoli leaves. (see below for step to tenderize broccoli leaves)
Cook Pasta and Prep Salad Greens
1. While the broccolini roasts, bring a large pot of salted water to a boil and add the orzo. Cook pasta until al dente, about 6 or 7 minutes. Drain pasta and set aside.
2. Prep the broccoli greens but removing the leaves from the stems and giving the leaves a good rinse. Dry the leaves and use a sharp knife to roughly chop the leaves into bit size pieces. Add broccoli leaves to a large bowl. Squeeze out the juice of half a lemon over the broccoli greens and drizzle a tablespoon of extra virgin olive oil over the greens. Massage the greens to begin tenderizing the leaves. Allow the broccoli greens to sit and marinate in the lemon juice and olive oil while preparing the salad dressing and remaining ingredients.
Prep Salad Dressing
1. Prep the dressing by whisking together the lemon juice, white wine vinegar, dijon mustard, honey (or maple syrup), salt and pepper, and olive oil together until well emulsified. Add in the grated parmesan and whisk together. Taste and adjust seasoning as needed. Set dressing to the side.
Toast Breadcrumbs
1. Toast breadcrumbs in a small skillet for about 3 to 5 minutes with a tablespoon or two of olive oil and all the dried seasonings. Toast until golden brown and crispy. Alternatively, you can toast up Italian seasoned bread crumbs if you have those on hand instead. Remove from heat to cool slightly.
Salad Assembly
1. Assemble the remaining salad ingredients by adding in the cannellini beans, chopped sun-dried tomatoes, and cooked orzo pasta to bowl with the roasted broccolini and tenderized greens. Add half the toasted breadcrumbs and using salad tongs begin tossing salad ingredients to combine. Add in salad dressing and give it another toss before portioning salad in bowls and garnishing with more crispy breadcrumbs and grated parmesan, if desired.
Fall Share Week 4
“When the frost is on the punkin” is the opening phrase of a classic poem by James Whitcomb Riley. I have always felt these symbolic words of autumn to so accurately capture the essence of fall. Time for cozy sweaters, aromatic stews, fresh-pressed cider, steel gun colored skies, fierce winds whipping the air and scouring the soil so the grit is like sandpaper on your skin. And mostly time to harvest the pumpkins!!! Believed to have been cultivated as far back as 3599 BC pumpkins are native to Central America and Mexico and can now be found all over the world. The word itself comes from the Greek word Pepõn, which means "large melon." A symbolic fruit representing abundance, prosperity and natural goodness due to its prolific production of large quantities of food from one single seed and ability to grow like a weed.
Recipes Today:
- HOW TO ROAST PUMPKIN
- HOW TO ROAST PUMPKIN & SEEDS
- SAVORY STUFFED SUGAR PUMPKINS
HOW TO ROAST PUMPKIN
Source: https://minimalistbaker.com/how-to-roast-pumpkin/#wprm-recipe-container-34577
An easy-to-follow recipe for how to roast pumpkin and make homemade pumpkin purée! Perfect for pies, soups, pastas, and more!
Ingredients
1 2-3 lb. sugar pumpkin
1 Tbsp coconut or avocado oil (if avoiding oil, sub water)
1 pinch sea salt
Instructions
1. Preheat oven to 350 degrees F (176 C) and line a baking sheet with parchment paper.
2. Using a sharp knife, cut pumpkin in half lengthwise (removing the top and bottom is optional). Then use a sharp spoon or ice cream scoop to scrape out all of the seeds and strings.
3. Brush the pumpkin flesh with oil, sprinkle with salt, and place flesh down on the baking sheet. Pierce skin a few times with a fork or knife to let steam escape.
4. Bake for 45-50 minutes or until a fork easily pierces the skin. Then remove pan from the oven, let the pumpkin cool for 10 minutes, then scoop out and use for whatever dish you’d prefer! See text links above.
5. If turning into purée, simply scoop pumpkin into a high-speed blender or food processor and blend until creamy and smooth. if it has trouble blending, add a little water. But it shouldn’t need it!
6. Baked pumpkin and pumpkin purée will keep covered in the refrigerator up to 1 week, or in the freezer for 1 month (or longer).
HOW TO ROAST PUMPKIN & SEEDS
Source: https://ohsheglows.com/how-to-roast-perfect-pumpkin-seeds-easy-crunchy-addictive/ Yield: 4 cups flesh, 3/4 cup seeds
Prep time: 10 minutes, Cook time: 35 minutes
This is my go-to method for roasting a sugar pumpkin and its seeds at the same time! Most recipes tend to provide instructions on roasting them separately, but I wanted to come up with directions on how to roast them both simultaneously. And, luckily, I've discovered it couldn't be easier.
Ingredients
1 sugar pumpkin (2 1/2 to 3 pounds)*
Extra virgin olive oil
Pink salt, fine sea salt, or Herbamare
Directions
1. Preheat the oven to 325°F (160°C) and place two racks near the centre of the oven. Grab two rimmed medium-sized baking sheets and line one of them with parchment paper.
2. Fill a medium-sized bowl with water and set aside. Lie an absorbent towel onto the counter next to the bowl.
3. Slice off the pumpkin stem and discard.
4. Place the pumpkin, cut side down, onto a cutting board. Carefully slice the pumpkin in half.
5. Scoop out the pumpkin seeds and flesh/strings and place it all into the bowl of water. The seeds will float to the top (like magic!). Using your hands, grab the big chunks of flesh and pick off any attached seeds. Place the seeds back into the bowl of water. Discard/compost the chunks of flesh.
6. Use a slotted spoon to remove the seeds. Let excess water drip off and then place the seeds onto the towel. Blot dry (the seeds don’t have to be bone dry and it’s okay if there are some strands attached—they add flavour!).
7. Spread the seeds onto the baking sheet without the parchment and toss with 1 teaspoon of oil. Spread the seeds out into a single layer and sprinkle with salt.
8. Mist or spread oil all over the inside of each pumpkin half and then sprinkle with salt and pepper. Place each half cut-side down onto the lined baking sheet.
9. Place both sheets into the oven with the seeds on the lower rack. Roast at 325°F (160°C) for 20 minutes then remove the seeds and taste test a couple. As long as the inner seeds aren't tasting burned, you can keep roasting them. I usually return the seeds to the oven for another 3 to 4 minutes. Remove the seeds and cool.
10. Leave the pumpkin in the oven and increase the oven temp to 350°F (180°C). Continue roasting the pumpkin for another 12 minutes or so, until fork-tender. (The timing may vary based on how large and fresh your pumpkin is.) At this point you can slice it up and serve it as a side vegetable with your meal, or process/blend the flesh to make homemade pumpkin purée.
Tip: * One sugar pumpkin (roughly 2 3/4 pounds) yields about 4 cups (720 g) of roasted pumpkin flesh and 3/4 cup (75 g) seeds.
SAVORY STUFFED SUGAR PUMPKINS
Source: https://theculinarycure.com/savory-stuffed-sugar-pumpkins/
This recipe is an absolute show stopper. Individual pumpkins stuffed with bacon, cheese, bread, herbs and spices makes a dramatic and delicious presentation. It is not nearly as complicated to make as it looks; and it is a creative way to use whole pumpkins. Servings 4
Ingredients
2 sugar pumpkins each 1-1.5 pounds. I look for the smallest ones.
Salt and freshly ground pepper
1/4 pound stale bread or unseasoned stuffing mix 1/2-inch cubes
1/4 pound cheese such as Gruyere, swiss, cheddar, or a combination cut into 1/2 inch cubes
2-4 garlic cloves chopped
4 slices bacon sliced into cubes and cooked until crisp
1/4 cup snipped fresh chives
1 tbs fresh thyme
1 tsp fresh sage chopped
1/2 cup heavy cream - more if needed
1/4 tsp nutmeg
Instructions
1. Preheat oven to 350 degrees F.
2. Center a baking rack in the middle of the oven.
3. Line a baking sheet with a silicone baking mat or parchment.
4. Rinse outside of pumpkin to remove any residue and dirt.
5. Take a sharp knife and cut a cap out of the top of the pumpkin. Cut at a degree angle and make the opening large enough to scrape seeds and loose pulp out of the pumpkin. Reserve seeds for toasting.
6. Scrape clean inside of the pumpkin and cap, and season well with salt and pepper.
7. Toss bread, cheese, garlic, bacon, and herbs together in a bowl.
8. Season heavy cream with salt, pepper and nutmeg.
9. Combine bread and cream mixtures, mixing well until moist. Add more cream if needed, mixture should be moist, not too wet.
10. Stuff each pumpkin with the bread mixture until slightly overflowing, and place pumpkin caps on top of stuffing.
11. Bake for 1 hour. Remove caps and bake for 15-30 minutes more until pumpkins are done. Pumpkins should be soft to the touch, but not collapsing, when they are done.
12. Ninety minutes usually does it, but it can be sooner depending on pumpkin size.
Fall Share Week 3
Our hearts go out to those folks in the Southeast, hoping and praying they will get through the horrible weather conditions.
It’s coming!!! Cooler weather that is — already had a light frost the other day on higher elevations in the region and more to come as the temperatures decline at night. We haven’t been touched yet and I alternately look forward to and dread when the frost settles in. Dread because that will mean the ending of the more fragile leafy greens and looking forward to the vegetables that will benefit from the freeze and the sweetness that will bring on in Brussels sprouts and other root crops.
Winter squash this week — there's a variety from which you can choose. Lupe picked out mostly acorn style for you today — so pretty they make gorgeous table decorations until you’re ready to eat them!!
Recipes
Did you know bok choy is the perfect substitute for napa cabbage?Along with being crunchy and delicious, bok choy is full of fiber, vitamins, minerals, and other nutrients that make it a beneficial addition to your diet. Like other dark, leafy greens, it’s full of antioxidants and other compounds that help to promote better health. For more detailed information check out Bok Choy: Health Benefits, Nutrition Information, How to Prepare It, and More (webmd.com)
DAVID TANIS'S GLAZED SHIITAKES WITH BOK CHOY
Adapted from the New York Times
Source: David Tanis's Glazed Shiitakes with Bok Choy - The Wednesday Chef
Serves 2 as a main course with rice, or 3 to 4 as a side dish
Ingredients
1-2 pounds baby bok choy
2-3 tablespoons vegetable oil
1 small dry red Calabrian pepper or one fresh red chile pepper
1 pound shiitake mushrooms (about 4 dozen), stems removed
Salt and pepper
4 garlic cloves, minced
1 tablespoon grated ginger
1 tablespoons sugar
1 teaspoon sesame oil
3 tablespoons tamari or soy sauce
6 scallions, sliced diagonally, for garnish (optional)
1 tablespoon roasted sesame seeds for garnish (optional)
Directions
1. Bring a large pot of water to a boil. Cut off and discard stem ends of bok choy. Separate leaves, rinse and drain. Drop leaves into boiling water and cook for 1 to 2 minutes, until barely cooked. Immediately remove and drain. Arrange leaves on a serving platter, then set aside.
2. Put a large wok or cast-iron skillet over high heat. Add oil and heat until nearly smoking, then add hot peppers and shiitake caps, stirring to coat. Stir-fry for 2 minutes. Reduce heat slightly and add garlic, ginger, sugar, sesame oil and tamari. Stir-fry for 1 to 2 minutes more.
3. Spoon shiitake and pan juices over reserved cooked bok choy. Garnish with scallions and sesame seeds, if using. Serve immediately or at room temperature.
BOK CHOY WITH CILANTRO SOY SAUCE
Source: Bok Choy with Cilantro Soy Sauce (bigoven.com)
Yield: 6 Servings
Ingredients
1 c Tomato juice
1/2 c Chopped yellow bell pepper
2 garlic; finely chopped
1/4 c Chopped green onions
2 tb Fresh Cilantro; chopped
1 ts Finely chopped ginger root
2 tb Lime juice
4 c Chopped bok choy
1 ts Reduced-sodium soy sauce
1 c Chopped mushrooms
Preparation
Mix 1/2 cup of the tomato juice, the garlic and ginger root in 10-inch skillet. Cook over medium heat 2 minutes. Stir in remaining tomato juice, the bok choy, mushrooms, bell pepper and onions. Cook 3 minutes, stirring occasionally, until bok choy leaves are wilted. Stir in remaining ingredients.
Fall Share Week 2
Simply cannot believe here we are at the beginning of October. The greens are loving the current weather conditions, mountains of squash are piling up in the fields, potatoes like jewels in a treasure chest are being dug, cleaning out freezers in preparation for winter storage while cleaning seed trays in readiness for new plantings. Early morning fog obscures the valley in a damp mist, while the sun shines as it burns away the wispy clouds. Everyone is in sweatshirts and flannels first thing in the morning while quickly dressing down to t-shirts for the midday, early afternoon heat. Constantly reading recipes, seed descriptions and dreaming of what's to come from both the fields and kitchen. Checking out tools and tractors — what do we need most, how can we do better, be better. At times it seems daunting, feels like there is so much to do and so little time, and then I look back at what we’ve done and am so proud of my team, how ch we’ve accomplished and so grateful for all the people in my life. Winter squash this week — there's a variety from which you can choose including butternut and carnival. Carnival is a gorgeous multicolored squash which is kin to acorn. Can be cooked anyway you cook acorn squash.
ROASTED BROCCOLINI
Source: The Best Roasted Broccolini Recipe • It Doesn't Taste Like Chicken (itdoesnttastelikechicken.com)
Roasted Broccolini is restaurant quality fancy but it's so quick and easy to make! Crispy, salty, and oh-so-delicious, roasted broccolini is the best, easy side dish for any meal. This broccolini is so tasty that I can't resist eating it straight from the pan!
Ingredients
1 bunch (8 oz/ 227g) broccolini, (see step 2 for prep)
1 tablespoon olive oil
1/4 teaspoon garlic powder1/8 teaspoon salt, (or to taste)
1/8 teaspoon black pepper, (or to taste)
Instructions
1. Preheat your oven to 425℉ (220℃).
2. To prep the broccolini: Trim about ½ inch off the bottom of each broccolini stem and throw that part away.Take one broccolini at a time and cut its stem in half from lengthwise to make two pieces leaving any leaves attached. If the stem is very thick, cut it into quarters. If the stem is thin, you can skip cutting it. This helps them cook evenly and gives you more broccolini pieces.
3. Spread the broccolini across a large baking sheet. Drizzle the olive oil over top and then sprinkle over the garlic powder, salt, and pepper. Using clean hands, toss well so that the broccolini pieces are evenly coated in oil and seasonings.
4. Bake in the preheated oven for 10 - 15 minutes until crispy and browned. Cook for 10 minutes if you like it extra crunchy, cook a little longer for more tender broccolini.
5. Roasted Broccolini is delicious served hot out of the oven, but it is also equally yummy served cold. If you have leftovers, just allow the broccolini to cool then store in an airtight container in the fridge for up to 4 days.
Notes
Oil-free: to make oil-free, omit the oil and instead use vegetable broth or aquafaba. Don’t throw away those leaves — totally edible. I like to chop, blanch them and mix into rice with cilantro for a variation of “green rice”
BROCCOLI AND GREENS GRATIN
Source: Broccoli and Greens Gratin - Two Lucky Spoons
Don’t be intimidated by the wordiness of the instructions, this recipe comes together fairly fast and all of the ingredients can be prepped a day ahead of time. Servings: 4-6 servings
Ingredients
3/4 cup whole milk
3/4 cup heavy cream
1 clove garlic smashed
1 sprig of thyme
2 tablespoons olive oil
1 lb bunch of Swiss Chard or spinach stems and leaves chopped
1 pound broccoli cut into 1-inch florets or substitute broccolini
1 teaspoon kosher salt
1 teaspoon pepper
2 eggs
1 cup grated Parmesan
1 cup fresh bread crumbs
Instructions
1. Preheat your oven to 350 degrees, making sure that the rack is in the upper third of your oven.
2. In a small saucepan combine the milk, cream, garlic clove and sprig of thyme. Bring the mixture just to a simmer then remove from the heat and let the ingredients steep while you prepare the rest of the dish.
3. In a large skillet, heat 1 tablespoon of oil over medium high heat and add the Swiss Chard or spinach to the pan. It is going to seem like a lot of greens, but this will all cook down to a much more manageable mass. Add ½ cup of water to the hot pan and cover with a lid. Cook the greens until the stems are softened and the leaves are wilted, about 5 minutes. Meanwhile, bring a pot of salted water to a boil and add the broccoli to the boiling water. Blanch the broccoli for about 5 minutes, then drain and rinse with cold water to stop the cooking.
3. Put the broccoli and Swiss chard in the bottom of a 2-quart baking dish and sprinkle with ½ t. salt and ½ t. pepper. Then, strain the cream mixture into a mixing bowl and whisk in the eggs, remaining salt and pepper, and Parmesan cheese. Pour the egg mixture over the vegetables. Stir the remaining one tablespoon of oil together with the bread crumbs and a pinch of salt and pepper, and then sprinkle over the top of the gratin.
4. Bake until the custard is set, about 30 minutes, then turn on the broiler and broil until the bread crumbs are golden and crisp, 2 to 3 minutes. Let the gratin stand for 5-10 minutes before serving.
ROASTED RAINBOW POTATOES WITH ROSEMARY (COLORED POTATOES)
Source: Roasted Rainbow Potatoes with Rosemary (Colored Potatoes) Recipe (rebeccataig.com)
Recipe Author : Rebecca Taig
These crispy Roasted Rainbow Potatoes are the perfect side dish to compliment your holiday table. Seasoned with garlic, fresh rosemary, olive oil, and a hint of butter, these colored potatoes are packed full of flavor.
Ingredients
3 lbs rainbow potatoes
1 large white sweet potato optional
2 tablespoons extra-virgin olive oil
1 tablespoon butter, melted
2 tablespoons fresh rosemary, finely minced
1 teaspoon garlic powder1 teaspoon salt3/4 teaspoon black pepper
Instructions
1. Preheat the oven to 400°F.
2. Prep the potatoes. Peel and dice the white sweet potato. Cut the rainbow potatoes in half or quarters (depending on size) and place everything in a mixing bowl with olive oil, melted butter, garlic powder, minced rosemary, salt, and pepper. Toss everything together until well coated.
3. Transfer the potatoes to a large baking sheet. Spread them out in a single layer, cut side down.
4. Roast the potatoes. Place the tray in the oven for 45-55 minutes, stirring halfway through, until golden brown and tender.
5. Serve. Transfer the potatoes to a serving bowl. Sprinkle a little extra rosemary on top before serving.
Summer Share Week 13
No sweet corn this week. The last planting was picked out and the next one just isn’t ready yet. No matter how carefully we plan, nature has a mind of her own and the harvest will come in when Mother Nature decides it will and not on our time. The next planting should be ready next week and then we should have corn until the first hard frost of fall. Now is the time if you have the space to put some corn in the freezer to make a great chowder later in winter. I don’t know if you’ve had a chance to view the moon these past couple nights, but it’s been quite beautiful. Tuesday night was the full moon called the harvest moon. A precursor to the autumn equinox which officially falls on Sunday September 22 this year. This is when the days get shorter and the nights a little bit longer. The temperature is a bit cooler, the trees more colorful before they get naked and lose their leaves, time to pick pumpkins and apples and eat as many cider donuts as you can! As you can tell autumn is my most favorite time of the year!!
We here at the farm want to thank you for being a part of our journey this summer. You mean the world to us and are why we do what we do!!
Winter squash this week - choose between butternut and Robins Koginut. Butternut is a traditional favorite of many — roasted, mashed, cubed into soups, chilies and stews. Robins Koginut is a relatively new arrival on the vegetable scene, developed by Dan Barber’s seed company Row 7, it is a cross between butternut and kabocha. Edible skin and awesome flavor roasted, and like it’s cousin butternut also tasty mashed, cubed into soups, chilies and stews
Recipes
How to Safely Slice Your Butternut Squash Butternut squash is large and dense, so it can be difficult to manage. Here are some tips on how to prepare it safely:
- Start with a sharp chef’s knife and a stable cutting board. You can place a lightly damp tea towel beneath your cutting board to keep it from moving around.
- Use the knife to cut off the tip-top and very bottom ends of the squash.
- Stand the squash upright with the thickest flat side as the base.
- Carefully slice through the squash from top to bottom to divide it in half. Your fingers should never be in the blade’s way.
- Lastly, use a large spoon to scoop out the seeds and discard them (we won’t need them for this recipe).
BUTTERNUT SQUASH MAC AND CHEESE
Source: Butternut Squash Mac and Cheese Recipe - Cookie and Kate
Prep Time: 15 minutes; Cook Time: 1 hour; Total Time: 1 hour 15 minutes; Yield: 8 servings
This butternut squash mac and cheese is a delight! It’s just right—cheesy and creamy but not too rich, with subtle roasted butternut squash flavor. To help this recipe come together quickly for a weeknight dinner, roast the squash in advance. If you choose a large squash, you’ll have about twice as much as you need—freeze it for future use. Recipe yields 8 servings (quite a lot!) and leftovers are great.
Ingredients
1 medium to large butternut squash (1.5 pounds or larger), halved
1 teaspoon extra virgin olive oil
2 tablespoons unsalted butter
1 teaspoon garlic powder
1 teaspoon onion powder
1 pound short-cut pasta (pipe regate, macaroni noodles, casarecce, cavatelli, fusilli)
5 cups water
1 teaspoon fine salt, to taste
4 ounces cream cheese, cubed
8 ounces shredded sharp cheddar cheese
1/2 cup (2 ounces) finely grated Parmesan cheese, plus more for serving
Instructions
1. To roast the squash: Preheat the oven to 425 degrees Fahrenheit. Line a large, rimmed baking sheet with parchment paper for easy clean-up. Scoop out the squash seeds with a spoon (we won’t need them for this recipe). Rub the olive oil over the cut sides of butternut, then place them on the prepared pan, flat sides down.
2. Bake until the squash flesh is easily pierced through with a fork, about 40 to 60 minutes. Once it’s cool enough to handle, peel off the skin and discard it. Use a potato masher to mash up the squash—don’t worry about getting it perfectly smooth. You’ll need about 2 cups mashed squash for this recipe (you’ll likely have plenty extra, which you can freeze for future mac and cheese). Set aside, refrigerate and/or freeze the squash until ready to use.
3. To prepare the mac and cheese: Melt the butter in a large pot or Dutch oven over medium heat. Add the garlic and onion powder and cook for 2 to 4 minutes, stirring often, until the butter is fragrant and you see little brown flecks forming in the pan. Add the dry pasta and gently toss to coat it in butter.
4. Pour in the water and salt. Add 2 cups of the mashed butternut squash. Cover the pot and bring it to a boil over high heat. Once boiling, remove the lid and set the timer for 8 minutes.
5. Cook, stirring occasionally, until the timer goes off. Do not drain the water. Stir in the cream cheese. Cook until the cream cheese has melted and the pasta is al dente (careful when you taste, it’s quite hot), about 4 to 5 more minutes. Turn down the heat as necessary to avoid scorching but maintain a steady simmer.
6. Reduce the heat to low. Add the cheddar and Parmesan, and stir until the mixture is melted and creamy. Remove the pot from the heat.
7. Season with salt, to taste (I usually add ¼ teaspoon more). Serve the pasta in bowls with extra Parmesan grated on top, if desired. Leftovers keep well, covered and refrigerated, for up to 5 days.
Notes
Make it gluten free: Gluten-free pastas vary widely. Choose a spiral-shaped gluten-free brown rice pasta, such as fusilli, over other pasta types (my tester was pleased with Jovial brand). Stir gently and don’t cook the pasta any longer than necessary or it may start to lose its shape.
ROASTED KOGINUT SQUASH (+ PURÉE)
Source: roasted-koginut-squash-puree (row7seeds.com)
Ingredients
2 Koginut squash
1 tablespoon olive oil or vegetable oil
Salt and freshly ground black pepper
Directions
- Preheat oven to 400˚F.
- Holding each squash securely on its side, remove the stem by firmly knocking it several times with the top (blunt) end of a chef’s knife—it should pop right off. Working top to bottom, slice each squash in half, then use a spoon to scoop out the seeds. (Compost the seeds, if possible, or clean, roast and eat them.)
- Salt and oil the cut sides of the squash halves, then place them cut-side down on a baking sheet. Roast in the oven for 35 minutes. Remove the sheet from the oven, use tongs to flip the squash halves over, and brush more olive oil over the tops. Return to the oven and continue roasting until soft and caramelized, about 15 to 20 minutes more. Finish with a drizzle of good olive oil and a sprinkling of crunchy salt.
To make the purée:
- Let the roasted squash halves cool completely. To mash the squash, you can either use a tamis sieve (often used for sifting flour) or a wire baking rack. If using the tamis, scoop the flesh out of the skins with a spoon, then force it through the sieve with a flexible spatula or bowl scraper into a medium bowl below. If using the baking rack, rest it over a medium bowl and place one of the squash halves over the rack, flesh-side down; pushing gently but firmly, smear the squash back and forth to force the flesh through the rack. You should be left with the skin still in your hand, but a very fine mash in the bowl. Repeat with the rest of the squash halves.
- Transfer the mashed squash into the bowl of a food processor, and blend until completely smooth, taking breaks to scrape down the sides of the bowl. If the squash does not move once the food processor is running, add a small amount of water to get it going; no added moisture is ideal, however.
- If you’re planning to use this versatile unseasoned purée at a later date, pack it into labeled airtight containers and store it in the freezer. If, however, it tastes too delicious to wait, eat immediately seasoned with salt, lemon juice and generous amounts of good olive oil, butter or brown butter.
Summer Share Week 12
Thought I would give you a quick update on the house fire situation. Can’t believe the fire happened January 3rd. Waiting on delivery and installation of the kitchen cabinets and appliances which are scheduled to come this week. Then the final inspection for the certificate of occupancy and we will be able to move in. We are so ever grateful for all of you and the support you have given us as we have maneuvered through this situation. I’ve got Lupe coming to help me today, we’re going to be cleaning out the greenhouse to get it ready for storage of winter squashes, onions and potatoes. Next week I’m planning on both Benito and Lupe helping me to clear out debris from next to the greenhouse so we can build some raised beds. These will come in handy during the upcoming seasons. We’ll be able to grow cold tolerant crops and get a jump on spring plantings. I know I can't believe it either that we’re still in summer mode, getting ready for Fall/Winter and talking about Spring!
CRUSTLESS CORN AND HONEY QUICHE
Source: Crustless Corn and Honey Quiche - Framed Cooks
Author: Kate Morgan Jackson
This one dish recipe for crustless corn and honey quiche is the perfect way to enjoy fresh summer corn!
Prep Time: 10 minutes, Cook Time: 45 minutes, Total Time: 55 minutes
Yield: 6
Ingredients
4 eggs, beaten
1 tablespoon flour
1 teaspoon salt
½ teaspoon pepper
1 ¼ cups half and half
2 tablespoons melted butter
2 cups fresh corn (from 2–3 ears of corn)
1 tablespoon fresh thyme leaves
Honey for drizzling
Instructions
1. Preheat the oven to 375 and spray a 9 inch pie pan with baking spray.
2. Mix the eggs, flour, salt, pepper, half and half and melted butter together. Stir in the corn and thyme.
3. Bake until the quiche is golden and a little puffed up, about 45 minutes. Cool for 5-10 minutes, cut into wedges, drizzle with honey and serve!
RUSTIC CABBAGE SOUP
Source: Rustic Cabbage Soup - 101 Cookbooks
Use a good tasting vegetable broth or boost some water with a cube of bouillon here. I like to make my own homemade bouillon powder, but use what you've got. The goal is using a great tasting broth for your base. For a soup this simple, it's important. For the vegans out there, just skip the cheese or dairy in the added toppings, or swap in something like an herby drizzle in place of the dairy.
Ingredients
2 tablespoons extra-virgin olive oil
1/2 teaspoon fine grain sea salt, or to taste
1 pound potatoes, skin on, cut 1/4-inch pieces
4 cloves garlic, chopped
1/2 large yellow onion, thinly sliced
5 cups vegetable broth or water (see head notes)
2 cups white beans, precooked or canned (drained & rinsed well)
1/2 medium cabbage / 12 ounces, cored and sliced into 1/4-inch ribbons
Topping ideas: sour cream, spicy chile paste, chives, more good-quality extra-virgin olive oil (or chile oil) for drizzling
Instructions
1. Warm the olive oil in a large thick-bottomed pot over medium-high heat. Stir in the salt and potatoes. Cover and cook until they are a bit tender and starting to brown a bit, about 5 minutes - it's o.k. to uncover to stir a couple times.
2. Stir in the garlic and onion and cook for another minute or two. Add the broth and the beans and bring the pot to a simmer. Stir in the cabbage and cook for a couple more minutes, until the cabbage softens up a bit and the soup comes back up to a simmer. Now adjust the seasoning with more salt if needed. Getting the seasoning right is important or your soup will taste flat and uninteresting. The amount of salt you will need to add will depend on how salty your stock is (varying widely between brands, homemade, etc)...
3. Serve hot with a couple dollops of sour cream, a drizzle of good olive oil, a bit of something spicy (like a chile paste), and a sprinkling of chives.
CABBAGE NOODLES ALFREDO Source: Cabbage Noodles Alfredo (Easy 10 Minute Prep!) - Easy Low Carb
This low carb cabbage noodle recipe is smothered with a creamy Alfredo parmesan sauce. It's easy to make and loaded with amazing flavor.
Prep Time: 10 minutes; Cook Time: 20 minutes; Total Time 30 minutes
Ingredients
1 medium head cabbage sliced
1 Tablespoon olive oil
salt and pepper to taste
Alfredo Sauce
¼ cup butter
2 cloves garlic minced
1 cup heavy cream
1 cup parmesan cheese grated
¼ teaspoon salt and pepper
pinch nutmeg
Instructions
1. Slice cabbage into long thick strips. Heat oil in a large pan and add the cabbage.
2. Cook for 10-12 minutes or until the cabbage starts to soften. Remove from the pan and set aside.
3. Melt butter in the same pan and add the garlic, cook for 30 seconds or until fragrant.
4. Stir in the cream and simmer until it starts to thicken about 5 minutes.
5. Turn heat down to low and whisk in the cheese and seasonings mixing until it is melted.
6. Add the cabbage back to the pan and toss with the sauce until it is heated through.
Notes
– Cut cabbage at least ¼” to ½” wide, anything narrower will get weighed down in the sauce.
– Whisk sauce on low heat so the Alfredo ingredients can melt together. If the sauce seems too thick, add a little more cream and cook on low.
Summer Share Week 11
After he had enough green tomatoes packed in a crock and pickling for the winter, Dad would always take a bunch of green tomatoes and wrap each one in a newspaper. He then put them in a refrigerator he kept in the basement and let them ripen so we could have red tomatoes for a special treat long after the frost had killed off the vines. The tomato season was kinda bleh this year. I asked a few of my farmer friends how their crops were and they felt the same. The fierce heat and heavy rains really beat up the plants which is why there are so many green tomatoes this year. Here are some tips to ripen green tomatoes off the vine. Keep in mind not every tomato will turn but most will.
* Place unripe tomatoes in a paper bag:
If taking the vine itself is not an option, picked tomatoes can still be ripened. One option is to place them in a breathable container, such as a paper bag, and leave them in a warm, dry spot that is as temperature-controlled as possible; 70-75 degrees Fahrenheit is the ideal temperature. Make sure there is plenty of space between the fruits for the air to circulate and lay them in a single, even layer to reduce crowding, as this can lead to mold. If a paper bag is not available, you can replace it with a plastic bag that has had holes punched through it.
* Leave tomatoes on a warm countertop:
The least-involved technique is simply to leave the tomatoes on a countertop, out of direct sunlight but somewhere which still keeps them sufficiently warm — so do not put them in the fridge! Tomatoes left in these conditions will begin to ripen after several days; they may take two weeks or longer to reach sufficient ripeness.
If you live in cooler climates or are experiencing a cold snap, a bright windowsill may help keep tomatoes at an appropriate temperature, but experts warn that excessive direct sun exposure can lead to tougher skins. It is recommended that you store them stem-side down, to keep them stable and reduce their vulnerability to mold.
* Add another ripening fruit to the mix:
Tomatoes aren’t the only fruit to produce ethylene as part of the ripening process. Combining tomatoes with another fruit or two that also produces ethylene will increase the overall amount of gas present and promote faster ripening. Popular choices are bananas and apples; try to choose a fruit which is still under-ripe itself, such as a banana which still has green patches on its peel.
You can combine this tip with some of the others, by adding a banana to your cardboard box or paper bag, or simply placing it among the tomatoes on the counter. This is a great option if you are in a time-crunch and need ripe tomatoes quickly.
* Other tips for ripening and storing tomatoes:
While these tips are sure to help continue the ripening process, some fruits will be more receptive than others. When picking the fruit, try to identify those that are further along in their ripening process: these may have some patches of red coming through or may be a little softer to the touch, because the gelatin inside is more liquid. These are more likely to ripen into red, juicy tomatoes than ones that are right at the beginning of ripening. Small, hard green tomatoes will more likely rot than ripen.
Once the tomatoes are set up, make sure to check them regularly and remove the fruits that have fully ripened. Leave only the tomatoes that are still green. This ensures that they don’t over-ripen and rot, contaminating others in the box.
RECIPES
Dill — Awesome sprinkled on new potatoes with salt, pepper and a drizzle of olive oil or add to the chive butter from the recipe below!
Sweet Corn — Corn salsa, just like Chipotle's!
CREAMY DILL SAUCE WITH SALMON OR TROUT
Author:Nagi | RecipeTin Eats
A fantastic quick meal! Dill Sauce is refreshing, rather than heavy as many "creamy" sauces can be, because it is made with sour cream. The slight acidity is a great pairing with salmon or trout which are quite rich and oily. I made this with trout.
Ingredients
Dill Sauce
3/4 cup sour cream (1)
2 tsp Dijon or hot English mustard (2)
1/2 tsp garlic powder or 1 small garlic clove , minced
2 1/2 tbsp fresh dill , finely chopped
1 tsp lemon zest
1 - 2 tbsp lemon juice
2 tbsp milk (or olive oil, for richness)
1/4 - 1/2 tsp salt
1/2 tsp white sugar
Fish
1/2 - 1 tbsp oil
4 salmon or trout fillets (125g / 4oz each)
Salt and pepper
Instructions
Mix the Dill Sauce ingredients together (Mix well to loosen the sour cream). Adjust consistency with milk and tartness with lemon juice. Set aside for 10 minutes if you can - if using fresh garlic, set aside for 20 min.
Pat fish dry with paper towel. Sprinkle with salt and pepper.
Heat oil in skillet over medium high heat. Place fish in skillet skin side down. Cook for 2 minutes, then flip and cook the other side for 1 1/2 minutes.
Remove from skillet onto serving plates. Serve with Dill Sauce on the side, garnished with fresh dill and lemon wedges if desired.
Recipe Notes:
1. You could use Greek Yoghurt instead of sour cream. It is slightly more tangy and low fat tends to be less creamy.
Low fat is fine but will be less creamy.
2. I like to use hot English mustard for a little kick. Alternatively you could use Dijon mustard + horseradish cream.
3. I served this with my lazy zucchini salad: Use a potato peeler to make long strips of zucchini and shave some parmesan. Toss with verjuice, olive oil, salt and pepper. Verjuice is made from unfermented grapes and is a very mild vinegar which makes it fantastic for really quick salad dressings because you don't need to tone down the acidity with other ingredients. Maggie Beer was the first to commercial produce verjuice, but other brands are now available in supermarkets in the vinegar section.
4. Nutrition per serving, assuming all the sauce is consumed. There is more sauce than needed, but I always make a little extra because it's nice to dip veggies and bread into the leftovers. 97 calories of the total is for the sauce.
If you use low fat rather than full fat sour cream, it reduces to 369 calories.
SIMPLE CHIVE BUTTER SAUCE RECIPE
Source: https://www.foodrepublic.com/recipes/simple-chive-butter-sauce-recipe/
Ingredients
2 sticks unsalted butter
1/4 cup chives
2 teaspoons lemon zest
fleur de sel
freshly ground black pepper
1/4 teaspoon garlic powder
Directions
– Combine all of the ingredients in a mixing bowl.
– After it’s mixed, roll butter into a log and wrap in plastic wrap. Place in the fridge to harden.
– Use this as a spread or, the next time you grill a steak, cut a 1/4-inch slice and place it over the top when the steak is warm. And that's it: Instant chive-butter sauce.
JUST LIKE CHIPOTLE'S CORN SALSA
Source: www.howsweeteats.com/2012/04/just-like-chipotles-corn-salsa/
Ingredients
1 12- ounce bag of frozen sweet yellow corn, defrosted and drained or use fresh corn
2 medium-sized jalapenos, seeded and chopped (leave in some seeds for more heat if desired)
1/2 red onion, finely chopped (about 1/3 cup)
3/4 cup fresh cilantro, torn or chopped
the juice of 2, juicy! limes
1/2 teaspoon salt
1/2 teaspoon pepper
Instructions
1. Combine all ingredients in a bowl and mix, mix, mix. Season with additional salt and pepper if desired. Add more cilantro, jalapeno or lime according to your tastes!
2. Note: obviously fresh corn would be the BEST option here… however I don’t have access to that at the moment… and when I do have access to it, it’s only for about 2-3 months. This was the next best thing.
Summer Share Week 10
I feel like the season has barely begun yet gradually the fields are being emptied of their harvests, black soil where vibrant green rows of onions once stood, corn stalks stripped of their ears. The continual hum of trucks racing down the roads, loaded with golden orbs of onions, crates of corn and winter squashes as we work to beat the rains of the hurricanes and get the harvests safely into storage. We picked the first sweet potatoes yesterday. Now we need to cure them so they’ll hold for the winter. I feel like I’m being bombarded by the seed companies begging us to order our seeds for 2025 now. It’s just way too soon to be doing that and yet I am so tempted to check out their offerings and see what’s new and exciting for the upcoming year. I had planted garleek, a new seed offering from Row 7, Dan Barbers, seed company. It is a cross of leek and garlic that sadly for me was a failure. Haven’t given up on it and will try again.
I wasn’t too sure about trying this recipe but it has turned out to be a new farm favorite!!! The walnuts are totally optional and we left them out.
GREEN TOMATO BREAD
Source: Green Tomato Bread Recipe (allrecipes.com)
Ingredients
2 cups finely diced green tomatoes
2 cups white sugar
1 ½ cups chopped walnuts (optional)
1 cup canola oil
2 eggs
1 tablespoon vanilla extract
1 teaspoon salt
3 cups all-purpose flour
1 tablespoon ground cinnamon
1 teaspoon baking soda
¼ teaspoon baking powder
Directions
Step 1: Preheat oven to 350 degrees F (175 degrees C). Grease and flour two 9x5-inch loaf pans.
Step 2: Mix tomatoes, sugar, walnuts, canola oil, eggs, vanilla extract, and salt together in a large bowl until well blended. Mix flour, cinnamon, baking soda, and baking powder together in a separate bowl; stir into egg mixture until just blended. Spoon batter into prepared loaf pans.
Step 3: Bake in the preheated oven until a toothpick inserted in the middle of each loaf comes out clean, about 1 hour. Let cool in the pans for about 10 minutes before transferring loaves to wire racks to cool completely. This freezes really well!!
Summer Share Week 9
The cooler weather has everyone practically dancing in the fields!! Except for the wetness it’s been a pleasure to be out there. The farmers are frantically weeding — it seems like we’re always playing “catch up” with those buggers. Benito has been planting like mad and the new crops are showing up in beautiful rows up and down the fields. With the advent of pumpkin spice season it seems appropriate that the farm will soon be turning on its own version of Pumpkin Spice Latte but not just yet. I think September is soon enough! With that in mind we should be harvesting winter squashes and sweet potatoes soon. They will need some time to cure and then we'll get them out the door. Was checking out the chili peppers but sadly it doesn't look like a good harvest of those this year. Sweet bell peppers are slowly coming on and I mean slowly. The plants normally should be groaning with the weight of their fruit, this year not so much. But that’s the nature of farming, taking the good with the not so great!!!
Fried Eggplant “Sandwich’
Source: David Tanis Market Cooking
To make these sandwiches: Peel an eggplant and slice into ½ inch thick rounds. Season with salt and pepper and coat lightly with flour. Dip the floured slices into a beaten egg then coat in breadcrumbs. Fry gently in ½ inch of oil, turning once. Remove and drain briefly on paper towels.
Take a slice of mozzarella, put between two slices of fried eggplant. Place the sandwich on a baking sheet. Pop into the oven for a few minutes to melt the cheese. Sprinkle it with salt and crushed red pepper. Eat while hot! For a change of pace, spoon some tomato sauce on a plate, top with sandwich and sprinkle with grated parm. Sprinkle some finely chopped basil and enjoy!!!
Creamy Sweet Corn Soup with Kefir
Source: Creamy Sweet Corn Soup Recipe with Kefir - Eat Something Sexy
Ingredients
2 tsp avocado oil
1 small onion chopped
2 cups chicken stock*
2 ears corn plus cobs
1/8 tsp cumin
1/4 tsp coriander
1/4 tsp salt
3/4 cup kefir
1 tsp fresh chives optional, finely chopped
Instructions
1. Cut corn from cob and reserve both corn and cobs.
2. Heat oil in a stock pot over medium-high heat. Saute onion for 2 minutes. Add chicken stock and bring to a boil. Turn heat down to simmer and add corn, cobs, cumin, coriander and salt. Simmer for 15 minutes.
3. Turn off heat. Remove 2 tbsp of corn from the pot and set aside. Remove cobs and pour the remaining soup into the blender. Blend until smooth.
4. Stir in kefir, reserved corn kernels and chives. Season with additional salt to taste.
5. Serve immediately with a side of warm, crusty bread or chill at least 2 hours for a cold soup.
Notes: * To make a vegetarian version, substitute with vegetable stock.
Serving suggestions
When I started experimenting with kefir soup recipes, I learned that the probiotic benefits of kefir are ruined if you boil it. So it is important that you remove the soup from the heat before you add in the kefir. That’s why you don’t return the soup to the heat after you blend it.
The soup will still be warm when you stir in the kefir. You can serve it this way, as a warm, not hot soup. Or you can chill it as a refreshing cold soup on a hot summer day. It’s kind of like a corn gazpacho.
Whichever way you choose to serve it, this soup offers the “pop” of fresh kernels between your teeth combined with an energizing tang from the kefir and the earthy pull of coriander and cumin.
You can use it as an appetizer before a summer barbecue. Or serve the soup as a main course for two with a side of crusty bread.
Summer Share Week 6
For me absolute signs of summer include sweet corn and tomatoes. First come the green tomatoes then the colors of the rainbow! Even the deer partake in those luscious orbs. A thick slice of tomato, sprinkle of salt and I’m so happy. We planted several varieties of heirloom tomatoes way back in February and March and now finally 6 months later we get to see the fruits of our efforts. If all goes well we should have colored tomatoes next week! If you have room in your freezer grab some extra corn, shave the kernels off the cob, then pack the kernels in zip lock bags and pop them in the freezer. Later on in late fall early winter pull out a bag of kernels to add to a pot of chili or make a nice corn chowder redolent of summer dreams!!
PERFECT FRIED GREEN TOMATOES
Source: Perfect Fried Green Tomatoes Recipe (allrecipes.com)
Submitted by Crystal Bodyroc McGlown
I have been making fried green tomatoes for over 35 years, taught by my Southern grandmother. Over the years I have tried and made fried green tomato recipes and this one is perfect. The Cajun-ranch sauce goes perfectly with these crispy on the outside but smooth and creamy on the inside tomatoes.
Ingredients
2 green tomatoes, cut into 1/4-inch slices
salt and ground black pepper to taste
1/2 cup all-purpose flour
1 teaspoon salt, divided
1 teaspoon ground black pepper, divided
1/2 cup buttermilk
1/2 cup cornmeal
1/2 teaspoon dried parsley
1 teaspoon paprika
1/4 teaspoon cayenne pepper
1 cups canola oil, or as needed
Cajun Ranch Sauce:
1/4 cup ranch dressing
1 tablespoon Cajun seasoning
1 teaspoon hot pepper sauce
Directions
Step 1: Season tomato slices with salt and pepper.
Step 2: Combine flour, 1/2 teaspoon salt, and 1/2 teaspoon pepper in a shallow bowl. Pour buttermilk into a second shallow bowl. Mix cornmeal, parsley, paprika, 1/2 teaspoon salt, 1/2 teaspoon pepper, and cayenne pepper in a third shallow bowl.
Step 3: Dredge each tomato slice in flour mixture to coat, dip into buttermilk, and finish by pressing both sides of tomato into cornmeal mixture to coat. Lay coated tomato slices on a baking sheet; set aside to let tomatoes absorb the coating, 10 to 15 minutes.
Step 4: Heat oil in a deep-fryer or large saucepan to 350 degrees F (175 degrees C).
Step 5: Gently drop tomato slices into hot oil and cook until golden brown and floating, 2 to 3 minutes. Drain on a plate lined with paper towels.
Step 6: Whisk ranch dressing, Cajun seasoning, and hot pepper sauce together in a small bowl; serve with fried tomato slices.
CHARD AND SWEET CORN GRATIN
Source: Chard and Sweet Corn Gratin Recipe (nytimes.com)
By Martha Rose Shulman
Yield: 6 servings
Ingredients
Extra-virgin olive oil
1 bunch Swiss or rainbow chard, stemmed and washed
Salt
1 large garlic clove, minced
½ teaspoon chopped fresh rosemary
½ teaspoon fresh thyme leaves
Black pepper
3 eggs
¼ cup milk
1 to 2 ounces Gruyère, grated (1/4 to 1/2 cup), to taste
Kernels from 1 cooked ear sweet corn (¾ to 1 cups)
1 ounce Parmesan, grated (¼ cup)
Preparation
Step 1: Heat oven to 375 degrees. Oil a 2-quart baking dish or gratin.
Step 2: Blanch chard: Bring a large pot of water to a boil while you stem and wash the chard leaves. When the water comes to a boil, salt generously and add chard leaves. (Set aside stems for another use, or discard.) Blanch 1 to 2 minutes, until tender but still bright. Transfer to a bowl of cold water, then drain thoroughly and squeeze out excess water; chop medium-fine.
Step 3: Heat 1 tablespoon olive oil in a medium skillet and add garlic. Cook, stirring, until fragrant, 30 seconds to a minute, then stir in rosemary, thyme and chopped blanched chard. Season with salt and pepper and stir over medium heat until chard is nicely coated with oil, about 1 minute. Remove from heat.
Step 4: In a large bowl, beat together eggs, milk and ½ teaspoon salt. Stir in chard mixture and Gruyère. Stir in corn and mix well. Scrape into prepared baking dish. Sprinkle Parmesan over top and drizzle with olive oil.
Step 5: Bake 35 to 40 minutes, until nicely browned on the top and sides. Allow to sit for at least 10 minutes before serving.
TIP: Blanched chard and cooked corn will keep up to 4 days in the refrigerator, and cooked gratin will keep for 3 to 4 days.
GREEN TOMATO SALAD WITH FOCACCIA CROUTONS
Source: Green Tomato Salad with Focaccia Croutons - Justine Doiron (justinesnacks.com) This salad is bright green, packed with vegetables and filled with fresh, wholesome flavor. The dressing is simple, the ingredients are equally approachable, and the topping of ricotta salata and green focaccia breadcrumbs makes it all the more delicious.
Prep Time:10minutes; Cook Time:15 minutes
Servings: 2 servings
Equipment: 1 chef's knife, 1 large sauté pan
Ingredients
1/3 serving Genoa Style Focaccia
2 tablespoons parsley oil
3 tablespoons white wine vinegar
2 teaspoons honey
2 tablespoons extra-virgin olive oil
Diamond Crystal kosher salt
Freshly ground black pepper
2 small green tomatoes
2 Persian cucumbers
1/2 large avocado
2 cups butter lettuce or red leaf lettuce
2 ounces ricotta salata
Instructions
1. Cube the focaccia into 1 inch square pieces. Drizzle with the parsley oil and toss to coat.
2. Put a large pan over medium heat and toast the croutons, shaking occasionally, for 4-5 minutes or until all sides are evenly golden brown and crisp.
3. In a large bowl, whisk together the vinegar, honey, and olive oil. Add a large pinch of kosher salt (about a quarter teaspoon) and a few cracks of black pepper. Whisk again.
4. Thinly slice the tomatoes and add them to the dressing, toss in the dressing and let this sit while you prepare the rest of the ingredients. The dressing is so acidic that it will almost quickly pickle the tomatoes.
5. Thinly slice the cucumbers and cube the avocado. Roughly tear up the lettuce. Add all of this in with the tomatoes and stir to combine.
6. Grate over the ricotta salata and give the salad another mix. Top with the focaccia croutons before serving. A simple but a good one!
Summer Share Week 5
As we harvest, the new plantings are going in and thanks to the most recent rainfalls you can see rows popping up in the beds. Tomatoes are slowly sizing up and ripening as they always do in their good old time. We picked a few green ones yesterday. Which is a good sign! Means they’re getting closer to a hopefully good harvest. The deer are everywhere it seems and they continue to help themselves to the vegetables — even the tomatoes. I know a few other farmers who are having trouble with the deer eating theirs.
ROASTED BEETS
Source: Roasted Beets Recipe - Love and Lemons
This easy roasted beets recipe is a delicious side dish! Season the beets simply with olive oil, salt, and pepper.
Ingredients
6 medium beets, tops removed, scrubbed well
Extra-virgin olive oil, for drizzling
Sea salt and freshly ground black pepper
Instructions
1. Preheat the oven to 400°F.
2. Place each beet on a piece of foil. Drizzle generously with olive oil and sprinkle with salt and pepper. Wrap the beets in the foil, place on a baking sheet, and roast for 35 to 60 minutes, or until fork-tender. The timing will depend on the size and freshness of the beets.
3. Remove the beets from the oven, remove the foil, and set aside to cool. When the beets are cool to the touch, peel off the skins. I like to hold them under running water and slide the skins off with my hands.
4. Cut or slice the beets and drizzle lightly with olive oil. Season to taste with salt and pepper, toss, and serve.
CUCUMBER BEET SALAD
Source: Cucumber Beet Salad - Plant Based Jess
This simple cucumber beet salad is easy to prepare and loaded with amazing flavors. It combines sweet beets, crunchy cucumber, fresh herbs and a tangy lemon dijon sauce. Super healthy, perfect for the summer and this version is naturally vegan and dairy-free.
Ingredients
3 small-medium beets
1 cucumber sliced or cubed
½ small red onion - sliced or cubed
⅓ cup fresh mint
¼ cup fresh Dill
¼ cup pumpkin seeds
FOR THE LEMON DIJON DRESSING
3 tbsp lemon - juiced
2 tbsp dijon mustard
1 tbsp maple syrup
1 tbsp nutritional yeast
1 small clove of garlic - crushed
1 tsp tahini (or 1-3 tablespoons of olive oil) - optional
salt and ground black pepper - to taste
Instructions
1. Start by cooking your beets: pre-heat the oven to 400º and cover the beets (unpeeled) with foil. Bake until tender, about 50-60 minutes. Cooking time will vary widely depending on the size of your beets, so check for doneness by pocking them with a knife. They are ready when the knife goes through easily and the beets feel soft and tender. Alternatively, you can boil the beets in water for 20-30 minutes.
2. When done cooking, remove them from the foil wrapping (careful, they will be steamy hot!) and then, remove their peels by rubbing on them. I like to do this in a large bowl of cold water or simply under running water. You can also remove the root end using a knife. Then, slice or dice the beets as you wish and set aside.
3. While the beets are cooking, make the dressing by whisking together the lemon juice, dijon, sweetener, nutritional yeast, tahini (or olive oil) garlic and salt. Taste and adjust flavor to your preference.
4. To serve, layer on a large plate the sliced beets, cucumber, fresh mint, dill, red onion and drizzle the dressing over. Check out my quick video to see how I do this. You can also dice the vegetable and toss everything in a bowl, although this will turn the salad completely pink! Enjoy!
CORN FRITTERS WITH CHIVES
Source: Corn Fritters with Chives - Simple Seasonal
yield: 4 SERVINGS prep time: 25 MINUTES cook time: 10 MINUTES total time: 35 MINUTES
Full of comfort food goodness, there's no wrong way to serve this tasty, Pennsylvania Dutch-inspired side!
Ingredients
2 1/2 C fresh sweet corn, cut off the cob and milked
1 1/2 Tbsp fresh chives, finely chopped
2 eggs, lightly beaten
1/4 C flour
1 Tbsp granulated sugar
3/4 tsp salt
1/8 tsp black pepper
1 tsp baking powder
1 Tbsp heavy cream
4 Tbsp canola or vegetable oil
Instructions
1. Prepare the corn by husking and removing the silk from the cob. Rinse under water before cutting. Cut the corn off the cob by standing it upright and then by slicing the blade down the side. Next, milk the corn by scraping the cut cob with the side of your knife to remove the milky juices.
2. Thoroughly mix together all of the ingredients except for the oil. Let the batter sit for 5 minutes and then gently stir before beginning to fry.
3. In a frying pan, heat the oil over medium heat. Measure 1/8 C of batter into the pan for each fritter. Cook 2-3 minutes and then flip once the bottom of the fritter starts turning golden-brown. Cook for another 3 minutes until both sides are golden-brown.
4. Gently place the cooked fritters on a paper towel lined plate to soak up any excess oil. Continue to do this, working in batches, until all of the batter is used.
5. Serve immediately. Makes 12-14 fritters.
Notes: This is delicious served as a side to chicken, beef, ribs, or eggs. It's also good drizzled with maple syrup.
Summer Share Week 4
Finally there appears to be some relief on the way from the last heat wave. It’s been hard on the farmers and the farm. Everywhere you look there are signs of heat and sun damage, mostly it’s the leafy greens that are showing the effects. The plants slow down in production as well, this respite from the intense heat will help the plants to rejuvenate and again overflow with an overly abundant harvest. Keeping ice, water and fruit flowing to the farmers, telling them to take more frequent breaks, work a bit slower, start earlier in the morning so they get out of the fields earlier. And through it all they keep smiling and laughing. They are true warriors in this valiant battle we fight as farmers. My respect, gratitude and admiration for them knows no bounds.
Firsts — it never grows old that first harvest ... Yesterday was our first harvest of new potatoes, those tender, buttery little orbs are just one of the luscious yields of labor begun in January with the first selection of varieties that I think and hope will appeal to you. Seeking out those with greater nutritional value, colorful jackets and rich flesh to brighten your plates. Then the anticipation of the delivery from Maine via tractor trailer, marking the soil with rows, planting the tubers and caring for them for months — weeding, hilling, picking those darn Colorado potato beetles, and now finally we hold our breaths as we tug the plants out of the soil to see what jewels await below. It truly is a treasure hunt of the most delicious kind.
BABY POTATOES WITH BUTTER & FRESH HERBS
Source: Baby Potatoes with Butter & Herbs - RecipeTin Eats
This is a wonderful, elegant potato side dish that's not too rich so it's ideal to serve with rich mains like roasts, and light enough to serve with more delicate foods such as seafood (fish, prawns/shrimp, lobster, crab, mixed seafood platter!) It's a classic side dish you will see offered at fine dining restaurants as a less heavy potato side compared to things like Paris Mash (the world's richest mashed potatoes!)
Ingredients
1 lb baby potatoes / new potatoes, about 3cm/1.2" round ideal (look for same size ones)
1/2 tbsp salt, for cooking (Note 1)
15g/1 tbsp unsalted butter (no need to melt)
1/4 tsp each salt and pepper
FRESH HERBS:
1 tbsp fresh dill, finely chopped
1/2 tbsp chives, finely chopped
1/2 tbsp parsley, finely chopped
Instructions
1. Boil potatoes: Place potatoes in a large pot of cold tap water with ½ tbsp salt. Bring to a boil over high heat, then lower heat to medium so they're simmering gently (this stops skin splitting). Cook for 10 – 15 minutes until there's no resistance when pierced with a knife. Alternatively, steam the potatoes.
2. Steam dry: Drain in colander then leave for a minute to let the potatoes steam dry (if wet, butter won't stick).
3. Toss with butter: Transfer to a bowl, add salt, pepper and butter. Toss to melt and coat.
4. Add herbs just before serving. Stir through, transfer to serving bowl and serve warm!
Recipe Notes:
1. Salt for cooking is important here to get flavour into the potatoes for this otherwise simple dish. That’s why I prefer boiling rather than steaming.
2. Herbs – this is my favourite combination, with the fresh dill being the dominant flavour, chives for a subtle touch of freshness and parsley mostly for background freshness. Change it up to your taste! Thyme is especially wonderful with potatoes.
3. Serving & make ahead – best served warm. But can also serve at room temperature – just keep cooked potatoes in fridge, then bring fully to room temperature. Pour over melted butter, add herbs just before serving. Never serve cold – the butter will harden into clumps!
CRISPY OVEN ROASTED BABY POTATOES
Source: Crispy Oven Roasted Baby Potatoes - Skinnytaste
These are the best, crispy Roasted Baby Potatoes made with on a sheet pan with small baby potatoes, Italian seasoning, garlic powder, and grated cheese.
Serving Size: 3 /4 cup (scant)
Ingredients
¾ pounds small baby potatoes, red, Yukon gold or multi-color
1 ½ tablespoons extra virgin olive oil
½ teaspoon garlic powder
1 ⅛ teaspoons dried Italian seasoning
1 ¼ tablespoons grated Pecorino Romano or Parmesan cheese
¼ teaspoon kosher salt, plus more for topping
ground black pepper
olive oil spray
Instructions
1. Preheat the oven to 400F and set the rack for the center of the oven. Cut the potatoes in half.
2. Drizzle the olive oil on the bottom of the sheet pan, spreading out to evenly cover the bottom.
3. Evenly sprinkle the oil with the garlic powder, Italian seasoning, grated cheese, salt and pepper.
4. Place the potatoes over the seasoning, cut side down in an even layer. Spritz the tops of the potatoes with olive oil spray and season the tops with a pinch more salt.
5. Bake in the center of the oven, 30 to 40 minutes, depending on the size of the potatoes, until the bottoms are golden and the potatoes are tender when pierced with a knife.
FAQ
Why can’t I get my roasted potatoes crispy?
Here are a couple of tricks for crispy roasted potatoes:
1. Use this oven method: Cut the potatoes in half, drizzle oil and seasoning on the bottom of the sheet pan and place the potatoes cut-side down over the seasoned oil. Roast until the potatoes are crisp and golden on the bottom.
2. Spacing: Ensure the potatoes aren’t touching on the baking sheet. If they are, they will steam instead of roast.
Summer Share Week 3
Hope you all enjoyed the fourth celebrations, I was leaving the farm around 9:00 at night and the entire valley was lit up with fireworks! What a gorgeous sight, every direction you turned the sparklers were lighting up the sky!! Such a great way to end the day. I feel like this week's share screams summer. The only thing missing is tomatoes. There are quite a few green ones in the field so soon, soon!!! I asked the farmers to make sure they left the leaves on the baby broccoli for you to use. Broccoli leaves are a special treat and I hope you will try them. The first harvest of sweet corn is another special treat of the summer vegetables.
ITALIAN STYLE ZUCCHINI AND MUSHROOMS
Source: Zucchini and Mushrooms (Easy Italian Style) - Christina's Cucina (christinascucina.com) Zucchini don’t just make a great quick bread. This recipe shows how to create a great side dish or main course!! A delicious and fresh way to prepare zucchini which happens to be vegan.
Servings: 4; Prep Time: 5 minutes; Cook Time: 18 minutes; Total Time: 23 minutes
Ingredients
4 Tbsp extra virgin olive oil
2 medium zucchini (or one large, green and/or yellow /courgettes)
2 medium tomatoes (preferably Roma diced, or about 4 oz/ 128 grams of good quality passata like Mutti)
⅛ tsp Kosher salt (optional, to taste)
⅛ tsp black pepper (optional, hot pepper is very good in this dish, too)
Mushrooms:
8 oz of mushrooms
½ Tbsp extra virgin oil oil (for sautéing)
1 clove garlic (for sautéing)
Instructions
1. Heat 2 Tbsp of the oil in a frying pan over medium high heat, then add the garlic and mushrooms. Sauté for about 6 to 8 minutes, sprinkle with a little salt and remove. Put the mushrooms in a plate or bowl and set aside.
2. Slice the zucchini in half lengthwise and then cut into slices.
3. Next, add the other 2 Tbsp of the oil and the sliced zucchini. Sauté and stir frequently, for about 10 minutes.
4. When the zucchini are just beginning to show tinges of brown, add the sautéed mushrooms. Keep the pan on the heat.
5. Now add the diced tomatoes or puree (move the zucchini to one side and turn the heat up a little to cook the tomatoes a bit before mixing them through) and continue to sauté, turning occasionally. Add salt and pepper. Taste, and add more salt if it's a bit bland. This dish is very flavorful.
6. Continue to cook for a few more minutes, then remove from heat. This makes a nice, light summer lunch, or a tasty side dish, along with some crusty bread!
TIP: If you like your zucchini with a little more bite, just place the cut pieces into a colander and lightly sprinkle with Kosher salt. Toss it around so it has salt all over, and let drain for about 20 minutes.
WHAT ABOUT THOSE BROCCOLI LEAVES???
Source: Turn Over a New (Broccoli) Leaf | Food Network Healthy Eats: Recipes, Ideas, and Food News | Food Network
Looks like Tuscan kale, tastes sweet like sugar snap peas, and offers 100% of your daily value of vitamin C and calcium per serving. What is this miracle food? It’s broccoli leaves. No, not those little delicate fronds that you find on the crowns of broccoli (though those, too, are edible); these larger leaves grow around the stalk of the broccoli plant.Farmers previously used them just for cultivating the soil, but now they are being recognized for their nutritional power.
Broccoli leaves can be prepared the same ways as kale, Swiss chard or collard and mustard greens. Try them in soups, salads or sandwiches, or even blended into a smoothie. Here are a few other techniques to try on your first batch of broccoli leaves.
Sautéed - Quick, simple and good-for-you mustard greens can be swapped out for broccoli leaves like in Anne Burrell’s Sauteed Mustard Greens.Sauteed Mustard Greens Recipe | Anne Burrell | Food Network
Stir-fried - Toss broccoli leaves into this Tofu Vegetable Stir-Fry.Tofu-Vegetable Stir-Fry Recipe | Food Network Kitchen | Food Network
Steamed - Add broccoli leaves to Steamed Clams and Kale.Steamed Clams and Kale Recipe | Food Network Kitchen | Food Network
Summer Share Week 2
The kale this week is a variety called Ethiopian Kale, I chose it for its milder sweet flavor and ability to withstand heat. It’s good raw or cooked and can be used in any recipe that calls for kale, cabbage, mustard greens or collards.
The heat and weather has been so crazy lately. Between the scorching heat, fierce winds and tornadoes touching down in our neighborhood you’d almost think we were on another planet. Last of the bok choy and broccoli raab for a while, the field was full of flowers brought on by the extreme heat. Should have zucchini in the next week or so. Potatoes are starting to blossom so soon we’ll start stealing them from the plants. Onions are bottoming up nicely. Very disappointed with the summer leeks. I purchased a new release called garleek which is a hybrid of garlic and leeks. None of the seeds germinated which is so disappointing I was really looking forward to this new variety. I’m going to give it another try and see if I can get a fall crop out of it. Deer are at it again and busily eating the head lettuce. I’m battling a raccoon in the greenhouse. Luckily he’s not disturbing the plants but he is devouring the leftover cat food after my guys have their breakfast. Other than that everything else is coming along nicely and we are looking forward to summer vegetables. I see sweet corn on the horizon!!!!! Wishing you all the best for the upcoming holiday and hope you get to see some spectacular fireworks!! See you in two weeks!!
— Farmer Cheryl and crew
SIMPLE SAUTÉED SWISS CHARD
Source: Simple Sautéed Swiss Chard - Healthy Seasonal Recipes
Author: Katie Webster TOTAL TIME: 20 YIELD: 6 servings
Ingredients
1 large bunch Swiss chard, or rainbow chard
1 tablespoon extra-virgin olive oil
2 cloves garlic, finely chopped
1/2 large onion, diced
1/4 teaspoon salt
pinch each dry thyme and nutmeg
Freshly ground pepper to taste
1 teaspoon balsamic vinegar, optional
Instructions
1. Chop and clean Swiss Chard: Stack several pieces of Swiss chard on work surface. Remove stems and set aside. Roughly cut leaves into pieces about 2-inch square. Repeat with the remaining swiss chard. Transfer the chopped leaves to a salad spinner filled with water. Drain, repeat washing if necessary, and spin dry. Rinse and chop the Swiss chard stems (about the same size as the diced onion.)
2. Cook The Swiss Chard Stems with Onions: Heat oil in a large heavy skillet over medium high heat. Add chopped chard stems, garlic, onion, salt, thyme, nutmeg and pepper and cook, stirring often until the onions are starting to brown, 6 to 8 minutes.
3. Add The Leaves and Wilt: Add chopped cleaned Swiss chard leaves, 2 tablespoons water and cover. Let wilt, 2 to 4 minutes.
4. Cook Until Softened: Remove lid and continue cooking, stirring occasionally until the Swiss chard is completely wilted and softened, 1 to 3 minutes.
5. To Finish and Serve: Remove from the heat and drizzle with balsamic vinegar if using. Serve hot.
Note from Cheryl: You can mix or substitute other leafy greens like spinach and kale for the chard .
ETHIOPIAN GREENS
Source: Ethiopian Kale Recipe - Food.com
"A garlicky balanced spiciness for a delicious pot of greens. Use less garlic if you aren't a fan, but don't omit it completely. Other greens could be used, but the amounts of greens and water needed and the cooking time will vary. From Diabetes Cooking for Everyone, by Carol Gelles."
Ingredients
2 cups water
6 cups lightly packed torn kale leaves
1 cup chopped red onion
2 teaspoons olive oil
1 tablespoon minced fresh ginger
4 garlic cloves, minced
1⁄4 teaspoon red pepper flakes (use more to taste)
salt
Directions
In a 2-qt. saucepan, bring the water to a boil over medium-high heat. Add the remaining ingredients and return to a boil. Reduce heat and simmer, uncovered, 25 minutes.
Summer Share Week 1
Summer is here with a vengeance!! The temperature in the fields feels like 100 plus and inside the greenhouse it feels even hotter. The farmers are coming in to work as soon as there is enough daylight to see so that by noon time they’re out of there. The ice chest is kept filled with ice, fruit, water and other beverages. More frequent breaks and shady hats all help to keep everyone as cool as possible under these temps. Am searching for my trash pump which is basically a portable water pump so that we can get some irrigation water on the fields and try and get some new plantings started. Today is also the longest day of the year! I am always stunned by how quickly the daylight will shorten and before you know it autumn and winter are here!
BOK CHOY SALAD WITH SESAME DRESSING
By Meggan Hill
Source: Baby Bok Choy Salad with Sesame Dressing - Culinary Hill
Turn a beloved pantry staple, ramen, into Bok Choy Salad for a crunchy, healthy appetizer. Loaded with vegetables, almonds, toasted noodles, and a nutty homemade sesame soy dressing, this makes for a great light lunch or dinner starter.
Ingredients
For the sesame dressing:
1/4 cup light brown sugar
1/4 cup olive oil
2 tablespoons red wine vinegar
2 tablespoons toasted sesame seeds (see note 1)
1 tablespoon soy sauce
For the salad:
2 tablespoons olive oil
1 package ramen noodles crumbled, seasoning packet discarded
1/4 cup sliced almonds
1 bunch bok choy sliced
5 scallions chopped
Instructions
1. To make the dressing, in a small bowl, whisk together brown sugar, olive oil, vinegar, sesame seeds, and soy sauce. Allow flavors to blend at room temperature while preparing the rest of the salad.
2. In a large saucepan over medium heat, heat olive oil until shimmering. Reduce heat to low. Add ramen noodles and almonds; sauté until toasted, about 10 minutes, stirring frequently to avoid scorching.
3. In a large bowl, combine bok choy, scallions, and crunchy mix. Drizzle salad dressing over the top and toss until uniformly combined. Serve at room temperature.
Notes:
1. Sesame seeds: Raw or toasted; take your pick. To toast sesame seeds, in a medium skillet over medium heat, heat the sesame seeds until golden brown and fragrant, stirring occasionally, about 3 to 5 minutes. Remove from heat and immediately transfer to a plate to cool completely. Store in an airtight container in the pantry for 6 months or freezer storage bag in the freezer for up to 1 year. 2. Ramen noodles: Dry, raw ramen noodles, right out of the package. And no, you don’t need the seasoning packet for this recipe (but see FAQs for ideas on what to do with it).
3. Sliced almonds: I like the blanched, skinless sliced kind, but skin-on almonds or slivered almonds are fine, too.
4. Yield: This recipe makes about 12 cups salad (or more depending on the size of your bok choy).
5. Storage: Store leftovers covered in the refrigerator. While the salad is still safe to eat for up to 4 days, the noodles will soften over time.
6. Make ahead: Make the salad dressing up to 7 days in advance. The toasted, cooled noodles and nuts can be stored in an airtight container for up to 6 months, or frozen for up to 1 year. Chop the bok choy and scallions the night before and refrigerate separately until serving time.
Spring Share Week 12
Thank you all so much for being a part of our lives throughout this Spring Season. You give us hope and faith in what we do. So excited! I know, I know you say that all the time Cheryl, but I really am, and I do get excited. Every day out in the fields feels like a new discovery; something has germinated or by some miracle doubled in size. What wasn’t ready for harvest yesterday can be picked today. We’ll be transplanting tomatoes, peppers and eggplants today and tomorrow. That last statement does not mean that they'll be ready for harvest tomorrow but soon! I wish you could smell the perfume of the tomato plants especially, it’s intoxicating. We gently brush our hands over the plants as they grow to help strengthen the stems. Basically we’re simulating “wind,” once the plants go into the fields there is no protection from the elements like inside the greenhouse and the plants must be toughened up and ready to deal with the adult world of tomatohood!
Verdolaga aka purslane is often labeled a superfood as it is one of the only and highest sources of plant based omega-3 fatty acids. Thought to be a protection against cardiovascular diseases and aid in regulating blood sugar, this plant is rich in vitamins and tastes good too. Our farmers first turned us onto this plant as it is another favorite of theirs. Simply prepped in a salad with lemon juice, salt and pepper. The time of day you harvest it will affect the flavor the earlier you harvest the more sour the taste.
PURSLANE TZATZIKI (HERB YOGURT DIP)
Source: Purslane Weed Recipe – Purslane, Yogurt, Dill, Cucumber, Sour Cream (seekingjoyfulsimplicity.com)
Ingredients
1 pound (1pint) plain yogurt
1 cucumber, unpeeled, seeded
1 cup purslane leaves (stems, flowers, and seeds are
OK, as they are all edible)
1 Tablespoon plus ½ teaspoon salt
½ cup sour cream
1 Tablespoon white wine vinegar
2 Tablespoons fresh lemon juice
1 Tablespoon olive oil
1 ½ teaspoons minced garlic
1 ½ teaspoons minced fresh dill
½ teaspoon freshly ground black pepper
Instructions
Place the yogurt in a cheesecloth or paper towel lined colander and allow the yogurt to drain over a bowl in the refrigerator. Cut and seed the cucumber, then grate and toss with 1 Tablespoon of the salt. Place the cucumber/saltin another colander over a bowl and place in the refrigerator to drain. Allow the yogurt and the cucumber to drain for 2 to 3 hours.
Finely chop or pulse the purslane in a food processor. Transfer the drained yogurt to a large bowl. Pressing as much liquid as you can from the cucumber, add the cucumber to the yogurt.
Mix in the remaining ingredients.
Can be served immediately, but the longer it sits, the better the tastes blend.
BLACK BARLEY, PURSLANE, AND WATERMELON SALAD
Source: https://www.healthygreenkitchen.com/black-barley-purslane-and-watermelon-salad/
Ingredients
*3 cups water
*1 cup black barley rinsed well in a fine mesh strainer
*1 1/2 cups seedless watermelon diced into small cubes
*1/4 cup coarsely chopped fresh flat-leaf or curly parsley
*1/4 cup coarsely chopped fresh basil
*1/2 cup fresh purslane leaves or additional parsley and basil
*1-2 teaspoons minced garlic
*3 tablespoons of your best olive oil
*1-2 tablespooons fresh lemon juice
*2 teaspoons finely grated well rinsed preserved lemon rind or microplaned lemon zest
*1/4 cup or more to taste crumbled feta cheese, plus more for garnish
Instructions
1. Bring water to a boil in a medium saucepan. Stir in black barley and reduce heat to a simmer. Cook for 35-40 minutes, until water is absorbed. Add 1 tablespoon of the olive oil, mix well, and allow to cool to room temperature.
2. Combine cooled barley with with watermelon, herbs, purslane, garlic, olive oil, preserved lemon rind or lemon zest, and feta cheese. Mix gently, then serve with additional crumbled feta on top for garnish, if desired.
VERDOLAGAS TACOS
Source: Verdolagas Tacos - The Garden Kitchen
Prep: 10 mins
Cook: 30 mins
Yields: 8 tacos
TIP: In a pinch, canned or jar Salsa Verde can be used instead of preparing the Tomatillo Sauce.
For a well-balanced meal, add black beans or shredded chicken to the tacos!
Ingredients
TOMATILLO SAUCE
4 Tomatillos, roughly chopped
1 small serrano chile, seeded
1/4 fresh white onion, chopped
1 clove fresh garlic
Salt and pepper, to taste
TACO INGREDIENTS
3 small bunches of verdolagas or other hearty greens (i.e. spinach or kale)
8 count corn tortillas
1/4 cup cup queso fresco (optional)
1 tbsp vegetable oil
Directions
Wash hands with soap and warm water,. Wash produce well.
Chop greens to 1 inch pieces and set aside.
Roughly chop tomatillos, chile, onion, and garlic.
Combine in a blender with ¼ cup of water and blend until smooth.
In a large skillet over medium heat, add tomatillo sauce and cook 10-15 minutes until mixture
reduces by half.
Stir in the oil, add greens, and cook until greens are soft, about 5-10 minutes.
Serve in warm corn tortillas with a sprinkle of queso fresco
Spring Share Week 11
The farmers are weeding for their lives — not literally but it sure does feel like it. Cristal, Lupe's daughter, has joined our valiant crew. What to do first? Weed the lettuce, no, the potatoes, no, the onions. It all needs to be done and sooner than later. Vegetables like onions due to their leaf structure aren’t able to throw shade on the weeds; the potatoes will crowd out the weeds with their canopy once they mature; lettuces grow pretty quickly so they have a shot at winning the race with a little help from us. Today you’ll find a bunched leafy green with red roots. Our farmers call it quelites you may know it as red root or lamb's quarters. I grew up knowing a different green as lamb's quarters, but no matter — think spinach in how you use them. I do prefer them cooked as opposed to raw. Our farmers like them simply sautéed with onion and chili.
FRIJOLES Y QUELITES WITH LAMB'S QUARTERS
Source: https://www.theintrepideater.com/frijoles-y-quelites-with-lambs-quarters/
Ingredients
1 tablespoon (15ml) vegetable oil
1 large onion, chopped
2 cloves garlic, minced (can sub garlic scapes)
1/2 teaspoon (0.5g) dried oregano, preferably Mexican
1 teaspoon (2g) chipotle chili flakes (or 1 chipotle from a can, minced)
1 teaspoon (2g) chili powder
1 teaspoon (2g) smoked paprika
1/2 teaspoon (1g) ground cumin
1/2 teaspoon (2.5g) kosher salt
8oz (250g) fresh lamb’s quarter leaves (quelites, sub kale or spinach or a blend of any and all)
1 can black beans, drained and rinsed
1 large tomato, chopped
1 teaspoon (6g) tomato paste*
1 cup (250ml) water or vegetable or chicken broth
1/2 cup (75g) crumbled cotija or feta cheese
Preparation
1. Be sure to soak and rinse your greens well.
2. Heat oil over medium-high heat in a pot or deep skillet. Add the onions, garlic, and spices and cook, stirring often, for 2 minutes.
3. Add the lamb’s quarters and cook for another 2 minutes.
4. Add the beans, 1/2 of the tomatoes, the tomato paste, and the cup of water or broth. Simmer on medium-low for 15-20 minutes, or until the liquid has reduced and thickened.
5. Add in the other 1/2 of the tomatoes shortly before serving. Ladle onto plates or into bowls and sprinkle over the cheese to serve. Enjoy!
*Hot tip: Buy your tomato paste in tubes (like toothpaste) rather than in tin cans. This allows you to keep a tube on hand in the fridge for times where you need just a little bit of tomato paste like this!
GARLIC SCAPES AND GARLIC SPEARS
Source: Gourmet Done Skinny Garlic Scapes and Garlic Spears: Air Fried, Grilled and Roasted - Gourmet Done Skinny
Garlic Scapes (or Garlic Spears) are a great treat in late spring and early summer. Try them grilled, air fried or roasted for a unique side dish.
Ingredients
– 1 bunch of garlic scapes also called garlic spears
– oil spray I like to use my Olive Oil Mister
– sea salt
– freshly ground pepper
– fresh lemon zest
Instructions
Air Fryer Directions:
1. Preheat air fryer to 400°.
2. Wash and pat dry garlic scapes. Lay and space them out separately on an air fryer basket. You may have to do this in batches. Mine is a Breville Smart Oven Air so I can do mine all at once as the baskets are large.
3. Spray with olive oil and season with Kosher salt.
4. Air Fry 5-10 minutes until tips are brown but not burnt. In a traditional air fryer this may take more or less time so watch them carefully. In my Breville it takes about 8 minutes and I don't have to turn them.
5. Zest a bit of lemon over the garlic scapes and serve immediately.
Grill Directions:
1. Preheat grill to 400°
2. Wash garlic scapes and pat dry.
3. Spray grill with oil. Lay scapes on grill, spray with oil and sprinkle with Kosher salt. Grill until tender and ends are brown, turn them as they start to brown. Zest with lemon and serve!
Oven Directions:
1. Preheat oven to 425°.
2. Place a piece of parchment paper down on a baking sheet.
3. Arrange garlic scapes so they are separated.
4. Spray with olive oil, season with Kosher salt.
5. Bake until tender about 20-25 minutes until tips are crispy. Turn them 1/2 way through.
6. Zest with lemon and serve
TE FRIO DE YERBA BUENA (COLD MINT TEA)
Source: La Cocina De Nathan: Cuban, Spanish, Mexican Cooking & More: Te Frio de Yerba Buena (Cold Mint Tea) (nathanscomida.blogspot.com)
Ingredients
- 1 big bunch of fresh mint leaves (washed and cleaned well)
- 16 cups of water
- 3/4 cups sugar (more or less to taste)
Directions
1. Bring water to a boil, add mint leaves, boil for 10 minutes uncovered (so your house can smell and minty and stuff ha ha).
2. Now when it changes color, shock it with a cup of cold or room temperature water this will make the color deepen stronger when it comes back to boil for another 5 minutes.
3. Turn off heat, let it cool a bit, put in large pitchers making sure to strain it to get the leaves out of the tea.
4. Add sugar to taste, and chill in the fridge :)
FRESH MINT SIMPLE SYRUP
Source: Fresh Mint Simple Syrup | Sweet Cayenne
This fresh mint simple syrup is a dark syrup made with raw sugar. It's perfect for sweetening your favorite cold beverages!
Ingredients
1 cup raw sugar (demerara or turbinado sugar)
1 cup water, preferably filtered
⅓ cup mint leaves + stems, roughly chopped to fit in your saucepan
Instructions
1. Combine the sugar, water, and mint in a small saucepan. Place over medium heat. Heat, stirring occasionally until the sugar is completely dissolved.
2. Remove the pan from heat and cover with a lid. Steep the mint into the syrup for 20 minutes. Strain the syrup into a Mason jar or container that has a tight-fitting lid.
3. Cool the syrup at room temperature for 10 minutes before transferring to the refrigerator to cool completely. Chill and use as needed in your favorite cold beverages!
4. Syrup will keep in the fridge for up to 4 weeks.
Spring Share Week 10
Lupe and Benito have begun the valiant fight against the ever ferocious weeds on the farm. Because we don’t spray it is a constant battle but one we firmly believe is worth fighting. The potato plants are already 6 inches tall and we’re seeing signs of the voracious CPB aka Colorado Potato Beetle. We’ll start harvesting the larvae and the bugs themselves. This can get tiresome after a while and we really need to work quickly if we’re going to eradicate them. These buggers will devour hundreds of plants in a few hours which will severely compromise the harvest. Not only will they go after the potatoes but they will devour anything in the nightshade family which includes tomatoes and eggplants. They do seem to avoid the hot pepper plants—thank goodness for small graces!!!
SAUTÉED SPINACH, KALE, AND COLLARD GREENS
Source: Sautéed Spinach, Kale, and Collard Greens Recipe | MaxLiving
COOK TIME: 10 mins; SERVINGS: 6 -1 cup servings
Want to add some nutrient dense veggies to your meal that still taste great? Try this easy sautéed greens recipe packed with vitamin A, vitamin K, fiber, calcium, antioxidants, and much more! Spinach, collards, and kale go great with so many easy dishes — serve it alongside Salmon with Basil Cream Sauce, Coconut Curry Chicken, or Caribbean Chicken. Put your own spin on this recipe by sautéing a mix of your favorite greens along with broccoli, brussels sprouts, or cabbage to make the perfect healthy side dish.
Ingredients
1 tbsp coconut oil
½ small onion chopped
6 black olives pitted, optional
2 lbs mix of chopped spinach, kale, or collard greens (broccoli can be used if you parboil it first)
1 tsp lemon juice
3 cloves garlic optional
Salt and pepper to taste
¼ cup crumbled feta optional (Core plan only)
Instructions
1. Heat a large pan over medium-high heat. Add oil and onion and cook until onion wilts.
2. Add greens (chop the kale or collards but not the spinach) and olives, if using them.
3. Sauté the greens 8–10 minutes.
(If using spinach, add after 5 minutes and sauté spinach for only 2–3 minutes).
4. Add lemon juice, salt and pepper and cook one more minute.
Optional:
Sprinkle with feta cheese.
SPINACH AND COLLARD GREEN PACHADI
Source: Spinach and Collard Green Pachadi - Spice Chronicles
Prep Time: 10 minutes; Cook Time: 10 minutes; Total Time: 20 minutes
Yield: Serves 4 to 6
A pachadi or gently seasoned South Indian dish made with mixed greens and yogurt.
How to Enjoy this Dish: The bitterness of collards add character to the milder spinach. With just enough spices and some great homemade yogurt, all is good with this recipe. Eat a bowl plain, serve it with a side of steaming rice and lentils.
Ingredients
For the base:
2 tablespoons oil
1 tablespoon minced ginger
1 red onion finely chopped
1 green chili such as a serrano, finely chopped
3/4 cup collard greens tough stems removed, finely chopped
3/4 cup chopped spinach
1 teaspoon salt or to taste
1 small tomato, diced (optional)
1 cup of natural yogurt (not Greek), well beaten
For the finish:
1 tablespoon oil or ghee
1 teaspoon black mustard seeds
1/2 teaspoon whole cumin seeds
6 to 8 curry leaves
Instructions
1. In a medium sized pan, heat the oil add in the ginger and the onion. Sauté for about 4 minutes until the onion softens and turns gently fragrant.
2. Add in the green chili and stir well.
3. Add in the collard greens and spinach with the salt. Cook for 3 minutes and add in the tomato.
4. Cook until the greens are wilted, and the tomato softens, just a little.
5. Turn off the heat and add in the yogurt, mixing it in lightly.
6. Heat the oil or ghee in a small pan, add the mustard seeds and cumin seeds and wait until the mustard seeds pop. Add the curry leaves and quickly pour this mixture over the spinach and collard mixture.
7. Enjoy this warm or at room temperature.
Spring Share Week 9
Forgot to snap a picture before planting but we put out hundreds of sweet potato slips yesterday. Sweet potatoes aren’t started by seeds, they're actually started by shoots that are grown from mature potatoes. You can start slips yourself at home which I have done and it is pretty fun to watch. The quantity of slips we need is just too grand for us to accomplish so I purchase ours from other farmers. These babies like lots of heat and the soil must be warmed up before planting. We can let nature run its course or place a layer of plastic that will increase the soil temperature exponentially. If all goes well we’ll have orange, purple and white sweet potatoes at harvest time.
SIMPLY SAUTÉED BROCCOLI RABE & ASPARAGUS
Source: Simply Sautéed Broccoli Rabe & Asparagus - WellBeing Magazine
A simple but delicious side to accompany many a dish, or even just some scrambled eggs!
Ingredients
1 bunch broccoli rabe
1 bunch asparagus
1 tbsp olive oil
1 clove garlic, chopped
1 tsp chilli flakes
⅓ cup pepitas
Method
Optionally, roughly chop broccoli rabe and asparagus.
Add a little olive oil to frying pan over medium–high heat.
Add vegies and sauté for a few mins.
Add chopped garlic and chilli and cook for 1 min.
Transfer to plate, sprinkle over pepitas and drizzle with a little extra olive oil if desired.
GREEN STIR FRY WITH BROCCOLI RABE, ASPARAGUS & CHICKEN
Source: Green Stir Fry with Broccoli Rabe, Asparagus & Chicken (fullbellysisters.blogspot.com)
Ingredients
serves about 4
2-4 tablespoons olive oil or peanut oil
1 1/4- 1 1/2 pounds boneless, skinless chicken thighs, cut into 1-inch pieces
1 bunch asparagus
1 bunch broccoli rabe
1/4-1/2 cup white wine or chicken stock
3 tablespoons soy sauce
1 teaspoon brown sugar
1 teaspoon sriracha
Kosher salt and freshly ground pepper
1/8-1/4 cup sesame seeds or chopped peanuts or cashews, optional for garnish
Instructions
– Snap off the tough ends of the asparagus and cut into 1-2-inch pieces. Remove any thick stems from the broccoli rabe, and then chop the remaining stems and florets and place with asparagus. Chop the leaves from the broccoli rabe and reserve in a different pile.
– In a small bowl, mix soy sauce, brown sugar, and sriracha. Set aside.
– In a large cast iron skillet, heat 2 tablespoons oil and sauté the chicken over medium-high heat until it is well browned and beginning to caramelize. Remove to plate.
– Deglaze the skillet with the wine or stock, scraping up all those little crusty bits on the bottom of the pan. There is serious flavor here!
– Mmm...tasty, crusty bits! So much flavor!
– Add asparagus and broccoli stems and florets to the skillet; sauté until crisp tender, stirring frequently and adding another tablespoon or two of oil if needed. Add the chopped leafy parts of the broccoli rabe and sauté until the leaves wilt but are still bright green. I like to use a spatula and flip the bottom layer to the top a number of times so that the leaves get incorporated into the rest of the veggies and wilt evenly.
– Add the chicken back to pan and pour the sauce all over. Mix thoroughly and cook another minute or two or until chicken is thoroughly heated.
– If desired, garnish with sesame seeds or peanuts and add salt and pepper to taste.
Spring Share Week 8
Potatoes were planted Saturday — all 900 plus pounds!!! Finally I received a seed that I’ve been anxiously waiting for from Row 7 — a new development called garleek — the breeders blended the sweet flavor of leeks with the mellow, savory tones of garlic. The whole plant is edible. Down side — it takes 95-110 days from planting to harvest, so now we wait! We are also trying a lettuce developed by Row 7 called Teagan, a gorgeous red/green semi heading lettuce. This one takes 65 days to mature. I think that’s one of the biggest attributes a farmer can possess — patience!!!
Recipe
Radishes - don’t throw away those tops, the whole plant is edible!!!
I think one of the best ways to eat most any root vegetable is roasting, here is a simple recipe that can be applied to most any root crop!
GARLIC ROASTED RADISHES
Source: Garlic Roasted Radishes (therealfooddietitians.com)
Ingredients
1 lb. fresh radishes, stems removed, ends trimmed, and halved
1 tablespoon melted ghee, butter, avocado oil or olive oil
½ teaspoon fine salt
⅛ teaspoon black pepper
¼ teaspoon dried parsley, dried chives, or dried dill or mix
2 garlic cloves, finely minced
Optional for serving: Ranch dressing for drizzling or garnish of fresh parsley, dill, or chives
Instructions
1. Preheat oven to 425℉.
2. In a bowl, combine the radishes, cooking fat (ghee, butter or oil), dried herbs, salt, and pepper; toss until the radishes are evenly coated. (Note: don’t add the minced garlic until step 3).
3. Spread the radishes into a single layer in a large 9×13-inch baking dish.
4. Bake for 20-25 minutes, tossing every 10 minutes.
5. After the first 10 minutes of baking, add the minced garlic and toss well. Return the dish to the oven to bake for an additional 10-15 minutes or until the radishes are golden brown and easily pierced with a fork.
6. If desired, serve with ranch dressing for dipping or drizzling on top and garnish with fresh parsley, dill, or chives.
Spring Share Week 7
I had the excavator out again this week and managed to get all the ditches dug. Long term forecasts are calling for lots of rain over the summer so I was very relieved to get the ditches all cleaned up. Slowly the fields are filling up with row upon row of seeds and plants. The days are getting longer and warmer. It feels so good to be out in the fields soaking up the warm sunlight and earthy perfume of the soil. Now we wait — I get so anxious for the seeds to germinate and that first harvest. Truly miraculous how a tiny little seed can sprout and become a monstrous tomato plant or octopus-like vine of a winter squash.
Vegetable: Green Onion Shoots
Green onion shoots are young greens of onions. Can be used anywhere you like that flavor — in eggs, chopped into cottage cheese, sprinkled over salads.
Recipe
I like asparagus simply roasted — a drizzle of olive oil sprinkle of salt and pepper done! This is one of those dishes I have to hide from my sister or she’ll eat it all and not leave me a single piece!!
ROASTED ASPARAGUS WITH LEMON VINAIGRETTE
Recipe courtesy of Melissa d'Arabian
Source: 60 Best Asparagus Recipes & Ideas | What to Make with Asparagus | Recipes, Dinners and Easy Meal Ideas | Food Network
Level: Easy; Total: 20 min; Prep: 10 min; Cook: 10 min; Yield: 4 servings
Ingredients
3/4 pound fresh asparagus, woody stems removed
2 tablespoons extra-virgin olive oil
Kosher salt and freshly ground black pepper
For the Vinaigrette:
1/2 teaspoon Dijon mustard
1/2 lemon, juiced
1 tablespoon olive oil
Kosher salt and freshly ground black pepper
Directions:
1. Preheat the oven to 400 degrees F.
2. In a large bowl toss the asparagus in the olive oil, and liberally season with salt and pepper. Spread the stalks out on a baking sheet, in a single layer, and roast until tender but still firm and moist, about 10 minutes.
3. Meanwhile, make the vinaigrette: In a small bowl, vigorously whisk together the mustard and lemon juice. Slowly drizzle in the olive oil, whisking quickly to emulsify the olive oil into the juice mixture. Season with salt and pepper, to taste.
4. Transfer the asparagus to a serving platter, toss with the vinaigrette and serve. The dish may be eaten warm or cold.
Toss the asparagus with some baby spinach or salad greens, dress with the vinaigrette for a yummy meal! Alternatively you could also add some shrimp, roasted chicken breast, slices of roasted beef or sundried tomatoes for a complete entree!!
Spring Share Week 6
Everyone is getting anxious for that first harvest of luscious green asparagus. Fingers crossed we’ll have it this coming week. Planting is steadily progressing, potatoes should go in the ground this coming week and it’s close to being able to plant things like snap beans. Our typical last spring frost is around the end of May. We usually transplant tomatoes and peppers on Memorial Day, which seems to be a pretty safe date for us, frost-wise. The heat we’re experiencing now will act as an accelerant — warming the soil and pushing the seeds and plants to grow. Need to get the cabbages and head lettuce in the fields before the soil gets too dry ... it happens in a heartbeat!!
Recipes
This was one of our favorite breakfasts on the farm. Spring mix tossed with a light dressing of cider vinegar and olive oil. Lemon juice is also a good choice. Toss with salt and black pepper to taste.
Top with 2 eggs — my favorite style was soft or over easy so the yolk was still slightly runny or jammy. A sprinkle of sunflower seeds, some sun dried tomatoes, scallions or chives and some diced red peppers. Side of crusty bread toasted. I could eat this 3 times a day!
CHICKEN FLORENTINE — CHERYL'S WAY
Original recipe: https://www.skinnytaste.com/chicken-florentine/
YIELD: 4 servings (halve everything for 2 servings)
The other night I sort of made this for dinner for my sister and I. By sort of I mean I didn’t have the exact recipe ingredients so I improvised. This Creamy Chicken Florentine recipe is made with baby spinach in a lighter, creamy white sauce. It's undeniably delicious!
At bottom are changes I made.
Equipment
large deep skillet
Ingredients
2 large boneless skinless chicken breasts (8 ounces each, halved lengthwise)
1 teaspoon kosher salt (plus 1/4 teaspoon)
1/2 teaspoon garlic powder
1/4 teaspoon fresh black pepper
1/4 cup all purpose flour ( or gluten-free flour mix)
1.1/2 tablespoons extra virgin olive oil (divided)
1/3 cup chopped shallots
2 cloves garlic (minced)
1/3 cup diced red bell pepper
9 ounces fresh baby spinach
2 ounces 1/3 less fat cream cheese
3/4 cup chicken broth
3 tablespoons half & half cream
1/4 cup grated Parmesan cheese (divided)
Instructions
1. Gently pound the thicker end of the breast to 1/2-inch thickness so the chicken cooks evenly. Season chicken on both sides with 1 teaspoon salt, garlic powder and black pepper, to taste.
2. Dredge each chicken piece in flour, shaking off any excess.
3. Heat 1 tablespoon of olive oil in a large deep skillet over medium heat. Add the chicken and cook for about 3 to 4 minutes per side or until the chicken is cooked through and has a golden-brown crust. Remove the chicken from the skillet and set it aside and wipe the skillet.
4. In the same skillet, reduce heat to medium-low and add the remaining 1/2 tablespoon of olive oil. Add the minced shallot and garlic and sauté for about 2-3 minutes until they become fragrant and translucent.
5. Add the bell pepper and spinach, season with a pinch of salt and pepper and cover, cook until the spinach wilts down, stirring 2 to 3 times, about 4 to 5 minutes.
6. Reduce the heat to low, and then add the cream cheese, chicken broth, half-and- half, 1/4 teaspoon salt and parmesan cheese and mix well until cream cheese is melted and the sauce is well combined.
7. Return the chicken and any of its juices to the skillet with the spinach and let it simmer in the sauce for a few minutes until heated through.
NOTES:
– I had no cream cheese but mascarpone so subbed this.
– Subbed water for the chicken broth.
– I almost always have roasted garlic in olive oil so used that for the garlic cloves.
– Omitted the flour, seared the breast in olive oil and a hot pan
– No shallots used chives instead
– No garlic powder, subbed minced onions
– Added sundried tomatoes for that umami flavor
– Leftover sauce went over eggs for breakfast the next morning.
My sister declared this one a definite keeper!!!
Spring Share Week 5
The anticipation is palpable. Every day we plant seeds — still too soon for plants. These frosty nights are killer for the baby plants no matter how cold tolerant they may be. Keep watching and poking for signs of life — germination of a seed here or there. Miraculously a row starts to appear then 2 or 3, next entire beds make their presence known. As the sun warms the soil, and gentle showers moisten the earth, nature just takes over. Next will come the real work: keeping the plants weed and insect free ... Dad always said it’s so easy to plant but then you have to take care of them and harvest and sell them. So many lessons and I still keep learning.
MUSHROOM TOAST WITH ARUGULA & LEMON
Serves 1
Source: Mushroom Toast With Arugula (camillestyles.com, password protected post) A protein-packed vegetarian breakfast you'll love.
Ingredients
1 tablespoon olive oil
1 clove minced garlic
1 cup shiitake mushrooms
Handful arugula
Kosher salt and freshly ground black pepper
1 large slice toasted sourdough
Whole milk ricotta or vegan ricotta (optional)
Instructions
1. Heat olive oil in a skillet, add minced garlic and sliced mushrooms, and cook for 10 min over medium heat. Season with salt and pepper, then turn off heat, add arugula and stir to warm through.
2. Top toast with ricotta (if using), mushroom mixture, lemon zest, and pinch of red pepper flakes. Add a drizzle of oil and a squeeze of lemon, eat!
How to store leftovers
Mushroom Toast with Arugula makes a great leftover lunch, just store the mushroom mixture mixture in an airtight container in the fridge, then when you’re ready to eat, toast your bread and pile the leftover sautéed mushrooms on sourdough toast slathered with creamy ricotta.
ONE POT GARLICKY MUSHROOM PASTA WITH SAUSAGE & ARUGULA
Source: https://camillestyles.com/food/one-pot-sausage-pasta-recipe/
This Garlicky Mushroom Pasta with Sausage & Arugula is a 10 out of 10 weeknight dinner that comes together in 30 minutes.
Ingredients
1 pound fettuccine, pappardelle, or tagliatelle
1 pound sliced baby bella mushrooms
extra-virgin olive oil
1/3 pound ground Italian sausage
5 garlic cloves, sliced
Chunk of parmesan, for grating
1 lemon, zest and juice
4 cups arugula
3 tablespoons butter, sliced
garnish: red pepper flakes, basil, and parmesan
Instructions
1. Put a large pot of pasta water on to boil.
2. In a large skillet, heat 3 tablespoons olive oil and add mushrooms in even layer (you may need to do this in two batches.) Stir to coat mushrooms in oil, then cook undisturbed for 3 minutes. Sprinkle with salt and pepper, then stir well and continue cooking, stirring occasionally, for about 5 minutes. Transfer to a plate.Add sausage to the pan and sauté for about 5 minutes over medium-high, breaking up with a fork and stirring occasionally, until cooked through.
3. Add the sliced garlic and sauté until golden. Return mushrooms to pan, toss well, and turn off heat.
4. Meanwhile, add pasta to boiling water and cook according to package directions. Use a pasta scoop to transfer pasta into pan with mushrooms and sausage, allowing some of the pasta water to come with it. Grate a bunch of parmesan over the top, along with lemon zest and juice, arugula, butter. Toss well for a minute or two — put some muscle into it! You want everything to coat the pasta in a light layer of sauce.
5. Serve with more grated parmesan, red pepper flakes, and basil
Spring Share Week 4
The weather has been somewhat cooperative. Perfect planting conditions — cool and misty, still too early for tenders like tomatoes and peppers to go out but great for cool-loving seeds like cabbage, kale, spinach, Swiss chard, beets, carrots and peas. Seed potatoes are being prepped for planting, by this I mean we have to cut the potatoes to just the right size/piece to ensure a plentiful harvest later on. Those funky “eyes” you see growing out of mature potatoes are the future plant. Dad would always tell us to make sure there were about 3 eyes on each piece to ensure a healthy plant later. Small sized potatoes usually we plant whole. It always amazes me to see something grow from a piece to a whole!
Recipes
DARK GREENS WITH GARLIC, LEMON AND SPICES
Source: Please Pass the Greens: How To Beat a Crappy Mood (plus a recipe for spiced greens)
The point of this recipe is simplicity and ease. It can be as fast as: steam greens. Toss in lemon juice, olive oil, salt and pepper. Serve. Or you can get fancy with the garlic and spices.
Chard, kale, tenderstem or purple sprouting broccoli, broccoli rabe, beet greens, turnip greens, spinach, arugula (rocket), mustard and dandelion greens ... these all work. If you're using dandelion or mustard greens, you might want to use them as an accent to a different green like chard, spinach or kale, unless you're really hard core about your bitter foods.
Ingredients
2 bunches of greens, about 300 grams, or 4 big handfuls after you chop them
1 - 2 Tablespoons olive oil
2-3 medium/large garlic cloves
1 Tablespoon sesame seeds, enough to sprinkle over the pan
1 - 2 Tablespoons fresh squeezed lemon juice (save the rind and put it in tea)
1/4 - 1/2 teaspoon each: cumin, coriander and paprika powder
1/2 teaspoon turmeric powder
pinch of chili flakes (optional)
fresh herbs (optional): parsley, coriander, basil, oregano ... it's up to you. A sprig or two of each.
fresh ground black pepper
1/4 teaspoon sea salt (to taste, or leave it out here)
Directions
Wash the greens, remove any tough stems and chop them. Mince the garlic. Heat the oil on medium in a medium/large skillet, then add the garlic and sesame seeds. Toast for a minute or two, just until the garlic starts to brown a bit. Then add the greens, lemon juice to taste and crack the pepper over the greens. Stir occasionally until the greens have wilted down.
A minute or two before the greens are cooked to your liking, add the cumin, coriander, paprika and turmeric powder; also add the fresh herbs. Sprinkle a bit of salt over everything. Mix well. With dry spices, you want to add them just before you're done cooking. They dry out the pan and will stick and burn quickly if there is very little moisture in the pan. You want to heat them just enough to take out any raw taste but not much more.
Taste for salt and pepper, then serve. I actually love this for breakfast, for the way it tastes and for the way it makes me feel, with an egg or two on the side, or fried and placed on top.
WHITE BEAN, SAUSAGE, AND TURNIP GREEN STEW
Adapted from: White Bean, Sausage, and Turnip Green Stew Recipe | MyRecipes
Turnip greens, a Southern staple, have a peppery and slightly sweet taste.
Ingredients
1/8 cup plus ¾ tsp. kosher salt, divided
½ lb package fresh chopped turnip greens (can mix with kale)
1 cup diced smoked sausage
1 Tbl olive oil
3 medium potatoes and or turnips
1 onion chopped can use leeks
1 small red bell pepper, chopped
1-2 garlic cloves, minced
1 (15-oz.) cans white beans, drained and rinsed
1 (32-oz.) container reduced-sodium chicken broth
¼ cup grated Parmigiano-Reggiano cheese
1 tsp ground black pepper
Directions
Bring 2 qt. water and 1/8 cup kosher salt to a boil in a large stockpot over high heat. Add greens, and boil 5 minutes or until tender.
Drain.
Cook sausage in hot oil in a large Dutch oven over medium heat, stirring often, 5 minutes or until browned. Stir in potatoes, and cook 5 minutes. Add onions and next 3 ingredients, cook, stirring often, 5 minutes or until onions are tender.
Increase heat to high. Add greens and chicken broth, and bring to a boil. Reduce heat to medium, and simmer, stirring occasionally, 10 minutes. Stir in Parmigiano-Reggiano cheese. Season to taste with black pepper and salt.
Spring Share Week 3
What a sight to see this past week! The onion farmers are busy getting transplants out into the fields. It’s like watching a tidal wave of green flowing across the valley, baby onion plants arriving by the tractor trailer load from Florida and other places. Repurposed school buses being used as transportation for the workers line the side roads, 5 at this farm, 3 over there. Mountains of empty wire bound boxes pile up as the plants are removed and strategically placed in the beds for optimum planting. Like precision drill teams the workers punch the plants into the rows one after the other until ribbons of green fill the black velvet soil.
RECIPES
CREAMY CHIVE DIP
Source: https://therecipe.website/creamy-chive-dip/Ingredients
8 oz cottage cheese low fat
1/2 cup sour cream nonfat
4 tsp garlic powder
4 tsp onion powder
3 tbs chives chives
Instructions
Mix all ingredients together by hand until smooth. Enjoy with pita slices or sliced vegetables for a perfect picnic or lunch box
Notes: Pack this dip in a crock or sturdy Tupperware container and pack it in your picnic basket, along with some crunchy vegetables or chewy pita bread wedges.
CHIVE BUTTER
Author: Sarah Trenalone
Source: https://champagne-tastes.com/chive-butter/
Freezer Friendly? Yes; Will It Keep? 5 Days (Fridge), 6 Months (Freezer)
This spring, use fresh garden chives and blossoms to make chive butter! This herb compound butter is easy to make and can be frozen for later.
Ingredients
½ pound unsalted butter, divided (2 sticks)
small handful chive blossoms (optional)
¼ cup chives, diced
1 teaspoon garlic powder (or finely minced garlic)
½ teaspoon sea salt
Instructions
1. Fully soften the butter by leaving it at room temperature for 30-60 minutes before proceeding.
If using chive blossoms, dip the blossoms in a bowl of water to clean, and then set on a towel to dry.
2. Melt about 1 tablespoon of butter on medium-low heat in a pan. Add the chives (but not the blossoms), garlic, and salt to the butter, and gently heat until the chives soften and the garlic is fragrant (about 2-3 minutes).
As soon as the garlic is fragrant, turn off the heat. Do not allow the chives to brown. If swapping fresh garlic for garlic powder, do not allow the garlic to brown.
Set aside and allow to cool until slightly hardened.
3. Use a rubber spatula to fold the softened butter into the chive and butter mixture.
Break the chive blossoms apart into small, individual flowers, and fold those into the butter.
Tip: If your pan is too hot, you might accidentally melt all of the butter. If that happens, simply set it aside and let it cool and harden before trying to form it into a log.
4. To serve the same day: Pour butter into a serving bowl and refrigerate for at least an hour before serving. Note that butter will harden again in the fridge, so if you want it to be spreadable, take out of the fridge a few minutes before serving. Refrigerate leftovers and use within 5 days.
To store for later: Chill butter until it's cool enough to form, and then roll it into a log. Use parchment paper or a rubber spatula to help you form the log. Wrap in parchment paper or plastic wrap, and store in an airtight container, and freeze for up to 6 months.
When you're ready to use the butter, simply slice off the amount you want to use and put the rest back in the freezer.
Notes: Avoid wrapping the butter in wax paper, which (in my experience) tends to stick to the butter (especially when softening the whole log).
SAUTEED WATERCRESS WITH GARLIC
Author: Liza A
Source: Sauteed Watercress with Garlic - Salu Salo Recipes (salu-salo.com)
Serves: 1-2 (side dish) servings
This watercress recipe is the perfect side dish to any meat dish. Along with sautéed gai-lan (Chinese broccoli), this dish is our family’s favorite vegetarian dish whenever we have dim sum at Chinese restaurants. I love this awesome green not only for its amazing health benefit but also for its peppery taste. This dish is so simple and easy to make. The hard and tedious part is preparing and washing the watercress. It is an important and necessary step to remove any dirt in the leaves. Serve this tasty dish with your favorite meat and enjoy!
Ingredients
1 tbsp olive oil
3 garlic cloves, minced or grated
1 bunches watercress, trimmed and rinsed thoroughly
kosher salt to taste
Instructions
1. Heat oil in a skillet or wok over medium heat. Add garlic and saute until fragrant.
2. Add watercress and salt; cook, stirring constantly, for about 40 seconds.
3. Add 2 tablespoons water and stir. Cover and cook for 25 seconds, or until leaves are wilted.
WATERCRESS SALAD WITH EGGS AND CHIVE-CAPER VINAIGRETTE
Source: https://www.wellness.com/recipe/watercress-salad-with-eggs-and-chive-caper-vinaigrette
Watercress salad with eggs and chive-caper vinaigrette is a delicious American recipe usually served as a main dish. It requires about 10 minutes of prep time and about 0 minutes of cooking time for a combined total time of 10 minutes. The overall cooking skill level is considered easy. This recipe will yield 4 servings if prepared as directed.
Ingredients
1 tablespoon fresh chives, finely chopped
1 tablespoon capers, chopped
1 1/2 tablespoons extra-virgin olive oil
1 teaspoon Dijon mustard
1 teaspoon champagne vinegar or white wine vinegar
6 cups watercress, trimmed
4 hard-cooked large eggs, quartered
1/4 teaspoon fine sea salt
1/4 teaspoon freshly ground black pepper
Directions
1. In a small bowl, combine the first 5 ingredients, whisking together until well combined.
2. Add the watercress to a large bowl, and top with half of the vinaigrette. Toss gently to coat evenly.
3. Place equal portions of the watercress mixture onto four salad plates. Top each serving with an egg that has been quartered. Drizzle the remaining vinaigrette over the salads. Sprinkle with salt and pepper, and serve immediately.
Spring Share Week 2
What crazy weather but I guess this is what we should expect for Springtime. Spent a good bit of Monday on the excavator and posted my first tik tok video showcasing the machine at work. I think you can find it on my YouTube channel here is the short; or on IG @yesifarm. This is all new to me so I might not have it quite right. One ditch was so badly dammed up I kept looking for the beavers. The runoff from the rain really scoured some channels in the field. I was able to get quite a bit dug but will need to rent the excavator again next week to properly finish the project.
RECIPES
BOK CHOY IN GINGER SAUCE
Source: Bok Choy in Ginger Sauce | RecipeTin Eats
Lots of great tips on this site for asian greens!!!
A favorite way to cook bok choy is with a lovely shiny, ginger sauce. Great way to load up on leafy Asian greens quickly and easily! Be careful not to overcook the bok choy, it cooks really fast. Pan-steam for just 45 seconds, then it finishes cooking in 30 seconds with the sauce. Recipe also works great with other Asian Greens like pak choy, choy sum (see Note 1). Make this ginger version one day then garlic the next! Serve as a side, with fluffy rice or over noodles in soup.
Recipe adjusted for 2 servings
Ingredients
3 small bok choys , up to ~17cm/7″ long, or other Asian greens (Note 1 + photos in post)
1 Tbsp vegetable oil
⅛ cup about 3 tablespoons ginger, finely julienned (or 1 tbsp garlic)
⅛ cup water
Sauce (Note 5 for Charlie shortut!):
1 ½ tsp cornflour/cornstarch
¾ tsp light soy sauce , or all-purpose soy (Note 2)
½ tsp oyster sauce (sub vegetarian oyster sauce)
1 tsp Chinese cooking wine (Note 3)
½ tsp sesame oil , toasted
⅛ cup water
⅛ tsp cooking salt
pinch white pepper
Instructions
1. Cutting – Trim the base of the bok choy then separate all the leaves. Leave the delicate baby bok choy in the centre intact, it's precious! Cut giant stems in half lengthwise so they are all roughly the same size. Rinse in colander, shake off excess water (don't need to dry fully).
2. Sauce – Stir Sauce ingredients except water in a jug until cornflour is dissolved. (Easier to make lump free with less liquid). Then stir in water.
3. Gingery oil – Put the ginger and oil in a large non-stick pan. Turn onto medium heat. Once the ginger starts sizzling, sauté for 1 minute until it turns light golden and is a bit floppy. Add bok choy then use 2 spatulas to toss the ginger for around 15 seconds to coat.
4. Steam – Turn heat up to medium, pour water over. Cover with lid and steam for just 45 seconds.
5. Sauce – Remove lid (bok choy will still be a bit underdone), pour in sauce, toss for 30 seconds until sauce changes from murky to clear, and thickens. Bok choy should be just floppy but still soft crunch, not mushy. If your sauce gets too thick (Note 4), add a tiny splash of water and mix.
6. Serve – Pour the bok choy and all the sauce onto a serving plate, then eat!
Recipe Notes:
1. Bok Choy & other asian greens – can use other leafy Asian greens, such as pak choy, choy sum, baby and full size. For short ones, like the pictured baby bok choy, just trim the base and separate the leaves (keep stem and leafy part attached). For long ones, cut into 7.5cm/3″ (ish) lengths (see photos in post). If the stems are really thick, cut in half. Toss the stems in first to give them a head start, then add the leafy part just at the end before adding water to steam. Recipe will work with gai lan (Chinese broccoli) too, just get the stem going first (it’s thicker so will take longer to cook) and steam it for a little longer (around 2 minutes in total).
2. Soy sauce – Use either light or all purpose soy sauce. But not dark soy sauce – flavour is too strong and the color is too intense! More on which soy sauce to use when here.
3. Chinese cooking wine (“Shaoxing wine”) is an essential ingredient for making truly “restaurant standard” Asian sauces, adds depth of flavour. More info on it here. Substitute with Mirin, cooking sake or dry sherry. Non alcoholic sub – sub both the cooking wine AND water with low sodium chicken broth/stock.
4. Sauce relies on some water coming out of the bok choy as it steams. If your bok choy is old and shrivelled, not enough water will come out. Easy fix – just add a tiny splash of water!
5. Charlie option – To make this using Charlie (my all-purpose stir fry sauce), mix 2 tablespoons of Charlie with 1/4 cup water. Then use as the Sauce!
6. Leftovers will keep for 2 days but the vegetables do tend to get watery/floppy.
BOK CHOY, KALE AND SAUSAGE SOUP
Author: Sandra Morgan
Source: Bok Choy, Kale and Sausage Soup - (sandramorganliving.com)
Serves: 6
Ingredients
1 cup chopped onion
1 tsp diced garlic
1 tsp onion salt
3 links Italian sausage (can sub plant based sausage)
3 cups kale
6 stalks of bok choy (top half)
16 oz of vegetable stock
1 cup water
1 chicken bouillon
1 can cannellini beans
3 tbsp Olive Oil
2 - 3 cups wide egg noodles
Black Pepper
Red Pepper Flakes
Instructions
In a medium or large pot combine the olive oil, onion and garlic and cook on medium heat for 3 minutes. Next add in the sausage and cook for an additional 5 minutes til cooked through. Then add in the vegetable stock, water and bouillon (if you have chicken stock on hand that is fine too). Cook for 2-3 minutes. Add in the kale, bouillon, cannellini beans a pinch or two of red pepper flakes and salt and pepper to taste. Cook for 3 minutes and add in the egg noodles and cook for an additional 5-8 minutes until the noodles are al dente.
Spring Share Week 1
Happy Easter! I cannot believe this is the end of the first quarter of the year already! Benito and Lupe helped me clean out more of the greenhouse Tuesday, making room for even more seeds to be planted. Received an email yesterday that the seed potatoes are on their way from Maine. Almost every day there are packages of seeds being delivered. On Monday the excavator will be delivered to the fields and with it I’ll clean out the ditches. The rental place for the excavator mounts what we call a muck bucket on the machine for me. It’s about 3–4 feet wide and lets me get a nice big scoop out of the ditch with every pass of the machine. Once I get reacquainted with the operation of the machine I should be able to move quite quickly and get the farm completely dug in one day. These ditches are vital to the survival of the farm and a good growing season. Without clean ditches the water has no where to drain and the fields become waterlogged making it extremely difficult to accomplish any planting and then harvesting.
MINT YOGURT SAUCE
Source: Mint Yogurt Sauce - The clever meal
This easy mint yogurt sauce only requires 1 bowl and 5 minutes of prep time, and it's so deliciously fresh, zippy, and versatile. Its bright flavour and texture is excellent with veggies, salads, fritters, falafel and all your freshly grilled or roasted summery stuff!
Yield: about 1 ½ cup of sauce, enough for 4 people.
Ingredients
1 cup (250 grams) Greek yogurt (or full-fat plain yogurt)
½ garlic clove, finely grated
1 ½ Tablespoon extra virgin olive oil
1 ½ Tablespoon fresh lemon juice, use more if you like
¼ to ½ teaspoon fine salt, to taste
⅛ teaspoon freshly ground black pepper, or to taste
⅛ teaspoon cayenne pepper, or to taste (optional)
2-3 Tablespoons fresh mint leaves, chopped
Instructions
Add the yogurt, olive oil, lemon juice, garlic, cayenne pepper, salt (I use about ½ scant teaspoon), and pepper to the bowl, and stir to blend. Chop the mint leaves, add them to the bowl, and stir to combine.
Leave the mixture to rest for 5 minutes to allow the flavors to mingle. Then taste and add additional lemon juice, and/or salt and cayenne pepper, if necessary. You might add more chopped mint if you like, the recipe is very flexible and you can adjust it to your liking.
Serve immediately at room temperature or chill for later (see the recipe card for the storage).
Notes
How long does it keep? Leftover yogurt mint sauce keeps well, chilled, for about 4 days. Store in an airtight container, possibly a glass container. It’s not freezer friendly.
Make it dairy free/vegan? Substitute an equal amount of coconut yogurt for the Greek yogurt.
Suggestions for some other mint recipes: 18 Refreshing Mint Recipes - The clever meal
BROCCOLI RABE, FETA & MINT PASTA
Source: Adapted from Williams-Sonoma Weeknight Fresh & Fast, by Kristine Kidd (Williams-Sonoma, 2011).
Pleasantly bitter broccoli rabe, lightly sharp feta cheese and refreshing mint perk up tomato sauce in an inventive meatless meal (just omit the pancetta for a vegetarian version). For a fresh, authentic flavor, use sheep’s milk feta. The pasta is so satisfying, no side dish is needed.
Ingredients
1/2 Tbs. olive oil
1 oz. pancetta, chopped (optional)
1/2 yellow onion, finely chopped
1 large pinch of red pepper flakes
1 can (14 oz.) Italian tomatoes, preferably San Marzano
Coarse kosher salt and freshly ground black pepper, to taste
1 bunches broccoli rabe, cut into 1-inch pieces
7-8 oz. rotini pasta, preferably multigrain
1/8 cup chopped fresh mint
1/2 cup crumbled feta cheese
Directions
– In a large fry pan over medium heat, warm the olive oil. Add the pancetta and sauté until brown, about 5 minutes. Add the onion and red pepper flakes and sauté until the onion is tender, about 8 minutes. Add the tomatoes and ½ cup water and bring to a boil, breaking up the tomatoes with a spoon. Reduce the heat to medium-low and simmer until the sauce thickens and the flavors blend, 15 to 20 minutes. Taste and adjust the seasonings with salt and black pepper.
– Meanwhile, bring a large pot three-fourths full of salted water to a boil over high heat. Add the broccoli rabe and cook until just crisp-tender, about 4 minutes. Using a slotted spoon, transfer the broccoli rabe to a bowl. Add the pasta to the pot, stir well and cook until al dente, about 11 minutes. Return the broccoli rabe to the pot and cook until heated through, about 30 seconds.
– Drain the pasta and broccoli rabe and return them to the same pot. Add the sauce and mint and stir to coat. Stir in 1/2 cup of the cheese. Taste and adjust the seasonings with salt and black pepper. Transfer the pasta to a warmed shallow bowl. Sprinkle with the remaining 1/4 cup cheese and serve immediately. Serves 4.
Quick Tips: Keep pancetta, high-quality canned tomatoes, red pepper flakes and pasta on hand in the pantry for quick dinners that need no advance planning. Crumbled fresh goat cheese or grated pecorino romano cheese are delicious alternatives to the feta. Feel free to substitute any short pasta shapes such as fusilli or penne for the rotini.
Winter Share Week 12
Welcome Spring!!!! Thank you all so much for staying with us throughout the winter season. There were some fiercely cold days for sure but we’re slowly warming up and it’s not raining — today at least. The valley is literally humming with tractors and farm equipment, I often liken the sights and sounds to a busy hive of bees. Everywhere you look you see John Deere Green, Kubota Orange, Ferguson Red and Ford Blue. All the colors of a farm rainbow and of course good old rusty brown for those aging antiques that many of us still use. The perfume of the newly turned soil permeates the air as the rich soil is changing from dull steely grayish colors to a rich vibrant black as the tractors and plows turn it over getting ready to begin anew. Starting with cold tolerant crops like peas, spinach, radishes and cilantro then gradually moving onto the warmer crops as the soil warms, it’s like a tidal wave advancing slowly but surely until the height of the season when the valley is redolent with sights and smells of a bountiful harvest.
Winter Greens Pesto - this is not your traditional pesto, as anyone who knows me knows I tend to do things a little differently. Kale, spinach and parsley combine to make a vibrant & beautiful green sauce. Use as you would a traditional pesto — over pasta, on a cheese plate, on slabs of crusty bread ... the possibilities are endless.
I haven’t tried this recipe yet but the idea of broccoli raab and harissa on a grilled cheese sandwich intrigued me. I think I’ll make it this weekend. I’ll use my favorite sandwich bread.
BROCCOLI RABE GRILLED CHEESE W/ GREEN HARISSA
Gluten-Free & Vegan (Ed: or you can sub your own bread & cheese)
Makes 2 Sandwiches
Source: https://www.dollyandoatmeal.com/blog/2021/8/26/broccoli-rabe-grilled-cheese-w-green-harissa
Ingredients:
GREEN HARISSA (makes roughly 1/2 cup)
1 1/2 cups packed cilantro
1 1/2 cups packed parsley
1 serrano pepper
2 cloves garlic
1 1/4 teaspoons fine salt
1 teaspoon ground cumin
1/2 teaspoon ground coriander
1/4 cup lemon juice
1 teaspoon apple cider vinegar
1/3 cup extra virgin olive oil
GRILLED CHEESE (makes 2 large sandwiches)
1/2 bunch broccoli rabe,
1 cup vegan cheese shreds
Fine salt & freshly ground pepper
4 slices Little Northern Bakehouse Wide Slice Gluten-Free Bread
2 tablespoons vegan butter, at room temperature and divided
1-2 tablespoons green harissa
METHOD:
Make the green harissa. Combine all the ingredients, except the olive oil, in a food processor fitted with a metal “s” blade. With the motor running, pour the olive oil through the pour spout, and blend. Stop the motor and scrape down the sides. Blend once more until everything is combined. Taste and adjust any seasonings. Pour into a small bowl, and set aside.
Make the grilled cheese. Trim the bottom 1-inch off the ends of the broccoli rabe. Bring a salted pot of water to a boil. Toss the broccoli rabe in, and blanch for 1 minute, until bright green and wilted. Drain, and run under cold water. Wring out the broccoli rabe in a dish towel until dry.
Roughly chop the broccoli rabe and add it to a bowl with the cheese shreds. Toss everything together, and season with salt and pepper to taste.
Use 1 tablespoon of butter and butter one side of each slice of bread; place the bread on a work surface, butter side down. Spread the inside of the bread with about 2 teaspoons green harissa, and top with the broccoli rabe-cheese mixture.
Heat your skillet over medium heat. Once hot, add half of the remaining butter, and place sandwich in. Cook each side for 1-2 minutes, until golden brown and cheese is melted. Repeat with remaining sandwich.
Serve immediately, and enjoy!
Winter Share Week 11
Happy St. Patricks Day everyone!!! Traditionally a day to plant your spring peas and they will bring you good luck come harvest time! Legend has it that the phrase “green thumb” originated during the reign of King Edward I of England. He was particularly fond of green peas and kept six serfs busy shelling them during the season. The serf with the greenest thumb won a prize! Sources: Growing Peas: How to Plant, Grow, and Harvest Peas | The Old Farmer's Almanac
CABBAGE — It seems that cabbage is becoming the new darling of the vegetable world. Bob forwarded me a link to an interesting article about cabbage: https://www.nytimes.com/2024/03/10/dining/cabbage-popularity.html?unlocked_article_code=1.cU0.uYIg.14YWTG5_rKe-&smid=nytcore-ios-share&referringSource=articleShare&sgrp=c-cb
Maybe it’s because we grew up on cabbage but it's actually a vegetable I have enjoyed greatly over time. There are so many recipes out there— cabbage and eggs, grilled cabbage, the inevitable slaw, galombki (stuffed cabbage) and so many more.
RECIPE
CORNED BEEF AND CABBAGE WITH HORSERADISH CREAM SAUCE
Source: https://www.onceuponachef.com/recipes/corned-beef-and-cabbage.html#tabrecipe
3 hr 20 min · 577 cals; Read full directions
Take your corned beef and cabbage up a notch by skipping the traditional boiling method and slow-roasting in the oven instead.
Ingredients
FOR THE CORNED BEEF AND VEGETABLES
1 4-pounds Flat-Cut Corned Beef (with seasoning packet, do not trim the fat)
4 tablespoons Unsalted Butter (melted)
2 tablespoons Prepared Horseradish
1 ¾ teaspoons Salt
½ teaspoon Black Pepper (ground)
6 Medium Carrots (cut into 2-in chunks)
1 ¼ pounds Small Gold Potatoes (about 2.5" in diameter, halved)
1 Very Small Green Cabbage (cored and cut into 1/2-inch-thick slices, see note)
2 tablespoons Italian Parsley (chopped, for garnish, optional)
FOR THE HORSERADISH CREAM SAUCE
1 cup Sour Cream
2 tablespoons Prepared Horseradish (plus more to taste)
1 tablespoon Dijon Mustard
1 teaspoon White Wine Vinegar
¼ teaspoon Sugar
Directions
1. Preheat the oven 325°F. Set one oven rack in the middle position and another in the bottom position.
2. Rinse the corned beef several times under running cold water. (No need to dry it.)
3. Place the corned beef fat side up in a large roasting pan (you'll (you'll trim the fat after the meat is cooked). Pour about ⅛ inch water around the meat. Sprinkle the contents of the seasoning packet into the water around the corned beef. Cover the pan tightly with heavy-duty aluminum foil and roast on the middle rack for 3 hours.
4. Meanwhile, in a small bowl, mix together the melted butter, horseradish, salt and pepper.
5. Place the carrots, potatoes and cabbage side by side on a rimmed baking sheet (do not line the pan with foil; the potatoes will stick). Drizzle the horseradish-butter mixture over the veggies and toss with a spatula to coat all of the vegetables evenly, keeping the vegetables separate. Turn the potatoes so that they are cut side down (they'll get crispier that way).
6. After the corned beef has roasted for 1 hour and 30 minutes, place the pan of vegetables on the bottom rack of the oven. Roast the vegetables and continue cooking the corned beef for 1 hour and 30 minutes more, until both the meat and vegetables are tender. Check on the veggies occasionally to be sure they are browning evenly. (The cabbage will brown first, so give it a toss when the bottom pieces look golden. The potatoes and carrots may need to be turned, but only if they are nicely browned on the bottom before the cook time is up.)
7. Transfer the corned beef to a cutting board and let sit until cool enough to handle, about 5 minutes. Cut off the layer of fat on top of the corned beef and discard. Slice the meat against (or perpendicular to) the grain into ¼-inch slices. Arrange the meat on a platter with the roasted vegetables and sprinkle with parsley, if desired. Serve with the horseradish cream sauce.
FOR THE HORSERADISH CREAM SAUCE
Combine all of the ingredients in a small bowl and stir to combine. Taste and adjust seasoning, adding more horseradish to taste, if desired.
Note: You won't use the whole head of cabbage; just use enough to cover ⅓ of the sheet pan.
More recipes:
https://www.tastingtable.com/1535412/colcannon-st-patricks-day/
https://www.nytimes.com/2024/03/10/briefing/cabbage-culinary-star.html
Winter Share Week 10
Time to spring ahead!!! Sunday, March 10th daylight saving time begins. That means we lose an hour of sleep. Daylight saving time is frequently attributed to farmers but seems to really be connected to war time. It's really daylight that governs the what, when, and why of farming. A cow doesn't care what the clock says, she just knows when it's time to be fed or milked!
TURNIP SWEET POTATO MASH
Source: https://www.eatingwell.com/recipe/250177/sweet-potato-turnip-mash-with-sage-butter/
By Raghavan Iyer
Ingredients
1 pound sweet potatoes, peeled and diced
8 ounces turnips (about 2 medium), peeled and diced
3 large cloves garlic
30 fresh sage leaves, divided (12 left whole, the rest cut into strips)
2 tablespoons butter
1 teaspoon kosher or sea salt
½ teaspoon coarsely cracked pepper.
Directions
– Place potatoes, turnips, garlic and 12 sage leaves in a medium saucepan and cover with water. Bring to a boil. Reduce the heat to medium-low, cover, and simmer until the vegetables are fork-tender, 12 to 15 minutes. Drain. Return the vegetables to the pan and keep covered.
– Heat butter in a small skillet over medium-high heat. As it melts and turns lightly brown, add the strips of sage and allow them to crackle and flavor the butter, about 1 minute.
– Pour the sage and butter over the vegetables and smash with a potato masher. Stir in salt and pepper and serve.
VEGETABLE FRITTERS WITH AVOCADO BLUE CHEESE DIP
Yield: 12 servings
Ingredients
2 carrots (peeled)
2 potatoes (peeled)
3 cloves garlic (peeled)
1 turnip (small, peeled)
2 medium zucchini
1 small onion (peeled)
1 sweet potato (medium, peeled)
3 large eggs (beaten)
3/4 cup all purpose flour
1 Tbsp. thyme (divided)
1 Tbsp. rosemary (divided)
1/2 tsp. salt (divided)
1 tsp. pepper (divided)
1/2 tsp. cayenne
Dip
1 cup greek yogurt
1/2 cup blue cheese
1/2 tsp. salt
1 avocado (small, ripe)
1 Tbsp. lemon juice
1/2 tsp. dill
4 Tbsp. olive oil
Directions
– To prepare fritters, fit Food Processor with shredding blade, attach lid turn unit on high and one at a time feed carrots, potatoes, turnip, onion, sweet potato and zucchini in teed tube and press through with food pusher, when finished
– Empty vegetables into clean dish towel and wring all of the water of the vegetables and put in medium size bowl and add eggs, flour, thyme, rosemary, 1-1/2 tsp salt, 1 1/2 tsp pepper and cayenne, mix well until combined.
To prepare dip, Food Processor with bowl and Multi-Purpose Blade, add yogurt, blue cheese, avocado, lemon juice, dill, salt and pepper to taste, secure lid and turn on high until smooth.
– Heat olive oil in a heavy saute pan to medium-high heat and make 12 round patties, about 3" in diameter, and fry about three minutes per side in batches until golden brown.
– Serve with dip on the side.
Winter Share Week 9
It’s getting closer — SPRING that is! Was at a meeting the other night and of course the topic of spring planting was at the forefront of our conversations. No frost in the ground, a bit muddy but that’s to be expected. We’re all planning in about 2 weeks to get out the excavators and plant cilantro and other cold tolerant crops. We farmers are all so excited to begin our journey once again!
RECIPES
HOW TO COOK BLACK BEANS
Source: https://cookieandkate.com/best-black-beans-recipe/
This foolproof recipe yields perfectly tender and delicious black beans. Make a pot and enjoy black beans all week! No need to soak the beans before using. Recipe yields 6 cups of beans (the equivalent of 4 cans); you can freeze leftovers or cut the recipe in half.
Ingredients
1 pound (16 ounces or scant 2 ½ cups) dried black beans*
1 medium red onion, chopped
4 medium cloves garlic, peeled but left whole
2 bay leaves
1 tablespoon extra-virgin olive oil
1 teaspoon fine sea salt
1 teaspoon ground cumin
One strip of orange zest, about 2 inches long by ½ inch wide
½ teaspoon red pepper flakes (omit or reduce if sensitive to spice)
8 cups water**, more if needed
2 tablespoons finely chopped cilantro, optional
1 tablespoon lime juice
Instructions
First, pick through your black beans for debris (sometimes tiny rocks can sneak in). Place the beans in a fine mesh colander or sieve and rinse very well. Pour the beans into a large Dutch oven or saucepan (4 quarts or larger in capacity).
Add the onion, garlic, bay leaves, olive oil, salt, cumin, orange zest and red pepper flakes (if using) to the pot. Pour in the water.
Cover the pot and bring it to a boil over high heat. Remove the lid and reduce the heat to low to maintain a gentle simmer. Give the beans a stir to make sure none are stuck to the bottom of the pot, and set a timer for 1 hour. Leave the pot uncovered and adjust the heat as necessary to maintain a gentle simmer (you should see several small bubbles popping to the surface at any given moment).
Once the timer goes off, test a couple of beans by using a fork to press them against the side of the pot. If they’re easy to press through, taste a few (carefully! they’re hot!) to see if they’re sufficiently plump, tender and delicious.
Otherwise, continue cooking, testing in 15 to 30 minute intervals as needed, until they’re done. If you’re running low on liquid, add water in 1-cup increments so the beans are covered at all times. (As mentioned in the post, if your beans are old, they can take several hours to cook and require a lot more water, and some very old beans may never cook through.)
Once the beans are very tender and tasty, you can increase the heat a little to reduce the cooking liquid into a more gravy-like consistency, about 5 to 15 minutes (it will continue to thicken up as the beans cool).
Remove the pot from the heat. Carefully remove the orange zest and both bay leaves. Use a fork to press the garlic against the side of the bowl to break it up. Add the cilantro, if using, and lime juice. Stir to combine. Season to taste with additional salt, if needed. Use as desired.
Allow leftover beans to cool to room temperature before storing in the refrigerator, covered, for up to 4 to 5 days. You can also freeze leftover beans for several months.
For more recipes check out our farm recipe blog: https://blackdirtrecipes.wordpress.com
YouTube Channel: https://www.youtube.com/channel/UCPYfuRXgE6SgaLMmd_vYx9Q
Follow us on Instagram @yesifarm
Winter Share Week 8
Thought I would give you an update on the fire situation. Thank you all so much for your support. Knowing you are there with us means a great deal, that we are not alone. The house has been completely gutted, 8 containers of debris hauled away so far, nothing but studs left in the interior. We’re meeting with the lead contractor today to review next steps, which I think means replacing the roof, connecting electric, removing burnt studs and replacing them with new ones. We’re hoping the results will be in as to whether the tile floor in the kitchen contains asbestos. Fingers crossed it doesn’t. Finally secured an apartment so we can move out of the hotel we’ve been living in. Will be such a relief to have a kitchen again, cooking with a microwave is not fun. In the meantime I’ve got most of the greenhouse cleaned out and will begin repairing and building new tables for all those seeds we’re going to be starting. I picked up the parts for the Kubota last week so the mechanic can give it a tune up. $500 for filters and oil. YIKES!!! Hopefully the mechanics fee will be reasonable. Will also need to get a tire fixed. Then that will be ready to rock and roll. As soon as the weather stabilizes I’ll rent the excavator and clean out the ditches, then the serious field work will begin!
RECIPES
KALE SWEET POTATO SOUP
Source: https://frommybowl.com/sweet-potato-kale-soup/
This Sweet Potato Kale Soup is easy, cozy, and healthy! These steamy bowls of vegetables, chickpeas, and flavorful broth won’t last long at your table.
Yield: 4 Servings
Ingredients
2 stalks of Celery, diced
½ Large Yellow Onion, diced
1 Red Bell Pepper, diced
3–5 cloves Garlic, minced
1 tsp Dried Rosemary
½ tsp Dried Thyme
2 Medium or 1 large Sweet Potato, peeled and diced
2 cups cooked Chickpeas, rinsed well if canned
4 cups Vegetable Broth
4 cups Filtered Water
1/2 bunch Curly Kale, roughly chopped (about 4 cups)
Salt and Black Pepper, to taste
Instructions
– First, add the Onion, Celery, and Bell Pepper to a large nonstick pot with a splash of water or oil. Sauté over medium heat for around 5 minutes, until the Onion is translucent. Add in the Garlic, Rosemary, and Thyme, then sauté for an additional 1-2 minutes.
– Add Sweet Potato to the pot with 1/3 cup of water, then cover the pot and let steam for 5 minutes.
– Uncover, give everything a good stir. Add in the Chickpeas, Water, and Vegetable Broth, stir well, and bring the mixture to a boil over high heat. Once boiling, reduce the heat to medium-low and let simmer for 10 minutes.
– Add the chopped Kale to the pot, stir again, and cook for an additional 2-5 minutes. Serve warm.
LEEK AND SWEET POTATO SOUP
Source: https://paleoleap.com/leek-and-sweet-potato-soup/
A simple and quick pureed leek and sweet potato soup. A great paleo soup to prepare when fresh and local vegetables are plentiful.
Ingredients
1 onion chopped
2 cloves garlic crushed
1 teaspoon ground cumin
1/2 tablespoon cooking fat like coconut oil or clarified butter
1 or 2 large leeks the top part removed, and the softer part sliced in rounds
2 cups chicken or beef stock
2 sweet potatoes peeled and chopped
1/2 can coconut milk
Sea salt and freshly ground black pepper to taste
Instructions
1. Sauté the onions with the cooking fat in a large saucepan over medium heat for a few minutes. Stir frequently to prevent the onions from burning.
2. Add the garlic and leeks to the pan and cook for approximately 3-4 minutes to allow everything to soften.
3. Sprinkle in the cumin and combine well.
4. Add the stock and the sweet potatoes. Bring to a boil and then allow to simmer for approximately 10-15 minutes or until the sweet potatoes are soft.
5. Remove the soup from the heat and slowly mix in the coconut milk. Season with salt and pepper to taste.
6. Puree the soup in a blender and serve.
For more recipes check out our farm recipe blog: https://blackdirtrecipes.wordpress.com
YouTube Channel: https://www.youtube.com/channel/UCPYfuRXgE6SgaLMmd_vYx9Q
Follow us on Instagram @yesifarm
Winter Share Week 7
This was a rough one! 13 inches of snow, bitter cold, winds so fierce that in places they swept away the snow to bare earth. The grit carried by the wind felt like sandpaper on your face. It scraped over your teeth making you feel like they were grindstones. Given these conditions, time was of the essence and we didn't get to bunch the kale this week!
ROASTED POTATOES, CARROTS & BEETS
Source: https://www.atasteofmadness.com/roasted-potatoes-carrots-and-beets.html
This Roasted Potatoes, Carrots and Beets recipe is the perfect way to roast your root vegetables. Seasoned with balsamic vinegar and rosemary.
Ingredients
1 large white potato, cut into 1 inch cubes
3 small red potatoes, cut into 1 inch cubes
3-4 medium carrots, peeled and cut into 1 inch pieces
1 medium onion, cut into wedges
3 medium beets, peeled and cut into 1 inch pieces
3 Tbsp olive oil
1 tsp balsamic vinegar
1/2 tsp salt
1/2 tsp ground pepper
1 tsp dried rosemary
1 tsp dried parsley
Instructions
1. Preheat the oven to 400˚F.
2. In a large bowl, mix together the potatoes, carrots, onion, and beets. Set aside.
3. In a small bowl, mix together the olive oil, balsamic vinegar, salt, pepper, rosemary and parsley. Pour over the vegetables, and mix until the veggies are fully coated.
4. Pour your vegetables on a rimmed baking sheet, and spread them out so that they are in one layer.
5. Roast the vegetables in the preheated oven for 20 minutes. Remove to stir, and return to the oven to cook for another 20-25 minutes.
MASHED PURPLE POTATOES
Source: https://itsavegworldafterall.com/mashed-purple-potatoes/#recipe
These gorgeous mashed potatoes are easy to make for a crowd-pleasing side.
Ingredients
1 pounds purple potatoes
1/4 cup whole milk
1 tablespoon salted butter - more to taste
Salt - to taste
Freshly ground black pepper - to taste
Fresh herbs - such as chives or parsley, for garnish
Instructions
1. Prepare the potatoes by peeling them if desired (you can also leave the peels on), removing any bruised areas, and cutting them into 2-inch pieces. Place them in a large pot, cover with water, add up to ½ teaspoon of salt, and bring to a boil. Let them boil for 15 to 17 minutes until fork-tender.
2. In the meantime, combine the milk and butter in a small saucepan over low heat. Cook until the butter is melted, then remove from heat, being careful not to let the mixture boil.
3. When the potatoes are cooked, drain and return them to the pot. Pour in the milk and butter mixture, and mash the potatoes with a handheld masher or a handheld electric mixer (for a creamier texture) until smooth. Taste, and add salt, pepper, more butter, and fresh herbs as desired. For additional flavor, consider adding up to 1/4 cup sour cream. Enjoy warm!
Notes
* Serve on the side of meat or fish or as the base for a gravy or stew.
* Leftovers will last in an airtight container in the fridge for 2 to 3 days. Reheat in the microwave for 1 to 2 minutes. You may need to add a splash or milk or some melted butter and stir before microwaving to prevent drying out the potatoes.
* Purple potatoes are earthier than other varieties, so you may need to add more butter, salt, pepper, or herbs to reach your desired flavor.
For more recipes check out our farm recipe blog: https://blackdirtrecipes.wordpress.com
YouTube Channel: https://www.youtube.com/channel/UCPYfuRXgE6SgaLMmd_vYx9Q
Follow us on Instagram @yesifarm
Winter Share Week 6
Well the verdict is in Punxsutawney Phil has made his prediction! According to Phil we’re headed for an early spring. The weather these past few days sure does seem to feel that way. In a way it will be a welcome relief but we still have to make it through February which in my opinion while being the shortest month is one of the toughest to get through. I was curious as to how Groundhog Day got started and discovered it has its roots in ancient Christianity and Celtic traditions. Also known as Imbolc, this pagan holiday is supposed to mark the halfway point between the winter and spring solstice. In ancient Christian traditions, this holiday was known as Candlemas, a time when the clergy would distribute candles to their congregation as a reminder of how long and cold winter would be. In my family/community this evolved into a special mass for the “blessing of the throats.” At the end of our church service we line up and the priest places two candles alongside our throat while saying a prayer. This blessing is intended to keep us well and healthy throughout the year. The first Groundhog Day was celebrated on Feb. 2, 1887, in Punxsutawney, Pennsylvania and while Phil only has an accuracy rating of about 30% I think I’ll listen to his guidance and plan for an early spring. Sources: weather.com, https://www.history.com/topics/holidays/imbolc
Recipes
QUICK CELERIAC REMOULADE
Source: https://www.bbcgoodfood.com/recipes/quick-celeriac-remoulade
Ingredients
7 tbsp good quality mayonnaise
3 tbsp Dijon mustard
1 lemon, juice only
1small celeriac, about 650g/1lb 7oz
toast and watercress, to serve
Method
STEP 1: In a large bowl, mix the mayonnaise, mustard and lemon juice together thoroughly with a generous sprinkling of salt and some freshly ground black pepper, so it all becomes one sauce.
STEP 2: Peel and quarter the celeriac, then, working quickly, coarsely grate it and stir into the sauce until evenly coated. Serve the celeriac remoulade with lots of toast and some dressed watercress. It will keep in the fridge for up to 2 days.
EASY OVEN ROASTED POTATOES
Source: https://www.spendwithpennies.com/simple-herb-oven-roasted-potatoes/
Crisp on the outside and fluffy on the inside, Roasted Potatoes are an easy side dish that goes with pretty much any meal!
Ingredients
1 pounds red or yellow skinned potatoes
1 tablespoons olive oil
1/2 teaspoon garlic powder
1 1/2 tablespoons fresh herbs chopped (rosemary, parsley, thyme, basil)
1/4 teaspoon paprika
coarse salt and pepper to taste
Instructions
Preheat oven to 425°F.
Scrub potatoes (do not peel them). Dice into 1” cubes.
If time allows, soak potatoes in cold water for up to 1 hour. (This removes starch and makes for a fluffier potato). Drain and dry potatoes, if required
Toss potatoes, olive oil, herbs, and seasonings
Place on a baking sheet and bake for 30-35 minutes until browned and tender.
Notes
Use any combination of herbs you'd like. Dry spices/herbs can be substituted, use 1-2 teaspoons dry herbs in place of fresh.
Any kind of potatoes will work in this recipe and peeling potatoes is optional.
For more recipes check out our farm recipe blog: https://blackdirtrecipes.wordpress.com
YouTube Channel: https://www.youtube.com/channel/UCPYfuRXgE6SgaLMmd_vYx9Q
Follow us on Instagram @yesifarm
Winter Share Week 5
{*please note there are many nuanced issues mentioned below that bear longer discussion, in a different venue!}
There's a saying “Life is a political event.” I have found this to be so true in so many ways! Last week I had the opportunity to attend a roundtable session of farmers and politicians: Senators, county legislators, Orange County Farm Bureau, USDA representatives and more. The purpose of this session was for us farmers to, hopefully, impress upon our governing officials the gravity of the issues we face, suggestions of ideas on how to help remediate them, and what resources are readily available and what is needed down the road. Topics covered were lack of resources like slaughterhouses — appointments are made 2-3 years out and that’s if you have a relationship with them. Lack of milk processing facilities — farmers feel like they are held hostage, stories were heard of how during the pandemic farmers were told we don’t want your milk there isn’t enough demand — told to dump it in their fields. Vegetable farmers who are working with institutions like schools to get their produce to the kids lunches, so highly regulated and understandably so, food safety is no joke. And the ever present issue of labor. Minimum wage in NY creeping up on $20 an hour, H2A workers who are brought into this country — the expenses on the farm side are continuously rising. Yet we still live in an environment where folks believe in cheap food. Continual threats of cuts to programs that provide financial resources to folks in food deserts and who desperately need assistance to procure fresh fruits and vegetables. I feel so often there is so much work to do and so little time, but I also know that through the support of folks like you, we CAN and WILL make a difference.
Recipes
ULTIMATE SHAVED BRUSSELS SPROUTS SALAD WITH LEMON SHALLOT VINAIGRETTE
Source: https://kalejunkie.com/ultimate-shaved-brussels-sprouts-salad-with-lemon-shallot-vinaigrette/
If a crunchy salad that only gets better with time is what you're looking for, then look no further because this is it! My Ultimate Shaved Brussels Sprouts Salad with Lemon Shallot Vinaigrette is a simple salad that's filled with crunchy shaved Brussels sprouts, red pear, pomegranate arils, and pepitas for a perfectly crunchy salad that is packed with flavor. Plus, it's topped with a homemade lemon shallot vinaigrette that is so good, you could drink it.
Ingredients
For the Salad:
1/2 Pounds Brussels Sprouts shaved
1/3 Cup Pomegranate Arils
1/2 Large Red Pear diced
1/4 Cup Pepitas
1/4 Cup Parmigiano Reggiano finely grated
1/4 Cup Fresh Parsley chopped
For the Dressing:
1/3 Cup Extra Virgin Olive Oil
1/4 Cup Lemon Juice this is equivalent to the juice of approximately 2 lemons
1 Large Shallot finely diced
1 Teaspoon Kosher Salt
1/2 Teaspoon Ground Black Pepper
Instructions
– Start by preparing the dressing. Dice the shallot and add it to a small bowl alongside the olive oil, lemon juice, kosher salt, and ground black pepper. Whisk until the ingredients are fully combined. Set the dressing aside while you prepare the salad.
– Prepare the Brussels sprouts by washing them and shaving them. I recommend shaving the Brussels sprouts in a food processor! You can also do this by hand by using a mandolin.
– Then, add the shaved Brussels sprouts to a large bowl, followed by the pomegranate arils, diced pear, pepitas, parmigiano reggiano cheese, and parsley.
– Pour the dressing on top of the salad ingredients, and then toss until the salad is fully coated in the dressing.
– Taste and adjust the seasonings as needed. I like to add another sprinkle of cheese on top of the finished salad.
– Once it's done, serve and enjoy! Store any leftovers in an airtight container, in the fridge, for up to three days. The longer this salad sits, the better the flavors get over time!
FRESH CRANBERRY BEANS WITH OLIVE OIL & GARLIC
Source: https://mayihavethatrecipe.com/meatless-monday-fresh-cranberry-beans-with-olive-oil-garlic/
NOTES
– If you can only find dry cranberry beans, you will need to soak them overnight in 2.5 times their volume in water. Add a couple of teaspoons of baking soda. The next day, rinse the cranberry beans really well and follow the cooking instructions. You will probably need to use more water (just remember to check the pot periodically during the cooking process).
– It may take longer than 20 minutes for the beans to get tender, it will depend on your stove and the beans. Just keep adding water as it cooks out.
Ingredients
1 lb fresh cranberry beans ( about 4 cups shelled) ( See Note 1 for dry cranberry beans)
3 garlic cloves, whole
1 1/2 tbsp extra virgin olive oil
1/4 tsp red hot pepper flakes (or to taste)
1/2 tsp fresh thyme
1-2 cups water
2 bay leaves
1/4 tsp salt ( more or less to taste)
Instructions
– Shell the cranberry beans, rinse and drain
– Heat the olive oil in a deep skillet over medium heat. Add the garlic and tilt the pan so all the oil goes to one side of the pan and the garlic cooks evenly. Cook for about 2 minutes or until it starts to get a slight golden color (make sure it doesn't burn!)
– Add the red hot pepper flakes and thyme and cook for another 2 minutes
– Add the shelled beans, stirring well so the beans get evenly coated with the oil and cook for 3 minutes
– Add 1 cup of water, bay leaves and salt. Bring to a boil for about 5 minutes, uncovered
– Turn down the heat and simmer, covered, for about 20 minutes or until the beans are tender but not mushy. (See Note 2). You should have some cooking liquid remaining in the pot. If the beans are not tender and there is little water left, keep adding water until thy soften. Taste and adjust the seasoning if needed (take into consideration that, as the beans, cook the flavor and saltiness concentrates. Do not oversalt!)
– Mash the garlic into the cooking liquid ( It should be very tender and mash easily. These are delicious eaten plain, served over rice or with crusty bread
For more recipes check out our farm recipe blog: https://blackdirtrecipes.wordpress.com
YouTube Channel: https://www.youtube.com/channel/UCPYfuRXgE6SgaLMmd_vYx9Q
Follow us on Instagram @yesifarm
Winter Share Week 4
Starting to feel and look like Spring or perhaps the season of mud is more appropriate. 'Twas a slippery slope out there this morning, the recent rain was just enough to loosen the top little bit of frost in the ground. Some finesse was required in moving around the farm, it’s not fun when you take a flop on that mucky stuff! How can it be the 25th of January already??? I’ve been busy cleaning out the greenhouse to make space for all the new plantings. I get so excited just thinking about it. I would drive my Dad crazy around February after being cooped up inside during the winter. “Dad can’t we start plowing?” He would chuckle and say, "Not yet, once we start it’s a long haul Cher!" Mom was so exasperated with my pent up energy she’d chase me out of the house, “Go take the dog for a walk, get outside.” Which was exactly what I needed. Going for a walk meant walking down the lane on the farm next door down to the old channel and back over a good mile of wind swept drifts on an old gravel road. You had to cross over a rickety bridge that I swear had more holes than boards on it. But that would usually do the trick — both Lady, Brandy and I would be tired puppies at the end of that long trek!!!
Recipes
Being an onion girl I like pretty much all forms of alliums — but I really do enjoy a good shallot. Their flavor is somewhere between a red or yellow onion with a slight sweetness.
SHALLOT VINAIGRETTE
Source: https://www.gimmesomeoven.com/shallot-vinaigrette/#tasty-recipes-78906
Ingredients
1 large shallot, peeled and finely minced (about 3 tablespoons)
1 clove garlic, peeled and finely minced
1/3 cup extra virgin olive oil
1 lemon, zested and juiced (about 2 tablespoons juice)
1 teaspoon Dijon mustard
1/4 teaspoon fine sea salt
1/4 teaspoon freshly-cracked black pepper
Instructions
Combine. In a large bowl, whisk all of the ingredients together vigorously for 1 minute or until fully emulsified. (Or alternately, vigorously shake the ingredients together in a covered mason jar until fully emulsified.) Serve. Serve immediately or refrigerate in a sealed container for up to 3 days.
SAUSAGE AND KALE SCRAMBLESource: "Let them eat Kale!" by Julia Mueller
Ingredients
1 Tablespoon Olive oil
2 cups white or red potato chopped into ½ inch pieces
1 cup ground breakfast sausage of your choice
½ cup onion, chopped
2 cups lightly packed kale, leaves chopped
6 eggs, lightly beaten
½ cup mozzarella or jack cheese - grated
Salt and Pepper to taste
Instructions
– Heat oil in medium skillet. Add chopped potato and saute, stirring every few minutes until they begin to soften. About 8-10 minutes
– Add ground sausage and brown the meat, chopping it into bite size pieces - a spatula works well for this
– Add onions and kale leaves, cover pan and allow kale to soften.
– Pour eggs over the sausage mixture. Allow the eggs to sit and cook for a few minutes then flip over. Letting them sit for a bit before flipping helps the scramble to hold together.
– Sprinkle shredded cheese over the eggs, continue to cook until eggs are cooked through.
– Season to taste with salt and pepper.
– Serve with guacamole and sour cream or plain yogurt.
For more recipes check out our farm recipe blog: https://blackdirtrecipes.wordpress.com
YouTube Channel: https://www.youtube.com/channel/UCPYfuRXgE6SgaLMmd_vYx9Q
Follow us on Instagram @yesifarm
Winter Share Week 3
Did any of you see the Well section of this past Tuesday's NY Times? Bob very kindly forwarded the article to me. It was a great story about how vegetables and fruits aren't just sides. When I'm on my game breakfast will often look more like lunch — heaping bowl of greens topped with whatever might be in the kitchen that day — fruit like apples and pears, vegetables like red peppers, tomatoes, summer squash, onions, roasted winter squashes, radishes, craisins, sunflower seeds, pepitas. Olives. Cheese like feta or goat. A poached egg, salt, cracked pepper and a simple vinaigrette of cider vinegar and olive oil. I can eat like this 3x a day!!!! Best of all you can eat like this with the seasons year round. Grilled peaches, strawberries, blueberries, cucumbers, oven roasted potatoes, sweet potatoes, tomatoes and peppers. The possibilities are endless. For a more structured recipe check out Mark Bitman’s more vegetable than eggs frittata recipe: https://www.food.com/recipe/more-vegetable-than-egg-frittata-mark-bittman-447539
VEGETABLE — CELERIAC
That gnarly looking bulb in your share this week is celeriac. Known by other names celery root, knob celery and turnip-rooted celery. It is a member of the carrot family with a flavor similar to celery and can be eaten raw or cooked. For me it's another "new" vegetable that I've only recently discovered. The flavor is evocative of celery but softer and more delicate. I find myself adding it to my soups and stews quite often. Takes a while to grow, we need to start the seeds in the greenhouse and then put the transplants out into the fields. From my research in finding recipes for you all I have discovered it is a good match flavorwise for apples! I am hoping to create an apple celeriac cake sometime soon!!!! Oh I love vegetables, they're so exciting.
CREAMY CELERIAC MASH
https://itsavegworldafterall.com/celeriac-mash-recipe/
A simple, healthy celeriac recipe that makes a delicious side dish.
Author: Lizzie Streit, MS, RDN
Ingredients
2 pounds celeriac
2 shallots - peeled and quartered
6 cloves garlic - peeled
Vegetable broth - to cover the veggies, about 2 cups
½ cup whole milk - or half and half
2 tablespoon butter - salted
Salt - to taste
Pepper - to taste
Fresh herbs - for serving
Instructions
– Use a swivel peeler to remove the brown celeriac flesh. You may need to use a paring knife to slice off small areas that you can't reach with the peeler. Rinse off each peeled celeriac, and cut into cubes.
– Add the celeriac, shallots, and whole garlic cloves to a pot or Dutch oven. Pour in enough vegetable broth to just cover the veggies. Bring to a boil over high heat, cover, reduce heat to low and cook for 20 minutes, or until the celery root is fork-tender.
– Carefully drain most of the vegetable broth (about ⅔ of it; leave some for flavor). Return the pot with the veggies back to the stove and add the whole milk and butter. Cook for 2-3 minutes over medium heat, stirring well, until the butter is melted and the milk is warmed (but not boiling).
– Carefully transfer the mixture to a blender. Depending on the size of your blender, you may want to do it in batches to prevent overheating/splattering. Blend for ~1-2 minutes, until smooth. Alternatively, you can use a potato masher and mash the celeriac right in the pot. It will still taste delicious but won't have as creamy of a texture as it does when you blend it.
– Taste and adjust seasonings as desired. Serve with more butter, salt, pepper, and fresh herbs.
Notes
Serve with lentils, mushroom gravy, or drizzled with melted butter and honey. It makes a great side dish for Thanksgiving and Christmas roasts. You can also serve it with a scoop of stew or French onion soup.
Store leftovers in an airtight container in the fridge for up to 5 days. Reheat in the microwave on high for 1-2 minutes.
HERB ROASTED CELERIAC
https://veggiedesserts.com/roasted-celeriac/
Kate Hackworthy
Ingredients
1 large celeriac (celery root)
2 tablespoons olive oil
2 teaspoons Italian herbs
½ teaspoon each salt and pepper
Instructions
– Preheat the oven to 400°F/200°C
– Peel the celeriac (it may be easier to use a knife than a vegetable peeler), then chop into chunks.
– Add the celeriac to a bowl with the remaining ingredients and toss well to coat.
– Spread into a single layer on a sheet pan and roast in the oven for 15-20 minutes or until golden on the outside and soft and cooked inside.
For more recipes check out our farm recipe blog: https://blackdirtrecipes.wordpress.com
YouTube Channel: https://www.youtube.com/channel/UCPYfuRXgE6SgaLMmd_vYx9Q
Follow us on Instagram @yesifarm
Winter Share Week 2
And so life goes on, by now you may have heard about the fire we had at our farm kitchen last week. The house is a mess but thankfully the insurance company is working with us. No one was hurt except possibly my one cat Tippy. I haven't been able to find her. Am praying that she is hunkered down somewhere. In the meanwhile it's farming as usual! Cleaning and reorganizing the greenhouse, creating maps for the fields, ordering seeds, dreaming about my perfect farm and how I will make that real this coming season ... As a farmer, we're always talking about weather — our lives, and your supply of local vegetables revolve around it!!! The rain and runoff just keep saturating the fields. The valley looks like pools of mirrors and more rain on the way.
RECIPE
ROASTED ROOT VEGETABLES
Source: https://www.loveandlemons.com/roasted-root-vegetables/
Prep Time: 15 minutes; Cook Time: 45 minutes; Total Time: 1 hour
Serves 4 to 6
These oven roasted root vegetables are a delicious side dish! I top the tender, caramelized veggies with a fragrant sage oil and crispy sage leaves for a rich, earthy depth of flavor. We love to serve this recipe as a holiday side dish, but it would be a great addition to any fall or winter meal. Vegan and gluten-free.
Ingredients
2 beets, preferably 1 red and 1 golden, peeled and chopped into 1-inch chunks
1 large carrot, roll cut into 1-inch chunks
3 parsnips, chopped into 1-inch chunks
1 medium sweet potato, chopped into 1-inch chunks
1 turnip, chopped into 1-inch chunks
Extra-virgin olive oil, for drizzling
1 tablespoon chopped fresh rosemary
1 tablespoon chopped fresh sage leaves
1 tablespoon fresh thyme leaves
Sea salt and freshly ground black pepper
Crispy Sage and Sage Oil
2 tablespoons extra-virgin olive oil
10 fresh sage leaves
Instructions
– Preheat the oven to 425°F and line two baking sheets with parchment paper.
– Place the beets and carrots on one baking sheet and the parsnips, sweet potato, and turnip on the other. Drizzle the vegetables with olive oil and sprinkle with the rosemary, sage, thyme, pinches of salt, and several grinds of pepper. Toss to coat and spread evenly on the baking sheets. Roast for 25 to 50 minutes, or until tender and browned around the edges. The parsnips, sweet potato, and turnip will bake for less time. The beet and carrot will roast longer.
– Make the crispy sage: Line a plate with paper towels. Heat the olive oil in a small saucepan until bubbling, add the sage leaves, stir, and cook until crisp, about 1 minute. Remove the leaves from the oil and transfer to the prepared plate to drain. Reserve the oil for serving with the vegetables.
– Remove the vegetables from the oven and toss with 1 tablespoon of the sage oil. Transfer to a platter and top with the crispy sage leaves.
Note: You can change up the vegetables to Brussels sprouts and/or onions; all work well with this.
For more recipes check out our farm recipe blog: https://blackdirtrecipes.wordpress.com
YouTube Channel: https://www.youtube.com/channel/UCPYfuRXgE6SgaLMmd_vYx9Q
Follow us on Instagram @yesifarm
Fall Share Week 13
December 21st, the shortest day of the year, also known as the Winter Solstice. I had a cousin who was born on this day and she swore that’s why she was so short (like 4 foot)! I am always amazed at how the daylight increases with each passing day. What I also find amazing is how plants that we seed out now barely move and once the daylight gets long enough it’s like steroids for plants and the growth is exponentially enhanced. Folks think it's heat that prompts the growth, which I thought so too and being warm doesn’t hurt for sure! But it’s the length of daylight that is the true accelerant. So as we bask in the glorious sunlight of winter, we wish you all the best for this holiday season and hope you and yours are safe no matter where your journeys take you. MERRY CHRISTMAS!!!!!!
RECIPES
As you may have guessed by now I love to roast my vegetables — especially roots. The roasting brings out the natural sweetness and is very forgiving as I don't have to watch the oven so closely.
ROASTED SWEET POTATOES & ONIONS Recipe by Jean Carper
Source: https://www.allrecipes.com/recipe/82575/roasted-sweet-potatoes-onions/
This delicious side dish is packed with nutrition. Sweet potatoes, onions and almonds are powerhouses of antioxidants and other nutrients — in fact, almonds are among the most nutrient-dense foods, containing high concentrations of vitamins and minerals per calorie. Plus, olive oil and almonds contain monounsaturated fat — the good type.
Ingredients
2 large sweet potatoes, peeled and cut in 1-inch chunks
2 medium Vidalia or other sweet onions, cut in 1-inch chunks
3 tablespoons olive oil
¼ cup amaretto liqueur
1 teaspoon dried thyme
Salt and freshly ground black pepper, to taste
¼ cup sliced almonds, toasted
Directions
Heat oven to 425 degrees F.
Toss first 6 ingredients in a shallow medium-sized baking dish. Cover; bake 30 minutes. Uncover; bake 20 minutes more. Sprinkle with almonds and serve!
Tips
Substitute almond extract and a little extra olive oil instead of amaretto
Can omit the almonds and almond extract if nuts are an issue.
Turn this into a main course with slices of kielbasa on top.
SIMPLE ROASTED TURNIPS Author: Holly Nilsson
Source: https://www.spendwithpennies.com/simple-roasted-turnips/#wprm-recipe-container-193418These Roasted Turnips are crispy on the outside and perfectly seasoned!
Servings: 4
Ingredients
1 ½ pounds turnips peeled and cut into bite sized pieces
2 teaspoons olive oil
⅛ teaspoon ground sage
kosher salt & pepper to taste
2 teaspoons butter
Instructions
Preheat oven to 425°F.
Toss turnips with olive oil, sage, salt & pepper.
Roast 30-35 minutes or until tender.
Remove from the oven, toss with butter and season to taste.
Notes
If you cut the turnips a bit larger, they will need longer to cook. Smaller pieces will cook a bit faster.
ROASTED BEETS
Source: https://www.loveandlemons.com/roasted-beets/#wprm-recipe-container-45340
This easy roasted beets recipe is a delicious side dish! Season the beets simply with olive oil, salt, and pepper or see the link for other suggestions in the previous blog posts.
Ingredients
1 large beet, tops removed, scrubbed well
Extra-virgin olive oil, for drizzling
Sea salt and freshly ground black pepper
Instructions
Preheat the oven to 400°F.
Slice beet into quarters.
Place each quarter on a piece of foil. Drizzle generously with olive oil and sprinkle with salt and pepper. Wrap the beets in the foil, place on a baking sheet, and roast for 35 to 60 minutes, or until fork-tender. The timing will depend on the size and freshness of the beets.
Remove the beets from the oven, remove the foil, and set aside to cool. When the beets are cool to the touch, peel off the skins. I like to hold them under running water and slide the skins off with my hands.
Cut or slice the beets and drizzle lightly with olive oil. Season to taste with salt and pepper, toss, and serve.
For more recipes check out our farm recipe blog: https://blackdirtrecipes.wordpress.com
YouTube Channel: https://www.youtube.com/channel/UCPYfuRXgE6SgaLMmd_vYx9Q
Follow us on Instagram @yesifarm
Fall Share Week 12
Did you know there are over 5,000 varieties of potatoes in the world? First cultivated by the Inca Indians in Peru, the length of time it took to cook potatoes were used as a measurement of time. It wasn’t until thousands of years later when Thomas Jefferson served these delicious tubers at the White House that they became popular here in the US. While Ireland is renowned for potato consumption it took over 40 years for the rest of Europe to accept this vegetable as part of their cuisine. Coming in many shapes, colors and textures and highly nutritious, but depending on the variety can be high in carbs, potatoes are a versatile vegetable. Early on the purple potato was used as a “marker potato.” Much under-appreciated for its color and texture, farmers would plant a few of these purple potatoes in between varieties to mark where the different varieties were planted in their fields. Potatoes described as starchy or flourly are high in starch and good for thickening a soup and frying. They hold their shape well and while not related, sweet potatoes fall into this category as well. Waxy potatoes include red ones which are less starchy but are moister and frequently used for potato salad and casseroles. And then there is the all purpose potato like a Yukon gold which can be prepared most any way. Sources of information: https://www.kew.org/; https://potatogoodness.com/potato-fun-facts-history/
RECIPE
Latkes not just for Hannukah! We grew up on potato pancakes or as we knew them placki for our Friday night suppers. Dad would peel and grate potatoes and onions on the box grater, add eggs, salt and pepper. Sprinkle some flour to help thicken the batter and in his later years added some baking powder to give them loft! I still remember how excited Dad was when Mom bought our first food processor — that shredder blade made short work of prepping the potatoes and onions!!!! In a large skillet there would be oil sizzling, Dad would fry them until there were crispy shreds on the outside. We would gobble these up as soon as they were cool enough! Mom would serve them with sour cream and apple sauce on the side. I still cook them pretty much the same way today. Sometimes I like some horseradish mixed in with the sourcream and might garnish with chives or scallions. I’ll also shred carrots or sweet potatoes into the mix and chop some parsley in for extra flavor. In the summer I’ll add zucchini and have even added sweet potatoes to the mix. And of course the original straight up potato is always appreciated. Jalapeno and cilantro are great flavor combos as well!
If you need a recipe to follow, this one is pretty much how my Dad made ours.
POTATO PANCAKES
Source: https://www.allrecipes.com/recipe/14089/potato-pancakes-i/
Recipe by Heather Fantasia
These traditional potato pancakes are wonderful comfort food. Serve with applesauce and sour cream for a light dinner, or with roast chicken for a hearty winter meal.
Ingredients
4 large potatoes
1 yellow onion
1 egg, beaten
1 teaspoon salt
ground black pepper to taste
2 tablespoons all-purpose flour, or more as needed
1 cup vegetable oil for frying, or as needed
Directions
Finely grate potatoes and onion into a large bowl. Drain off any excess liquid.
Mix in egg, salt, and pepper. Add enough flour to make the mixture thick, about 2 to 4 tablespoons all together.
Preheat the oven to low, about 200 degrees F (95 degrees C).
Heat 1/4 inch oil in the bottom of a heavy skillet over medium-high heat. Drop two or three 1/4-cup mounds of batter into hot oil, and flatten with back of a spatula to make 1/2-inch-thick pancakes. Fry, turning pancakes once, until golden brown.
Transfer pancakes to a plate lined with a paper towel to drain. Keep warm in the oven until serving. Repeat until all potato mixture is used.
For more recipes check out our farm recipe blog: https://blackdirtrecipes.wordpress.com
YouTube Channel: https://www.youtube.com/channel/UCPYfuRXgE6SgaLMmd_vYx9Q
Follow us on Instagram @yesifarm
Fall Share Week 10
Hope you all enjoyed a peaceful holiday! This is the time of year when I start to do as much research as I can — seeds, plants, recipes, technology. Over the years I’ve learned so much but still have so much to learn. About 20 years ago I started to learn about “caterpillars,” low tunnels constructed from plastic and PVC pipe. Anywhere I tried to glean knowledge about these structures I was met with “Can’t be done, Impossible. Doesn’t exist.” It took a bit of ingenuity and finally finding the right farmers to share ideas with, that I was able to figure out a crude system for our operation. The tunnels were above ground structures created with PVC pipe. I had to custom order the pipe from our local hardware store as no one had it in stock. We cut the 3-inch pipe into 18-inch lengths. These pieces were pounded into the ground, in two rows and spaced about 6 feet apart in each row. The two rows were also spaced about 6 feet apart. Next we took 2-inch PVC pipe, bent it into an arc and inserted each end into one of the pipes we pounded into the ground. Had to do this on a warm day so the pipes would bend and not shatter. The rows were about 20-30 feet long. Over these arcs we strung plastic sheeting, lassoed the sheet with some rope that we fastened to pins we set in between the 3 inch pipes and Voila! our mini greenhouses aka caterpillars were created. For something so rudimentary they worked pretty well. Now you can purchase kits with metal pipes and all sorts of fasteners to make the job go faster. Amazing what happens with the passage of time, so now I am again on the trail of caterpillar structures and figuring out the best methods for us in our operation to extend our growing season.
RECIPE
How to Cook Frozen Corn (the RIGHT way)
Source: https://www.favfamilyrecipes.com/how-to-cook-frozen-corn/
Want to know the secret to making frozen corn taste delicious? Kick your corn side dish up a notch with How to Cook Frozen Corn (the RIGHT way)!
You will need a skillet
Ingredients
· 1 pound frozen corn
· 4 Tablespoons Butter
· 1 Tablespoon Sugar
Instructions
· Place corn in a colander and rinse with cold water until ice is no longer present. Shake off excess water over the sink. Place corn and butter in a medium-sized skillet over medium-high heat. Sprinkle sugar over corn and stir until butter is melted and corn is hot (about 5-6 minutes). Do not over cook. Season with Kosher salt and fresh black pepper if desired.
· Serve immediately.
Notes
· Don’t BOIL frozen kernel corn! Just don’t do it. I know the package tells you to do it, but trust me, it zaps all the flavor out of the corn.
· Use a skillet. Stir-frying or sautéing frozen corn keeps it crisp and bright and tastes much better than roasted corn in the oven.
· Add a little sugar. It’s ok, it won’t taste weird and it will bring out the natural sweet flavor.
· Don’t salt until ready to serve. Salting the corn too early can dehydrate it and it won’t taste as sweet. Wait until after you’ve cooked it, then salt and pepper to taste.
INSTANT POT BLACK BEANS RECIPE
Source: https://thekitchengirl.com/instant-pot-black-beans/
Cooked to perfection and recipe-ready!
Yield 6 cups
Ingredients
1 pound Dried Black Beans same as 2 cups
6 cups Water (for no soak beans) 4 cups (for soaked)
1 teaspoon Sea Salt optional
Equipment
§ 6-quart Instant Pot or other size pressure cooker
§ colander to rinse beans
§ stirring utensil
§ airtight storage container(s)
Instructions
· Sort and rinse dry BLACK BEANS. If soaking, continue to step 2. If using the no-soak option, skip to step 3.
· To soak black beans, place them in a large bowl with 8 cups water and soak for 8 hours. Drain and rinse.
Note: Reduce the water amount to 4 cups in the next step.
· Place BLACK BEANS, WATER, and (optional) SALT in the Instant Pot.
· Secure lid and turn pressure release valve to “ Sealing” position. Select “manual” or “pressure cook" on HIGH for 30 minutes (for no-soak option) and 15 minutes (for soaked beans).
Note: It takes at least 20 minutes for the Instant Pot to fully pressurize.
· When cook cycle ends, allow the cooker to sit undisturbed for a 20-minute natural pressure release (NPR).
· Safely turn pressure release valve to “Venting” position to release any remaining steam. Open the lid and test beans for softness.
If needed, run another pressure cook cycle for 3 to 5 minutes followed by NPR until beans are soft to your liking.
· Serve warm.
· To store, allow beans to cool completely and refrigerate in an airtight container up to 5 days or freeze up to 30 days (or more if vacuum sealed).
REFRIED BLACK BEANS
Source: https://thekitchengirl.com/how-to-make-refried-black-beans-from-canned-whole-beans/#Recipe
Make creamy refried black beans from canned or scratch-cooked black beans in ten minutes with a few spices and a potato masher.
Prep Time: 5 minutes
Cook Time: 5 minutes
Total Time: 10 minutes
Yield 2 cups
Ingredients
2 tablespoons Olive Oil
¼ teaspoon Garlic Powder
¼ teaspoon Chili Powder
¼ teaspoon Cumin
1 (15 ounce can) Black Beans or 1 ½ cups cooked black beans with juice
Sea Salt to taste
Black Pepper to taste
Equipment
§ colander to drain beans
§ mixing bowl goes under colander to capture liquid
§ 11-inch skillet
§ silicone spatula
§ potato masher
Instructions
· Drain BLACK BEANS into a colander over a fitted bowl to capture the bean juice. Set aside briefly.
· In a skillet, heat OLIVE OIL until shimmering. Add GARLIC, CUMIN, and CHILI POWDER. Sauté until fragrant (about 1 minute), stirring continuously to prevent overcooking.
· Add BLACK BEANS to the skillet (without the juice). Toss beans to coat with oil, then saute a few minutes until warmed through, stirring as needed.
· Mash the beans with a potato masher until no longer whole and starting to become creamy.
· Add small amounts of reserved bean juice (or other liquid) to adjust consistency to your liking, stirring as needed.
· Add SALT and PEPPER to taste. Serve warm.
· To store, allow to cool, then refrigerate in an airtight container up to 5 days.
For more recipes check out our farm recipe blog: https://blackdirtrecipes.wordpress.com
YouTube Channel: https://www.youtube.com/channel/UCPYfuRXgE6SgaLMmd_vYx9Q
Follow us on Instagram @yesifarm
Fall Share Week 9
Happy Thanksgiving!!!! This is one of my most favorite holidays for so many reasons! We share holidays amongst my brother and sister. I staked a claim on this one so I get to plan a dinner that helps me show them how much I love and appreciate them. No one gets turned away, over the years many friends have been a part of our celebrations. One of my chef friends, a vegan, talks about how Thanksgiving is her favorite holiday because there’s so much food to eat, all those sides!!! LOL! My biggest challenge is choosing what to make, I always want to try out new recipes while celebrating the traditions we grew up with. There will be turkey, Mom’s stuffing (made with GF bread now that my brother is celiac), gravy, mashed potatoes, creamed onions, roasted vegetables, cranberry sauce, salad, pickles, a charcuterie plate, and fresh baked bread for leftover turkey sandwiches. Cookies and pies — my sister figured out how to make a crustless pumpkin pie! Knowing me I’ll be adding a few other things to the menu but I have gotten better at restraining myself just a little when it comes to cooking for the day which is a real challenge for me, as I do love to cook!
Anyway, I wanted to say THANK YOU for beng a part of our lives and how important you are to us here on the farm! We hope you enjoy a delicious and safe holiday and see you soon!!!
SWEET POTATO CHIPS
By Devon O'Brien
Source: https://www.eatingwell.com/recipe/256622/sweet-potato-chips/
Make perfectly crunchy veggie chips at home with this healthy recipe. Use a mandoline to slice the sweet potatoes extra-thin for the optimum crunch!
Yield:5 servings
Ingredients
· 1 large sweet potato (about 1 pound), thinly sliced (about 1/8 inch thick)
· 1 tablespoon extra-virgin olive oil
· ½ teaspoon salt
Directions
1. Preheat oven to 200 degrees F. Line 2 large baking sheets with parchment paper.
2. Toss sweet potato slices with oil and salt. Spread in a single layer on the prepared baking sheets.
3. Bake on the upper and lower oven racks until crisp, rotating the pans top to bottom and front to back halfway through, about 3 hours. Cool on the pans for 30 minutes before serving.
Tips
Equipment: Parchment paper
CABBAGE ROLL SOUP
Source: https://reciperunner.com/cabbage-roll-soup/
YIELD: 6
Ingredients
1 tablespoon olive oil
1 pound lean ground turkey
1 cup diced yellow onion
3 cloves of garlic, grated (about 2 teaspoons)
Salt and freshly ground black pepper to taste
1 cup diced carrots
5 cups chopped green cabbage
1 tablespoon Worcestershire
1 teaspoon smoked paprika
1 teaspoon dried oregano
1 tablespoon chopped fresh thyme
1 bay leaf
1/4 teaspoon ground cinnamon
4 cups beef or chicken broth
16 ounce can tomato sauce
28 ounce can crushed tomatoes
1 tablespoon maple syrup (or brown sugar)
1 tablespoon apple cider vinegar
1/2 cup uncooked rice
Instructions
1. Over medium-high heat, add the olive oil to a large pot or Dutch oven. Once the oil is hot, add in the ground turkey, onion, and garlic. Sauté the meat crumbling it as it cooks. Season with salt and pepper.
2. Once the meat is browned and the onions have softened, about 8 minutes, add in the carrots and cabbage. Sauté for another 3-4 minutes or until the cabbage starts to wilt.
3. Add in the remaining ingredients and stir everything together. Bring the soup to a boil then lower the heat and let it simmer for about 20 minutes or until the rice is tender. Stir the soup occasionally so that the rice doesn’t stick to the bottom.
4. If the soup is too thick for your liking, pour in extra broth until it's a consistency you like. Taste for seasoning and then remove the bay leaves and serve.
For more recipes check out our farm recipe blog: https://blackdirtrecipes.wordpress.com
YouTube Channel: https://www.youtube.com/channel/UCPYfuRXgE6SgaLMmd_vYx9Q
Follow us on Instagram @yesifarm
Fall Share Week 8
As Thanksgiving approaches there’s a sense of both relief and melancholy on the farm. Relief that the intense ferocity of the field work is coming to an end and at the same time nostalgia for the scents, textures and flavors of fresh tomatoes, peppers, tender herbs like basil, the crispy crunch of snap beans and sweetness of sugar snap peas. And while we experience all that, we look forward to the flavors of fall and winter – sweet potatoes, squashes, onions, dried beans, Brussels sprouts, stews and soups. And from the freezer and pantry the flavors of summer we captured: frozen sweet corn and peppers, pickles and fermented cabbages. That is what I love about farming between growing and cooking, having the opportunity to share with you all. The satisfaction, when everything goes mostly right, of seeing those tiny little seeds germinate and morph into amazing plants showering us with their abundant harvest, and even when it goes wrong like severe weather that we persevered and adapted to what Mother Nature threw our way. I am so looking forward to sitting by the fireplace with some freshly baked bread, a pot of stew and maybe a glass of wine with a pile of seed catalogs on one side and cookbooks on the other as I dream of the amazing things yet to come!
RECIPES — Brussels Sprouts
I really like Brussels sprouts roasted or finely saved raw in a salad. Some say you should boil the Brussels before roasting to soften up the middle and take away any bitter notes they might have. I just like to slice the bigger ones in half, toss them with olive oil, salt and pepper and roast at high heat around 400 degrees. I start checking them after about 20 minutes, give them a toss so they get evenly roasted. Another vegetable I have to hide from my sister LOL.
THE BEST BRUSSELS SPROUTS OF YOUR LIFE
Author: Erren Hart
Source: https://www.errenskitchen.com/the-best-brussels-sprouts-of-your-life/ Salad
Jazz up your Brussels Sprouts with a kick of garlic and freshly grated cheese – making this simple side dish one that the whole family will love!
Ingredients
½ pound Brussels Sprouts Cleaned and trimmed
3 cloves garlic peeled & sliced *See the notes section before starting
salt and freshly ground black pepper To taste
1 ½ tablespoons good quality olive oil or for Keto, butter flavor coconut oil
Instructions
Preheat the oven to 400°F/200°C.
If needed, clean and trim the Brussels sprouts and cut them in halves and place them in an oven safe dish. Make sure to dry them very well before cooking. Add the garlic, Parmesan cheese, salt, and pepper, followed by the olive oil. Toss to coat. Roast in the oven uncovered for 20-25 minutes until crisp, brown and caramelized on the outside and tender on the inside. Serve with more grated cheese.
Tips + Notes
*This recipe makes very crispy garlic. In some ovens, it could burn or become bitter. If you are worried about the garlic getting too dark for your liking, slice it thin and add at the last 5-7 minutes of cooking time, coated in a little oil, and scattered around the pan.
For less crispy cheese, add it for the last 10 minutes. To keep your sprouts from sticking, line your pan with nonstick foil or baking paper. Dry your Brussels sprouts well. The drier they are, the crispier they’ll be. If washing, use paper towels to pat them dry or use a salad spinner to spin that liquid right off. For crisper sprouts, spread them out on the pan without too much touching. Overcrowding causes you to steam the Brussels sprouts instead of roasting them. Cut the sprouts into even-sized pieces if you want them to have a similar texture. Be sure to start with a hot oven to help the sprouts crisp on the outside and soft on the inside. Brown is good. If you’ve never cooked Brussels sprouts this way, at first glance, you may think it looks burnt out of the oven, but once you taste it, you’ll know those little “burnt” areas are the best-tasting parts! When using untrimmed Brussels sprouts, trim off the dry part of the stem at the base of the sprout and any loose outer leaves. For an extra caramelized area, place the sliced Brussels sprouts cut-side down on the pan. This will give a larger browned surface area. Leave smaller sprouts whole to avoid overcooking. On smaller sprouts that don’t need to be halved, slice a cross in the stem (see the video). The stem is the toughest part of the Brussels sprout, and the cross allows them to cook at the same rate as the tender area. For an extra kick of flavor, try adding lemon zest before roasting and a squeeze of fresh lemon juice before serving. Be sure to taste and season well before serving.
EASY BRUSSELS SPROUT SALAD
Source: https://www.acouplecooks.com/brussels-sprout-salad/
This Brussels sprout salad has the best fresh flavors and zingy dressing! Pair it with apples, almonds and dried cherries for a tasty side.
For the salad
1/2 pound Brussels sprouts, enough for 4 cups shredded (or 8 ounces shredded)
1 ½ cups chopped escarole or other crunchy leafy green, optional
1 large crisp tart red apple (like Honeycrisp)
¼ cup dried tart cherries
¼ cup almonds (Marcona almonds, if possible)
1/8 teaspoon kosher salt
1 recipe Dijon Mustard Dressing
Feta cheese crumbles, optional (omit for vegan)
Instructions
Shred the Brussels sprouts: go to How to Shred Brussels Sprouts. Or, use a food processor slicing blade or mandoline to slice each sprout from top to end.
Prep the vegetables: Chop the escarole or other leafy green. Dice the apple. Make the dressing: In a medium bowl, whisk together the Dijon mustard, white wine vinegar, maple syrup, and salt. Then whisk in the olive oil 1 tablespoon at a time until a creamy dressing forms. Assemble the salad: Mix together all salad ingredients. Mix with ½ cup of the dressing (add more to taste, if desired). Top with feta crumbles, if using, and serve.
Dijon Mustard Dressing
2 tablespoons white wine vinegar
1 tablespoon Dijon mustard
1 teaspoon maple syrup
¼ teaspoon kosher salt
6 tablespoons olive oil
In a medium bowl, whisk together the white wine vinegar, Dijon mustard, maple syrup, and kosher salt. Whisk in the olive oil 1 tablespoon at a time until a creamy emulsion forms. Store refrigerated and bring to room temperature before serving (keeps at least 2 weeks).
For more recipes check out our farm recipe blog: https://blackdirtrecipes.wordpress.com
YouTube Channel: https://www.youtube.com/channel/UCPYfuRXgE6SgaLMmd_vYx9Q
Follow us on Instagram @yesifarm
Fall Share Week 7
Frost on the pumpkin, it’s most definitely there this morning. I couldn’t sleep so I was out walking about at 2 AM. Everything was coated with that glistening, glittery white cover of our first hard frost. Even without a totally full moon the valley looks like a fairy dusted it ever so slightly in that sparkly glitter like you see on holiday cards. For me this is the final salvo for anything summery in the field crops. While a prelude of hard killing frosts to come, we’ll see how the herbs and other fall crops survive this first one. One thing is for sure the kale and other leafy greens will be so, so much sweeter now. Sugar is the natural antifreeze in plants, so as the temperatures go down the sugar levels go up. Even this does have its limits and eventually the field crops will succumb to the freezing effects. As this transition to fall begins in earnest, we can harvest the Brussels sprouts, their flavor will be so sweet and tender now.
RECIPES
Cabbage – Oh the lowly cabbage, another of those misunderstood and underrated vegetables. There were so many recipes I could hardly choose just one to share with you. Cabbage — it’s not just for coleslaw!
ROASTED CABBAGE WEDGES
Source: https://www.tastingtable.com/783834/roasted-cabbage-wedges-recipe/
This roasted cabbage wedge recipe served with a tangy dressing and feta cheese makes for the perfect side dish for practically any main course.
Ingredients
1 head green cabbage, cut into 8 wedges
2 tablespoons olive oil
2 tablespoons unsalted butter, melted
4 cloves minced garlic
1 tablespoon fresh lemon juice
½ teaspoon red pepper flakes
salt and pepper, to taste
¼ cup feta cheese, crumbled
2 tablespoons fresh parsley, chopped
Directions
– Preheat the oven to 400 F.
– Line a baking sheet with foil and lightly coat it with olive oil. Place the cabbage wedges evenly spaced on the baking sheet. In a small mixing bowl, combine the olive oil, melted butter, garlic, lemon juice, and red pepper flakes. Brush the mixture onto both sides of the cabbage wedges and season them with salt and pepper.
– Roast for 20-25 minutes, until the edges of the cabbage are starting to brown and the cabbage is tender. Cooking time will vary depending on the size of the wedges. Remove from the oven and serve immediately, sprinkled with crumbled feta and chopped parsley.
EASY ROASTED CABBAGE STEAKS
Author: Julia | The Yummy Bowl
Source: https://theyummybowl.com/easy-roasted-cabbage-steaks/?utm_source=newsletter&utm_medium=emal&utm_campaign=cabbagesteaks#wprm-recipe-container-29703
These Roasted Cabbage Steaks are so easy and delicious. Made with only six ingredients, this simple recipe makes a flavorful snack or side that you're going to just love! A whole head of cabbage is transformed into thick slices, roasted until tender and caramelized on the inside, and irresistibly crispy on the outside. Whether you make it in the oven or on the grill, this dish is a crowd-pleaser that pairs well with any meal.
Ingredients
1 small green cabbage (cored and cut crosswise into ¾-inch slices, about 2 pounds)
⅓ cup extra virgin olive oil
2 cloves garlic (minced)
1 teaspoon smoked paprika (see notes)
½ teaspoon salt (or to taste)
¼ teaspoon ground black pepper
2 tablespoons fresh parsley (finely chopped)
For Serving:
Lemon wedges (optional)
Grated Parmesan cheese (optional)
Instructions
1. Preheat your oven to 400 degrees Fahrenheit. Line a large baking sheet with parchment paper and set it aside.
2. Prepare the cabbage by removing the root end. Slice the cabbage into medium-thick disks, about ¾ to 1 inch thick. You should have around 5 disks. Place them on the prepared baking sheet.
3. In a small bowl, whisk together the olive oil, minced garlic, paprika, salt, and pepper. Use a brush to generously coat both sides of the cabbage steaks with this mixture.
4. Bake the cabbage steaks in the preheated oven at 400°F for approximately 25-30 minutes. Keep an eye on them and remove them when the leaves are nicely browned and the center is tender.
5. Once the cabbage steaks are done, sprinkle them with grated Parmesan cheese and garnish with fresh parsley. Squeeze some lemon juice over the top for added flavor.
6. Serve the cabbage steaks while hot and enjoy!
Notes
Cabbage - Green cabbage is the best choice for this recipe, but you can use red cabbage as well. Choose a young green cabbage head that is a little loose. I prefer green cabbage for its mild flavor as red cabbage tends to have more peppery and stronger flavor than green cabbage.
Olive oil - Oil tenderizes the cabbage slices as they bake. I like to use good quality olive oil for its flavor and nutrition profile.
Spices - Salt, paprika, and for a little spicy kick you can add optional red pepper flakes. For the most natural flavor, choose kosher salt or sea salt and not table salt.
Lemon - Always use fresh and not bottled. The acid in lemon juice offsets the inherent bitterness of cabbage. However, it is still optional or you can add just a little drizzle while serving.
Garlic - Can't skip this one! Garlic and parmesan add so much more flavor to these cabbage steaks.
Toppings - Freshly grated Parmesan cheese, fresh herbs, or chopped nuts make delicious garnishes.
Grilling Instructions
– Prepare the cabbage as instructed for the oven method.
– Heat your grill to medium-high heat (around 400 to 425 degrees Fahrenheit) and lightly brush it with oil.
– Place each cabbage steak directly onto the grill.
– Cook for about 5-8 minutes per side until the steaks are crispy on the outside and tender on the inside. The cabbage should be still crunchy and not too soft.
– Top the grilled cabbage steaks with parmesan cheese, your favorite dipping sauce (check below for my fave options)
For more recipes check out our farm recipe blog: https://blackdirtrecipes.wordpress.com
YouTube Channel: https://www.youtube.com/channel/UCPYfuRXgE6SgaLMmd_vYx9Q
Follow us on Instagram @yesifarm
Fall Share Week 6
Happy Halloween — normally I would be giving you sugar pumpkins now in honor of the season but this year the crop was not so hot. All that rain earlier on took a toll on our pumpkin crop. I tried to get some pumpkins from farmer friends of mine but we’re all in the same boat. The entire Northeast is hurting this year. Between the freeze back in March, which ruined the stone fruit harvest and caused us to lose early plantings of leafy greens and beets. Then all the rain — what is it something like ten weeks in a row now? I think we all were beginning to feel like we were growing mold on us! But we persevere and instead of pumpkins you have Robin's koginut squash which is so awesome and flavorful! A cross between kabocha and butternut, the flavor is so rich and amazing — bonus the skin is edible. I’m going to be roasting a bunch to put in the freezer and turning some into quiches and mac and cheese. Those baby cauliflowers are so pretty — the green ones are Romanesco style. Raw or roasted you can’t go wrong, and the leaves are edible as well!! We are so grateful you are here. Knowing you are sharing in the farm life with us helps to get through the not-so-great days!!!
ROASTED BROCCOLINI
Source: https://www.delish.com/cooking/recipe-ideas/a26966406/broccolini-recipe/
The broccolini can easily be swapped for cauliflower, broccoli and other cruciferous vegetables.
Ingredients
1 lb. broccolini
2 tbsp. extra-virgin olive oil
Kosher salt
Freshly ground black pepper
Crushed red pepper flakes
Instructions
Step 1: Preheat oven to 425°. Place broccolini on a large baking sheet and drizzle with oil. Season with salt, pepper, and a pinch of red pepper flakes and toss to coat.
Step 2: Roast until fork-tender and ends are slightly charred, 30 minutes.
ROASTED KOGINUT SQUASH SALAD
Author: Gina Matsoukas
Source: https://www.runningtothekitchen.com/roasted-koginut-squash-salad/
Ingredients
1 koginut squash
2 tablespoons avocado oil
1 teaspoon Kosher salt
1/2 teaspoon black pepper
1/2 teaspoon cinnamon
1/2 teaspoon garlic powder
1 tablespoon maple syrup
3/4 pound Brussels sprouts trimmed and thinly sliced
1/4 cup pecan halves
2 tablespoons pomegranate arils
FOR THE DRESSING
1 tablespoon extra virgin olive oil
1 shallot minced
1/4 cup apple cider
1 tablespoon apple cider vinegar
1 tablespoon maple syrup
salt and pepper to taste
Instructions
Preheat the oven to 425°F. Grease or line a baking sheet with parchment paper or a silicone baking mat.
– Slice the squash in half lengthwise. Remove the seeds then slice into wedges about 1/3"-1/2" thick. Place on the prepared baking sheet.
– Drizzle the squash with the avocado oil then season with salt, pepper, cinnamon and garlic powder. Drizzle the maple syrup evenly on top of the squash slices then roast for 35-40 minutes flipping each piece halfway through roasting. Squash should be fork tender and caramelized along the edges when done.
– While squash roasts, place the sliced Brussels sprouts in a large bowl.
– Make the dressing by adding the olive oil and shallots to a small skillet over medium heat. Sauté until shallots are softened, about 3 minutes. Add the apple cider, apple cider vinegar, maple syrup, salt and pepper. Stir together and bring to a high simmer. Cook for 1-2 minutes until flavors are melded together.
– Pour the hot dressing into the bowl with the Brussels sprouts and toss until well combined.
– Add the pomegranates and pecans to the bowl, toss and transfer to a serving bowl/platter.
– When the squash is done roasting, arrange slices on top of the salad. Season to taste with additional salt and pepper and serve warm.
For more recipes check out our farm recipe blog: https://blackdirtrecipes.wordpress.com
YouTube Channel: https://www.youtube.com/channel/UCPYfuRXgE6SgaLMmd_vYx9Q
Follow us on Instagram @yesifarm
Fall Share Week 5
I attended the variety showcase at the Glynwood Center this week. It was an event designed to build community among plant breeders, seed growers, farmers, chefs, bakers, distillers, retailers, distributors and consumers interested in the local food system. We were provided a unique experience of tasting new and in-development vegetable, fruit, and grain cultivars. One huge tent was dedicated just to grains. It was wonderful to see so many new cultivars. There were new winter squashes in the kabocha family, perfectly sized for single portions and the skin is edible. A gorgeous leek with a huge white shank at least 8 inches in length, a stunning red and white cabbage more rose in color. Red collard greens! Peter Hoffman, chef of Savoy, a leader in the farm to table movement, was there and shared a sample dish made with onions — a rosa di Milano, an Italian variety. Was so great to see that not only are the breeders growing for looks but especially flavor! I was able to get some seed samples for us and made some great connections with the various breeders and seed company reps. Cannot wait for spring to get planting!!!
QUICK COLLARD GREENS
Source: https://cookieandkate.com/quick-collard-greens-recipe/#tasty-recipes-32984-jump-target
These collard greens are quickly cooked in olive oil and finished with a squeeze of lemon juice. You’re going to love these healthy, vegetarian collards! Recipe yields 2 side servings. To make multiples, simply repeat the ingredients and instructions below (cook each batch separately for best results).
Ingredients
· 1 large bunch (about 10 ounces) collard greens
· 1 ½ tablespoons extra-virgin olive oil
· ¼ teaspoon fine sea salt
· 2 medium cloves garlic, pressed or minced
· Pinch of red pepper flakes (optional, scale back or omit if sensitive to spice)
· A couple lemon wedges, for serving
Instructions
1. To prepare the collards: Cut out the thick center rib out of each collard green. Stack the rib-less greens and roll them up into a cigar-like shape. Slice over the “cigar” as thinly as possible (⅛″ to ¼″) to make long strands. Shake up the greens and give them a few chops so the strands aren’t so long.
2. Heat a large, heavy-bottomed skillet over medium-high heat, then add the olive oil. Once the oil is shimmering, add all of the collard greens and the salt.
3. Stir until all of the greens are lightly coated in oil, then let them cook for about 30 seconds before stirring again. Continue stirring in 30-second intervals until the greens are wilted, dark green, and some are starting to turn browns on the edges (this is delicious). This will take between 3 to 6 minutes.
4. Once the collards are just about done, add the garlic and red pepper flakes (if using). Stir to break up the garlic and cook until it’s fragrant, about 30 seconds. Remove the pan from the heat.
5. Immediately divide the cooked collards onto plates, and serve with a lemon wedge each.
Note: Don’t throw away those stems — dice them up and add them to a pot of water or broth. Simmer until very tender. Eat as is or stir it into the collard greens or other dishes.
LEMONY COLLARD GREENS PASTA
Source: https://cookieandkate.com/lemon-collard-greens-pasta/#tasty-recipes-23269-jump-target
Yield: 2 servings
Super quick, bold and bright pasta dish tossed with thinly sliced and sautéed collard greens, lemon juice, pine nuts and spices.
Ingredients
· 8 ounces fresh collard greens (about 10 big leaves)
· ⅓ or more of a package of whole wheat thin spaghetti or “spaghettini”
· 3 tablespoons pine nuts
· olive oil (the good stuff)
· 2 small cloves garlic, pressed
· big pinch red pepper flakes
· sea salt and black pepper
· 1 ounce Parmesan cheese
· ½ or more of a lemon, cut into wedges
Instructions
1. Bring a big pot of salted water to a boil and cook the pasta according to directions. Drain quickly, reserving a bit of cooking water, and set aside.
2. Cut out the center rib of each collard green. Stack a few greens at a time and roll them up into a cigar-like shape. Slice across the roll as thinly as possible (⅛″ to ¼″). Shake up the greens and give them a few chops so the strands aren’t so long.
3. Heat a heavy-bottomed 12″ skillet over medium heat and toast the pine nuts until they start to turn golden and fragrant. Pour them out of the skillet and save for later.
4. Return the skillet to medium heat and pour in a tablespoon of olive oil. Sprinkle in a big pinch of red pepper flakes and the garlic and stir. Once the oil is hot enough to shimmer, toss in all of your collard greens. Sprinkle the greens with salt. Stirring often (try not to let them clump), sauté the greens for about three minutes.
5. Remove the pan from heat. Scoop the greens into the pasta pot and toss with another drizzle of olive oil, adding pasta water if necessary. Divide onto plates, top with pine nuts and Parmesan shavings and serve with two big lemon wedges per person.
For more recipes check out our farm recipe blog: https://blackdirtrecipes.wordpress.com
YouTube Channel: https://www.youtube.com/channel/UCPYfuRXgE6SgaLMmd_vYx9Q
Follow us on Instagram @yesifarm
Fall Share Week 4
The temps are falling and so are the leaves. We’re holding our breaths for the first winter freeze. Heavy sweatshirts, cups of steaming hot coffee, soup and hot chocolate fortify us for the day as we finish the fall harvest. We should have all the potatoes and squashes in storage by the end of next week. Taking a gamble and planting some more cold hardy greens for a quick harvest.
RECIPE
ROASTED SEASONED WINTER SQUASH MEDLEY
Source: https://www.skinnytaste.com/roasted-seasoned-winter-squash-medley/
A winter squash medley roasted with a savory, sweet, spicy and smoky seasoning
Ingredients
1 tablespoon onion powder
1 tablespoon garlic powder
½ teaspoon smoked paprika
½ teaspoon cayenne pepper
½ teaspoon kosher salt
2 teaspoons brown sugar
2 pounds mixed winter squash peeled and cubed
1 tablespoon unsalted butter melted
1 tablespoon olive oil
Instructions
- Preheat oven to 400 degrees.
- In a small bowl, combine the onion powder, garlic powder, smoked paprika, cayenne, salt and brown sugar.
- In a large mixing bowl, toss squash with butter and olive oil. Add 1 tablespoon of the spice mixture to the bowl and toss well to coat.
- Place squash on a sheet pan lined with parchment and bake for 40-45 minutes, tossing every 15 minutes, to allow for even browning. Sprinkle with 1 1/2 teaspoons more of spice mixture. Toss gently to coat and serve hot.
For more recipes check out our farm recipe blog: https://blackdirtrecipes.wordpress.com
YouTube Channel: https://www.youtube.com/channel/UCPYfuRXgE6SgaLMmd_vYx9Q
Follow us on Instagram @yesifarm
Fall Share Week 3
As the weather changes, so does the farm. Cooler-loving veggies take center stage as the heat-loving crops droop and fade away. We’re pulling as much of the heat lovers as we can and will put them in storage. It’s amazing how well they can hold. We’re also busy putting veggies away in the freezer for use during the cold days of winter. And from what the Farmers Almanac is predicting for the Northeast (lots of snow and cold) we’ll be really looking forward to some savory soups and stews. I’ve been getting more and more requests for vegan, sugar-free and salt-free products from my farm kitchen, this has sent me doing even more research for healthier vegetables to grow while still keeping that great flavor we all love. Sweeter carrots, lower-carb potatoes, higher lycopene tomatoes and at the same time looking for disease resistant varieties as well as heat tolerant ones. I was reading an article the other day about seed companies that are doing the same thing — R&D into vegetables and fruits that can tolerate hotter climates, diseases and pests. It’s exciting to be doing all this research, makes me hungry to learn, grow and cook even more!!!!!
RECIPE
OVEN ROASTED EGGPLANT
Source: https://www.loveandlemons.com/roasted-eggplant/#wprm-recipe-container-64916
Learn how to roast eggplant perfectly every time! This easy recipe is a delicious side dish or addition to pastas, salads, and more.
Ingredients
- 1½ pounds eggplant, about 1 large globe eggplant or 2 medium eggplants, chopped into ½-inch cubes
- 2 tablespoons extra-virgin olive oil
- ½ teaspoon sea salt
Instructions
1. Preheat the oven to 425°F and line a large baking sheet with parchment paper.
2. Place the eggplant on the baking sheet and toss with the olive oil and salt. Spread evenly on the baking sheet and roast for 25 to 35 minutes, or until tender and brown around the edges
EGGPLANT CAPONATA
Source: https://www.loveandlemons.com/caponata-recipe/
This eggplant caponata recipe is a delicious summer appetizer or side dish! My take on the sweet and sour Sicilian stew, it's fantastic chilled or at room temperature. We love it on crostini with fresh basil for garnish.
Ingredients
- 1 recipe Roasted Eggplant
- 3 tablespoons golden raisins
- 3 tablespoons sherry vinegar (can sub white wine vinegar)
- 2 tablespoons capers
- 2 tablespoons extra-virgin olive oil
- ½ medium yellow onion, chopped
- 1 celery stalk, diced
- 1 red bell pepper, stemmed, seeded, and diced
- ½ teaspoon sea salt
- 1 tablespoon tomato paste
- 3 garlic cloves, grated
- 1 pound tomatoes, about 4 medium, cored and diced
- ½ teaspoon cane sugar
- ¼ cup chopped fresh parsley
- Freshly ground black pepper
- Fresh basil or parsley leaves, for garnish
- Crostini, for serving
Instructions
1. Roast the eggplant according to this recipe.
2. In a small bowl, combine the golden raisins, vinegar, and capers. Set aside for the raisins to soften while you prepare the caponata.
3. Heat the olive oil in a large skillet over medium heat. Add the onion and celery and cook for 8 minutes, or until the vegetables have softened. Add the red pepper and salt. Cook until tender, about 8 minutes.
4. Add the tomato paste, garlic, tomatoes, and sugar, and cook, stirring often, for about 8 minutes, or until the tomatoes have cooked down and become saucy.
5. Add the roasted eggplant, raisins, vinegar, capers, and several grinds of pepper, and cook, stirring, for 5 more minutes. Stir in the parsley and season to taste.
6. Allow the caponata to cool to room temperature. We like it best on days 2 and 3, after the flavors have had a chance to meld. Store it in an airtight container in the refrigerator for up to 5 days.
7. When ready to serve, garnish the caponata with fresh basil or parsley. Serve with crostini.
For more recipes check out our farm recipe blog: https://blackdirtrecipes.wordpress.com
YouTube Channel: https://www.youtube.com/channel/UCPYfuRXgE6SgaLMmd_vYx9Q
Follow us on Instagram @yesifarm
Fall Share Week 2
This week's share is so evocative of autumn — rainbow chard, carrots, and colorful peppers. I love to feast with all my senses — sights, smells, feel, and of course taste, even sounds — the way the vegetables snap and crunch. Supposed to rain *again* tomorrow so the farmers are busy harvesting potatoes and squashes today. Tomorrow while the skies pepper us with raindrops the farmers will be busy inside the greenhouse shelling and winnowing the dried beans. We’ll be getting those out to you pretty soon. As much as I love being in the fields I also love being in the kitchen. I think it’s a bit of the legacy my parents and grandparents passed on to me. I still have vivid memories of baking cookies and cakes with Babcia (Grandma); helping Grampy cook the slop for the pigs; Dad making his favorite stews and Sunday morning pancakes; Mom prepping huge roasting pans of gaɫombki (stuffed cabbage) and pans of pierogis ... While Mom would moan about how quickly we devoured them, especially Dad and the gaɫombki, she was secretly pleased of how much we appreciated her hard work in the kitchen. If I’m sounding nostalgic today, it is my Babcia’s birthday and wedding anniversary. She married Grampy on her 16th birthday, he was 18. They said it rained like holy Hannah and according to Polish superstition as the weather goes on the wedding day so goes the “weather” of married life. Needless to say they fought like the fiercest thunderstorms and made up like the brightest rainbows!!!
RECIPES for Swiss Chard (or other leafy greens!)
While both recipes are for sautéed swiss chard they are different. Use them for other leafy greens as well!
SAUTÉED SWISS CHARD
Source: https://www.loveandlemons.com/swiss-chard/
This simple Swiss chard recipe is an easy, healthy, and delicious side dish! You could also toss it with pasta or serve it over creamy polenta to make it a meal.
Ingredients
1 bunch Swiss chard
½ tablespoon extra-virgin olive oil
1 garlic cloves, thinly sliced
1/8 teaspoon sea salt, more to taste
Lemon wedge, for squeezing
Freshly ground black pepper
Instructions
Slice the stems off the chard leaves and chop the stems into 1/4-inch slices. Coarsely chop the leaves. Heat the oil in a large skillet over medium heat. Add the chard stems and cook for 1 to 2 minutes, or until they begin to soften. Add the chard leaves, garlic, salt, and several grinds of pepper, and sauté for 1 to 2 minutes, or until the leaves are wilted. Turn off the heat, squeeze a little lemon juice over the chard, and toss. Season to taste and serve.
SIMPLE SAUTÉED SWISS CHARD
Source: https://www.healthyseasonalrecipes.com/simple-sauteed-swiss-chard/
Simple Sautéed Swiss Chard with onions, garlic and a splash of balsamic vinegar. It is a healthy low calorie side dish that’s perfect for beginners!
Ingredients
· 1 large bunches Swiss chard, or rainbow chard
· 1 tablespoons extra-virgin olive oil
· 1-2 cloves garlic, finely chopped
· 1 medium onion, diced
· ¼ teaspoon salt
· pinch each dry thyme and nutmeg
· Freshly ground pepper to taste
· 1 teaspoon balsamic vinegar, optional
Instructions
1. Chop and clean Swiss Chard: Stack several pieces of Swiss chard on work surface. Remove stems and set aside. Roughly cut leaves into pieces about 2-inch square. Repeat with the remaining swiss chard. Transfer the chopped leaves to a salad spinner filled with water. Drain, repeat washing if necessary, and spin dry. Rinse and chop the Swiss chard stems (about the same size as the diced onion.)
2. Cook The Swiss Chard Stems with Onions: Heat oil in a large heavy skillet over medium high heat. Add chopped chard stems, garlic, onion, salt, thyme, nutmeg and pepper and cook, stirring often until the onions are starting to brown, 6 to 8 minutes.
3. Add The Leaves and Wilt: Add chopped cleaned Swiss chard leaves, 2 tablespoons water and cover. Let wilt, 2 to 4 minutes.
4. Cook Until Softened: Remove lid and continue cooking, stirring occasionally until the Swiss chard is completely wilted and softened, 1 to 3 minutes.
5. To Finish and Serve: Remove from the heat and drizzle with balsamic vinegar if using. Serve hot.
Note — Alternative To Large Skillet with Lid: If you don’t have a very large skillet with a lid you can do this in a wide Dutch oven instead.
OTHER ELEMENTS TO TRY ADDING TO THIS RECIPE:
If you’re ready to get creative with this recipe here are some idea starters for ways to liven up this recipe even more!
1. Add a handful of toasted almonds or pine nuts at the end.
2. When you remove the lid add a handful of golden raisins, dried cranberries or dried currants
3. When you pull it off the heat crumble on a little feta or goat cheese.
4. Fresh herbs can be added as well. Savory woody herbs like oregano or thyme can go in with the onions, where as tender herbs like mint, basil or chives can be stirred in after it comes off the heat.
For more recipes check out our farm recipe blog: https://blackdirtrecipes.wordpress.com
YouTube Channel: https://www.youtube.com/channel/UCPYfuRXgE6SgaLMmd_vYx9Q
Follow us on Instagram @yesifarm
Fall Share Week 1
Welcome fall!!! I know it’s not officially here until the weekend but the weather has that "feel." This past Sunday morning around 3 AM I was baking and loading the truck getting ready for the day's market. Not sure what made me do it but I looked up at the sky and was blown away by it’s clarity, the constellations appeared so close I felt like I could reach up and touch them. I don’t remember the last time when I took a moment to just be awed by the night sky. It was so surreal and beautiful!!
VEGETABLES — BROCCOLINI & BABY CAULIFLOWER
Broccolini has become one of my favorite vegetables. It’s a cross between broccoli and gai-lan, a variety of Chinese broccoli. Though it tastes similar to broccoli, broccolini’s flavor is milder and sweeter. And when you cook it well, the florets and stems have a fantastic crisp-tender texture. Here are some serving suggestions:
Easy Baked Ziti
Stuffed Shells
Lentil Pasta
Creamy Mushroom Polenta
Mushroom Risotto
SAUTÉED BROCCOLINI
Source: https://www.loveandlemons.com/broccolini/
Serves 4
This easy sautéed broccolini recipe is a perfect weeknight side dish! It's ready in minutes, and it's deliciously seasoned with garlic, red pepper flakes, and lemon.
Ingredients
2 tablespoons extra-virgin olive oil
3 garlic cloves, thinly sliced
¼ teaspoon red pepper flakes
1 bunch broccolini, trimmed, halved lengthwise if thick (about 6 ounces)
¼ teaspoon sea salt, plus more to taste
2 tablespoons water
2 teaspoons fresh lemon juice
Instructions
Heat the olive oil in a large lidded skillet over medium heat. Add the garlic and red pepper flakes and cook for 30 seconds, then add the broccolini and salt and toss.
1. Cook, tossing occasionally, for 2 minutes. Add the water, cover, reduce the heat, and cook for 3 to 5 minutes, tossing occasionally, or until tender and bright green.
2. Remove from the heat, toss with the lemon juice, and season to taste.
Baby Cauliflower also known by the following names:
Fioretto, Biancoli, Sweet sprouting cauliflower, Karifurore, Flowering cauliflower, Stick cauliflower and Chinese cauliflower
Cooking Methods
My favorite way – and one of the best ways I think to cook this vegetable – is roasting. The brown crispy edges of the flowers are just delish. Other simple ways to prepare it - microwave, stir fry, raw with dips or in salads, steamed and grilled.
(ROASTED) BABY CAULIFLOWER RECIPE
Source: https://twokooksinthekitchen.com/roasted-baby-cauliflower/
Ingredients
1 large baby cauliflower, about 2 lbs/0.9kg
3 tablespoon olive oil (extra-virgin olive oil or neutral)
1 teaspoon kosher salt
1/2 teaspoon black pepper
1/2 teaspoon garlic powder (optional)
Optional Garnishes
zest from 1 lemon (optional but great)
Parmesan cheese, toasted crushed nuts or pine nuts, red pepper sauce, herb sauce, pesto, pea sprouts, balsamic reduction, chopped strawberries.
Instructions
SET OVEN TEMPERATURE TO 425F/218C. Spray large rimmed baking sheet with oil. Or, for easy clean up, line large pan with parchment (or foil sprayed with oil).
PREPARE BABY CAULIFLOWER: Cut 2 inches/5cm off thick bottom stem. Cut the rest of cauliflower into small pieces, leaving on small stems. Toss with oil, salt and pepper (and garlic powder if using). Place cauliflower in single layer in pan. Do not overcrowd the pan or the cauliflower will steam.
ROAST for 15 minutes in preheated oven until flower tips become golden brown and cauliflower is fork tender. Transfer to plate or bowl and sprinkle with lemon zest and/or other garnishes if desired Note 1. Serve immediately.
Notes: Tailor to Your Taste
Seasonings: Try adding curry powder, Parmesan cheese, or red chili flakes for heat.
Drizzles: Try balsamic reduction, Japanese salad dressing, basil pesto, herb sauce or red pepper sauce.
Garnishes: If you like lemon, a sprinkle of lemon zest or squeeze of lemon juice after roasting is a wonderful flavor booster. Other good options are fresh herbs, pine nuts (or other toasted chopped nuts), green onions, pea sprouts, chopped tomatoes or strawberries (for color).
Make Ahead
– Complete the recipe and let it sit on counter until needed. When ready to use, warm the cauliflower in a hot oven for 5 minutes. Or, transfer to a dish after roasting, then warm it in microwave for 1 minute when ready to use.
– Alternatively, the baby cauliflower can be served at room temperature or even cold.
For more recipes check out our farm recipe blog: https://blackdirtrecipes.wordpress.com
YouTube Channel: https://www.youtube.com/channel/UCPYfuRXgE6SgaLMmd_vYx9Q
Follow us on Instagram @yesifarm
Summer Share Week 13
Finally the weather is showing off with stunning fall-like conditions. Everyone is smiling like the sun is bursting through them. Didn’t send potatoes this week as the farmers didn’t have time to dig fresh ones. There’s that old saying “timing is everything” and boy is that true on the farm. My Dad was full of truisms that were guiding words of wisdom that I still follow to this day. Don’t plant pumpkins after June 15! Get your lettuce and leafy greens planted in the field by the end of May! Wait until after the end of May to plant tender crops like peppers and tomatoes! Plant more leafy greens and radishes near end of August! Harvest onions by the end of September — Hurricane season is coming! Get the pumpkins and winter squashes harvested by mid-late September before the frost settles in! Strip all the peppers and tomatoes by then too! Prep and package whatever vegetables we can and get them into the freezers for special treats in January and February! Start shelling the dry beans for hearty soups and stews to keep you warm. And I am already dreaming and planning for next season's crops. I can’t wait to begin again!! I want to thank you for your support and being part of our farm family. This was a rough season with all the weather changes — drought, too much rain, high winds — it was definitely one of the crazier weather seasons and having you there to support us and live the farm life with us means more than you can know. Our farmers say thank you and want you to know how much they appreciate you all. THANK YOU!!!!
MEXICAN STREET CORN SALAD
Source: https://www.loveandlemons.com/mexican-street-corn-salad/#wprm-recipe-container-63728
Serves 4
This easy Mexican street corn salad is the ultimate summer side dish! Lightly creamy, spicy & bright, it's a recipe you'll make again and again.
Ingredients
4 ears fresh corn, husked
Extra-virgin olive oil, for brushing
1½ tablespoons mayo, (or vegan mayo)
1 garlic clove, minced
Zest and juice of 1 lime
⅓ cup chopped scallions
¼ cup crumbled Cotija, or feta cheese
¼ cup finely chopped cilantro
¼ teaspoon smoked paprika, or chili powder
1 jalapeño, diced*
¼ teaspoon sea salt
Instructions
– Preheat a grill to medium-high heat. Brush the corn with olive oil and grill for 2 minutes per side, or until char marks form. Remove from grill and set aside.
– In a large bowl, combine the mayo, garlic, and lime zest and juice. Slice the kernels off the corn and add to the bowl along with the scallions. Stir to coat, then add the cheese, cilantro, smoked paprika, jalapeño, and salt. Season to taste and serve immediately or chill until ready to serve.
Notes
– *Roast the jalapeño alongside the corn if you'd like.
– Make this recipe vegan by omitting the cheese.
PEANUT GINGER SAUCE
Source: https://plantbasedrdblog.com/2022/01/peanut-ginger-sauce/
Prep Time: 10 minutes; Yield: 6 servings
A fresh and creamy dressing perfect for salads, bowls and dipping. This peanut ginger sauce is tangy, sweet and loaded with garlic and ginger. Try this over bok choy!!
Ingredients
· 1/4 cup natural peanut butter (only contains peanuts and salt)
· 3 tbsp soy sauce, tamari or gluten-free alternative
· 2 tbsp maple syrup
· 2 tsp sriracha, or more
· 1/2 tsp garlic powder or one clove crushed garlic
· 1/2 tsp ginger powder or 1 tsp freshly grated ginger
· Juice of half a lime
· 1/4 cup or more of water
Instructions
1. To a small bowl add in your peanut butter, soy sauce, maple syrup, sriracha, garlic, ginger and lime juice then whisk to combine. You will notice the sauce start to thicken as you mix it.
2. Slowly pour in your water, about 1 tablespoon at a time, until the sauce is at your desired consistency. Enjoy as desired.
Notes:
– Adjust the consistency of your dressing by adding small amounts of water to the dressing until you achieve your desired consistency.
– To help mellow out the taste of fresh garlic, let it sit in the citrus juice a little before adding the rest of the ingredients to mix.
– To truly make this gluten-free, make sure to use a gluten-free soy sauce, gluten-free tamari or coconut aminos.
For more recipes check out our farm recipe blog: https://blackdirtrecipes.wordpress.com
YouTube Channel: https://www.youtube.com/channel/UCPYfuRXgE6SgaLMmd_vYx9Q
Follow us on Instagram @yesifarm
Summer Share Week 12
Ooof! This heat has been rough on people and plants, lots of water and ice along with frequent breaks are on the menu for the day. Soon though, the weather will change to fall conditions and we’ll be wearing sweatshirts and hoodies to try and stay warm. The valley is humming like a bee hive, I know I use that analogy frequently but it so describes the vibe in the air now. The farms are always thrumming with a sense of urgency to get the crops planted, weeded, harvested. Now is peak onion harvest time. It always amazes me how one day the fields are full of onions, then bins and crates full of harvested onions, and then nothing but empty fields of chaff and tops left over from the harvest.
RECIPES
Eggplant — not a vegetable we grew up with and I wasn’t too sure if I liked it when I first tried it, but along the way I discovered that some of my new favorite foods included baba ganoush and ratatouille!
BABA GANOUSH
Source: https://cookieandkate.com/epic-baba-ganoush-recipe/
Ingredients
· 1 pound Italian eggplants (about 2 small-to-medium eggplants*)
· 1 medium clove of garlic, pressed or minced
· 1 tablespoon lemon juice, more if necessary
· 1/8 cup tahini
· ⅓ cup extra-virgin olive oil, plus more for brushing the eggplant and garnish
· 1 tablespoon chopped fresh flat-leaf parsley, plus extra for garnish
· 1 ½ teaspoons salt, to taste
· 1/8 teaspoon ground cumin
· Pinch of smoked paprika, for garnish
Serving suggestions: warmed or toasted pita wedges, carrot sticks, bell pepper strips, cucumber slices, etc.
Instructions
1. Preheat the oven to 450 degrees Fahrenheit with a rack in the upper third of the oven. Line a large, rimmed baking sheet with parchment paper to prevent the eggplant from sticking to the pan. Halve the eggplants lengthwise and brush the cut sides lightly with olive oil. Place them in the prepared pan with the halved sides down.
2. Roast the eggplant until the interior is very tender throughout and the skin is collapsing, about 35 to 40 minutes (this might take longer if you are using 1 large eggplant). Set the eggplant aside to cool for a few minutes. Flip the eggplants over and scoop out the flesh with a large spoon, leaving the skin behind.
3. Place a mesh strainer over a mixing bowl, then transfer the flesh to the strainer and discard the skins. Pick out any stray bits of eggplant skin and discard. You want to remove as much moisture from the eggplant here as possible, so let the eggplant rest for a few minutes and shake/stir the eggplant to release some more moisture.
4. Discard all of the eggplant drippings, drain and wipe out the bowl, and dump the eggplant into the bowl. Add the garlic and lemon juice to the eggplant and stir vigorously with a fork until eggplant breaks down. Add the tahini to the bowl and stir until it’s incorporated. While stirring, slowly drizzle in the olive oil. Continue stirring until the mixture is pale and creamy, and use your fork to break up any particularly long strings of eggplant.
5. Stir in the parsley, salt and cumin. Season to taste with more salt (I usually add another pinch) and more lemon juice, if you’d like a more tart flavor.
6. Transfer the baba ganoush to a serving bowl and lightly drizzle olive oil on top. Lastly, sprinkle parsley and smoked paprika on top. Serve with accompaniments of your choice. It’s also great on sandwiches!
RATATOUILLE
Source: https://www.onceuponachef.com/recipes/ratatouille.html
Ingredients
· 1 large eggplant, cut into ⅓-inch cubes
· Salt
· 3-6 tablespoons extra virgin olive oil, plus more for serving
· 1 medium zucchini or summer squash cut into ⅓-inch cubes
· 1 medium yellow onion, finely chopped
· 1 red, orange or yellow bell pepper, cut into ¼-inch dice
· 2-5 large cloves garlic, chopped
· 2-5 large vine-ripened tomatoes cut into ⅓-inch cubes, with their juices
· ½ – 1 tablespoon tomato paste
· 1 teaspoon fresh chopped thyme, plus more for serving
· 1 ½ - ¾ teaspoons sugar
· 1/8 teaspoon crushed red pepper flakes (optional)
· 1 ½ - 3 tablespoons chopped fresh basil
Instructions
1. Heat 1 ½ tablespoons of oil in a large nonstick pan over medium heat. Add the eggplant and season with pinch of salt. Cook, stirring frequently, until soft and starting to brown, 10 to 12 minutes. Transfer to a plate and set aside.
2. Add another tablespoon of oil to the pan (no need to clean it). Add the squash and cook, stirring frequently, until tender-crisp, 3 to 4 minutes. Season with pinch of salt and transfer to a plate; set aside.
3. Add a tablespoon of oil to the pan and add the onion and bell pepper. Cook, stirring frequently, for about 5 minutes. Add the garlic and continue cooking for about 3 minutes more. Do not brown. Add the tomatoes and their juices, tomato paste, thyme, sugar, crushed red pepper flakes (if using) and pinch of salt. Cook, stirring occasionally, until the tomatoes are broken down into a sauce, 8 to 10 minutes. Add the cooked eggplant to the pan; bring to a gentle boil, then reduce the heat to low, and simmer, uncovered, for about 10 minutes or until the eggplant is soft. Add the zucchini/squash and cook for 1 to 2 minutes more, or until just warmed through. Taste and adjust seasoning, if necessary. Sprinkle with fresh basil and thyme, drizzle with a little olive oil if desired, and serve warm or chilled. Leftovers can be stored in the refrigerator in an airtight container for up to 5 days.
4. Freezer-Friendly Instructions: Let the dish cool completely and freeze in an airtight container for up to 3 months. (Keep in mind that the zucchini won't stay crisp after being frozen.) This is delicious served cold, or reheated in the microwave.
For more recipes check out our farm recipe blog: https://blackdirtrecipes.wordpress.com
YouTube Channel: https://www.youtube.com/channel/UCPYfuRXgE6SgaLMmd_vYx9Q
Follow us on Instagram @yesifarm
Summer Share Week 11
We had planned on different vegetables for today but the weather dictated otherwise. We were going to harvest beans but you can’t do that when they’re wet and we had a fierce rainfall here for quite a few hours so that put a stop to that. The herbs are loving the current weather pattern — the mint and basil are quite stunning right now. The beets this week are of different varieties you might find: Gold (orangey skin in color with gold flesh — doesn’t bleed like the red beets), Chioggia (Italian candy stripe beet which has a watermelonish colored skin with a flesh that is evocative of a peppermint candy—also doesn’t bleed like the red), or Detroit Red (a traditional red beet — my Dad grew this variety I love the flavor but it is a messy one with the red flesh and juice) in your bag. We had to lop the tops off as the weather beat them up pretty good. The farmers are busily harvesting and weeding but at least the weather is giving us some space to breathe. Now that it is drying out we can begin to harvest the shell beans — black and a white cannellini style. Once we pull the plants we have to remove the beans from their shells. Fans are set up to blow on them and help them dry, we can’t put them in storage if they are wet or they will go moldy! Wishing you all a safe Labor Day!
RECIPE
Beets – I like them cooked in the simplest way possible – roasted or boiled. I don’t peel them until after I cook them – makes it so much easier to remove the skin. I find that roasting brings out the natural sugars. Once cooked I’ll nibble on them just like that or with some butter and salt for seasoning. I enjoy beets added to a sald and find they pair particularly nicely with chevre or goat cheese. Beets can also be eaten raw – peel with a potato peeler and shred over salad, cottage cheese or even yogurt!
25 Delicious Recipes That’ll Change Your Mind About Beets
From appetizers and cocktails to soups and salads, there’s truly something here for everyone.
Source: https://www.foodnetwork.com/recipes/photos/beet-recipes
RUSSIAN BEET POTATO SALAD (VINAIGRETTE) RECIPE
Source: https://grantourismotravels.com/russian-beet-potato-salad-recipe/
This traditional Russian beet potato salad recipe makes a creamy pink potato and beetroot salad that is fragrant with dill and delightfully tangy, thanks to the gherkins and capers. Based on my Baboushka’s recipe, it was a staple at family meals, Sunday lunches and summer picnics.
Ingredients
250 g waxy potatoes (about half pound)
250 g beetroot (about half pound)
2 small gherkins finely chopped
25 g onion finely chopped
2 tbsp capers
1 tbsp creamy mayonnaise
Salt and black pepper to taste
2 tbsp fresh dill
Instructions
1. Boil the potatoes and beetroots in separate pots for 20-25 minutes until you can easily slide a fork into them, allow to cool, peel, and chop into cubes.
2. In a bowl, gently combine the potatoes, beetroot, capers, finely chopped onions and gherkins, with a tablespoon of creamy mayonnaise. Take care not to combine it so much that it turns to mash.
3. Add a pinch of salt and pepper, and taste. Add more salt and pepper, or even mayonnaise, if you like.
4. Transfer to a salad bowl and garnish with dill.
For more recipes check out our farm recipe blog: https://blackdirtrecipes.wordpress.com
YouTube Channel: https://www.youtube.com/channel/UCPYfuRXgE6SgaLMmd_vYx9Q
Follow us on Instagram @yesifarm
Summer Share Week 10
The workload is fierce now — what do we do first? Harvest, weed, plant, yikes! Get it all done now, double YIKES!! While there is still time to plant and harvest summer squash, zucchini, cucumbers, carrots, beets and herbs plus salad greens and cabbages. On top of all this we are already planning for 2024! If you read the Farmers Almanac it’s going to be an intense winter. Snowy and cold. Somehow we will get through it all — plus a few other projects I haven’t listed here or thought of yet!
GREEN TOMATO RECIPES:
https://www.foodnetwork.com/recipes/photos/green-tomato-recipes
SAUTÉED BROCCOLINI
Source: https://www.loveandlemons.com/broccolini/
This easy sautéed broccolini recipe is a perfect weeknight side dish! It's ready in minutes, and it's deliciously seasoned with garlic, red pepper flakes, and lemon.
Ingredients
2 tablespoons extra-virgin olive oil
3 garlic cloves, thinly sliced
¼ teaspoon red pepper flakes
1 bunch broccolini, trimmed, halved lengthwise if thick (about 6 ounces)
¼ teaspoon sea salt, plus more to taste
2 tablespoons water
2 teaspoons fresh lemon juice
Instructions
1. Heat the olive oil in a large lidded skillet over medium heat. Add the garlic and red pepper flakes and cook for 30 seconds, then add the broccolini and salt and toss.
2. Cook, tossing occasionally, for 2 minutes. Add the water, cover, reduce the heat, and cook for 3 to 5 minutes, tossing occasionally, or until tender and bright green.
3. Remove from the heat, toss with the lemon juice, and season to taste.
CORN CHOWDER
Source: https://www.simplejoy.com/corn-chowder/#recipe
Corn Chowder is a delicious creamy soup recipe made from scratch that you will fall in love with. This recipe makes a great side dish, but is perfect as the star of your dinner show.
Ingredients
· 2 slices of thick cut bacon diced into small pieces
· 3 cups vegetable stock
· 1 small onion diced
· 1 cloves of garlic minced
· 4 cobs of corn husks and silk removed and kernals cut off (see our note in the post about using frozen corn and read below in the note section how use it)
· 1 ½ tablespoon all purpose flour
· 3/4 pounds red skin potatoes diced into 1/2 inch pieces do not peel
· 1/8 teaspoon dried thyme
· 1 bay leaves
· ½ cup heavy cream
· salt and pepper
Instructions
· In a large stew pot, cook the bacon over medium heat until crisp, stirring often.
· Add the onions, cooking until they are translucent and very soft, about 5 minutes.
· Add the minced garlic and cook, stirring, until fragrant, about 30 seconds, being careful that the garlic doesn’t burn.
· Stir in the flour, coating all the onions and the bacon. Continue cooking about a minute until the flour begins to brown, it will be very thick and gummy.
· Very gradually, pour in the chicken stock. Pour about two tablespoons at a time (no need to measure, this is just an estimate), whisking it into the flour mixture. There should be no visible liquid between each pour. Continue this way until you use all the liquid, pouring more quickly at the end. This should take no more than about a minute or two.
· Add the potatoes, corn, thyme, and bay leaf and increase the heat to high and bring to a boil (you are looking for big bubbles at the surface). Then reduce to a simmer (the lowest you can go heat wise and still see bubbles) and continue cooking for 20 minutes or until the potatoes are soft.
· Stir in the cream, and let heat through for a minute. Season with salt and pepper to taste. The amount of salt you add will vary depending on your bacon and chicken stock. We added ½ teaspoon kosher salt and 1/8 teaspoon freshly ground black pepper at the end.
For more recipes check out our farm recipe blog: https://blackdirtrecipes.wordpress.com
YouTube Channel: https://www.youtube.com/channel/UCPYfuRXgE6SgaLMmd_vYx9Q
Follow us on Instagram @yesifarm
Summer Share Week 9
Wahoo yes there are tomatoes!!!! Seems like it was a forever grind to get to this harvest and I know you were feeling it too. Benito has been busy planting, and provided the weather cooperates, the farm is getting ready to explode again!!! What a fierce year it has been between the drought conditions and the excessive rain. The fields have not yet dried out and there are mud holes everywhere. So we take our time and proceed with caution ... It is no fun when you get stuck in a muddy hole and everything has to come to a screaming halt while you get unstuck. Almost finished harvesting the onions, potatoes will be next. With all the moisture this year we need to be sure whatever we plan on storing is as cured and dry as possible. In anticipation we’ve been clearing out the greenhouse to make space to lay out the crops, and turning fans on them — whatever we can do to get those crops dry!!!
SAUTÉED BROCCOLI RAAB AND CORN
Source: https://themom100.com/recipe/sauteed-broccolini-and-corn/#wprm-recipe-container-31812
This quick (15-minutes!) and easy side dish is a colorful companion to all kinds of entrees.
Ingredients
1 tablespoon olive oil
1 red onion (halved and thinly sliced)
4 cups roughly chopped broccoli raab, broccolini or broccoli
1 jalapeno pepper (seeded and minced)
1 cup corn kernels (fresh, frozen or canned and drained)
Kosher salt and freshly ground pepper (to taste)
1 tablespoon finely grated lemon zest
Instructions
* Heat one tablespoon of the olive oil in a large skillet over medium high heat. Add the onion and sauté for 5 minutes until starting to soften.
* Add the raab, broccolini or broccoli and sauté for 7 minutes until the broccolini starts to soften. Add the jalapeños and corn and sauté for another two minutes. Add half the zest and stir to blend.
* Turn the vegetable mixture into a serving bowl. Sprinkle with the remaining lemon zest. Serve hot.
For more recipes check out our farm recipe blog: https://blackdirtrecipes.wordpress.com
YouTube Channel: https://www.youtube.com/channel/UCPYfuRXgE6SgaLMmd_vYx9Q
Follow us on Instagram @yesifarm
Summer Share Week 8
I know you’ve all been anxiously awaiting tomatoes.* The anticipation is palpable!!!! I feel pretty confident in predicting tomatillos and peppers next week. And I am extremely hopeful for tomatoes this week as well. On a positive note you’re getting an absolutely beautiful spring mix for some pretty great salads and sandwiches. August is onion-harvesting season. The onions are looking pretty spectacular right now which is so good to see a crop come in well considering the growing conditions we’ve experienced this year. The weather is perfect right now and the storms seem to be settling. *FSM ed. note: we have added Sycamore Farm Cherry Tomatoes to your share this week!
RECIPE — Was looking for a different recipe that wasn’t just another stir fry. Found this in one of my older cookbooks. I can’t wait to try it myself!
PICKLED PAK CHOI (aka Bok Choy)
Source: Recipes From A Kitchen Garden authored by Renee Shepherd & Fran Raboff
Makes 1 quart.
Ingredients
2 cups water
1 cup red wine vinegar
1/2 cup sugar
2/3 cup dry sherry
1 teaspoon salt
4 large stalks pak choi or 6-8 small stalks, cut into ½ inch diagonal pieces
3 carrots, peeled and cut into ½ inch diagonal slices
3 scallions cut into 1 inch pieces
1 teaspoon mustard seed
1 tablespoon finely chopped ginger
2 small dried red chili peppers, seeds removed,coarsely chopped
Optional: 1 clove garlic sliced in half
Directions
In a medium saucepan combine water vinegar, sherry and salt. Heat, stirring until sugar is dissolved. Simmer 5 minutes, then cool to room temperature. Place the vegetables in a 1-quart jar. Stir mustard seed, ginger, peppers and garlic into cooled vinegar mixture and pour into vegetables. Cover tightly and refrigerate for at least 2 days.
SUMMER SQUASH AND SWEET CORN CASSEROLE
Source: https://www.allrecipes.com/recipe/149308/yellow-squash-and-corn-casserole/
Ingredients
· 2 eggs
· 2 ears sweet corn – kernels scraped off the cob
· Dollop of sour cream or heavy cream
· 1/4 cup grated Parmesan and cheddar cheeses
· 1/4 cup vegetable oil
· 2 Tablespoons white sugar
· 1/4 teaspoon minced garlic
· 1/4 teaspoon ground black pepper
· 1/4 cup chopped onions
· 2 cups sliced yellow squash
· 1/2 cup biscuit baking mix
Directions
1. Preheat oven to 350 degrees F (175 degrees C). Grease a 9x9 inch baking pan.
2. Whisk eggs in a large bowl until smooth. Stir in cream, corn, cheeses, oil, sugar, garlic, and pepper. Fold in onions, squash, and biscuit mix. Pour into prepared baking pan.
3. Bake in preheated oven until bubbly and lightly browned, 30 to 40 minutes.
For more recipes check out our farm recipe blog: https://blackdirtrecipes.wordpress.com
YouTube Channel: https://www.youtube.com/channel/UCPYfuRXgE6SgaLMmd_vYx9Q
Follow us on Instagram @yesifarm
Summer Share Week 7
When Zigi and I were chatting last week I said how I felt I should start the newsletter off with “It takes a warrior.” It does indeed take the fortitude of a warrior to be a farmer given all the battles we fight — weather, bugs, and all that goes with it. I had started a bunch of seeds in the greenhouse — lettuces and more. They were gorgeous!!! We transplanted them in the field and then ... yup you guessed it … more rain came and washed away the plants. You just want to scream!!! I know you are 'jonesing' for tomatoes, we are too! I’m hoping we should be able to harvest some green ones soon for that special summer treat of fried green tomatoes! We were so happy to bring you sweet corn!! There’s nothing like that first bite of fresh corn, well let's be honest there’s nothing like the fresh bite of anything that comes direct from the field to your plate!
SWEET CORN – My Dad always talked about how his Mom would send him out to the fields to pick fresh corn for dinner and if he fell when he was running back to the house throw it away because it was bruised and he would have to pick fresh ones! The following recipe is a great base. Feel free to adjust your flavor preferences by adding any of these options: sweet peppers, carrots, jalapeños, cucumbers and more!
SUMMER SWEET CORN SAUTÉ
Source: https://iowagirleats.com/SUMMER-SWEET-CORN-SAUTE/#RECIPE-CARDINGREDIENTS
serves 4-6
Ingredients
· 4 Tablespoons butter
· 4 ears sweet corn, kernels sliced from cobs (~4 cups kernels)
· 3 green onions, chopped
· 2 cloves garlic, pressed or minced
· salt and pepper
· 8 medium-sized basil leaves, chopped
Directions
Add butter to a large skillet over medium-high heat. Once melted, addsweet corn kernels, green onions, and garlic then season with lots (to your preference) of salt and pepper and saute until kernels are crisp-tender, 4-5 minutes. Add chopped basil then stir to combine and serve.
I have not tried the following recipe but it does kind of make sense. I'm going to give it a go this weekend.
BEST WAY TO COOK CORN ON THE COB
Source: https://spicysouthernkitchen.com/best-way-to-cook-corn-on-the-cob/
Boiling corn with a cup of milk and a stick of butter creates the most delicious corn imaginable. Truly the BEST way to cook corn on the cob!
Ingredients
4-6 ears of corn, husks and silks removed and cut in half (if desired)
¾ cup milk
¾ stick butter
Instructions
· Fill a large pot about halfway with water.
· Bring water to a boil.
· Add milk and butter. Add corn and reduce heat.
· Simmer corn for 6 to 8 minutes.
· Remove corn from cooking liquid and its ready to serve.
For more recipes check out our farm recipe blog: https://blackdirtrecipes.wordpress.com
YouTube Channel: https://www.youtube.com/channel/UCPYfuRXgE6SgaLMmd_vYx9Q
Follow us on Instagram @yesifarm
Summer Share Week 6
So it seems we've evolved from rain to intense heat. The horror stories are coming out. One farmer lost all his spinach, another is worried about his pepper and tomato plants. Yet another had his mushrooms cooked from this high heat. Everywhere you look the faces on the farmers are strained from the stress, fears and worries. Talking to each other about how they can almost cry. I am so worried about our farmers working in the fields in this heat. Lots of ice and water frequent breaks are all on call for the day. It's so easy to forget to hit that pause button, breathe deeply and enter a Zen state so you can calmly push through. No promises but we might have corn next week. I know I've got fingers and toes crossed, there's nothing like that first nibble of corn!
CUCUMBER SALAD — This is another one of those things we grew up on. From what I've researched it's a traditional Polish thing.
The simplest way to prep: Wash the cucumber, slice relatively thin, sprinkle with some salt a pinch of fresh cracked pepper, and a dollop of sour cream. You can also do mayo or a combo of both. Season to taste with dill. You can let this set a bit to meld the flavors. Enjoy!!! When tomatoes come in you can add some of those to the Cucumber Salad. If you want, add some tuna, beef or chicken. We enjoy it as a simple salad. I hope you will too! The cukes you're getting are Kirby which are commonly used for pickling. A quick Vinegar dressing is also perfect on these babies!
Check out this link for some great ideas:
https://www.delish.com/cooking/recipe-ideas/g2877/summer-salads/?utm_source=google&utm_medium=cpc&utm_campaign=arb_ga_del_m_bm_prog_org_us_g2877&gclid=CjwKCAjwq4imBhBQEiwA9Nx1Bh_lohn0lao24VGTeIxD5TrBowWEh8ZWRgAXf7HyfDwTYG11KZT93xoCMPgQAvD_BwE
For more recipes check out our farm recipe blog: https://blackdirtrecipes.wordpress.com
YouTube Channel: https://www.youtube.com/channel/UCPYfuRXgE6SgaLMmd_vYx9Q
Follow us on Instagram @yesifarm
Summer Share Week 5
Rain and more rain. Yes that’s right more rain, the fields are like shloggy soup, you can barely walk through the rows, can’t hoe the weeds, tops are snapping off carrots and onions as we tug at them to harvest from the wet muck. Radish tops are turning a bright citron color from sun and rain, we’ll have to leave the tops in the fields and just bring in the roots. The beans were so loaded with blossoms not sure how that harvest will go, zucchini harvested in the AM is half melted by the PM. Cucumbers are coming — little baby Kirbys are the first to come in. Shhh don’t tell but sweet corn is getting close to harvest!!!! As soon as it dries out a bit we'll try for a second planting of cucs and zukes. We here at the farm can’t say thank you enough. As a part of our CSA you truly do get to live the life of the farm with us and that does mean the good, bad and ugly. Right now I’d say we’re about halfway between bad and ugly. Truth be told I have seen and lived through worse. Such is the life of a farmer! We will hang on and persevere ... I’ve been asked how do you do it. My usual answer is you dig deep and then you dig deeper. Somehow you find the strength and you go on.
BOILED NEW POTATOES WITH GARLIC
by Holly Nilsson
Source: https://www.spendwithpennies.com/garlic-dill-new-potatoes/
This New Potato side dish is full of garlic, fresh dill, and creamy butter!
Ingredients
• 1 ½ pounds new potatoes or baby potatoes
• 4 cloves garlic or 2 pieces of scapes
• 2 tablespoons butter
• 1 tablespoon fresh herbs chopped
• salt & pepper to taste
Instructions
1. Wash potatoes and cut in half if larger than bite-sized.
2. Peel garlic cloves and slice each clove into 2-3 slices. If using scapes chop into bite sized pieces.
3. Bring a large pot of salted water to a boil. Add potatoes and garlic.
4. Boil until potatoes are tender when poked with a fork, about 12-14 minutes.
5. Drain potatoes & garlic well and place in a bowl.
6. Stir in butter and dill or herbs and season with salt & pepper to taste.
Notes
• Baby new potatoes don’t need peeling because the skin is so thin!
• If baby new potatoes aren’t available, thin-skinned potatoes (red or Yukon gold) can be chopped and used instead!
• Dill or Basil is very delicate and the entire piece can be used, even the stems!
• Cooking potatoes too long can make them water logged and prevent the butter and herbs from sticking as they should.
• Add other fresh herbs like oregano, chives, or parsley. If using sage or rosemary, they should be cooked a little bit in the butter before adding the potatoes.
• Leftover new potatoes can be chilled and added to potato salad too!
For more recipes check out our farm recipe blog: https://blackdirtrecipes.wordpress.com
YouTube Channel: https://www.youtube.com/channel/UCPYfuRXgE6SgaLMmd_vYx9Q
Follow us on Instagram @yesifarm
Summer Share Week 4
Rain and more rain. Seems to be our mantra of late. We hope you all survived the rampage. Our part of Orange County made it through ok, it seems that the more eastern parts were spared. Other parts in the Western part of the County — near Cold Spring and West Point not so much, roof ripped off a building, chunks of streets tore up and tossed like Lego blocks. Sadly most of all a woman lost her life trying to escape the flood water. They say this storm had the ferocity equal to Hurricane Irene. Irene ravaged us with a viciousness I won’t soon forget. Mother Nature can be so kind and cruel. Again we are forever grateful to those looking over us, protecting us. With that in our hearts, spirits and minds we will persevere.
VEGETABLE/RECIPE — BEETS & BEET GREENS
My family is originally from Poland so we grew up on beets — borscht, pickled, blended with horseradish, or just plain boiled or roasted with butter dripping off those gorgeous ruby colored orbs. I still grow an heirloom variety my Dad grew — Detroit Red. Detroit Red has a sweetness not usually found in the modern varieties of beets. Was chatting with someone a few weeks back and they were telling me about a restaurant near Central Valley that used to serve a beet dish and dropped it from their menu. The reason they dropped it was due to the inferior quality and lack of flavor in the beets. So I hope you enjoy the beets today — I’m already prepping my beets for borscht, pickles and a lentil beet salad.
Basic Beet prep:
Remove tops and set aside. Trim tap root but leave most of root attached to ball. Now you have 2 choices – Boil or Roast. If boiling put beets in a pot with enough water to cover, bring to a simmer and let cook until tender when pierced with a fork — like you cook potatoes. If you choose to roast – rinse beets place in a roasting pan cover with foil, roast at 350° F again till fork tender like a potato.
CLASSIC BORSCHT RECIPE (BEET SOUP) RUSSIAN STYLE
Source: https://natashaskitchen.com/classic-russian-borscht-recipe/#jump-to-recipe
Prep Time: 30 minutes; Cook Time: 40 minutes; Total Time: 1 hour 10 minutes; Servings: 10
Author: Natasha of NatashasKitchen.com
Our family's go-to recipe for Borscht (Red Beet Soup). It's best to have all of the ingredients prepped and ready to go which makes this soup super easy and care free. Serve with a dollop of sour cream or real mayo.
Ingredients
For Borscht:
3 medium beets, peeled and grated
4 Tbsp olive oil, divided
8 cups chicken broth , + 2 cups water (use vegetable broth for a vegetarian version)
3 medium yukon potatoes, peeled and sliced into bite-sized pieces
2 carrots, peeled and thinly sliced
For Zazharka (Mirepoix):
2 celery ribs, trimmed and finely chopped
1 small red bell pepper, finely chopped, optional
1 medium onion, finely chopped
4 Tbsp ketchup or 3 Tbsp tomato sauce
Additional Flavorings:
1 can white cannellini beans with their juice
2 bay leaves
2-3 Tbsp white vinegar, or to taste
1 tsp sea salt, or to taste
1/4 tsp black pepper, freshly ground
1 large garlic clove, pressed
3 Tbsp chopped dill
Instructions
1. Peel, grate and/or slice all vegetables (keeping sliced potatoes in cold water to prevent browning until ready to use then drain).
2. Heat a large soup pot (5 1/2 Qt or larger) over medium/high heat and add 2 Tbsp olive oil. Add grated beets and sauté 10 minutes, stirring occasionally until beets are softened.
3. Add 8 cups broth and 2 cups water. Add sliced potatoes and sliced carrots then cook for 10-15 minutes or until easily pierced with a fork.
4. While potatoes are cooking, place a large skillet over medium/high heat and add 2 Tbsp oil. Add chopped onion, celery and bell pepper. Saute stirring occasionally until softened and lightly golden (7-8 minutes). Add 4 Tbsp Ketchup and stir fry 30 seconds then transfer to the soup pot to continue cooking with the potatoes.
5. When potatoes and carrots reach desired softness, add 1 can of beans with their juice, 2 bay leaves, 2-3 Tbsp white vinegar, 1 tsp salt, 1/4 tsp black pepper, 1 pressed garlic clove, and 3 Tbsp chopped dill. Simmer for an additional 2-3 minutes and add more salt and vinegar to taste.
BEST BEET GREENS RECIPE TIPS
– Clip them right away. To extend the life of both the beets and greens, clip the greens from their roots as soon as you get home from the farmers market or store. Otherwise, the greens will pull moisture from the beets, causing them to wither quickly. After you clip the greens, wrap them in plastic or a reusable produce bag and store them in the crisper drawer of your fridge until you’re ready to cook them.
– Wash them well. At the store, you’ll rarely find beet greens that are pre-washed and ready-to-eat. In my experience, they’re usually the opposite: covered in dirt! Always, always wash and dry beet greens before you cook them to remove any dirt or debris.
– Use the stems as well as the leaves. Like Swiss chard, beet leaves have crisp, edible stems that add color and crunch to any beet greens recipe. Don’t toss them! Finely dice them and cook them right along with the leaves.
How to Cook Beet Greens
You’ve clipped the beet leaves off the beets, and you’ve washed and dried them. It looks like you’re ready to cook! My favorite method for how to cook beet greens is to sauté them. Here’s how I do it:
– Start by removing the leaves from the stems. Then, finely chop the stems and tear or chop the leaves into bite-sized pieces. While you’re at it, go ahead and mince a clove of garlic too.
– Then, cook! Heat a splash of olive oil in a large skillet over medium heat. Add the garlic and chopped stems and cook, stirring, for 1 minute. Next, toss in the greens, season with salt and pepper, and sauté, tossing, until wilted.
– That’s it! Your beet greens are ready to eat.
Sautéed Beet Greens Serving Suggestions
On their own, sautéed beet greens are a delicious side dish. I like to dress them up with a big squeeze of lemon, golden raisins, and toasted walnuts. The raisins bring out the greens’ sweetness, and the walnuts add a delicious crunch. If you’ve been reading the blog for any length of time, you know that I like to squeeze lemon on just about everything, but it really adds a nice bright pop of flavor here. Don’t skip it!
– With eggs. Fold the beet greens into scrambled eggs or an omelet, or add them to your next veggie frittata.
– In pasta. Toss the greens with pasta, walnuts, feta cheese, and red pepper flakes for a quick and easy weeknight dinner.
– In a grain bowl. Start with a grain like quinoa, farro, or brown rice. Then, add the sautéed greens and a protein like baked tofu, lentils, roasted chickpeas, or a hard-boiled egg. Top it off with a tasty sauce like tahini sauce, pesto, or lemon vinaigrette to make a delicious, healthy meal!
SAUTÉED BEET GREENS
This simple sautéed beet greens recipe is a delicious, nutritious side dish!
Ingredients
1 bunch beet greens
1 teaspoon extra-virgin olive oil
1 garlic clove, finely chopped
2 tablespoons golden raisins
Lemon wedge
1 tablespoon chopped walnuts or pistachios
Sea salt and freshly ground black pepper
Instructions
1. Separate the stems from the beet greens. Finely chop the stems and coarsely chop the leaves.
2. Heat the oil in a large skillet over medium heat. Add the garlic and the beet stems and cook, stirring, for 1 minute. Add the beet greens, a few pinches of salt and freshly ground black pepper, and sauté, tossing, until just wilted.
3. Turn off the heat, add the raisins, a big squeeze of lemon, and toss. Transfer to a platter, top with the walnuts and season to taste with more salt and pepper.
For more recipes check out our farm recipe blog: https://blackdirtrecipes.wordpress.com
YouTube Channel: https://www.youtube.com/channel/UCPYfuRXgE6SgaLMmd_vYx9Q
Follow us on Instagram @yesifarm
Summer Share Week 3
Rain and more rain. A couple weeks ago we all were crying how dry it was and were looking for rain. Now the fields are so, so wet. Was talking with some farmers around the valley the other day. Acres of spinach rotting in the fields, instead of flatbed trucks running on the roads loaded with produce you see tractors and wagons hauling their precious cargo. The trucks can't get through the mud and even the tractors are struggling. Not only does the rain make for muddy conditions, the humidity encourages growth of things like mold, bacteria and higher cases of diseases. I began more aggressively seeking out varieties that are disease resistant to help ward off infections etc. So far knock on wood our struggles have been mostly mud related. As you can tell the produce may need an extra bath this week. We do wash our produce two or three times after harvesting but the mud just splashes everywhere making it difficult to get the produce clean. I always remember my Dad telling us to be careful how we walked in the fields — pick up your feet, don’t drag soil over the lettuce heads. It’s like playing hopscotch where the produce becomes the lines you shouldn’t step on. So much to remember!!!
Summer often means salads, here is a basic vinaigrette dressing with a couple variations that should be quick and easy go-tos in your repertoire.
BASIC VINAIGRETTE (PLUS VARIATIONS!)
Source: https://cookieandkate.com/how-to-make-vinaigrette-plus-variations/
Here’s a go-to vinaigrette recipe! It’s so easy to make and tastes way better than store-bought dressings. You can change up the flavors by choosing the vinegar that suits your salad best. Recipe yields ¾ cup dressing, enough for about 6 medium salads (assuming 2 tablespoons per salad).
Ingredients
· ½ cup extra-virgin olive oil
· 3 tablespoons vinegar of choice (balsamic vinegar, red wine vinegar, white wine vinegar)
· 1 tablespoon Dijon mustard
· 1 tablespoon maple syrup or honey
· 2 medium cloves garlic, pressed or minced
· ¼ teaspoon fine sea salt, to taste
· Freshly ground black pepper, to taste
Instructions
1. In a liquid measuring cup or bowl, combine all of the ingredients. Stir well with a small whisk or a fork until the ingredients are completely mixed together.
2. Taste, and adjust as necessary. If the mixture is too acidic, thin it out with a bit more olive oil or balance the flavors with a little more maple syrup or honey. If the mixture is a little blah, add another pinch or two of salt. If it doesn’t have enough zing, add vinegar by the teaspoon.
3. Serve immediately, or cover and refrigerate for future use. Homemade vinaigrette keeps well for 7 to 10 days. If your vinaigrette solidifies somewhat in the fridge, don’t worry about it—real olive oil tends to do that. Simply let it rest at room temperature for 5 to 10 minutes or microwave very briefly (about 20 seconds) to liquify the olive oil again. Whisk to blend and serve.
Notes
BALSAMIC VINEGAR: Makes a bold, slightly sweet dressing that is wonderful on green salads with fruit, such as apples, strawberries or peaches.
RED WINE VINEGAR: Packs a punch and works well with other bold flavors and bright veggies, like tomatoes, bell peppers, cucumber, cabbage and more (think Greek salads).
WHITE WINE VINEGAR: This is a more mellow vinegar and it’s especially nice with more delicate flavors like cucumber and sweet corn. It’s lovely on just about every green salad out there.
GREEK/ITALIAN VARIATION: Use red wine vinegar. Add 1 to 2 teaspoons dried oregano and, optionally, a pinch of red pepper flakes.
For more recipes check out our farm recipe blog: https://blackdirtrecipes.wordpress.com
YouTube Channel: https://www.youtube.com/channel/UCPYfuRXgE6SgaLMmd_vYx9Q
Follow us on Instagram @yesifarm
Summer Share Week 2
We hope you are all keeping safe with the return of the smoke from up North. Bob was laughing with me yesterday when we delivered the produce, he said I was “giddy” which in truth I was. Oooh ooh ooh you should see the potato plants!!!! Their blossoms are floating above their foliage like delicate bells or fairies dancing in the wind. A few more weeks and we’ll begin to harvest, those new potatoes are so tender they just melt in your mouth! Verdolaga translates to Green Water, it is one of the few land vegetable items that is loaded with omega 3 fatty acids like those found in salmon! This vegetable has been so underrated in the past and has finally been coming into its own and is being recognized for the power house it is! Our farmers enjoy it like this: Chop up a handful, toss into a saute pan and lightly saute. Scramble some eggs and pour them over the verdolaga, season to taste with salt and pepper. Enjoy!!!! I like them in my potato salad, on chicken salad sandwiches. Just for fun I also like them dipped in tempura batter, fried then served with some dipping sauce or savory jam. Which I suppose does negate all the health benefits, but sometimes you just have to go there …
PURSLANE HERB SALAD
Source: https://www.lifeslittlesweets.com/purslane-herb-salad/
Ingredients
· 4 ounces purslane, washed and dry, chopped
· 1 ounces parsley, chopped
· 2-3 sage leaves, chopped
· 6 tablespoons extra virgin olive oil
· 1 teaspoon apple cider vinegar, or more, amount to taste
· 1 ounces basil, chopped
· 1/2 ounce mint, chopped
· 2 sprigs of thyme leaves, stems removed
· 1-ounce chives, chopped
· 1/4 teaspoon kosher salt, amount to taste
· 1/8 teaspoon fresh ground black pepper, amount to taste
Instructions
1. In a medium mixing bowl, add prepared, chopped herbs, apple cider vinegar, extra virgin olive oil, and stir to combine. Serve with bread, toast, crackers, and chips - enjoy! Serve cold.
Note: If you want to give this salad more zip, try a spritz of lemon juice, chopped onion.
For more recipes check out our farm recipe blog: https://blackdirtrecipes.wordpress.com
YouTube Channel: https://www.youtube.com/channel/UCPYfuRXgE6SgaLMmd_vYx9Q
Follow us on Instagram @yesifarm
Summer Share Week 1
Here we are the first official day of summer! Some would call the weather dreary but for us on the farm it's quite perfect. All the plants we set in the fields are getting a gentle drink and the seeds being planted now will germinate that much quicker. I keep poking the cucumbers and zucchini hoping to see some production of flowers and fruits. No matter how long I've been growing I still get so anxious to begin harvesting and find myself reading and researching what parts of the plants are edible and how we can use them. It's quite fascinating, for me anyway. Years and years ago I tried to research wild edibles, Latin and Asian vegetables but it was so difficult. Not much was available or readily accessible. Now it's like an explosion of information almost to the point of overload. New varieties, old varieties being rediscovered, new recipes and again recipes from our respective heritages being rediscovered. All of this makes it a joy to grow, cook and of course eat!!!
10 MINUTE GARLIC BOK CHOY RECIPE
Ingredients
1/2 tablespoon vegetable oil
2-3 cloves garlic - minced
1 large shallots - minced
1 pounds baby bok choy - halved or quartered
1 tablespoon soy sauce
1/2 teaspoon sesame oil
1/2 teaspoon crushed red pepper - optional
Instructions
– Add the oil to a large wok or skillet over medium-high heat. Swirl to coat the entire surface of the pan. Add the garlic and shallots, stirring continuously for 1-2 minutes, or until fragrant.
– Add the bok choy, soy sauce, and sesame oil. Toss to coat and cover. Cook for 1-2 minutes, uncover and toss, and then cover and continue to cook until bok choy is cooked to desired doneness (approximately 3-5 minutes more).
– Sprinkle with crushed red pepper and serve immediately. Enjoy!
Source: https://theforkedspoon.com/bok-choy-recipe/
For more recipes check out our farm recipe blog: https://blackdirtrecipes.wordpress.com
YouTube Channel: https://www.youtube.com/channel/UCPYfuRXgE6SgaLMmd_vYx9Q
Follow us on Instagram @yesifarm
Spring Share Week 13
Here we are the last week of the spring share. Looking backwards, what a tough start to this year's growing season. That's part of the joy of belonging to a CSA — you get to live the life of the farm with us! The freezes that kill, the blessings of spring showers and bright sunny days. Trying out new and different vegetables or maybe new ways of cooking old family favorites. We are so grateful to call you family because that's what you mean to us. Thank you for your support as we travel this journey of farm life.
We made the decision, said a little prayer and began transplanting. Tomatoes, peppers—hot and sweet, eggplants, tomatillo, husk cherry tomatoes, herbs. We started cucumber and summer squash seeds in the greenhouse and now have the most beautiful plants to set out in the fields. If we can successfully ward off insects and critters (we don't use chemicals) soon we'll be harvesting those gorgeous babies. I can already smell and taste them. Now we just have to hope the weather will settle down to more consistent behavior.
SAUTÉED GARLIC SCAPES
Source: https://thishealthytable.com/blog/garlic-scapes/
Garlic scapes you ask? One of the most special treats. Actually the seed stalk of a hard-neck garlic looking a bit like string beans with all the flavor of garlic. Awesome grilled, sautéed, in Pesto — wherever you want that garlic flavor to come through. Use the whole piece unless it's brown. These delicious sautéed garlic scapes are easy to make and ready in a few minutes.
Ingredients
8 ounces garlic scapes, cut into 4-inch pieces
1 tablespoon olive oil
½ tablespoon soy sauce
1 teaspoon rice wine vinegar
Instructions
- Heat a large skillet over medium-high heat. Once hot, add the scapes and allow to cook, tossing occasionally, for about 4 minutes or until they begin to brown.
- Reduce the heat to medium and add olive oil. Toss to coat the scapes. Cook for an additional minute.
- Add the soy sauce and toss to coat for 30 seconds. Be careful as the pan will be hot and might spit.
- Turn off the heat and add the rice wine vinegar. Toss to combine and allow to rest in the pan for 30 seconds before serving.
Here's some ideas on how to use them:
12 Ways to Add Garlic Scapes to Your Spring Cooking Routine
Attention garlic lovers: When spring hits, you have only a few short weeks to work garlic scapes into as many meals as you can. BY EMILY SALADINO
Source: https://www.bonappetit.com/test-kitchen/ingredients/article/garlic-scapes
Like your favorite track off an artist’s largely ignored second album, garlic scapes are treasures hiding in plain sight. The long, curly tendrils show up at many farmers markets and well-stocked supermarkets or grocery stores in late spring or early summer. They’re generally sold by the bunch and make a stellar addition to pesto, soups, stir-fries, and more.
What are garlic scapes, exactly? These green stalks extend from the base of hardneck garlic plants, resembling oversize chives or scallions. They’re related to but different from green garlic (the bulbs and shoots of garlic plants that haven’t fully matured). If left unattended, garlic plants will sprout tiny purple or white flower buds at the tips of the scapes. Farmers tend to trim them, though, to encourage bulb growth.
You can use scapes in all sorts of ways. Less pungent than garlic cloves, they provide subtle garlicky flavor and can be served cooked or raw. Sauté the green shoots in olive oil with green beans and other veggies for a side dish that screams, “hi, hello, it’s springtime,” or mix finely chopped raw garlic scapes into compound butter or hummus for a quiet kick. They’re also an excellent substitute for or used in addition to ramps or leeks in pasta recipes or frittatas.
For more recipes check out our farm recipe blog: https://blackdirtrecipes.wordpress.com
YouTube Channel: https://www.youtube.com/channel/UCPYfuRXgE6SgaLMmd_vYx9Q
Follow us on Instagram @yesifarm
Spring Share Week 12
We hope you are all keeping safe with the smoke that’s been smothering the region. Our farmers worked at a slower pace, wore masks and drank lots of water in an effort to stay safe while getting your produce harvested and cleaned. Different farmers on Instagram were sharing how they were coping. Looking to the West, farmers in California have dealt with these types of issues for so long they wear respirators while working in the fields. Never thought we would reach those levels here on the East Coast. While we cope with this we think of the folks up in Canada who are dealing with so much more.
I see you wondering what exactly is “stem spinach?” It’s basically mature spinach with the stem attached, whereas baby spinach is much smaller, younger and without the stem. The stem spinach is a variety called Bloomsdale Long Standing, my Dad always grew it. It’s another one of those personal favorites for me. I used to make a salad for Dad that he loved! Went something like this — take the spinach, tear it into bite size pieces, finely chop some red onions and black olives. Toss all that together and dress with an Italian vinaigrette. Dad would eat it right out of the bowl.
QUELITES or lambsquarters is a favorite of our farmers. A member of the amaranth family, use it like spinach.
Qué bonito es el Quelite
Bien haya quien lo formó
Que por sus orillas tiene, de quien acordarme yo
How beautiful is the Quelite
Laud to its creator
That through its ruffled edges, myself I do remember
— El Quelite by Hermanos Zaizar
Some parts of the country call lambsquarters “bacon weed,” because, well … fry up some bacon, remove and chop it, cook a mess of lambsquarters in that bacon fat, maybe with some onions and garlic, add back the bacon as well as a splash of vinegar and you’ll thank me later.
Source: https://honest-food.net/lambsquarters-edible-huauzontles/
SERIOUSLY, THE BEST BROCCOLI OF YOUR LIFE
Source: https://www.errenskitchen.com/seriously-best-broccoli-life/
A delicious side dish that’s quick and easy to prepare and makes a great accompaniment to meat, poultry or fish.
Ingredients
1 pound broccoli
1 garlic clove peeled and sliced
Olive oil for Keto version butter flavored coconut oil
1/8 teaspoon kosher salt
Pinch of ground black pepper
½ teaspoon lemon zest
½ tablespoon lemon juice
Freshly grated parmesan cheese
Directions
1. Preheat the oven to 400°F/200°C.
2. Cut the broccoli florets from the thick stalks, leaving an inch or two of stalk attached to the florets, discarding the rest of the stalks. Cut the larger pieces through the base of the head with a small knife, pulling the florets apart. You should have about 2 cups of florets.
3. Place the broccoli florets on a sheet pan large enough to hold them in a single layer. Toss the garlic on the broccoli and drizzle with 5 tablespoons olive oil. Sprinkle with the salt and pepper.
4. Roast for 20 to 25 minutes, until crisp-tender and the tips of some of the florets are browned.
5. Remove the broccoli from the oven and immediately toss with 1½ tablespoons olive oil, the lemon zest, lemon juice, and Parmesan. Serve hot.
*This recipe makes very crispy garlic. In some ovens it could burn or become bitter. If you are worried about the garlic getting too dark for your liking, add at the last 5-7 minutes of cooking time coated in a little oil and scattered around the pan.
6. Don’t skimp on the oil (even if it seems like a lot), season well, and make sure your oven is hot before adding the broccoli.
7. On washing your broccoli: After washing your broccoli, be sure to dry it thoroughly. The drier it is, the more it will crisp up.
8. For crispy results: If you want an even crisper broccoli, try flipping it halfway through the roasting. It’s a time-consuming task, but it crisps on all sides.
For more recipes check out our farm recipe blog: https://blackdirtrecipes.wordpress.com
YouTube Channel: https://www.youtube.com/channel/UCPYfuRXgE6SgaLMmd_vYx9Q
Follow us on Instagram @yesifarm
Spring Share Week 11
Planting beans today — green, gold, black cranberry, white — all sorts! Still a little nervous to put out the tomatoes and peppers. That freeze a couple weeks back was more than scary. I heard one of the bigger farmers in the area lost 40 acres of produce. That's a hard hit to take. As a safety net we planted cucumbers and zucchini in the greenhouse. They're a few inches tall already, once we feel more comfortable we'll pop them into the field and won't be too long after that we'll be harvesting them. I. Cannot. Wait.
MOM'S CARROT SALAD
One of my sisters favorite salads is carrot, the other is Cole slaw. Every once in a while I'll surprise her with a bowl of one or the other. The carrot salad is another one of those Mom recipes. Peel the carrots (not totally necessary). Shred the carrots. A sprinkle of salt and pinch of pepper. A splash of mayonnaise, golden raisins or dark ones (usually it's whatever I grab first) or if you really want to walk on the wild side use both! Stir well. It's good to let it set a bit so the flavors meld. Once in a while I'll add pineapple or shred an apple into it. Not only a salad it's good on a sandwich too!
For more recipes check out our farm recipe blog: https://blackdirtrecipes.wordpress.com
YouTube Channel: https://www.youtube.com/channel/UCPYfuRXgE6SgaLMmd_vYx9Q
Follow us on Instagram @yesifarm
Spring Share Week 10
Update on status of fields from last week's freeze: Pretty much wiped out most of the more fragile things and “burned” the parts of the potato plants that were stretching out above the soil. Luckily potatoes are fairly hardy and they will recover from this. Still hesitant to planting anything tender like tomatoes, peppers and eggplants. Definitely waiting till after Memorial Day! Silvia came back to work today so we now have our three core workers back at the farm. It is such a relief to have folks working with us that have been with us for more than a few years now. They not only take care of the farm but me too!!! They call me Charo, as my name is difficult for them to pronounce. One of the young ladies who worked for me many years ago said, "Did you know the farmers call you Shadow? Kristin didn’t quite understand the farmers' accents. Smile. At the farmers markets there are several young women who help us. Mostly high school age, I feel so fortunate that through the years most everyone looks to stay with me even after they’re in college. “I’ll be home for the summer if you need me.” I have no children but every one of these young people eventually becomes "mine." They call me their work Mama and I love every one of them as if they were my own!
CHIVE BLOSSOM VINEGAR
Source: https://leitesculinaria.com/80938/recipes-chive-blossom-vinegar.html
Ingredients
¾ cup Champagne or white wine vinegar
1 ¼ cups chive blossoms, snipped right beneath the head
Directions
1. Heat the vinegar in a small saucepan over low heat until just warm. Keep an eye out so that it doesn't boil; you want the warmth of the vinegar to seduce the coy, subtle flavor out of the blossoms, not immolate them.
2. Meanwhile, plunge the flowers in a bowl of cold water and gently swish them around to flush out any dirt and bugs that have taken up residence. Dump the flowers into a colander and thwack it against the side of the sink to shake off the excess water.
3. Stuff the pint jar with the blooms. Don't be too Martha about this. It's okay if the blossoms get crushed a bit.
4. Pour enough of the warm vinegar into the jar just to submerge the blossoms, using a metal spoon to push down any errant blooms that want to float up over the top. You might not need all of the vinegar.
5. Let the vinegar cool, then place a square of parchment paper over the opening of the jar and screw on the top. You want to make sure the vinegar doesn't come in contact with the metal lid, as the acid will erode the finish of the cap and do nasty things to the taste of your infused vinegar. Of course, you can make short work of this by using a glass-lidded canning jar--I just can never find them. Place the container in a dark, cool spot that's so hidden you'll forget about it. This infusion benefits from a long steep--1 to 2 weeks minimum. Trust me, the vinegar will bless you abundantly for your patience--or your forgetfulness.
6. When you're happy with the chive-y strength of the brew, strain it through a fine sieve and toss the spent blossoms. Pour the vinegar into your favorite (preferably glass) sterilized bottle with a rubber stopper and display prominently. Its hue--the blush of a very embarrassed Rosé--is a great conversation starter. Just don't forget to use it.
FAQs
Can I Use Other Kinds Of Vinegar?
Yes, I normally use white vinegar but white wine vinegar would also work well. You’ll want to avoid using vinegar that has a strong flavor like apple cider vinegar because it would overpower the onion flavor of the chives.
Do I Have To Steep It For 2 Weeks?
No, you can use the chive vinegar sooner. But cutting the steeping time too short can lower the intensity of the chive flavor. I would let the blossoms steep for at least 3 or 4 days but the full 2 weeks gives a better result.
Can I Make A Larger Or Smaller Batch?
Yes, of course! You can cut the recipe in half or double or triple the recipe if you have enough chive blossoms. Either use a larger half-gallon or gallon jar or split it into multiple quart jars.
This recipe is very forgiving. You can add more or less flowers to get the flavor you like.
How To Make CHIVE BLOSSOM BUTTER
Source: https://www.homestead-acres.com/chive-blossom-butter/
Ingredients
1/2 cup of salted butter softened
4 chive blossoms
Serving or storage container for the finished butter.
Directions
Step 1. Gather The Flowers
Pick fresh chive flowers from your herb garden. I like to pick the whole stock the flower is on. These flower stocks are harder than the normal chive leaves. You’ll want to discard this stock later as they are too hard to eat but they make it easier to hold onto the flower while you clean them.
Step 2. Clean And Separate The Flowers
Then give them a rinse with cool water to remove any dirt or little bugs that could be hiding inside the flowers. Cut the flower off the stock and pat the flowers dry with a paper towel or spread onto a kitchen towel to dry. When the flowers are dry separate the florets of the flower. I find the fastest way is to use kitchen scissors and snip the flowers apart.
Step 3. Mix Together
Place your softened butter into a mixing bowl and add the chive flowers. Mix them together until they are well combined. Then spoon the butter into a serving container or place it into parchment paper or plastic wrap and roll it into a log.
How To Store
Chive blossom butter will keep for 1 week in the refrigerator. You can also freeze herb butter for up to 3 months. For easier use, place the butter into small silicone molds and freeze. When frozen, remove them from the molds and package them in freezer bags. You can also roll the butter into a log shape using plastic wrap or parchment paper and cut it into small sections before freezing. This makes it much easier to take out a little at a time.
How To Use Chive Blossom Butter
Having herb compound butter on hand is so handy! With this butter you can use it anywhere you would like to add a mild onion flavor to your dish. Spread it on freshly baked bread, biscuits, or savory muffins. Use it to fry eggs or home fries. Add a pat of butter on top of your steak or fish before serving. Add chive butter to your mashed potatoes or other mashed vegetable dishes. You can also use it as a base for making gravy and other sauces.
Can I Use Unsalted Butter?
Yes, you can use unsalted butter to make chive blossom butter. I prefer to use salted butter because it lasts longer and we love salt in our food. But if you are watching your salt intake the recipe will work with unsalted butter
Can I Add Chive Leaves?
Yes, of course, you can! The leaves have a stronger taste than the blossoms do but chopping up some of the leaves can add a great pop of color to your butter.
For more recipes check out our farm recipe blog: https://blackdirtrecipes.wordpress.com
YouTube Channel: https://www.youtube.com/channel/UCPYfuRXgE6SgaLMmd_vYx9Q
Follow us on Instagram @yesifarm
Spring Share Week 9
Soooo ... cold this morning, not really but under the theory of relativity for our crops it really is. At 5:30 AM there’s a light freeze across the valley, different vegetation is showing its reaction to the cold. A glassy translucence over some leaves and no reaction from others. This is why we wait to transplant tender plants like basil, tomatoes, peppers, eggplants and others — they would never survive a night like yesterday and with another chill headed our way tonight, that would be the end of them. I remember one year we had planted our tomatoes and peppers in the field and in June — yes June — there was a significantly cold night. All the plants in the field froze and we lost that harvest. Luckily Dad still had some plants in reserve that we hadn’t planted yet. We protected them with covers that night and the next day we were able to keep on planting. So back to cranking up the heat in the greenhouse to safeguard the babies in there until we think it’s safe to put them in their beds for the summer, usually around Memorial Day. It’s now around 7:30 AM and the plants already show signs of recovery. The leaves look normal and the plants are standing straight and tall — now we pray for tonight to be as kind.
ROASTED ASPARAGUS
In my opinion this is one of the best ways to enjoy asparagus – roasted! For the prepping of asparagus there are differing opinions — snap the ends or cut them off. The ends are a bit tougher and best used for stock. The theory is that snapping causes a higher break point and leaves you with less stalk. Cutting you can adjust the stalk to wherever you are comfortable.
Directions
Preheat oven to 400. Leave the spears whole or cut into bite size pieces. Drizzle with olive oil, sprinkle with salt and pepper. Toss spears with seasonings then place on sheet pan. Roast in preheated oven. Start checking after 20 minutes — thinner spears will cook faster. I tend to choose thicker stalks so for me roasting can take 30 minutes plus. Once roasted to your preference, pull from oven and let cool. This is where I have to hide them from my sister. She will devour the whole pan in a blink of an eye! I like asparagus simply roasted like this — if you’re looking for some flavor variations you can opt for a sprinkle of parmesan, a light sprinkle of hot pepper flakes — more or less to your taste. You can also toss the spears with cherry tomatoes, sundried tomatoes, mushrooms, garlic, onions or scallions. Any of these combinations with some pasta and an awesome dinner awaits
LEBANESE POTATO SALAD WITH LEMON & MINT
Source: https://food52.com/recipes/33279-lebanese-potato-salad-with-lemon-and-mint
This classic Lebanese salad embodies all that is delicious and healthy about Lebanese cuisine: a potato salad that is both light and high on flavor. The potatoes absorb their lemony dressing perfectly, and they're scented with mint, one of the very favorite Lebanese herbs. —Maureen Abood
Ingredients
· 1 pound Russet potatoes, peeled and cut in 1/2-inch dice
· 3/4 teaspoon Kosher salt
· juice of 1 small lemon
· 1/8 cup extra-virgin olive oil
· 2 scallions, finely sliced, both white and green parts
· 1/8 cup fresh mint, cut in chiffonade or finely chopped
Directions
1. Place the potatoes in a large saucepan and cover by 1 inch with cold water. Add a teaspoon of salt. Cover and bring to a boil. Remove the lid and reduce the heat to medium. Test a sample of the potatoes every minute or so with the tip of a paring knife. They are ready when the knife cuts into the potato with just a hint of resistance. Taste the samples, looking for an al dente quality. Russet potatoes cook in about 13 minutes. Be careful not to overcook the potatoes or they will turn to mash when they are stirred with the dressing.
2. Drain the potatoes and place in a medium bowl. Season the warm potatoes with salt, lemon juice, and olive oil, stirring very gently. Taste and adjust seasonings. When the potatoes have cooled down almost to room temperature, add the scallions and mint, stirring gently to combine.
3. This potato salad is delicious warm, as well as the next day (cover and refrigerate over night. Bring to room temperature and add more fresh mint, again stirring gently).
For more recipes check out our farm recipe blog: https://blackdirtrecipes.wordpress.com
YouTube Channel: https://www.youtube.com/channel/UCPYfuRXgE6SgaLMmd_vYx9Q
Follow us on Instagram @yesifarm
Spring Share Week 8
It’s been a slow grind this spring, the weather is finally settling down into what we would call more “normal.” As much as we needed the rain it really did hamper our progress. One of the fields is so wet we have to wait for it to dry out. There seems to be a problem with the drainage and I will have to climb down into the ditch and investigate the culvert to see if there is a blockage of some sort, hopefully it’s something we can poke at with a couple shovels and I won’t have to get the excavator to clear it. Oy vey the weeds! Did you know the definition of a weed is something that’s growing where you don’t want it to? So an onion or a rose could be a weed! In our case it’s the vegetation that creeps up like a magic carpet in between the plants and seeds we deliberately cultivate. Today Benito and Lupe are busily weeding so we can keep the unwanted vegetation at bay.
I wanted to give a mini tribute to the Moms in my life, they were and continue to be such an inspiration for me. On my Mom’s side of the family My Great Grandmother aka Grammy was the local mid-wife who delivered countless babies in the community. Her daughter Julia (one of seven kids) my Babcia was a 5-foot tall powerhouse. Babcia drove tractor trailers for my grandfather in their trucking business and was one of the first women to serve on a local jury. In her late 70s she still drove the tractor that pulled the onion harvester on our farm. My Mom, Lillian, a registered nurse graduated with the very first class of nurses from our local community college. I still remember how proud I was at the age of five sitting on her lap steering the tractor that pulled the onion harvester. Love and miss you all! Happy Mothers Day!!!!!!
BABCIA'S POTATO SALAD
Babcia is Polish for grandmother, we named this salad after my Mom as it was how she made potato salad. Folks love this, in my opinion it’s the best when the potatoes are still warm. The recipe is a guess by golly as it is how Mom cooked and how I learned to make it.
Ingredients
Potatoes, onions, celery, mayonnaise, salt and pepper.
You can use red skin or golden potatoes for this.
Directions
I don’t peel my potatoes, if small I cook them whole otherwise I cut them into manageable bite size pieces. Rinse in cold water, drain, cover with cold water, add some salt to the cooking water. Cook until fork tender. Drain, return potatoes to pot and over the still warm burner give the pot a shake and let the excess water steam off. Place the potatoes into a bowl. After peeling I will grate the onions on the coarse side of a box grater and add them to the potatoes, finely chop some celery then add to the potatoes and onions. A dollop of mayonnaise, salt and pepper to taste. Mix well.
As I said I really enjoy this the most when the potatoes are still warm and melty!
For more recipes check out our farm recipe blog: https://blackdirtrecipes.wordpress.com
YouTube Channel: https://www.youtube.com/channel/UCPYfuRXgE6SgaLMmd_vYx9Q
Follow us on Instagram @yesifarm
Spring Share Week 7
As Cinco de Mayo approaches the importance of this date becomes more understood. As I chatted with our farmers about the holiday yesterday I learned that this battle took place in the heart of Puebla which is where our farmers are from. Benito said they don’t really celebrate with food but with mega parades, streets filled with people waving flags celebrating the bravery and honor of the Mexican and Indigenous people. The pride in Benito's face and demeanor as he described the valor of the soldiers was palpable. The Battle of Puebla took place on May 5, 1862 when a force of 5,000 French soldiers armed with heavy artillery faced off with 2,000 poorly armed Mexican soldiers. By the end of the day with nearly 500 dead French and fewer than 100 dead Mexicans, the French withdrew. While not seen as a critical fight the moral boosting effect was incredible. Benito said there are lots of parades held in commemoration in California.
Info Sources: Farmers Benito & Lupe
https://www.history.com/topics/holidays/cinco-de-mayo#the-battle-of-puebla
MEXICAN STYLE SWEET POTATOES
Source for all recipes: https://www.acouplecooks.com/mexican-stuffed-sweet-potatoes/
Ingredients
2 medium sweet potatoes
Olive oil, for rubbing
Kosher salt
1 recipe Black Bean Salsa
1/4 cup frozen corn kernels
Creamy Cilantro Sauce or Creamy Cilantro Dressing, to serve (plus a few extra cilantro leaves)
Mexican hot sauce (such as Cholula), to serve
Other topping ideas: Sour cream, Mexican Crema, cheese, Vegan Nacho Cheese, Vegan Sour Cream, Cashew Cream, or Chipotle Sauce
Instructions
– Start soaking the cashews for the Creamy Cilantro Sauce (or make it in advance; you can also soak the cashews the night before for easy day-of prep). If you’re planning to make the Creamy Cilantro Dressing, skip this part.
– Preheat oven to 450°F.
– Wash the sweet potatoes and slice them in half. Place on a parchment paper lined baking sheet and rub lightly with olive oil, just enough to coat. Sprinkle with kosher salt. Bake until tender and lightly browned on the edges, about 25 to 35 minutes depending on the size of the potatoes.
– Make the Black Bean Pico de Gallo.
– Defrost the frozen corn.
– Make the Creamy Cilantro Sauce (or Creamy Cilantro Dressing). Save out a few cilantro leaves and chop the cilantro for a garnish.
– To serve, top the roasted sweet potatoes with Black Bean Pico de Gallo, corn kernels, cilantro, and dollops of Creamy Cilantro Sauce
BLACK BEAN SALSA RECIPE
This black bean salsa recipe is quick and full of zesty flavor! Mix beans with fresh tomatoes, onion, lime and cilantro.
Ingredients
· 1 pound ripe tomatoes
· ½ cup red onion, minced
· ¼ cup cilantro, finely chopped
· 1 jalapeño pepper
· 15-ounce can black beans (or 1 ½ cups cooked or Instant Pot black beans)
· 1 lime (2 tablespoons juice)
· ½ teaspoon kosher salt, plus more to taste
Instructions
1. Dice the tomatoes. Mince the red onion. Finely chop the cilantro. Remove the ribs and seeds of the jalapeño pepper and finely chop it. Drain and rinse the black beans. Juice the lime.
2. In a bowl, add tomato, red onion, cilantro, jalapeño, black beans, lime juice, and kosher salt. Stir to combine, and add kosher salt to taste.
CREAMY CILANTRO SAUCE
This cilantro sauce is creamy, tangy, savory, sweet, and totally delicious! It’s plant-based and perfect for dolloping on baked potatoes, tacos and more.
Ingredients
· 1 cup raw or roasted cashews*
· ½ cup water
· ¼ cup lime juice (juice from 2 limes)
· 2 large handfuls cilantro leaves and tender stems**
· ½ teaspoon kosher salt
Instructions
1. Place the cashews in a bowl and cover them with water. Soak for 1 hour (or the very least, 30 minutes if you have a high speed blender). For preparation in advance, you can soak the cashews overnight, which is even better.
2. Juice the limes.
3. Drain the cashews. Add the cashews, water, lime juice, cilantro, and kosher salt to a blender, then blend on high for 1 minute. Stop and scrape, then add additional liquid if necessary to come to the desired creamy consistency (we added 2 additional tablespoons; you could add more for a more drizzle-able sauce). Blend for several minutes until creamy and smooth. Store in a sealed container in the refrigerator for up to 1 week or in the freezer for several months.
For more recipes check out our farm recipe blog: https://blackdirtrecipes.wordpress.com
YouTube Channel: https://www.youtube.com/channel/UCPYfuRXgE6SgaLMmd_vYx9Q
Follow us on Instagram @yesifarm
Spring Share Week 6
Rainy overcast day — great weather for all the planting we’ve been doing! Potatoes are planted and now we wait for the tubers to push their way up through the soil and send out blossoms. Was a bit of a hard frost yesterday, thankfully the seedlings seem to have survived the slight glaze that covered them. As we continue planting, weeding moves higher up on the priority list. Since we do not use herbicides aka weed killers on our farm, we become the weed killers. The farmers move at a rapid pace with hand and hoe to stay ahead of the advancing threat of the weeds' ability to grow and thrive at a pace that can choke out the herbs and vegetables if left unattended.
STUFFED BAKED POTATOES
Source: https://www.asouthernsoul.com/stuffed-baked-potatoes_5/
Author: Donya Mullins
Potatoes are comfort food, and stuffed baked potatoes are definitely in the Top 10 of best potato recipes.
Ingredients
4 medium russet potatoes – washed and dried
1 1/2 cups shredded cheese
½ cup cooked bacon – chopped
2 tablespoons butter
1 ½ cup sour cream
¼ cup grated onion
¼ cup chopped green onion
½ teaspoon salt
¼ teaspoon fresh ground pepper
Instructions
* Heat oven to 400 degrees.
* Drizzle potatoes with canola oil and sprinkle with kosher salt. Place potatoes on center rack in oven. Bake for 1 hour or until done (insert a knife into potato to check for doneness)
* Take potatoes out of oven and cool on baking rack.
* When potatoes are easy to handle, cut an oval on skin and remove. Scoop out inside of potato using a spoon and place in mixing bowl. Add butter and blend using a potato masher.
* Add 1 ¼ cups of cheese, the bacon, sour cream, grated onion, salt and pepper – mixing well. Taste, adjusting seasoning.
With a small spoon, stuff mixture into potato skins making sure not to over pack. Place in an oven proof dish, cover with foil and heat in a 350 degree oven for 15 minutes.
* Remove foil and sprinkle with remaining cheese. Heat until cheese is melted.
* Serve potatoes with sour cream, chopped green onions and additional bacon.
Notes:
– Cheese? Use what you like — Cheddar, Swiss, Gruyere ...
– No green onions? Use chives
– No bacon? Use ham or sausage
Another Recipe: CROCKPOT GARLIC MASHED POTATOES
Source: http://www.thetipgarden.com/2011/11/crockpot-garlic-mashed-potatoes.html
For more recipes check out our farm recipe blog: https://blackdirtrecipes.wordpress.com
YouTube Channel: https://www.youtube.com/channel/UCPYfuRXgE6SgaLMmd_vYx9Q
Follow us on Instagram @yesifarm
Spring Share Week 5
Transplanted a bunch of different vegetables this week — kale, broccoli, Swiss chard, bok choy, lettuces, spinach and more. Our onion plants are going in tomorrow, it will be a few weeks before we put out any tenders like tomatoes and peppers — it’s just way too cold now and the risk of frost is high. I am going to tinker with some zucchini and cucumber plants in the green house to try and get a jump start on the season. Marisa asked me yesterday when is my favorite season. I have to confess as much as I do love springtime, I am a fall girl — that crossing over of summer and fall when the harvest is overflowing with an abundance that can be overwhelming and the colors!!!! For me spring is the season of green — lots of leafy greens, herbs and the start of baby roots. I swear you can even taste the color green if that makes any sense whatsoever. Then come the golden colors of summer — corn, beans so fresh they snap when you try to bend them! Followed by the rainbow of fall – purples, reds, oranges and more golden and green colors and flavors.
SPICY SKILLET TURNIP GREENS
Source: https://addapinch.com/spicy-skillet-turnip-greens-recipe/
A quick recipe for spicy skillet turnip greens for a comforting, home-cooked meal.
Ingredients
½ tablespoon olive oil
1 small onion, cut into wedges
½ pound turnip greens, cleaned and chopped
¼ cup water
pinch of brown sugar
¼ teaspoon red pepper flakes – to your taste
Instructions
· Drizzle olive oil into skillet over medium heat. Add onion and cook until just tender, about 3 minutes. Then add ½ of turnip greens. Allow to cook down and add the remainder of the greens. Add water, brown sugar and red pepper flakes. Adjust the amount of red pepper to your personal taste.
BOILED POTATOES WITH CHIVES
Source: https://www.allrecipes.com/recipe/231861/boiled-potatoes-with-chives/
These delicious boiled potatoes with butter and chives are simple to make.
Ingredients
1 pound potatoes
1 ½ tablespoons unsalted butter, cut into several pieces and softened
1 ½ tablespoons finely chopped fresh chives
salt and ground black pepper to taste
Directions
1. Place potatoes into a large pot and cover with salted water; bring to a boil. Reduce the heat to medium-low and simmer until tender, 10 to 15 minutes. Drain and let sit until cool enough to handle, 1 to 2 minutes.
2. Cut potatoes in half or quarters depending on size. Place into a serving bowl. Add butter, chives, salt, and pepper; toss until butter melts and potatoes are well coated.
For more recipes check out our farm recipe blog: https://blackdirtrecipes.wordpress.com
YouTube Channel: https://www.youtube.com/channel/UCPYfuRXgE6SgaLMmd_vYx9Q
Follow us on Instagram @yesifarm
Spring Share Week 4
Smells of Spring — the valley is aromatic with the aroma of green onions. Acres upon acres of young tender transplants are going into the rich dark soil. The soil itself has the perfume of rich deep loam as it is turned over to refresh and renew for the season to come. As row upon row fills the fields a transformation occurs. Empty fields become full of what almost looks like rows of grass. With military-like precision every plant is precisely placed, so very critical so when the tillers and cultivators begin the work of clearing weeds not an onion is taken out by their blades. Seems like a very unimportant task/skill but that precision like placement of each plant sets the tone for the entire season and a successful harvest. In a few days those rows that look like straw and leave you thinking there is no way they’ll turn into verdant green tops on luscious savory bulbs, but nature has her ways and soon the valley floor will be filled with deep emerald green rows bringing the promises of many savory meals to come.
BENEFITS OF FROZEN CORN
Source: https://www.favfamilyrecipes.com/how-to-cook-frozen-corn/
Frozen corn beats canned corn any day of the week. And it’s a perfect substitute for fresh corn cobs. Why? For one thing, it’s cheaper. A big bag of frozen corn can last for several weeks in the freezer and when prepared correctly, tastes just as fresh as straight off the cob. And it actually takes less time to prepare than fresh. It’s nutritious too! There are actually fewer calories in frozen corn than in fresh or canned.
Ingredients
1 pound frozen corn
4 Tablespoons butter
1 Tablespoon sugar
Instructions
· Place corn in a colander and rinse with cold water until ice is no longer present. Shake off excess water over the sink.
· Place corn and butter in a medium-sized skillet over medium-high heat.
· Sprinkle sugar over corn and stir until butter is melted and corn is hot (about 5-6 minutes). Do not over cook.
· Season with Kosher salt and fresh black pepper if desired.
· Serve immediately.
Notes
· Don’t BOIL frozen kernel corn! Just don’t do it. I know the package tells you to do it, but trust me, it zaps all the flavor out of the corn.
· Use a skillet. Stir-frying or sautéing frozen corn keeps it crisp and bright and tastes much better than roasted corn in the oven.
· Add a little sugar. It’s ok, it won’t taste weird and it will bring out the natural sweet flavor.
· Don’t salt until ready to serve. Salting the corn too early can dehydrate it and it won’t taste as sweet. Wait until after you’ve cooked it, then salt and pepper to taste.
For more recipes check out our farm recipe blog: https://blackdirtrecipes.wordpress.com
YouTube Channel: https://www.youtube.com/channel/UCPYfuRXgE6SgaLMmd_vYx9Q
Follow us on Instagram @yesifarm
Spring Share Week 3
Spring a time for renewal and sprucing up. On the farm it means clearing out the growth left from last year. Prepping the soil to begin planting seeds and plants. Assessing the perennials to see how they survived the winter, what do we need to replant, what plants should we move and where to. The herbs are looking good — soon we’ll harvest chives, thyme and stinging nettles. Seeds are germinating and the faintest of signs are popping through the ground showing rows of what's to come. The soil is still holding winter's chill, as soon as it warms seeds will germinate quicker and it will be time to put the more tender plants and seeds out.
MAPLE GLAZED PARSNIPS ON KALE
Source: https://www.tasteofhome.com/recipes/maple-glazed-parsnips-on-kale/
Ingredients
4 tablespoons + plus 1 tablespoon unsalted butter, divided
1 pound medium parsnips, cut into 1/2-in. slices
1/3 cup maple syrup
1/2 medium shallot, thinly sliced
1/2 pound kale, stems removed, cut into 1-in. strips
1/4 teaspoon salt
1/2 tablespoon apple cider or juice
Directions
1. In a large skillet, melt 4 tablespoons butter over medium heat. Add parsnips and maple syrup. Cook, uncovered, for 15-20 minutes or until syrup is almost evaporated and parsnips are caramelized, stirring frequently.
2. Meanwhile, in a Dutch oven, melt remaining butter over medium heat. Add shallot; cook for 4-5 minutes or until tender. Add kale; sprinkle with salt. Cook and stir for 3-5 minutes or until slightly wilted. Add cider; reduce heat to low. Cover and steam for 5 minutes.
3. To serve, spoon kale onto a large plate; top with parsnips.
For more recipes check out our farm recipe blog: https://blackdirtrecipes.wordpress.com
YouTube Channel: https://www.youtube.com/channel/UCPYfuRXgE6SgaLMmd_vYx9Q
Follow us on Instagram @yesifarm
Spring Share Week 2
This weather is just a roller coaster ride, one day in the forty’s next hitting high 60s almost seventy. Snow, rain and sleet — nature seems to want to get it all in before March says its sweet goodbye. As the saying goes, "In like a lamb out, like a lion!" We’ve been busy getting the Kabota ready to work for the upcoming season. Changing filters, motor, hydraulic and transmission oils. Transplants in the greenhouse are growing like mad. Soon those babies will head out to the fields. Then we have to protect them from the wildlife who think we put out a buffet just for them!!! Bok choy, kales, chard, lettuces, salad mixes, spinach and more are all getting ready to be put to their “beds.” Checking the streams for watercress and the first pop of stinging nettles. Folks keep asking for scapes but that’s an early summer thing. The garlic is just barely breaking ground. All good signs for an exciting Spring!
Recipe — VEGETARIAN COLLARD GREENS
by Tania Sheff
Source: https://cooktoria.com/vegetarian-collard-greens/
This hearty and comforting Vegetarian Collard Greens recipe is easy to make and very delicious. They make a perfect side dish or can be eaten on their own with some fresh bread.
Ingredients
1/2 lb. collard greens thoroughly washed and cut into thin strips
.5 tbsp. olive oil
.5 tbsp. butter
1 small onion diced
1 cups vegetable stock
1/4 tsp. red pepper flakes
1 garlic cloves minced
¼ cup heavy cream
¼ cup Parmesan cheese
½ tbsp. chopped parsley
Salt & pepper to taste
Instructions
– In a large, deep skillet or pot, heat the olive oil with the butter over medium heat. Add in the onions and cook for 5 minutes, or until tender. Add the collard greens to the skillet, and when the greens begin to wilt down, add the red pepper flakes and vegetable stock. Cover with a lid and cook for about 45 minutes, or until your desired texture is reached,* stirring occasionally.
– At this point, add the garlic, and season with salt and pepper to taste. Cook for about 1 minute.
– Add the heavy cream, Parmesan, and parsley. Stir everything well and cook for 1-2 minutes.
For more recipes check out our farm recipe blog: https://blackdirtrecipes.wordpress.com
YouTube Channel: https://www.youtube.com/channel/UCPYfuRXgE6SgaLMmd_vYx9Q
Follow us on Instagram @yesifarm
Spring Share Week 1
Well it’s official, as of Monday spring has arrived! Throughout the valley the energy thrumming through the air is palpable. Tractors are running everywhere, the farmers have been arriving in droves, the first onions were planted today. Inside the greenhouse the temps were approaching 100. The young seedlings are jumping in size by leaps and bounds. There is still the danger of frost so we have to be mindful of what we plant in the fields. But oh how happy we are and by we I mean our farmers and I, to feel and see the warmth and brightness of the sun! It is so exciting to see the land transformed from greyish empty lots to rich black earth, filling up with row upon row of verdant vegetables — from transplants to seed placed directly into the ground. Once these plantings are established the real work will begin – weeding, tilling and then harvesting. I can just see the rich bounty of what is to come and can’t wait to share it with you all!
CARAMELIZED ONIONS
Source: https://www.acouplecooks.com/caramelized-onions/
Ingredients
2 tablespoons butter or olive oil
3 pounds yellow onions (5 medium onions)
1 teaspoon kosher salt
Directions
While you can saute onions in 10 minutes, cook them low and slow over about an hour, and their natural sugars take the onions from raw and pungent to silky smooth and deep brown. The flavor becomes sweetly savory, with an irresistibly luxurious texture, I can eat them just like that!!!
How to make caramelized onions:
Thinly slice the onions. About 1/8-inch thick works well. Place the onion on its flat side then cut slices following the curve of the onion, from the tip to the root. Use an entire 3 pound bag, which makes 2 cups caramelized onions — or less, if desired. Melt butter, then add the onions and saute on medium high heat until they’re soft – about 8*10 minutes. Add salt and cook 40 to 45 minutes on medium low until very dark brown. You’ll see the onions go through stages: first golden brown, then medium brown, then very dark brown. They’re done when the flavor is developed and sweet, and they’re almost falling apart they’re so tender. They can be refrigerated for up to 4 days, make sure to warm them before serving. You can freeze them too. Line a muffin tin with plastic wrap and add small portions of caramelized onions. Or you can freeze them in a large plastic bag (then you’ll have to defrost them all at once). They should last up to 3 months, or even longer. But they’re best after refrigeration!
Ways to use caramelized onions
There are so many ways to use caramelized onions: and you probably already have some ideas picked out! Here are some of the best ways to eat them:
Burgers: Add a gooey mess atop a cheese burger, veggie burger or portobello burger
Soup: Make elegant French onion soup
Dip: Mix with sour cream for Caramelized onion dip
Grilled cheese: Add some to a grilled cheese (or baked grilled cheese) and prepare to be amazed!
Pizza: Throw some on a cheesy pizza
For more recipes check out our farm recipe blog: https://blackdirtrecipes.wordpress.com
YouTube: https://www.youtube.com/channel/UCPYfuRXgE6SgaLMmd_vYx9Q
Follow us on Instagram @yesifarm
Winter Share Week 12
First off, as we come to the end of the winter season — thank you all for your support — we here at the farm are very grateful for you being there and living the farm life with us!!! We are getting anxious to get into the fields and start planting. Benito is calculating how much help he will need for the weeding, planting, and harvesting. My Dad used to say be mindful when planting as it is so easy to plant the seeds but then the real work begins. Boy was he ever right!!! It’s relatively simple to plant, you need to know proper depth to plant in the soil, how far apart to place the seeds. Then thinking down the garden path what will spread their vines and obscure the beds, what needs to be trellised, what are good companion plantings. Eg: we always plant basil in between the tomato plants — enhances the flavor of the tomatoes and basil is protected by the tomato plants until the tomatoes outgrow the basil. Where will the varieties be rotated to ensure best health of plant and soil. Lots to dream and think about!!!!
IRISH HERITAGE CABBAGE
Source: https://www.allrecipes.com/recipe/54728/irish-heritage-cabbage/
This recipe for Irish cabbage with bacon, melted butter, and nutmeg is the most delicious way to cook cabbage. If you can't find Irish bacon, regular works fine but drain well. If you don't like nutmeg, leave it out.
Ingredients
· 1 medium head cabbage, cored and cut into wedges
· 2 slices Irish bacon, diced
· 2 tablespoons melted butter
· 2 teaspoons ground nutmeg
· 2 cups water
· salt and pepper to taste
· ½ cup red wine vinegar
Directions
1. Place cabbage into a large pot. Add water and bring to a boil. Simmer over low heat until tender, about 10 to 15 minutes.
2. Meanwhile, place bacon in a large skillet and cook over medium-high heat, turning occasionally, until evenly browned, about 8 minutes. Drain bacon slices on paper towels, crumble and set aside.
3. Set an oven rack about 6 inches from the heat source and preheat the oven's broiler.
4. Drain cabbage and transfer to a baking dish; drizzle with melted butter and sprinkle with crumbled bacon and nutmeg.
5. Cook under the preheated broiler until the top layer is lightly browned, about 5 minutes. Serve with salt, pepper, and vinegar as desired.
For more recipes check out our farm recipe blog: https://blackdirtrecipes.wordpress.com
YouTube Channel: https://www.youtube.com/channel/UCPYfuRXgE6SgaLMmd_vYx9Q
Follow us on Instagram @yesifarm
Winter Share Week 11
So much happening this week—yesterday, International Women's Day; Sunday, Daylight Savings Time, change our clocks forward; Tuesday is Pie Day; and Thursday is St.Patrick's Day! We’re all chomping at the bit here in the valley — so anxious to get out into the fields and start planting. The winds have been beyond fierce — at times it feels like you’re in the middle of a sci-fi movie the way the soil scours across the valley obscuring the sky and nearby buildings. Even this morning as I’m looking out the window the trees are trembling in the gusts of air. This is when I wish there was more of a snow cover out there to help protect the land from erosion. Many years ago a friend of mine who ran the Sterling Forest Ski Center in Tuxedo, told me of a friend of his who operated a ski center in Connecticut. He spoke about how black the snow would become and it was the black dirt that had been blown out there. I had been told at one time we lose about a quarter inch of soil every year from erosion whether it be from wind or heavy rain. I can’t help but feel that we are losing more than that. It’s so important for us to safeguard the land and minimize the loss of this precious resource in the best way possible.
Vegetable / Recipe
FROZEN SQUASH – Surplus harvest from the fall, peeled, cleaned, cubed and frozen. Makes great soup or stew! Mashed with sweet potatoes makes a great side!
Source: https://www.thekitchn.com/frozen-butternut-squash-261647
3 TIPS FOR THE BEST OVEN-ROASTED FROZEN BUTTERNUT SQUASH
1. Preheat the baking sheet: Letting the baking sheet heat up as the oven heats means that as soon as you add the squash, the ice evaporates and the squash begin to brown and crisp. Making sure the pieces are arranged in a single layer (you’ll want to be sure to break apart any pieces that are frozen together) and roasting them at a high heat ensures the squash crisps instead of steams.
2. Don’t skimp on the oil and salt: A full two tablespoons of olive oil is enough to create a slick coating on each piece of squash without leaving them dripping in pools of it. The oil helps the squash take on color, as well as adds a rich flavor. And speaking of flavor, give the squash a nice generous pinch of salt — it will help draw out its natural sweetness.
3. Roast on the lowest oven rack: To get that gorgeous caramelized sear on the squash, you want to roast it in the hottest part of the oven, which is on the lowest rack. As it roasts, the squash will form a crispy crust, making it easy to slide a spatula underneath and flip it gently halfway through cooking so the other sides of the squash can have a turn.
Ingredients
· 1 (16-ounce) bag frozen butternut squash (about 4 cups, do not thaw)
· 2 tablespoons olive oil
· 1 teaspoon kosher salt
· Freshly ground black pepper
Equipment
· Medium bowl
· Rimmed baking sheet
Instructions
1. Heat the oven and baking sheet to 450°F. Arrange a rack in the lowest oven position and heat the oven to 450°F. Place a rimmed baking sheet in the oven to heat.
2. Season the squash. Place the squash in a medium bowl, breaking up any pieces that are frozen together. Add the olive oil, salt, and several grinds black pepper, and toss until the squash pieces are evenly coated.
3. Transfer the squash to the hot baking sheet. Remove the heated baking sheet from the oven and carefully pour the squash onto it. Arrange the squash in an even layer (this prevents it from steaming).
4. Roast the squash 18 to 20 minutes. Roast until squash is tender and crispy in places, gently stirring halfway through to ensure even cooking, 18 to 20 minutes total.
Storage: Leftovers can be refrigerated in an airtight container for up to 5 days.
For more recipes check out our farm recipe blog: https://blackdirtrecipes.wordpress.com
YouTube Channel: https://www.youtube.com/channel/UCPYfuRXgE6SgaLMmd_vYx9Q
Follow us on Instagram @yesifarm
Winter Share Week 10
Going to be short and sweet today—That storm was quite a whomper, over 6 inches of snow! Shovels were the tools of the day. I meant to take a picture of the greenhouse covered in snow— it looked like a giant igloo. I was worried that the snow load would cause it to collapse. Between cranking up the heat and pulling the snow off the roof we were able to get it cleared safely. We spent so much time clearing snow and ice we didn’t spend as much time harvesting so the shares are a bit lighter this week. We’ll bulk it up the next two weeks for you.
CREATIVE WAYS TO USE PESTO
Source: https://www.cooksmarts.com/articles/creative-ways-to-use-pesto/
1. Stir a Scoop Into Soup
2. Spread on Bread
3. Use as a Veggie Dip
4. Elevate Roasted Veggies
5. Stir Into Mashed Potatoes
6. Make Pesto Butter
7. Stuff Chicken Breast
8. Enjoy with Eggs
9. Pair with Grilled Meats
10. Toss with Pasta
For more recipes check out our farm recipe blog: https://blackdirtrecipes.wordpress.com
YouTube Channel: https://www.youtube.com/channel/UCPYfuRXgE6SgaLMmd_vYx9Q
Follow us on Instagram @yesifarm
Winter Share Week 9
Always learning — when I first started operating greenhouses and hi-tunnels I thought heat was the biggest factor for successful crops. While yes, it does play a critical part, the reality is that the length of daylight is almost more essential than heat. I thought planting seeds in December would give me a jump on the spring time harvest. While it does help me get an early start, it still is slow and steady. What I did find interesting is how once the daylight gets longer it’s like the seedlings are on steroids and the accelerated growth from the extended day light is amazing!!!
Vegetables / Recipes
CABBAGE ROLL CASSEROLE
Source: https://www.spendwithpennies.com/cabbage-roll-casserole/#wprm-recipe-container-122809
Love stuffed homemade cabbage rolls but short on time? We’ve got you covered with this Cabbage Roll Casserole! Layers of tender cabbage, rice, and meat in a zesty tomato sauce. Made with simple ingredients, this cabbage casserole is so easy to toss together and can be made ahead of time (on the weekend!). The family and the cook will love this simple and comforting dish!
Ingredients
1 pound lean ground beef or pork , or 1/2 pound of each
1 large onion diced
3 cloves garlic crushed
28 ounces diced tomatoes 1 can, including juice
1 cup tomato sauce
1 tablespoon tomato paste
1 teaspoon paprika
1 teaspoon thyme
1/2 teaspoon salt & pepper each
2 cups cooked rice (white or brown)
1 large head cabbage 12-14 cups
1 tablespoon olive oil
1/4 teaspoon dill optional
Optional Topping
2 cups Gruyere cheese or monterey jack cheese, shredded
1 egg
1/4 cup milk
Instructions
1. Preheat oven to 375°F.
2. Brown beef or pork, onion, and garlic over medium heat until no pink remains. Drain any fat. Stir in diced tomatoes (including juice), tomato sauce, tomato paste, & seasonings. Simmer uncovered for about 10 minutes until thickened.
3. Remove from heat and add cooked rice.
4. Meanwhile, chop cabbage into 1" squares, rinse and shake dry. Heat oil in a skillet and add ½ of the cabbage and 2 tablespoons of water. Cook just until softened (about 10 minutes). Repeat with remaining cabbage.
5. Place ½ of the cabbage in a 9x13 casserole dish. Top with ½ of the meat sauce. Repeat layers. Cover with foil and bake for 45 minutes.
Topping
1. In a small bowl combine cheese, egg, and milk. Remove foil, top casserole with cheese mixture, and bake uncovered for an additional 20 minutes.
Notes
– Use lean ground beef or pork or a combination of the two.
– This recipe calls for 2 cups cooked rice which is approximately ⅔ cup uncooked long grain white rice. If you have a tiny bit more or less, this recipe will still work well. Cauliflower rice can be used and should be precooked so it doesn't make the casserole watery.
– Cabbage can be steamed, boiled, or fried. We prefer frying for easy prep and flavor. If boiling or steaming, ensure the cabbage is drained well. The cabbage will soften a bit as it bakes but you'll want to ensure it's fairly tender before adding to the casserole.
– The cheese topping is optional (but delicious!). If you skip the cheese topping, bake covered for the last 20 minutes so the top doesn't dry out.
SLOVENIAN CABBAGE STEW
Source: https://www.forbes.com/sites/elizabethkarmel/2023/02/20/this-cozy-cabbage-stew-is-a-culinary-souvenir-from-slovenia/?sh=ee5c2f130389
This is my version of Slovenian Jota (cabbage stew) based on taste memory. When I visited Slovenia this summer, my favorite restaurant in Ljubljana was Jakob Franc. The Jota was so good that I ate it twice during my trip and became friends with the owner of the restaurant. We had several conversations about how he made “the stew that sat all day on the stove…” and because there wasn’t a recipe written down for the Jota, I used my taste memory, my conversations with Jakob and watched a few Slovenian home cooks make their version of cabbage soup on YouTube.
Makes 14 Cups
Ingredients
New Potatoes, about 1/2 pound—you need one cup (steamed and mashed) cooked potatoes
1 large onion, cut in half moon slices,
5 ounces country, ham or bacon, diced
4-6 cloves of garlic
Extra-virgin olive oil
2 bay leaves
1 14.5-ounce can diced tomatoes
1 38.5 ounce jar of sauerkraut, rinsed and drained about 4 cups
8 1/2 cups chicken stock, divided
1 16-ounce can pinto or borlotti beans, drained, and rinsed (about 2 1/2 cups cooked)
1 tablespoon smoked paprika
2 tablespoons Lipton onion soup mix, veggie or bouillon cubes
2 cups filtered water, plus more as needed
1/3 cup dry, Riesling, wine, optional
Kosher Salt and Freshly-ground pepper to taste
Method
1. Place potatoes in a small pot and fill with enough cold water to cover them by a few inches of water. Bring to a boil and check on them occasionally while you make the rest of the soup.
2. Meanwhile, add enough olive oil to coat the bottom of a large pot. I used a pressure cooker and sautéed the onions in the pressure cooker for five minutes.
3. Sauté and stir occasionally adding two good pinches of salt—you want the onions to be translucent but not browned. Add the garlic and sauté for 1-2 minutes, stirring occasionally. Add the country ham and sauté for an additional 1-2 minutes, stirring occasionally. At this point, the ham and onions will be lightly browned.
4. Add 6 1/2 cups of chicken broth, bay leaves, can of diced tomato, and the rinsed and drained sauerkraut. Stir well and set the pressure cooker on high pressure for seven minutes with a natural release.
5. While the cabbage stew is cooking, check the potatoes. When a knife easily goes through the potatoes, turn off the heat and let them sit until, they are cool enough to touch. Drain the potatoes and remove the skin.
Tip: An easy way to remove the skin is to take small pieces—about ¼ sheet—of a paper towel and rub the potato while it’s still warm, the skin will come off very easily.
6. Mash them with a fork and set aside. Note: Don’t be tempted to add any olive oil or butter. You are not making mashed potatoes, you’re going to use these cooked potatoes to add body to the soup.
7. When the pressure has released, open the top of the pressure cooker and add the remaining two cups of chicken stock, smoked paprika, 2 tablespoons of French onion soup mix, or other veggie/bouillon cubes, and the beans. At this point, you can determine whether or not you think the broth should be thinner. I ended up adding 3 cups of filtered water and 1/3 cup of dry Riesling wine because I had it.
8. Change the setting on your pressure cooker to slow cooker and add the “mashed potatoes” Stir well.
9. Let the stew simmer for at least an hour or longer, adding water if necessary as the broth evaporates. When you are happy with the consistency—all the potatoes should dissolve into the broth so that you can’t really see them. Stir well, and taste the stew to determine whether or not you want to add any more water or wine, salt, and pepper.
10. Serve with crusty bread as a meal in a bowl garnished with pink peppercorns if desired and enjoy!
For more recipes check out our farm recipe blog: https://blackdirtrecipes.wordpress.com
YouTube Channel: https://www.youtube.com/channel/UCPYfuRXgE6SgaLMmd_vYx9Q
Follow us on Instagram @yesifarm
Winter Share Week 8
Here we go again ... the temps rising to near 60 if not higher and then Friday night forecasted to drop to the 20s and mid-40s Saturday. While this can make us as humans uncomfortable, the effect on our crops can be far more devastating. During those sub-zero temps a couple weeks ago, my greenhouse furnace even with auxiliary heat couldn’t keep the temps up there and we lost some seedlings. The current cycling of temps can be detrimental to the orchards. If the nighttime temps get too warm, combined with warm daytime temps and followed by more days of seasonable cold temps, the trees could be triggered to set buds and cause a loss of fruit during harvest season. So far the orchards are okay and our fingers are crossed that the orchards will be safe throughout this critical time during the growing season.
SWEET POTATOES WITH YOGURT & CILANTRO-CHILE SAUCE
Recipe from Diana Henry, Adapted by Melissa Clark
https://cooking.nytimes.com/recipes/1018313-sweet-potatoes-with-yogurt-and-cilantro-chile-sauce
Yield: 4 to 6 side dish servings
Ingredients
1/4 cup plus 1/3 cup extra-virgin olive oil, plus more for serving
1/2 tablespoon honey
Juice of 2 limes
Kosher salt, to taste
Black pepper, to taste
2.1/4 pounds sweet potatoes, scrubbed and cut into 1-inch wedges
1/2 bunch cilantro, leaves only (1/2 ounce)
2 green chiles, seeded and chopped
2 garlic cloves, grated on a Microplane or minced
2 tablespoons sliced blanched almonds
1 tablespoon white wine vinegar
1 cup Greek yogurt
Instructions
– Heat the oven to 350 degrees.
– In a large bowl, combine 1/4 cup oil, the honey, juice from 1 lime, a large pinch of salt and pepper to taste, and toss with potato wedges. Spread in an even layer on a rimmed baking sheet, bake until tender and lightly browned in spots, 45 to 55 minutes. Sprinkle with additional salt to taste.
– Meanwhile, in a food processor, pulse to combine 1/3 cup oil, the cilantro, chiles, garlic, almonds, juice from remaining lime, vinegar and a large pinch of salt, until it forms a chunky purée. Taste and add more salt if needed. Spoon the sauce over the potatoes, dollop with some yogurt, drizzle with oil, and serve with any remaining yogurt on the side.
CILANTRO GINGER CARROTS
Peppery-sweet ginger and cooling cilantro have starring roles in this colorful side of crisp-tender carrots. The veggie goes from pan to plate in a twinkling.
—Taste of Home Test Kitchen: https://www.tasteofhome.com/recipes/cilantro-ginger-carrots
Ingredients
1 tablespoon butter
1 pound fresh carrots, sliced diagonally
1-1/2 teaspoons minced fresh gingerroot
2 tablespoons chopped fresh cilantro
1/2 teaspoon salt
1/4 teaspoon pepper
Instructions
– In a large cast-iron or other heavy skillet, heat butter over medium-high heat.
– Add carrots; cook and stir until crisp-tender, 4-6 minutes.
– Add ginger; cook 1 minute longer.
– Stir in cilantro, salt and pepper.
For more recipes check out our farm recipe blog: https://blackdirtrecipes.wordpress.com
YouTube Channel: https://www.youtube.com/channel/UCPYfuRXgE6SgaLMmd_vYx9Q
Follow us on Instagram @yesifarm
Winter Share Week 7
Seeds — I am never sure how much to order, every company has their own method of measure — by the count, gram, ounce, packet. I remember one year I ordered 25 pounds of beet seed — they came in a bag that looked like 50 pounds of potatoes would be packed in and lasted us over 2 years!! Then there was the carrot seed; I ordered something like a million seeds and they filled a #10 envelope which for us was nothing!!! Didn’t even fill a row in the field! I’m learning how to judge the amounts and luckily seed companies are more sophisticated now too, and most will send a list of what and how much you ordered last year. So as long as you keep track you can do a pretty good job of ordering for the current year!!!
ROASTED POTATOES AND CARROTS
Source: https://www.wellplated.com/roasted-potatoes-and-carrots/#search
Perfect Roasted Potatoes and Carrots with rosemary, spices, and honey. Tender, caramelized and absolutely delicious, this easy side pairs with any recipe!
Ingredients
1 pound potatoes, or thereabouts (approx. 4 medium potatoes)
1 pound carrots (4-5 medium carrots)
1 small onion
2 tablespoon olive oil
0.85 cups hot vegetable or chicken stock
For the Honey Yogurt Sauce:
1 cup nonfat plain Greek yogurt
1 1/2 tablespoons honey
Instructions
– Place a rack in the lower third of your oven, then preheat the oven to 400 degrees F. Line a large, rimmed baking sheet with foil and coat the foil with nonstick spray.
– Place the carrots and potatoes in the center of the baking sheet. Drizzle with the olive oil and honey, then sprinkle with cumin, smoked paprika, salt, and cayenne. Toss to coat, then spread into a single layer.
– Bake in the oven’s lower third until vegetables are browned in spots and tender when pierced with a small, sharp knife, about 25 to 30 minutes, tossing halfway through. Sprinkle with rosemary and toss to coat.
– While the vegetables bake, prepare the honey yogurt sauce: In a small bowl, stir together the Greek yogurt and honey. Transfer the vegetables to a serving plate. Serve warm with big dollops of yogurt on top and extra yogurt on the side.
WINTER STEW OF BRAISED TURNIPS WITH CARROTS, POTATOES AND PARSLEY SAUCE
Source: Vegetable Literacy; Deborah Madison
Ingredients
1 tablespoon butter
1 tablespoon sunflower seed oil
1 onion, cut into 1-inch dice
Generous 1-pound turnip, thickly peeled and quartered
8 ounces yellow-fleshed potatoes, scrubbed and cut into neat wedges
2 carrots, scrubbed, cut into 1 1/2-inch lengths, and wider ends quartered lengthwise
Pinch of dried thyme, or 1 thyme sprig
2 bay leaves
sea salt
1 cup water or vegetable or chicken stock
2 to 3 teaspoons mustard
freshly ground pepper
Parsley Sauce, or chopped parsley
Instructions
– Heat the butter and oil in a wide sauté pan with a lid over medium heat. Add the onion, turnips, potatoes, carrots, thyme and bay leaves, turn to coat, and season with 1 teaspoon salt. Cook over medium heat for 10 minutes, turning occasionally. Add the water, cover, turn the heat to medium-low, and cook for 20 minutes. Check to see how tender the vegetables are and how much liquid is left. When the vegetables are nearly tender, stir in the mustard and then continue cooking without the lid to reduce the cooking liquid.
– Remove and discard bay leaf and thyme if used. Finish with a spoonful of parsley sauce or sprinkle of fresh parsley. Taste for salt and season with pepper. Finish each serving with a spoonful of minced parsley.
Parsley Sauce
Awesome over cooked beets, carrots, pretty much any winter vegetable. Best texture is achieved if parsley chopped by hand. Food processor shreds it into an ugly mess.
Ingredients
1 clove garlic
Sea Salt
¼ teaspoon black peppercorn
¼ teaspoon fennel seeds
¾ cup finely chopped parsley
¾ cup olive oil
1 large shallot or 4 green onions thinly sliced
Grated zest of 1 lemon
Fresh lemon juice or champagne vinegar
Instructions
Pound the garlic in a mortar with ¼ teaspoon salt, peppercorns, fennel seeds and 2 tablespoons parsley to make a smooth paste. If mixture seems to dry to handle add a little olive oil. Stir in rest of parsley, shallot, lemon zest and oil to make a thick green sauce. Taste for salt and vinegar. Best when used right away, keep refrigerated for up to 2 days.
For more recipes check out our farm recipe blog: https://blackdirtrecipes.wordpress.com
YouTube Channel: https://www.youtube.com/channel/UCPYfuRXgE6SgaLMmd_vYx9Q
Follow us on Instagram @yesifarm
Winter Share Week 6
Brrrr ... doesn’t even begin to describe the impending winter cold about to bear down on us. The low temps are bad enough but the forecasted wind chill is what has us most fearful. We are keeping the heaters in the greenhouse running non-stop trying to keep the root crops in storage safe and the precious germinating seeds protected as well. Thankfully this cold snap is only supposed to last 2 days and then rising temps will once again keep us warm.
Vegetables/Recipes
BROCCOLI RAAB
Source: https://www.thekitchn.com/broccoli-rabe-23105240
A step-by-step recipe for easy sautéed broccoli rabe, which involves quickly blanching to reduce bitterness.
Ingredients
1 large bunch broccoli rabe (about 12 ounces)
3 cloves garlic
1 medium lemon
2 tablespoons olive oil
1/4 teaspoon red pepper flakes (optional)
1/2 teaspoon kosher salt
Instructions
– Prepare the blanching water and ingredients. Bring a large pot of heavily salted water to a boil over high heat. Meanwhile, trim the ends from 1 large bunch broccoli rabe, then cut crosswise into 2-inch pieces. Thinly slice 3 garlic cloves. Cut 1 medium lemon into wedges. Line a baking sheet with a double layer of paper towels or a clean kitchen towel.
– Blanch the broccoli rabe. Add the broccoli rabe to the boiling water and blanch until bright green and crisp-tender, about 1 minute.
– Dry the broccoli rabe. Transfer the broccoli rabe with tongs or a spider to the prepared baking sheet and arrange into an even layer.
– Sauté the aromatics. Heat 2 tablespoons olive oil in a large frying pan over medium heat until shimmering. Add the garlic and 1/4 teaspoon red pepper flakes if using, and cook, stirring frequently, until the garlic is very fragrant and light golden brown, about 1 minute.
– Sauté the broccoli rabe. Add the broccoli rabe, season with 1/2 teaspoon kosher salt, and sauté until heated through, 2 to 3 minutes. Serve with the lemon wedges for squeezing.
Storage: Leftovers can be refrigerated in an airtight container up to 4 days.
14 Broccoli Rabe Recipes We're Not Bitter About and are a perfect menu for a cold winters' day: https://www.bonappetit.com/recipes/slideshow/broccoli-rabe-recipes
For more recipes check out our farm recipe blog: https://blackdirtrecipes.wordpress.com
YouTube Channel: https://www.youtube.com/channel/UCPYfuRXgE6SgaLMmd_vYx9Q
Follow us on Instagram @yesifarm
Winter Share Week 5
Keeping watch — that’s what we seem to do now. Keeping watch on the sky, air and soil temperature, precipitation, and wildlife. Condition of soil, seeds I've planted in the greenhouse, and seeds being delivered. Spring is oh so close now. This morning out back across the valley, a huge flock of birds was floating up and down like the crest of a wave. Nearer the house the smaller song birds were out and about. Now the wind is so fierce, blowing containers all over, drying out the soil from all the rain and snow of the last couple of days. I’ve been perusing old cooking and gardening books. Some of mine are so old the seed companies they reference no longer exist and some of the varieties are no longer available either. So I continue to watch for heirloom varieties and the older companies who may have merged into other companies or passed on their collections to other sources and sometimes I get lucky on my watch and find a long lost friend or discover new ones in my quest for deliciousness to grow and cook.
SALT 'N PEPPER SWEET POTATO FRIES
Ingredients
3 large sweet potatoes, sliced into fries
1 ½ tbsp. extra-virgin olive oil
¾ tbsp. cornstarch
¼ tsp garlic powder
Kosher salt
Freshly ground black pepper
Directions
1. Preheat oven to 425°. Place sweet potatoes in a large bowl and cover with cold water. Let soak at least 30 minutes, then drain and dry well with paper towels.
2. On two large baking sheets, toss sweet potatoes with oil, cornstarch, and garlic powder and season generously with salt and pepper. Bake until crispy, 40 to 45 minutes, tossing halfway through.
Source: https://www.delish.com/cooking/recipe-ideas/recipes/a45026/salt-n-pepper-sweet-potato-fries-recipe/
BROWN BUTTER SWEET POTATO MASH
Directions
Pierce 4 sweet potatoes with a fork. Microwave until softened, 12 minutes. Melt 3 tablespoons butter in a saucepan over medium heat and cook until brown flecks appear. Add 3/4 cup milk, 1/2 teaspoon kosher salt and 1/4 teaspoon vanilla; heat until warm but not boiling. Peel the potatoes and puree in a food processor with the warm milk, adding up to 1/4 cup more milk if needed. Top with lemon zest.
Source: https://www.foodnetwork.com/recipes/food-network-kitchen/brown-butter-sweet-potato-mash-3364805
For more recipes check out our farm recipe blog: https://blackdirtrecipes.wordpress.com
YouTube Channel: https://www.youtube.com/channel/UCPYfuRXgE6SgaLMmd_vYx9Q
Follow us on Instagram @yesifarm
Winter Share Week 4
No matter how often or however many years go by, I am always in awe of nature and how the seeds we plant germinate and sprout. From tiny little sprouts to massive plants like tomatoes 6 feet tall or more. And how fast they grow! We planted pea shoots, sunflower seeds and a microgreen salad mix yesterday. According to the research I’ve done they should be ready for harvest in 8-10 days. That was another lesson learned — years ago when I first grew microgreens and when I read they would be ready in such a short window, what I didn’t realize was that the 8-10 days was from when the seeds germinated and began to show their first true leaves. The countdown didn’t begin from planting — the time from planting to germination could be 3-4 days while some plants can take 14 plus days to germinate and then another 2 weeks or so until they might be ready to harvest as microgreens. So it takes quite a bit of calculating to not only achieve a harvest but plant a steady succession so that you always have microgreens ready to harvest.
ROASTED PARSNIPS AND CARROTS
Ingredients
1 pounds parsnips, peeled
1/2 pound carrots, unpeeled
1 1/2 tablespoons good olive oil
1/2 tablespoon kosher salt
1 1/2 teaspoons freshly ground black pepper
2 tablespoons minced fresh dill or parsley
Directions
1. Preheat the oven to 425 degrees F.
2. If the parsnips and carrots are very thick, cut them in half lengthwise. Slice each diagonally in 1-inch-thick slices. The vegetables will shrink while cooking, so don't make the pieces too small. Place the cut vegetables on a sheet pan. Add the olive oil, salt, and pepper and toss well. Roast for 20 to 40 minutes, depending on the size of the vegetables, tossing occasionally, until the parsnips and carrots are just tender. Sprinkle with dill and serve hot.
Source: 2008, Barefoot Contessa Back to Basics https://barefootcontessa.com/cookbooks/barefoot-contessa-back-to-basics
CREAMED SPINACH AND PARSNIPS
Ingredients
4 tablespoons unsalted butter
2 tablespoons vegetable oil
2 pounds small parsnips, cut into 3/4-inch pieces
2 large shallots, thinly sliced
1 cup turkey stock or canned low-sodium broth
1 teaspoon chopped thyme
Salt and freshly ground pepper
1 1/4 pounds baby spinach (20 cups)
2 tablespoons all-purpose flour
2 cups half-and-half or whole milk
1/2 teaspoon freshly grated nutmeg
Directions
1. In a large, deep skillet, melt 2 tablespoons of the butter in the oil. Add the parsnips and cook over moderately high heat, stirring occasionally, until lightly browned, about 6 minutes. Add the shallots and cook, stirring, until softened, about 2 minutes. Add the stock and thyme and bring to a boil. Season with salt and pepper, cover and simmer over low heat until the parsnips are tender, about 8 minutes.
2. Meanwhile, fill a large, deep pot with 2 inches of water and bring to a boil. Add the spinach in large handfuls and blanch, stirring, just until wilted, about 10 seconds. Drain and cool under running water. Squeeze the spinach dry and coarsely chop it. Stir the spinach into the parsnips.
3. In a medium saucepan, melt the remaining 2 tablespoons of butter and cook over moderately high heat until lightly browned, about 4 minutes. Whisk in the flour and cook, whisking, for 1 minute. Whisk in the half-and-half and nutmeg, season with salt and pepper and bring the sauce to a boil, whisking until thickened, about 2 minutes. Stir the sauce into the spinach and parsnips and bring to a simmer. Transfer to a bowl and serve.
Make Ahead
The creamed vegetables can be refrigerated for up to 3 days and rewarmed over low heat. Stir in a little stock if the cream sauce is too thick.
Source: https://www.foodandwine.com/recipes/creamed-spinach-and-parsnips
For more recipes check out our farm recipe blog: https://blackdirtrecipes.wordpress.com
YouTube Channel: https://www.youtube.com/channel/UCPYfuRXgE6SgaLMmd_vYx9Q
Follow us on Instagram @yesifarm
Winter Share Week 3
Farming is supported by technology at so many levels. Especially on farms using those massive tractors and implements, computers are integrated in every level of functionality.Until recently the software was considered proprietary and farmers were denied access to it. For generations of farmers, repairs that were considered simple and fixable, were no longer doable. Farmers were forced to wait for mechanics, parts and more, sometimes for months, halting the entire operation. Finally after winning a lawsuit, farmers have once again been awarded the right to access the technology and parts and they are once again able to fix their own equipment. For a small farmer like me I am still using equipment my parents and grandparents used. Some of my tractors date back to the 1940s! Simple to fix, but getting parts can be a challenge. You learn how to comb “boneyards” for miscellaneous parts to keep things up and running — but they get the job done and are pretty efficient.
FRENCH BRAISED CARROTS & TURNIPS
Source: https://www.reneesgarden.com/products/recipes-from-a-kitchen-garden
Ingredients
1 pound carrots, peeled and sliced 1/2 inch thick
1 pound turnips, peeled, halved and sliced slightly thicker than the carrots
2 cups chicken stock or Vegetable Stock
2 teaspoon sugar
2 tablespoons butter
Salt and pepper to taste
Garnish chives
Directions
Place carrots and turnips in a large, heavy saucepan with the stock, sugar, butter, salt and pepper. Cook partially covered, over medium heat until tender, about 20 minutes. Check the seasoning, sprinkle with chives and serve in a warm dish.
CREAMY TURNIP SOUP
Source: https://www.eatingwell.com/recipe/252800/creamy-turnip-soup/
In this healthy turnip soup recipe, the humble turnip is transformed into a velvety soup made creamy with just 1 tablespoon of butter. Serve it as a starter or side soup. The mini salad on top is optional, but we love the bit of texture from the greens and pop of flavor from the vinaigrette.
Ingredients
4 medium turnips (about 1 1/2 pounds) plus 1 1/2 cups thinly sliced turnip greens or spinach, divided
2 tablespoons extra-virgin olive oil
divided1 tablespoon butter1 medium onion
sliced½ teaspoon dried rosemary
1/2 teaspoon salt plus a pinch, divided
1/4 teaspoon freshly ground white pepper plus a pinch, divided
4 cups reduced-sodium chicken broth or vegetable broth
1/4 cup shredded carrot
2 tablespoons thinly sliced scallion greens
2 teaspoons white-wine vinegar
Directions
Step 1 Peel and slice turnips. Heat 1 tablespoon oil and butter in a large saucepan over medium heat. Add onion and cook, stirring, until beginning to brown, about 5 minutes. Add the turnips, rosemary, 1/2 teaspoon salt and 1/4 teaspoon white pepper; stir to combine. Cover and cook, stirring once or twice, for 10 minutes.
Step 2 Add broth, increase heat to high and bring to a boil. Reduce heat to maintain a simmer, cover and cook until the turnips are tender, 10 to 12 minutes more.
Step 3 Meanwhile, toss the turnip greens (or spinach) in a medium bowl with carrot, scallion greens, vinegar, the remaining 1 tablespoon oil and pinch of salt and pepper.
Step 4 Puree the soup in the pan using an immersion blender or transfer to a regular blender and blend until smooth. (Use caution when pureeing hot liquids.) Serve each portion of soup topped with a generous 1/4 cup of the salad.
For more recipes check out our farm recipe blog: https://blackdirtrecipes.wordpress.com
YouTube Channel: https://www.youtube.com/channel/UCPYfuRXgE6SgaLMmd_vYx9Q
Follow us on Instagram @yesifarm
Winter Share Week 2
Farming — I always say you have to be fierce to be a farmer. At times it feels like you are playing by the rules of which there can be no rhyme or reason. You put a plan into place and when it's time to execute the plan Mother Nature goes "Uh ... uh ... uh ... not today!" For example I had planned on Brussels sprouts for the share this week. When Lupe began packing the shares she called me over to look at the Brussels sprouts; she spotted some teeny tiny holes in the sprouts and she didn't want to give them as she felt they were not of the quality that should come from our Farm. So you have cabbage instead today! You have to be nimble and be able to switch from Plan A to Plan B at times with minutes to spare. The flip side is that so often by having to change so rapidly, I have discovered new ways of using produce, new vegetables in the fields and new ideas for the future to protect and safeguard the harvest!
Recipe — My family originally being from Poland this is a real comfort food dish for us.
HALUSKI
Source: https://4sonrus.com/haluski-recipe-polish-fried-cabbage-noodles/
Ingredients
8 oz wide egg noodles uncooked
8 tbsp butter
1 small white onion roughly chopped
1/2 large head of cabbage
salt & pepper to taste
crisp, crumbled bacon optional
Directions
– Fill a large pot half way full with water. Lightly salt it, and over high heat bring the water to a boil.
– Once boiling, pour in the egg noodles, stir, and cook according to the package directions. Transfer the noodles to a colander when done, and drain away all excess water.
– While the noodles are cooking, get started on the cabbage by adding 6 tablespoons of butter to a large Dutch oven set over medium heat.
– Once the butter's melted, stir in the cabbage and onion. Cook the mixture, stirring occasionally, for 15-20 minutes or until the cabbage has browned/caramelized and is tender. Salt, to taste.
– Melt the last two tablespoons of butter in the pot, and add the cooked pasta to the pot, stirring everything to coat. Cook just long enough for the noodles to heat through.
– If using, stir in the bacon and season the haluski with freshly grated black pepper, to taste.
Serve immediately, and enjoy!
For more recipes check out our farm recipe blog: https://blackdirtrecipes.wordpress.com
YouTube Channel: https://www.youtube.com/channel/UCPYfuRXgE6SgaLMmd_vYx9Q
Follow us on Instagram @yesifarm
Fall Share Week 13
Here we are at the end of the fall season and the cold is deeply settling in. Fresh snow is a perfect decoration for the winter holiday! Taking a couple weeks to downplay and rest before we go crazy again. Wanted to wish you all happy, safe, and healthy holidays!!
BUTTERED CABBAGE, Serves 4
Source: https://food52.com/recipes/11214-buttered-cabbage
By checker
Every time I make something like this I wonder how many people all over the world are fixing the same thing: a vegetable cooked with butter, salt and pepper. It is so simple, and so good. In fact, we love this so much that I have decided to grow cabbage in my tiny community garden plot, in spite of the size and my fear of slugs…
Ingredients
1 medium head white cabbage
4-6 tablespoons unsalted butter
salt & pepper
Instructions
– Core the cabbage and slice it into thin strips.
– Over medium heat, melt the butter in a large skillet and add the strips of cabbage.
– Stir to coat with the butter then add a good amount of salt and pepper – about a teaspoon or so of each – to suit your taste.
– Continue cooking and stirring occasionally until the cabbage is “al dente” or until it is green and tender without being mushy.
Note: I once added a little celery salt to this, and it was a nice addition. However, I still think it is best when it is prepared in this simple manner.
BRUSSELS SPROUTS: 31 Brussels Sprouts Recipes for People Who Love Little Cabbages
Okay, they’re not actually baby cabbages. But they are adorable and delicious.
BY THE EDITORS OF EPICURIOUS
SOURCE: https://www.epicurious.com/ingredients/best-brussels-sprouts-recipes
Here's just one of 31 recipes:
ROASTED BRUSSELS SPROUTS WITH GARLIC AND PANCETTA
BY TRACEY SEAMAN
Active Time 10 min, Total Time 35 min
For maximum caramelization, make sure the cut side of the Brussels sprouts are flush with the bottom of the baking dish. As the whole thing bakes, the salty pancetta fat will melt over the sprouts imparting luscious porky flavor as the pancetta itself turns crisp.
Ingredients
4 servings
1 lb Brussels sprouts, trimmed and halved (quartered if large)
2 oz pancetta, visible fat discarded and pancetta minced
1 garlic clove, minced
½ tablespoon extra-virgin olive oil
¼ cup water
Directions
Step 1: Preheat oven to 450°F.
Step 2: Toss together Brussels sprouts, pancetta, garlic, oil, and salt and pepper to taste in an 11- by 7-inch baking pan and spread in 1 layer.
Step 3: Roast in upper third of oven, stirring once halfway through roasting, until sprouts are brown on edges and tender, about 25 minutes total. Stir in water, scraping up brown bits. Serve warm.
For more recipes check out our farm recipe blog: https://blackdirtrecipes.wordpress.com
YouTube Channel: https://www.youtube.com/channel/UCPYfuRXgE6SgaLMmd_vYx9Q
Follow us on Instagram @yesifarm
Fall Share Week 12
Brrrrrr ... it is so cold out!!!! Feels like true winter! The heaters seem to be running nonstop; the greenhouse is being kept around 70 degrees. Doesn't sound very warm but it's just enough to keep vegetables from freezing!
ROASTED ROOT VEGETABLES
Source: https://www.loveandlemons.com/roasted-root-vegetables/
This roasted root vegetables recipe is so delicious that you'll want seconds! Fresh herbs and a fragrant sage oil pack the veggies with rich, earthy flavor.
Prep Time: 15 mins; Cook Time: 45 mins; Total Time: 1 hr
Serves 4 to 6
These oven roasted root vegetables are a delicious side dish! I top the tender, caramelized veggies with a fragrant sage oil and crispy sage leaves for rich, earthy depth of flavor. We love to serve this recipe as a holiday side dish, but it would be a great addition to any fall or winter meal. Vegan and gluten-free.
Ingredients
2 beets, preferably 1 red and 1 golden, peeled and chopped into 1-inch chunks
1 large carrot, roll cut into 1-inch chunks
3 parsnips, chopped into 1-inch chunks
1 medium sweet potato, chopped into 1-inch chunks
1 turnip, chopped into 1-inch chunks
Extra-virgin olive oil, for drizzling
1 tablespoon chopped fresh rosemary
1 tablespoon chopped fresh sage leaves
1 tablespoon fresh thyme leaves
Sea salt and freshly ground black pepper
Crispy Sage and Sage Oil
2 tablespoons extra-virgin olive oil
10 fresh sage leaves
Instructions
Preheat the oven to 425°F and line two baking sheets with parchment paper.
Place the beets and carrots on one baking sheet and the parsnips, sweet potato, and turnip on the other. Drizzle the vegetables with olive oil and sprinkle with the rosemary, sage, thyme, pinches of salt, and several grinds of pepper. Toss to coat and spread evenly on the baking sheets. Roast for 25 to 50 minutes, or until tender and browned around the edges. The parsnips, sweet potato, and turnip will bake for less time. The beet and carrot will roast longer.
Make the crispy sage: Line a plate with paper towels. Heat the olive oil in a small saucepan until bubbling, add the sage leaves, stir, and cook until crisp, about 1 minute. Remove the leaves from the oil and transfer to the prepared plate to drain. Reserve the oil for serving with the vegetables.
Remove the vegetables from the oven and toss with 1 tablespoon of the sage oil. Transfer to a platter and top with the crispy sage leaves.
For more recipes check out our farm recipe blog: https://blackdirtrecipes.wordpress.com
YouTube Channel: https://www.youtube.com/channel/UCPYfuRXgE6SgaLMmd_vYx9Q
Follow us on Instagram @yesifarm
Fall Share Week 11
It would seem we're on a roller coaster ride regarding temperatures. Freezing cold then almost spring-like. Certainly putting the farm through its paces! On a positive note with the exception of a few windy cold days the weather has been very pleasant. I know I've written about this already but am getting busy with the task of seed planning. Looking at flavors, colors, harvest times, dreaming of the harvest yet to be. This is probably one part of the farm I enjoy the most.
SPICY VEGAN BUTTERNUT SQUASH FLATBREAD WITH ZA'ATAR & MISO GARLIC SAUCE
SOURCE: https://thefirstmess.com/2022/09/21/spicy-vegan-butternut-squash-flatbread/#recipe
PREP TIME: 30 MINS
COOK TIME: 35 MINS
TOTAL TIME: 1 HR 5 MINS
SERVINGS: 2–4
This is an exceptionally flavorful vegan butternut squash flatbread. The dough is brushed with chili crunch before being topped with za'atar-roasted cubes of squash and garlic slices, shallots, a creamy and tangy miso garlic sauce, and a super fresh arugula fennel salad.
TIP: One of my best bits of advice for making pizza/flatbreads at home is to invest in a pizza stone and peel. Nothing beats that high heat from all sides of the oven in addition to the stone crisping up your crust. It’s a game changer! I build my pizza on a circle of parchment paper with a little tab on the side. I find this so much easier to transfer to the hot stone.
Some More Tips for Making this Flatbread:
If you really like spice (like me!), you can go for 2 tablespoons of chili crunch instead of mixing it 50/50 with olive oil. I mostly buy pizza dough from a local grocery store, but I do have a spelt pizza dough recipe here. The miso garlic sauce is super savoury and tangy, and would work great on grain bowls, salads, as a little drizzle on roasted sweet potatoes etc. If you do weekly meal prep, you could pre-roast the squash and garlic, store it in the fridge and just have it ready for pizza time! Doing this would cut the prep time down considerably.
Ingredients
ZA’ATAR BUTTERNUT SQUASH
3-4 cups small-diced butternut squash about 1 small butternut or honey nut squash
1 ½ tablespoons olive oil
1 ½ tablespoons za’atar plus extra
2 cloves garlic peeled and sliced
sea salt and ground black pepper to taste
MISO GARLIC SAUCE (MAKES EXTRA)
2 tablespoons white wine vinegar
5 tablespoons avocado or other neutral-flavoured oil
2 tablespoons water
1 tablespoon light miso
3 cloves garlic peeled
1 teaspoon Dijon mustard
1 teaspoon maple syrup
FLATBREAD ASSEMBLY
1 lb 454 grams pizza dough
1 tablespoon chili crunch or other chili-infused oil option
1 tablespoon olive oil
1 small shallot peeled and sliced
1 small fennel bulb shaved thin
2 handfuls baby arugula
1 ½ tablespoons olive oil
1 tablespoon fresh lemon juice
Instructions
Lay a pizza stone on the bottom rack of a cold oven, ensuring that there’s enough clearance above to transfer the pizza, but also an accessible rack at the very top to roast the squash. Preheat the oven to 400°F.
Transfer the butternut squash to a baking sheet and toss with 1 ½ tablespoons of olive oil, the za’atar, garlic slices, salt, and pepper. Toss to coat and transfer to the oven. Roast until the squash cubes are tender and browning on the edges, about 25-30 minutes. Let it cool slightly.
While squash is roasting, make the miso garlic sauce. In an upright blender, combine the vinegar, olive oil, garlic, miso, Dijon mustard, maple syrup, water, and pepper. Blend on high until smooth and creamy. Set aside.
Once squash is done, raise the heat of the oven to 500°F.
Dust your working surface and a pizza peel with flour OR line the peel with a piece of parchment paper. Start stretching out the dough until you have a 12-inch circle of even thickness. Carefully transfer the dough circle to the floured/papered peel. If you use the paper method, trim the paper so that you have a ½ inch border around the circle of dough.
Jiggle the pizza peel to ensure that the flatbread will come loose. If it’s sticking, carefully lift up the edges and toss in a bit more flour until it seems to loosen from the peel.
In a little bowl, mix together the chili crunch and olive oil, then spread it over the surface of the stretched out dough. Then, top the flatbread with the roasted butternut squash and garlic mixture, as well as the thinly sliced shallots. I like to press the toppings into the surface of the dough a bit, kind of like how I would if I was making focaccia. Season the top with more za’atar if you like.
Open the oven and with equal measures of care and efficiency, slide the flatbread off of the peel and onto the hot stone with a few flicks of your wrist (or just pull a tab of the parchment paper if you went with that option). Close the oven immediately.
While flatbread is baking, toss the fennel and arugula together with the lemon juice, 1½ tablespoons olive oil, and some salt and pepper.
Let the flatbread cook for 7 minutes. Open the oven and, using the peel, rotate the pizza. Cook for an additional 3-5 minutes, or until the top crust is browning in spots and the shallots have shrunk up a bit.
Remove the flatbread from the oven and cut into slices. Drizzle with some of the miso garlic sauce, top with the fennel arugula salad, and serve!
For more recipes check out our farm recipe blog: https://blackdirtrecipes.wordpress.com
YouTube Channel: https://www.youtube.com/channel/UCPYfuRXgE6SgaLMmd_vYx9Q
Follow us on Instagram @yesifarm
Fall Share Week 10
We'll hear from our farmer Cheryl Rogowski next week!
Meanwhile, here is a snack recipe I make often ... (Ed.)
30-MINUTE CHEESY KALE CHIPS (Vegan)
Ingredients
10 ounces chopped kale leaves (washed, thoroughly dried // stems removed)
2 Tbsp grape seed, olive or avocado oil
1/4 cup raw cashews
2 Tbsp raw or roasted (unsalted) sunflower seeds
5-6 Tbsp nutritional yeast (divided)
1/4 tsp each salt + black pepper
1 tsp garlic powder
1 healthy pinch cayenne pepper (optional)
Instructions
– Preheat oven to 300 degrees F (148 C).
– Add kale to a large mixing bowl and drizzle with oil. Use hands to massage the kale to soften its texture and disperse the oil. Set aside.
– Add cashews, sunflower seeds, 4 Tbsp nutritional yeast (12 g // amount as original recipe is written // adjust if altering batch size), salt, pepper, garlic pepper, and cayenne pepper (optional) to a food processor or blender and blend/pulse into a fine meal, scraping down sides as needed.
– Add spice mixture to the kale and toss with hands to distribute, working it into the grooves so it’s thoroughly coated.
– Divide kale between 2 large baking sheets (or more if increasing batch size) and spread into an even layer, making sure the pieces aren’t overlapping to ensure crispiness. You may need to bake them in two batches depending on size of baking sheets.
– Sprinkle the kale with remaining 1-2 Tbsp (3-6 g // amount as original recipe is written // adjust if altering batch size) nutritional yeast for extra flavor and bake for 15 minutes. Then remove from oven and toss/flip kale to ensure even baking.
– Bake for 5-10 minutes more, or until chips are crispy and golden brown. Watch carefully to ensure they don’t burn. Let cool slightly before enjoying.
– Once completely cooled, store leftovers in a large plastic bag or container for 2-3 days. The crispy texture begins fading past 24 hours, so enjoy as close to baking as possible!
Notes: *Method slightly adapted from Oh She Glows! *Recipe as written yields ~5 cups.
Source: https://minimalistbaker.com/30-minute-cheesy-kale-chips/
Here's a quick tutorial & simple recipe for that Honeynut Squash:
ROASTED HONEYNUT SQUASH
Honeynut squash looks just like mini butternut squash, but on the inside you'll find an even sweeter, deeper orange flesh. This winter squash has only been available at farmers' markets and in select grocery stores for a few years. If you see it, grab a few to try! This simple roasting method enhances the natural flavor of the squash with butter and spices.
Ingredients
2 medium honeynut squash, halved lengthwise and seeded
4 teaspoons butter
¼ teaspoon salt
¼ teaspoon ground pepper
¼ teaspoon ground cinnamon
4 teaspoons pure maple syrup (Optional)
Directions
Step 1 Preheat oven to 425 degrees F.
Step 2 Arrange squash halves cut-side up on a baking sheet. Place 1 teaspoon butter in each cavity. Sprinkle with salt, pepper and cinnamon. Roast until tender, 25 to 30 minutes. Drizzle with maple syrup, if desired.
Source: https://www.eatingwell.com/recipe/268480/roasted-honeynut-squash/#recipe-body
For more recipes check out our farm recipe blog: https://blackdirtrecipes.wordpress.com
YouTube Channel: https://www.youtube.com/channel/UCPYfuRXgE6SgaLMmd_vYx9Q
Follow us on Instagram @yesifarm
Fall Share Week 9
Thanksgiving for me is one of the best and most important holidays. It means so much — and truly represents how I personally feel. As tough as a year like this one was — $7 a gallon for fuel in the spring, supply chain issues throughout the year right up until now, and drought in the summer — I am so grateful for all the support you provide us. Our farmers are grateful too, without you our farm wouldn't be what it is. You keep us going through the tough times in part for the hope you give us and the faith in knowing we will continue because you are there for us!!! I know next week when my family sits down to dinner you will be with us as we say THANK YOU and wish you a bountiful and blessed season now and always!!!!
Vegetables / Recipes
ROASTED WINTER SQUASH — Roasting is an indirect cooking method involving dry heat in an oven or over an open flame. The low and slow cooking of meats, vegetables, and fruit creates caramelization on the surface of the food to equal an added boost in flavor.
Prep: 15 mins, Bake: 1 hr, Stand: 10 mins, Total: 1 hr 25 mins
Yield: Makes 6 to 8 servings
Ingredients
1 (2- to 3-lb.) butternut squash *
1 (2- to 3-lb.) spaghetti squash *
1 (1- to 2-lb.) acorn squash *
1/4 cup butter
2 tablespoons honey
1 teaspoon salt
1/4 teaspoon pepper
* you don't have to combine squashes - you can use all one variety or mixture of any winter squashes.
Directions
Step 1
Preheat oven to 400°. Cut butternut squash, spaghetti squash, and acorn squash in half lengthwise, and remove seeds. Place squash, cut sides up, on an aluminum foil-lined baking sheet. Microwave butter and honey at HIGH 1 minute or until melted; stir until blended. Brush cut sides of squash with butter mixture. Sprinkle with salt and pepper. Bake, uncovered, 1 hour or until tender; let stand 10 minutes. Cut into large pieces and serve.
Or
Step 2
Roasted Acorn Squash: Omit butternut and spaghetti squash. Cut acorn squash in half; remove and discard seeds. Cut squash into 1/2-inch slices. Proceed with recipe as directed, decreasing bake time to 45 minutes or until tender. Garnish with sage sprigs, if desired. Makes 4 servings. Prep: 10 min., Bake: 45 min.
© Copyright 2022 MyRecipes. All rights reserved. Printed from https://www.myrecipes.com 11/17/2022
For more recipes check out our farm recipe blog: https://blackdirtrecipes.wordpress.com
YouTube Channel: https://www.youtube.com/channel/UCPYfuRXgE6SgaLMmd_vYx9Q
Follow us on Instagram @yesifarm
Fall Share Week 8
Part of keeping things healthy on the farm for the best soil and plants is rotating the crops from where they are planted each year. In theory this is a very basic concept, every year check to see what was planted where in every field for the past 3 years. The best rotation is 5 to 8 years but not easily doable. A lot of factors come into play — you need to know what was planted where and it's not as simple as tomato was here, peppers there, and eggplant over there. These are all members of the same genetic gene pool and enjoy similar traits which lends them susceptible to the same types of diseases and insects. We try our best to move everything around each year to avoid creating situations where something carries over from last year into this year's crops. Fun thing is we get to create a new picture on the farm every year!!
Vegetables / Recipes
* For conversion metric to U.S. measures: https://www.thespruceeats.com/metric-conversions-for-cooking-2355731
CHEESE POTATO ONION PIE
Ingredients
For the pastry
250g plain flour, plus extra for dusting
50g rye flour (or make up the weight with plain flour)
large pinch of cayenne pepper
1 tsp onion seeds or nigella
25g parmesan or vegetarian alternative, finely grated
125g cold butter, cubed
1 egg, beaten
For the filling
40g butter
3 large onions, finely sliced
2 bay leaves
1tbsp thyme leaves
1 medium potato (about 350g), halved lengthways and sliced
100ml double cream
150g extra mature cheddar, ½ grated, ½ chopped into small chunks
Method
STEP 1
First, make the pastry. Tip the flours into a medium bowl with the cayenne, onion seeds, parmesan and a generous pinch of salt. Rub in the butter until the mixture resembles breadcrumbs, then pour in half the egg and 2 tbsp cold water and bring everything together using your hands. Knead a couple of times until smooth. Flatten a third of the dough into a disc, then do the same with the remaining dough. Wrap both pastry discs and chill in the fridge for at least 30 mins. Will keep chilled for up to two days.
STEP 2
Meanwhile, make the filling. Heat the butter in a saucepan over a medium heat until sizzling, then scatter in the onions, bay, thyme, a large pinch of salt and good grinding of black pepper. Stir, then cook slowly for 10 mins until the onions have cooked down and started to caramelise. Stir in the sliced potatoes, cover and cook for 8-10 mins more, stirring occasionally until the potatoes are soft and starting to break down. Stir in the cream, remove the pan from the heat and leave to cool. Once cool, remove and discard the bay, then fold in the cheese.
STEP 3
Roll the smaller pastry disc out on a lightly floured surface to the size of a dinner plate and lift onto a baking sheet lined with baking parchment. Roll out the remaining pastry disc along with any offcuts to a circle about 5cm wider than the first. Spoon the filling into the middle of the smaller circle on the baking sheet, leaving a 4cm border. Brush the exposed border with some of the remaining beaten egg, then drape over the larger pastry circle. Tuck the edge around the filling to enclose it, as if making a giant ravioli. Trim the edge to neaten, then crimp with a cutlery knife handle or fork to seal. Brush the pie all over with most of the remaining beaten egg, and use any trimmings to make decorations, if you like.
STEP 4
Heat the oven to 210C/190C fan/gas 7. Bake the pie for 35-40 mins until deeply golden, brushing with the rest of the beaten egg halfway through. Leave to cool on the baking sheet for at least 20 mins before cutting into wedges, or leave to cool completely and serve cold.
Source: https://www.bbcgoodfood.com/recipes/cheese-onion-potato-pie?utm_source=Adestra&utm_medium=Email&utm_content=&utm_campaign=20221029_gf_satnl_act_2187301_BBC%20Good%20Food_Newsletters_23455522
For more recipes check out our farm recipe blog: https://blackdirtrecipes.wordpress.com
YouTube Channel: https://www.youtube.com/channel/UCPYfuRXgE6SgaLMmd_vYx9Q
Follow us on Instagram @yesifarm
Fall Share Week 7
The workload is really slowing down now, trust me there is still plenty to do but the pace is less frantic than it has been. Now is when we take time to look at the equipment and see what needs to be fixed so we’re ready to hit the ground running in Spring. Hard to believe but in just two months we’ll begin planting seeds in the greenhouse for early transplants. Seed catalogs have been trickling in with all sorts of new varieties and crazy names like sunrise bumble bee, Brad’s atomic grape, evil olive tomato and so many more.
Vegetables / Recipes
Baby lettuces today — I like these the simplest way possible — a light sprinkle of salt and pepper, drizzle of olive oil and cider or balsamic vinegar. If you want you can dress it up with a myriad of other vegetables, cheeses, whatever “feels” good for the moment.
{Ed. note: And more on using all your salad greens — https://www.thekitchn.com/how-to-use-salad-greens-23004401}
For more recipes check out our farm recipe blog: https://blackdirtrecipes.wordpress.com
YouTube Channel: https://www.youtube.com/channel/UCPYfuRXgE6SgaLMmd_vYx9Q
Follow us on Instagram @yesifarm
Fall Share Week 6
Barely finished the fall work and already starting on spring work. Tearing down equipment that needs repair, reconstructing tables so they're ready for all those amazing seeds we'll be planting in January and February. Tilling the soil so it will rest for a bit before we begin planting anew. Cleaning the dry beans, deciding which vegetables will provide us with seeds and cleaning and drying those. Checking our seed trays to see which ones need tossing, which ones can be sanitized and reused. The list goes on and on ...
Vegetables / Recipes
– You're getting some fun vegetables today - Brussels sprouts!!! I was kind of wishy-washy about them as a kid probably because like so many, Mom boiled them to a mushy state, blech!!!! I love to roast them at high heat with a splash of olive oil, sprinkle of salt, till they get crispy brown edges. Oooh yes! When I make a batch I have to hide them from my sister or she'll devour the whole pan.
– There's carrots today too. These also can be roasted at high heat. The sprouts and carrots cook differently so be prepared for different cooking times. Toss them together with the sprouts for an amazing side dish!
For more recipes check out our farm recipe blog: https://blackdirtrecipes.wordpress.com
YouTube Channel: https://www.youtube.com/channel/UCPYfuRXgE6SgaLMmd_vYx9Q
Follow us on Instagram @yesifarm
Fall Share Week 5
Nature has surely made her presence known. Every morning for the last few days a hard, hard freeze has settled over the valley looking like a blanket of white as if a layer of snow covered the valley floor. Our farmers have to wait for at least an hour for the vegetables to defrost before they can begin harvesting. The good thing about all this freezing is that it brings out the natural sugars in the vegetables as that is the vegetables’ “antifreeze,” so all those field grown greens are going to taste a whole lot sweeter, it also means that now we’ll start harvesting different vegetables like Brussels sprouts, carrots and beets. You can expect to see these other vegetables in your share starting next week!
Tasting Sample — none this week — I will make a double next week – we were scrambling to get anything sensitive in or under cover so there wasn’t a lot of time for kitchen work this week.
Vegetables / Recipes — VEGETARIAN POTATO-KALE SOUP
This potato-kale soup has a rich, yet light and velvety texture. Opt for baby, two-bite potatoes as they cook faster in the creamy, brothy soup. Serve with crusty bread and a glass of wine for a cozy meal.
Servings:4
Ingredients
1 tablespoon extra-virgin olive oil
1 small onion, halved and thinly sliced
3 cloves garlic, finely chopped
4 cups low-sodium vegetable broth
2 cups water
1 pound baby potatoes, halved lengthwise
2 medium parsnips, peeled and sliced 1/4-inch thick
1 teaspoon chopped fresh rosemary, plus more for garnish
¼ teaspoon salt
1 small bunch lacinato kale, stemmed and chopped
½ cup grated Parmesan cheese, plus more for garnish
¼ cup heavy cream
1 tablespoon lemon juice
Directions
– Heat oil in a Dutch oven or large heavy pot over medium-high heat. Add onion; cook, stirring occasionally, under tender, about 5 minutes. Add garlic; cook, stirring constantly, until fragrant, about 30 seconds. Stir in broth, water, potatoes, parsnips, rosemary and salt; bring to a boil. Reduce heat to medium-low; cover and cook, stirring occasionally, until the vegetables are tender, about 15 minutes. Using the back of a spoon, gently mash the vegetables to slightly thicken the soup.
– Stir in kale, Parmesan and cream; cook over medium-low heat, stirring occasionally, until the kale is wilted, about 10 minutes more. Stir in lemon juice just before serving. Garnish with additional rosemary and Parmesan, if desired.
Source: https://www.eatingwell.com/recipe/7921952/vegetarian-potato-kale-soup/
MASHED POTATOES WITH BOK CHOY & CRISPY ONIONS
In the interest of saving time, here's a fun and easy mashup: the spuds that folks crave at Thanksgiving, greens they might not typically enjoy on this holiday and the crispy bits that grace the top of a green bean casserole. Note: The recipe doubles easily.
Ingredients
· 2 pounds baby potatoes, scrubbed well
· Kosher salt
· 1 cup buttermilk, or more as needed (may substitute vegetable broth)
· Freshly ground black pepper
· 1 tablespoon grapeseed or canola oil
· 6 to 8 baby bok choy (bottoms trimmed), cleaned well and then cut crosswise into 1-inch pieces
· Crushed red pepper flakes (optional)
· Toasted sesame oil, for serving
· 1 cup crispy/fried onions or shallots, for garnish
Directions
– Place the potatoes in a pot and cover with water by about 2 inches. Bring to a boil over high heat and toss in a four-fingered pinch of salt, then reduce the heat to medium and cook for about 25 minutes, until the potatoes are fork-tender. Drain, return to the pot; immediately pour in the buttermilk, then use a potato masher to mash to your desired consistency (some chunks are nice). Add more buttermilk, as needed. Season lightly with salt and pepper; cover to keep warm.
– Meanwhile, heat the grapeseed or canola oil in a large skillet over medium-high heat. Once the oil shimmers, toss in the chopped bok choy (to taste) and a pinch of crushed red pepper, flakes, if desired. Stir-fry for 1 to 2 minutes, until warmed through and slightly wilted.
– Transfer the warm mashed potatoes to a warmed serving bowl. Top with the bok choy, then drizzle a little toasted sesame oil over them. Scatter the crispy onions or shallots on top; serve right away.
Source: https://www.washingtonpost.com/recipes/mashed-potatoes-bok-choy-and-crispy-onions/16168/
For more recipes check out our farm recipe blog: https://blackdirtrecipes.wordpress.com
YouTube Channel: https://www.youtube.com/channel/UCPYfuRXgE6SgaLMmd_vYx9Q
Follow us on Instagram @yesifarm
Fall Share Week 4
Well it finally happened, Saturday morning the vehicles were coated in not just frost but a thin layer of ice. And so with that marks the official end of summer for this season. It was a bittersweet one this year — so, so dry but we're certainly making up for it with all the rain this fall. Even though the rain has been fairly steady we're still able to enter the fields and get some weeding and last-minute planting done. For me and the Farm this weather now means it's time to make sauerkraut and play with other fermentation. Mom wasn't a big practitioner of fermenting, my dad was the bigger fan. I have to confess as a kid I was not a fan of the soured cabbage which is such a part of my heritage, but having matured in age my palate has grown with me and now I find sauerkraut to be one of my favorite foods to eat and make!
Vegetables / Recipes
ROASTED WINTER SQUASH WITH CILANTRO CHIMICHURRI
Source: https://www.simplyrecipes.com/recipes/roasted_winter_squash_with_cilantro_chimichurri/
PREP TIME: 10 mins, COOK TIME: 30 mins, TOTAL TIME: 40 mins
SERVINGS: 6 to 8 servings
– I typically use acorn or delicata squash for this recipe since they don’t have to be peeled and are easily prepped, though feel free to use any other hearty winter squash like butternut, pumpkin, or kuri. The chimichurri sauce is also great on roasted potatoes, carrots, and sweet potatoes.
– Urfa biber is a dark maroon chili flake common in Turkish cuisine. A super adulty spice. The chilies are sun-cured during the day and sweated at night before being ground with a touch of salt. The result is a smoky-salty-sweet-savory chili flake whose complex flavor is reminiscent of chocolate, raisins, and inky red wine. The heat is mild, but builds the more you eat, yet never overwhelms. It’s one of those rare ingredients that really can go on nearly everything. I actually keep it in a small container on the kitchen table for this reason and recommend you do so as well.
– You can find urfa biber pretty easily online at stores like Spice Jungle or Olive Nation. However, if you don’t have urfa biber chili flakes, then feel free to use regular chili flakes. I have done this plenty of times and the recipe is equally awesome.
Ingredients
For the squash:
3 pounds acorn or delicata squash
1 tablespoon olive oil
1/4 teaspoon salt
Ground black pepper
For the cilantro chimichurri:
1/2 cup olive oil
1/2 cup cilantro, finely chopped
1/2 cup parsley, finely chopped
1 tablespoon oregano leaves, finely chopped
1 1/2 teaspoons urfa biber, or regular chili flakes
1/4 teaspoon salt
4 cloves garlic, minced
1/4 cup red wine vinegar
Method
Preheat the oven: Preheat the oven to 375°F. Line a baking sheet with aluminum foil, a silicon baking mat, or parchment paper.
Prepare the squash: Cut the squash in half lengthwise. Scoop out and discard the strings and seeds (save and roast the seeds, if you like). Cut the squash into 1-inch slices.
Toss the squash with a 1 tablespoon of olive oil, 1/4 teaspoon or so of salt, and ground black pepper. Place on the prepared baking sheet.
Roast the squash for 30 minutes: or until easily pierced with a fork.
While the squash is cooking, prepare the chimichurri: In a medium bowl, stir together the olive oil, cilantro, parsley, oregano leaves, chili flakes, garlic, red wine vinegar and 1/4 teaspoon salt. Taste and add more salt if needed.
Serve: Transfer the roasted squash to a serving platter or individual plates, top with a generous amount of chimichurri, and enjoy.
For more recipes check out our farm recipe blog: https://blackdirtrecipes.wordpress.com
YouTube Channel: https://www.youtube.com/channel/UCPYfuRXgE6SgaLMmd_vYx9Q
Follow us on Instagram @yesifarm
Fall Share Week 3
Temperatures are dropping, trees are changing color, tender plants like basil, said "I quit!" a few weeks ago, saw my first full blown squad of Canadian geese in formation last week, hundreds of black walnuts cover the ground. These are all signs of fall. Forecast calling for freezing conditions Saturday night, that will wipe out the pepper and eggplant plants, will probably singe the chard. Kale will be sweeter. Time for soups and stews. Bracing ourselves for what winter might bring. High gas prices, heavy or light snow aka poor man's fertilizer. The snow helps to lock nitrogen into the soil which is a key nutrient for vegetables. And believe it or not, already planning for next year. Dreaming of new varieties to try, old favorites to keep growing — so we haven't even finished this season, and I'm already excited about the next one!
Vegetables / Recipes — Shishito Peppers
Finally these babies were ready to be harvested. If you’ve never had them you’re in for a treat! Simply roasted in a pan with a light sprinkle of salt and drizzle of oil shishito peppers are a real taste treat — 1 in ten is supposed to be the “hot” one but you won’t know until you taste it.
How To Cook Shishito Peppers
When we say “blistered shishito peppers” we do mean blistered! Cooked quickly at high heat, these peppers are as fast as they are delicious. Here’s how to make them:
– Heat oil over a high heat until it smokes.
– Carefully put the peppers in the pan, careful not to overcrowd them. You may want to work in batches, depending on the size of your pan.
– Turn the peppers after a few minutes, and finish cooking them. It should take just about four or five minutes total to cook the peppers. They’ll look blistered and wilted when they’re done.
– Salt them generously and finish them with a bit of lemon zest.
– Gobble! As soon as you can eat them without burning your mouth, eat them up!
Source: https://themodernproper.com/shishito-peppers
RADISH POTATO SALAD
Ingredients
5 medium red potatoes (about 1-1/2 pounds)
1 cup sliced radishes
2 hard-boiled large eggs, chopped
3/4 cup mayonnaise
3 tablespoons minced fresh dill or 2 teaspoons dill weed
2 tablespoons cider vinegar
1 tablespoon sugar
1/4 teaspoon salt
Dash pepper
Directions
– Place potatoes in a saucepan and cover with water. Bring to a boil. Reduce heat; cover and cook for 15-20 minutes or until tender. Drain and cool.
– Peel and cube potatoes; place in a large bowl. Add radishes and eggs. In a small bowl, combine the mayonnaise, dill, vinegar, sugar, salt and pepper. Pour over potato mixture; gently toss to coat. Cover and refrigerate for at least 1 hour
Source: https://www.tasteofhome.com/recipes/radish-potato-salad/
For more recipes check out our farm recipe blog: https://blackdirtrecipes.wordpress.com
YouTube Channel: https://www.youtube.com/channel/UCPYfuRXgE6SgaLMmd_vYx9Q
Follow us on Instagram @yesifarm
Fall Share Week 2
Scramble, scramble, scramble — that seems to be the sop on the farm. Right now we’re scrambling to get everything harvested before the frost comes. Picking every last pepper and eggplant, bringing in all the winter squashes, plant whatever we can that will stand up to frost and ultimately freezing conditions. In another week or so we’ll be harvesting the white shell beans, we seem to have harvested all the black beans and will be getting some of those to you soon! All the while keeping an eye on the weather, feeling for those folks down south it’s a horrible situation and having lived through Hurricane Irene and for you all in the city Hurricane Sandy, we all have an idea of what is happening down there.
Vegetables / Recipes
Bok Choy — it’s not just for stir fries! Too often when one sees bok choy they automatically think stir fry. That’s not the only way to enjoy it, being a member of the cabbage family it’s also good in salads and believe it or not as sauerkraut!
BOK CHOY SLAW WITH RADISHES
Ingredients
Dressing:
4 Tablespoons oil (I like to use sunflower seed oil)
3 Tablespoons cider vinegar
2 Tablespoons soy sauce
2 Tablespoons maple syrup
1 Tablespoon sesame oil
1 Teaspoon freshly grated ginger
Salad:
Small bunch Bok choy, bunch of radishes, carrot, scallion
Sesame Seeds
Directions:
In a medium salad bowl, combine a finely-shredded head of bok choy (or a few baby bok choy) with a grated carrot, several thinly-sliced radishes, and a thinly-sliced scallion. Sprinkle with toasted sesame seeds. Toss with a generous amount of the dressing, then taste and adjust the flavors with more dressing or more onion. Refrigerate the salad for at least an hour before serving to allow the flavors to meld. Stir well, garnish with more sesame seeds, and serve with a slotted spoon (the vegetables will release some additional liquid as they sit).
Source: https://emmycooks.com/2012/09/09/bok-choy-slaw-with-radishes/
CHICKEN WITH CHARRED BOK CHOY, RADISHES & PEANUT SAUCE
You can leave out the chicken and just serve the veggies as a side or over some rice as a main dish.
Ingredients
Peanut Sauce:
1 scallion, minced, white and light green parts only
1 clove of garlic, minced
2 teaspoons freshly grated ginger
1/4 teaspoon crushed red pepper flakes
1/2 cup creamy peanut butter (can sub with almond butter)
1/4 cup low sodium soy sauce
3 1/2 Tablespoons rice vinegar
2 Tablespoons pure maple syrup
2-3 Tablespoons water
Salad:
6-8 bone-in skin-on chicken thighs
1 bunch of radishes, trimmed and sliced in half
4 baby bok choy, trimmed, rinsed well and sliced in half lengthwise
Cooked rice or quinoa for serving (optional)
Preparation
1. Prepare the sauce by whisking together all the ingredients until smooth–this works best with an immersion blender or small food processor. Start with only 2 Tablespoons of water and if the sauce is a bit thick add a touch more water to thin as necessary. Taste test and set aside.
2. Arrange all vegetables on a rimmed baking sheet. Brush the veggies with a few Tablespoons of the sauce.
3. Arrange the chicken on a separate baking sheet lined with foil. Brush both sides of the chicken with a few Tablespoons of the sauce.
4. Generously oil the grates of an outdoor grill. Preheat the barbecue to medium high. Place the veggies in a single layer on the grates and cook until tender and lightly charred on all sides, about 5-6 minutes total. Remove from the grill and return cooked veggies to the baking sheet.
5. Place the chicken in a single layer on the grill and cook until no longer pink on the inside, about 5-6 minutes per side. Place the cooked chicken on a cutting board or clean plate.
6. Divide the chicken and veggies between plates and serve with additional sauce and cooked rice.
Notes: https://dishingupthedirt.com/recipes/charred-bok-choy-radishes-peanut-sauce/
Here’s a link for recipes that are not stir fries: https://www.ruralsprout.com/bok-choy-recipes/
For more recipes check out our farm recipe blog: https://blackdirtrecipes.wordpress.com
YouTube Channel: https://www.youtube.com/channel/UCPYfuRXgE6SgaLMmd_vYx9Q
Follow us on Instagram @yesifarm
Fall Share Week 1
Welcome to fall!!! While it won't officially be fall until about 9 PM tonight, the day does have that fall feel about it! The leaves are changing color, the rain has been steadily pouring since around 8 o'clock this morning and I've been busy checking out recipes. Even though I love all the seasons for what each brings, I am the most obsessed about fall. Partly for all the reasons listed above plus the colors of the vegetables, the flavors — and oh so many ways to cook them — and with the cooler weather you feel like, and want to cook. Over the summer a friend of mine said her husband was looking for my lasagna, and as much as I enjoy cooking, it was just way too hot to even think about turning that oven on! With the cooler temps he might get lucky — for I do see lasagna and meatballs on the horizon!!
Vegetables — Winter Squashes
Squashes — oh so many colors, flavors, and uses — it's so hard to choose just one. I asked our farmers to pick out an assortment for you. There's Acorn and Carnival — Acorn is dark green and has the shape of an acorn squash, Carnival is similar in shape but looks a crazy mishmash of colors. I like both of these sliced in half, scoop out the seeds (save them for roasting), put the cut side down on a sheet pan and roast at high heat till tender — if you can easily poke them with a fork they're done. For me, high heat is around 400 F. I start checking them after 20 minutes or so. Everyone's oven is different so you'll have to do some trial and error to see what works best for you. After they're roasted you can scoop out the flesh, mash it and serve any number of ways — brown sugar, maple syrup, honey, some butter. One of my favorite ways is after I hollow out the seeds I'll stuff the cavity with chili or a bread or rice stuffing. Put that in the oven to roast and when it's done grab a spoonful of the chili with some of the squash — oh so good, spicy and softly sweet all at once. If I'm stuffing the squash I use no sweetener and let the squash speak for itself.
I know they picked out some Butternut and Honeyut as well. The Honeynut is a miniature Butternut but much more flavorful and personal-sized. Then there's Robin's Koganut, a varietal from Dan Barber's seed company row 7. It's a cross between Kabocha and Butternut, look for that gorgeous buckskin color, the flavor pulls the best from its parents and is a very versatile squash.
Again roasting these is pretty reliable. If I'm going savory I might use a drizzle of olive oil, some salt and pepper. You can also peel them, then cube them into whatever size works best.
A melange of squash, tomatoes, eggplant, and onions would so hit the spot today — kind of a fall ratatouille.
For more recipes check out our farm recipe blog: https://blackdirtrecipes.wordpress.com
YouTube Channel: https://www.youtube.com/channel/UCPYfuRXgE6SgaLMmd_vYx9Q
Follow us on Instagram @yesifarm
Summer Share Week 13
First off – thank you so much for your support — this growing season was a seriously challenging one — too much rain in early spring and drought conditions throughout the summer. Knowing you were traveling this journey with us gave us fortitude, gratitude and the courage to persevere!!! How different the farm looks after getting all that rain and the fields have had time to soak it all in. The cooler temperatures are helping too! Benito is in quite the frenzy, “Charo que vamos hacer?” What are we going to do? There’s so many squashes and pumpkins we have no place to put them all!!! So greenhouse tables become converted to squash tables, every spare spot is put to use so we can store and cure the squashes for the fall and into the winter. That is one skill set you absolutely need as a farmer — adaptability and probably one of the next is resilience. You just never know what the universe is going to throw your way, but somehow you come up with plan B, C and even D if necessary. I was talking with some new farmers the other day and they were commenting about how hard farming is and how they made so many mistakes just because they didn’t know what to do. Even though I grew up farming I make mistakes too. It's all part of the learning process!! As perverse as it sounds the learning process is part of what I love about farming, each new discovery is like a miracle, some of those miracles bigger than others and some are little "aha" moments that blow your mind because they were right there in front of you the whole time but you just didn’t see them!
Vegetables / Recipes
ROASTED FENNEL & EGGPLANT
Ingredients
1 medium eggplant, cut lengthwise
1 medium fennel bulb, cut into thin slices
1 medium onion, chopped roughly
1 medium carrot, cut lengthwise
1 can (400 grams) peeled tomatoes
1 ½–2 tablespoons olive oil
Fresh thyme
Salt & pepper
Directions
– In a large saucepan heat the olive oil. Add the onions and cook until golden brown. Add the tomatoes and season with thyme, salt and pepper. Add a little bit of brown sugar if the tomatoes seem too tart. Add the carrots to the tomatoes and onions. Leave to cook on medium heat for 5-10 minutes,as you stir often.
– In the meantime heat a grill saucepan and grill the fennel and eggplant slices.
– Transfer the grilled fennel and eggplant to a baking dish. Pour the tomato mixture over the fennel and eggplant and bake on 350F for about 30 minutes.
– Serve warm.
Source: https://vessysday.com/roasted-fennel-and-eggplant/
For more recipes check out our farm recipe blog: https://blackdirtrecipes.wordpress.comYouTube Channel: https://www.youtube.com/channel/UCPYfuRXgE6SgaLMmd_vYx9Q
Follow us on Instagram @yesifarm
Summer Share Week 12
Wow, that was some weather system that passed through — it started to rain Monday around 1 PM and other than a moment here or there it rained steadily through until around 3 PM yesterday! In spite of that, the fields are still dry but the plants look like they gulped up every drop that fell. With the heat to come and Nature's sprinkler system, all the seeds Benito planted should germinate well and we’ll have more awesome crops to harvest! No corn today, it was just too bleh in the fields for that this week. Between the holiday Monday and the rain, the valley was strangely quiet. There was no hum of tractors and trucks racing up and down the roads, no frantic urgency of harvesting equipment moving down the fields, dust flying through the air. Like a giant beehive the hum of activity and sense of urgency was forced to halt for a bit, and today the valley will once again swarm with the frantic urgency of getting it done before the frost settles on the pumpkin.
Vegetables / Recipes
Black Beans — We call these the beans of love. I started growing dry beans over 30 years ago. I began with at least a dozen or so varieties because I had no idea what I was doing and no one had ever grown them in the black dirt before. We honed in on the black beans because they did well in our soil and climate. What began as cocoa, turtle and a couple other varieties eventually became our own special varietal. I originally started to grow them as a way of keeping our farmers employed in the wet days of autumn. To this day they are harvested and shelled by hand! In 2011 we were devastated by the flood waters of hurricane Irene. I thought we had lost our entire inventory of beans as most of the farm was under water for well over a week. Thankfully one of my chefs at the time had squirreled away 5 pounds of beans for her use in the kitchen. Dona gave me those five pounds of beans which became the seeds for the future from which you are enjoying their harvest, still harvested and shelled by hand. So you see they truly are “beans of love.”
Keep them in a breathable container — paper bags are good. They were harvested less than a month ago so they still have a lot of moisture in them.
HOW TO COOK BLACK BEANS
This foolproof recipe yields perfectly tender and delicious black beans. Make a pot and enjoy black beans all week! No need to soak the beans before using. Recipe yields 6 cups of beans (the equivalent of 4 cans); you can freeze leftovers or cut the recipe in half.
Ingredients
1 pound (16 ounces or scant 2 1/2 cups) dried black beans*
1 medium red onion, chopped
4 medium cloves garlic, peeled but left whole
2 bay leaves
1 tablespoon extra-virgin olive oil
1 teaspoon fine sea salt
1 teaspoon ground cumin
One strip of orange zest, about 2 inches long by 1/2 inch wide
1/2 teaspoon red pepper flakes (omit or reduce if sensitive to spice)
8 cups water**, more if needed
2 tablespoons finely chopped cilantro, optional
1 tablespoon lime juice
Instructions
– First, pick through your black beans for debris (sometimes tiny rocks can sneak in). Place the beans in a fine mesh colander or sieve and rinse very well. Pour the beans into a large Dutch oven or saucepan (4 quarts or larger in capacity).
– Add the onion, garlic, bay leaves, olive oil, salt, cumin, orange zest and red pepper flakes (if using) to the pot. Pour in the water.
– Cover the pot and bring it to a boil over high heat. Remove the lid and reduce the heat to low to maintain a gentle simmer. Give the beans a stir to make sure none are stuck to the bottom of the pot, and set a timer for 1 hour. Leave the pot uncovered and adjust the heat as necessary to maintain a gentle simmer (you should see several small bubbles popping to the surface at any given moment).
– Once the timer goes off, test a couple of beans by using a fork to press them against the side of the pot. If they’re easy to press through, taste a few (carefully! they’re hot!) to see if they’re sufficiently plump, tender and delicious.
– Otherwise, continue cooking, testing in 15 to 30 minute intervals as needed, until they’re done. If you’re running low on liquid, add water in 1-cup increments so the beans are covered at all time. (As mentioned in the post, if your beans are old, they can take several hours to cook and require a lot more water, and some very old beans may never cook through.)
– Once the beans are very tender and tasty, you can increase the heat a little to reduce the cooking liquid into a more gravy-like consistency, about 5 to 15 minutes (it will continue to thicken up as the beans cool).
– Remove the pot from the heat. Carefully remove the orange zest and both bay leaves. Use a fork to press the garlic against the side of the bowl to break it up. Add the cilantro, if using, and lime juice. Stir to combine. Season to taste with additional salt, if needed. Use as desired.
– Allow leftover beans to cool to room temperature before storing in the refrigerator, covered, for up to 4 to 5 days. You can also freeze leftover beans for several months.***
Notes – Recipe created with guidance from Serious Eats.
*Bean note: It’s very important that your beans are fresh. Freshly purchased beans from a store with good turnover can cook in as little as one hour. Older beans can require several hours on the stove (and several more cups of water). Very old beans may never soften all the way through, and will never be suitable for consumption.
**Water note: If you live in an area with hard water, the minerals in the water may impede the cooking process (your beans will take longer to cook). Use distilled or filtered water if possible.
***Freeze it: I like to freeze leftover beans with their cooking juices in wide-mouth, pint-sized mason jars. You could also use small freezer bags—once frozen flat, they can be stacked. Regardless of your container, be sure that your beans have cooled to room temperature before freezing. If you’re using a rigid container (instead of a bag), allow some room at the top for expansion, and wait until the beans are fully frozen before securely attaching an air-tight lid. Defrost the containers in the fridge for several hours before using as desired.
Source: https://cookieandkate.com/best-black-beans-recipe/#tasty-recipes-36694-jump-target
For more recipes check out our farm recipe blog: https://blackdirtrecipes.wordpress.com
YouTube Channel: https://www.youtube.com/channel/UCPYfuRXgE6SgaLMmd_vYx9Q
Follow us on Instagram @yesifarm
Summer Share Week 11
September 1 — how can it be that the whole summer has flown by? In a way I feel like we’re just getting started. I know our farmers are welcoming the return to “normal” weather conditions — cool nights, warm days. The days are already getting shorter — just a couple weeks ago I was able to work at 5:30 AM without a flashlight or headlamp. Now I find myself using lights until 6-ish, same on the other end of the day. It’s insidious how the darkness creeps in, every day, little by little, till we hit December 21 the shortest day of the year. You wouldn’t think that the length of daylight impacts the growing more than the temperature but it does. It’s awe-inspiring how nature has its own sensors when it comes to things like daylight. The plants respond without thought or aid from us, we are the caregivers — weeding, fertilizing, harvesting ...
Vegetables / Recipes — Eggplant
Eggplant isn’t something we grew up with but has become a vegetable I have learned to enjoy. I remember being turned off by eggplant due to being served it in an oily parmigiana-style dish. If there is one thing to remember about eggplant is that it truly acts as a sponge and will soak up whatever flavor and fluid it is immersed in! {Editor's note: Others love eggplant parmigiana — I for one!}
This easy Baba Ganoush recipe is one of my favorite healthy snacks! If I don't eat all of it straight out of the food processor, I love to serve it with pita and veggies.
BABA GANOUSH
Ingredients
· 1 medium eggplant
· 1/8 cup tahini
· 1 1/2 tablespoons fresh lemon juice
· 1 tablespoons extra-virgin olive oil, more for serving
· 1 garlic cloves
· 1/4 teaspoon sea salt
· Finely chopped parsley, for garnish
· Pinch of smoked paprika
· Pinch of red pepper flakes, optional
· Pita and veggies, for serving
Instructions
– Preheat the oven to 400°F and wrap the eggplant in foil. Roast the eggplant for 50 to 60 minutes, or until it is soft and collapses to the touch. Remove from the oven and set aside. Once cool to the touch, peel the skin from the eggplant, removing any big clumps of seeds. Place the flesh in a strainer over a bowl and let stand for 20 minutes to remove excess water.
– Place the eggplant flesh, tahini, lemon juice, olive oil, garlic, and salt in a food processor and pulse until smooth. Transfer to a serving dish, sprinkle with chopped parsley, smoked paprika, and red pepper flakes, if using. Serve with pita and veggies.
Source: https://www.loveandlemons.com/baba-ganoush/
Follow this link for 12 Easy Eggplant Recipes
https://www.loveandlemons.com/easy-eggplant-recipes/
For more recipes check out our farm recipe blog: https://blackdirtrecipes.wordpress.com
YouTube Channel: https://www.youtube.com/channel/UCPYfuRXgE6SgaLMmd_vYx9Q
Follow us on Instagram @yesifarm
Summer Share Week 10
Being a member of a CSA means you get to live the life of the farm with us! Whatever bounties we experience, so do you; but that also means you share in our struggles. This year the struggle has been real, excessive rain in the Spring, drought in the Summer, the growing conditions have been less than stellar. But in spite of all that, we’ve had some pretty amazing produce come out of the fields. The bit of rain we received this week allowed us to get some seed planted in the fields and with September around the corner we should see some relief from the fierce heat which will let those seeds grow. There’s been no kale or spinach lately as that has seen some pretty harsh sunburn. The sweet corn has been loving the dry conditions and I think it’s some of the sweetest we’ve ever grown! Chili peppers are starting to ripen and we’ve picked a few eggplant.
Vegetables/Recipes
FRIED GREEN TOMATOES
Yield: 2 servings
Ingredients
· 2 medium-sized, firm green tomatoes
· Kosher salt
· 3/4 cup all-purpose flour
· 3/4 tablespoon Cajun seasoning (Optional)
· 1/2 cup milk or buttermilk
· 1 large egg
· 1/3 cup fine white cornmeal (yellow is fine too)
· 1/2 cup fine dry bread crumbs
· 1/4 cup peanut, canola, or olive oil for frying
Directions
– Cut unpeeled tomatoes into 1/2 inch slices (horizontally).
– Sprinkle slices with salt. Let tomato slices stand for 5 minutes.
– While the salted green tomato slices are resting, place in three separate, shallow bowls:
1) the flour and Cajun seasoning (if using)
2) buttermilk and egg
3) breadcrumbs and cornmeal.
– Whisk together the egg and buttermilk.
– Heat the oil in a skillet on medium heat. Dip the green tomato slices in the flour-seasoning, then the buttermilk-egg mixture, then the cornmeal-breadcrumb mix.
– In the skillet, fry half of the coated tomato slices at a time, for 3 to 5 minutes on each side or until brown.
– Set the cooked tomatoes on paper towels to drain.
These fried green tomatoes are fantastic with a little hot sauce or remoulade.
Source: https://www.simplyrecipes.com/recipes/fried_green_tomatoes
For more recipes check out our farm recipe blog: https://blackdirtrecipes.wordpress.com
YouTube Channel: https://www.youtube.com/channel/UCPYfuRXgE6SgaLMmd_vYx9Q
Follow us on Instagram @yesifarm
Summer Share Week 9
What a tease Mother Nature is! The tiniest sprinkle of rain and we were all dancing for joy. At least she turned down the thermometer a bit, the nights have been cool, so cool we found ourselves wearing sweatshirts in the early morning hours. The plants are showing the stress from the heat and lack of rain. Some of the cool-weather loving leafy greens are becoming tinged with crispy edges — kind of like having a bad hair day if you will. Started to harvest the dry beans this week — the black ones are so shiny, they look like onyx! Even started to pick some winter squashes and while they might be ready I know I’m not willing to give in to autumn's siren call just yet. Soon though it will be cool enough to make sauerkraut, the old time theory is you need to process it during certain phases of the moon. Though it may sound like hooey I have often found following these old timey practices has really helped, whether it’s because it helps keep me on a schedule or incorporating the ever-present forces of nature and letting them help guide me.
Vegetables/Recipes — Swiss Chard
Cousin to beets, this is a pretty versatile green. Some folks find the leaves to have a mineral taste. A quick blanch will take care of that!
The other day I took a bunch of Swiss chard and the red amaranth. Stripped the amaranth off the stems, gave the leaves a quick blanch. I lopped the stems off the chard and gave those leaves a quick blanch as well. I am going to pickle the chard stems, not sure what to do about the amaranth stems. I might try and pickle those too but not feeling over confident with that idea. Next I took the blanched leaves and rung out as much water as I could, gave the leaves a rough chop and set them aside. I put some oil in a saute pan (one that I could put in the oven) with some garlic*. Preheat your oven to 350. Add the blanched leaves to the garlic oil, let them cook for a bit, seasoned them with salt, pepper, and a pinch of red pepper flakes. Next I made a couple wells in the sautéed greens and cracked an egg into each well. Pop the pan into the pre-heated oven, let it bake for maybe 15 minutes??? I like a soft egg with a runny yolk so for me less baking time is better. When done to my preference I pulled it out of the oven and enjoyed a really nice meal. Sometimes I’ll sprinkle a little parm on top. If this recipe seems familiar it’s based on the idea of a shakshuka recipe, not any one in particular just how I "feel" the vegetables talking to me! .
*Roasted Garlic Oil on hand: I always have a small pot full of oil and garlic at the ready. It’s a blend of olive and sunflower oils. I’ll put a couple handfuls of garlic cloves in a small stock pot, cover with the oils and let come to a slow simmer. Keep an eye on it, if the pot is too full it will splosh over the rim and make a nasty, not to mention dangerous mess. After I don’t know 10 minutes or so I give it a quick stir so the garlic on the bottom comes up to the top. It will scorch if you leave it sit. Let it simmer for 20 minutes or so and next thing you know you’ve got a lovely batch of “roasted” garlic and garlic infused oil to cook with. Once it’s cool put in a container and store in the fridge. Dip into it whenever you want some extra flavor or need a quick roasted garlic for a recipe.
For more recipes check out our farm recipe blog: https://blackdirtrecipes.wordpress.com
YouTube Channel: https://www.youtube.com/channel/UCPYfuRXgE6SgaLMmd_vYx9Q
Follow us on Instagram @yesifarm
Summer Share Week 8
It feels like it’s been a slow painful crawl in some ways. We finally harvested some peppers, hot and sweet, and a few eggplants. I know you all have been anxious for tomatoes, we are too. The weather has just been against us. When the farmers were harvesting your produce yesterday they found so many peppers with sunscald. Sunscald is when the pepper is exposed from beneath its canopy of leaves and basically becomes sunburnt. I might be able to salvage some for the kitchen and either pickle them or make some corn relish. All depends on how much of the pepper is “burnt.” Sometimes the effort to salvage the fruit isn’t worth the work it takes for the yield you get. In the meanwhile I hope you’re enjoying the corn. I think this harvest is the sweetest yet! Today there’s cauliflower – not the traditional white but shades of yellow, purple and palest of green. Enjoy those leaves too! They are also edible. I’ve been working towards zero waste on the farm, and am learning how to use every bit of the plant. Pickling Swiss chard stems this week and trying out a Swiss chard pesto recipe from the leaves. Nothing really ever goes to waste as whatever doesn’t get consumed by us ends up as compost in the fields.
Vegetables / Recipes — Cauliflower
It seems like this is the new darling of the vegetable world. Enjoy it raw, steamed or one of my favorites — roasted with olive oil, salt and pepper. I feel like I have to hide it from my sister when I roast it as she’ll eat the whole sheet pan by herself! When roasted you sprinkle some grated parmesan cheese on it, sprinkle some paprika on it, toss a few cloves of garlic in the pan with it. There are so many options. My sister and I will enjoy it plain right off the pan, if any manages to be left behind I’ll toss it into a salad for us.
The leaves can be sautéed in olive oil, garlic, seasoned with some salt and pepper for a nice side green. For some the leaves are firmer than they would like, so a quick blanch will help to soften them up.
CORN CHOWDER
Ingredients
· 1 tablespoon butter
· 2 scallions, white bulbs and green tops chopped and reserved separately
· 1/2 red bell pepper, chopped
· 1 rib celery, chopped
· 1/2 pound potatoes ( don’t have to peel them depends on if you want a ”pure” look)
· 2 cups fresh corn kernels (cut from about 8 ears)
· 1 small bay leaf
· 2 cups low-sodium chicken broth or homemade stock
· 1 teaspoon salt
· 1 cup milk
· 1/8 teaspoon fresh-ground black pepper
· Sour cream, for serving (optional)
Directions
Step 1: In a large saucepan, melt butter over moderately low heat. Add scallion bulbs, bell pepper, and celery and cook, stirring occasionally, until vegetables start to soften, about 10 minutes.
Step 2: Stir in potatoes, 1 cup corn, bay leaf, broth, and salt. Bring to a boil. Reduce heat and simmer, stirring occasionally, for 15 minutes.
Step 3: In a blender or food processor, puree remaining 1 cups corn with milk.
Step 4: Stir puree into soup along with black pepper. Simmer until soup thickens slightly, 5 to 10 minutes. Remove bay leaf. Stir in scallion greens. Top each serving with a dollop of sour cream, if using.
Notes: Frozen Corn Variation — If you want to use frozen corn, puree one cup of it with the milk as directed above, and add the remaining cup to the soup along with the puree. Since the corn is already cooked, it might toughen if it goes in earlier. You can add a pinch of sugar as well if you like.
Source: https://www.foodandwine.com/recipes/corn-chowder
More Chowder Soup Recipes More Easy Corn Recipes
For more recipes check out our farm recipe blog: https://blackdirtrecipes.wordpress.com
YouTube Channel: https://www.youtube.com/channel/UCPYfuRXgE6SgaLMmd_vYx9Q
Follow us on Instagram @yesifarm
Summer Share Week 7
Well the calendar has finally caught up with the weather! It most definitely has all the summer feels. Monday was bittersweet, my Dad passed away on Aug first in 1999. He was and is such a huge part of my life! How many lessons I learned by his side. In so many ways Dad was very old fashioned. I fought long and hard to get on a tractor, he was especially against me on the acg because "the way you had to sit on it wasn't ladylike." Once he realized that I was better on the tractors than the guys he wouldn't put anyone else on them, especially the cultivator and tillivator. He showed me how to plant, know when a crop was ready, the right way to harvest. How to save seeds, the right way to plow. How to tune a motor. Take time for Sunday rest and worship, catch a fish, enjoy an ice cold beer at the end of the day, treat your farmers with kindness, make awesome potato pancakes, but he never would teach me to play poker, lol! I think one of the most valuable lessons he left me with was these words just before he died "farming is a tough life Cher, but you're going to make it, you're going to do all right."
Vegetables/Recipes
I'm sensing a Latin feel this week: cilantro, corn, squash blossoms, and tomatillos. A simple corn relish is perfect for a hot summer day!
SQUASH BLOSSOM SOUP
Ingredients
2 cups of water
3 cups squash blossoms, stems removed* (see note)
1 cups squash, peeled and diced (optional)
1 tablespoon butter
1/8 cup onion, diced
1/2 garlic clove, minced
1 tablespoon flour
1 1/2 cups chicken broth
1/2 cup heavy cream (or sour cream)
Salt and pepper to taste
To serve:
1/4 cup of heavy cream or sour cream
Extra squash blossoms (optional)
Parsley or Epazote leaves, for garnishing
Instructions
- Place 2 cups of water in a saucepan and turn the heat to high. Once the water starts boiling, add the blossoms. After one minute, remove the flowers and place them in a bowl with ice-cold water to stop the cooking process. Drain and chop the blossoms, then set aside.
- In the same saucepan, melt the butter over low heat, then add the diced squash and fry for 5 minutes on low heat.
- Stir in the onion and garlic and fry for 1 minute. After this, add the squash blossoms and flour and stir well.
- Pour the chicken broth and stir in the heavy cream. Continue to cook on low for 8 minutes. After this, mix well and pour everything into your blender. Wait until it cools off a little, then process until you have a delicate, creamy sauce.
- Return to the saucepan and keep cooking for five more minutes or until it thickens. Season the soup with salt and pepper. Serve in bowls and top each one with a tablespoon of heavy cream. Garnish with the squash blossoms and parsley (or epazote).
Important Notes:
- To make this soup using only squash blossoms, use 3 cups of squash blossoms and skip the adding of the diced squash in step 2. Add the squash only if you can't find enough blossoms.
Source: https://www.mexicoinmykitchen.com/squash-blossom-soup/#recipe
For more recipes check out our farm recipe blog: https://blackdirtrecipes.wordpress.com
YouTube Channel: https://www.youtube.com/channel/UCPYfuRXgE6SgaLMmd_vYx9Q
Follow us on Instagram @yesifarm
Summer Share Week 6
Feeling a lot like summer, that heat last week was wicked. In the fields it felt like it was well over 100. And yet the weeds keep coming. It really can be a struggle to stay on top of them. The best eradicators are our farmers — between hand and hoe they keep up the valiant fight. Today, taking a break from weeding they are harvesting onions, this brings back such memories for me. I grew up on onions, sounds kind of funny I know. Our region was and still is known for them. In the 1920s we were the onion producing capital of the world! Pretty impressive, huh? Hard work which has gotten easier in some ways with machinery. Now I sound like an old timer — when we were growing up onions were harvested by hand and packed out on old equipment that had to be monitored by people. As the 50 lb. bags filled up at the front shoot, you had to flip a board that sent the onions from one side to the other, flip a handle, remove the filled sack, put that one on a scale and replace it with an empty sack. If you were good you could gauge the weight of the bag by eye and only have to adjust the quantity by one or two onions on the scale. If the harvest was good you could process 150-200 bags an hour. All on an old wooden machine that was then 40 years old. Nowadays computers control most of the process!
FRIED SQUASH BLOSSOMS
Don’t be intimidated! Yes it is a bit of work but oh so worth it. Stuffing the blossoms can be tricky. You can use the dipping batter from the following recipe and skip the stuffing. Much simpler presentation but still tasty! After drying, serve them with a dipping sauce or drizzle of pesto.
Ingredients
· 7 – 8 squash blossoms
· 1 clove garlic
· 3 large fresh basil leaves
· 1/2 tablespoon fresh mint leaves, dill, or chives
· 1/2 cup whole-milk ricotta cheese
· 1/4 cup cheese, such as grated Parmesan, crumbled fresh goat cheese, or shredded low-moisture mozzarella
· 1 large egg
· 1/2 tablespoon lemon juice
· 1/4 teaspoon kosher salt
· 1/8 teaspoon freshly ground black pepper
For the batter:
· 3/4 cup cold seltzer, club soda, or light-colored beer
· 1/2 cup all-purpose flour
· 1/2 teaspoon kosher salt
· 1 1/2 cups vegetable oil, for deep-frying do not use olive oil – it’s too heavy
Instructions
1. Prepare the blossoms. Trim the stems from the squash blossoms. Remove the stamen inside the blossoms. Gently rinse to remove any potential dirt or debris. Place on paper towels or a kitchen towel to dry.
2. Chop the aromatics. Prepare the following, placing them in a medium bowl as you complete them: Mince the garlic clove. Finely chop until you have 1 tablespoon fresh basil and 1/2 tablespoon fresh mint, dill, or chives.
3. Make the filling. Add ricotta cheese and cheese of choice, egg, lemon juice, salt and black pepper. Whisk until combined.
4. Stuff the zucchini squash blossoms. Transfer the filling into a piping bag or a large zip-top bag with the tip cut off. Gently open each squash blossom and pipe the filling inside. Fill to just below where the petals begin to separate, 1 to 1 1/2 tablespoons each. Twist the open end of each blossom to prevent the filling from falling out.
5. Heat the oil and make the batter. Fill a large heavy-bottomed, high-sided skillet with 1/2-inch oil (about 1 1/2 cups) and heat the oil over medium-high heat to 375°F. Place seltzer, club soda, or light-colored beer; all-purpose flour and kosher salt in a medium bowl and whisk until smooth. (The batter will be thin.)
6. Dip and fry the blossoms. Working in batches of 2-3, dip each blossom into the batter one at a time. Add to the oil and fry, flipping once, until golden-brown, about 2 minutes per side. Use a slotted spoon to transfer the fried blossoms to a paper towel-lined plate to drain. Repeat dipping and frying the remaining blossoms, making sure the oil is at 375ºF for each batch.
Source: https://www.thekitchn.com/fried-squash-blossoms-recipe-23173253
For more recipes check out our farm recipe blog: https://blackdirtrecipes.wordpress.com
YouTube Channel: https://www.youtube.com/channel/UCPYfuRXgE6SgaLMmd_vYx9Q
Follow us on Instagram @yesifarm
Summer Share Week 5
What a day it was yesterday. The heat is so intense in the fields we try to get in and out as early as possible. My sister sends me a text around 8-8:30 in the morning that there is no electric, has no idea why. I headed back to the house so I could see if it was just us or something more. A little bit past us on the top of the hill a tree had come down and took out wires and knocked over a utility pole. It wiped out the whole neighborhood but the worst of it was that for us no electric meant no water. The farmers usually finish harvesting around 11 or so. I just kept praying that the power would be restored by noon. No such luck so now we had to figure out how to get water. One option was to go to my brothers and haul water from his place, but that meant driving around and up through the mountain on a trip that would take close to 10 miles one way, this would have taken so much time and gas!!! Thank goodness for Silvia she knew a farmer a couple of miles from us in the other direction. They were very kind and let us get as much water as we needed; we just had to haul it. I’m not sure how many 5 gallon jugs we filled, but we had enough to get the job done. Thank goodness for kind people. The power wasn’t restored until around 3 PM just as we were finishing up cause that’s how these things roll. It did get me thinking once again about getting a generator for us. *As a result of the lack of electric it left me unable to do any food prep in the kitchen. For the tasitng sample, I’ll make you something extra next week!
… I know you’re getting anxious for tomatoes — we are too! The drought-like conditions and extreme heat have seriously slowed down the growing process. I am going to see if I can find my trash pump — a name commonly used for a gas powered pump. With this we can set up an irrigation system and get some water in the fields. This would help immensely!!! Wish us luck!!!
Vegetables / Recipes — Summer Succotash
This summer dish of farm-fresh ingredients of corn, zucchini, tomatoes and beans serve up nicely with any entree.
Ingredients
1½ cups onion, chopped
1 cup fresh zucchini, coarsely chopped
3 cups fresh corn kernels
1 cup fresh beans, blanched and cut in half-inch pieces
1 cup tomatoes, coarsely chopped
2 teaspoons kosher salt
¼ teaspoon ground black pepper
3 tablespoons fresh basil, coarsely chopped
3 tablespoons fresh cilantro, coarsely chopped
Butter (for sautéing)
Instructions
In a large skillet or saucepan over medium-high heat, sauté onion in butter until soft, about 2 minutes. Add chopped zucchini, and sauté 3 minutes. Stir in corn, beans and tomatoes. Add salt, pepper, basil and cilantro. Heat until mixture is hot.
Source: https://farmflavor.com/recipes/seasonal/summer/summer-succotash/
For more recipes check out our farm recipe blog: https://blackdirtrecipes.wordpress.com
YouTube Channel: https://www.youtube.com/channel/UCPYfuRXgE6SgaLMmd_vYx9Q
Follow us on Instagram @yesifarm
Summer Share Week 4
"Rain, rain go away come again another day ..." whoever is singing this childhood rhyme had better stop! It is so, so very dry right now. Most everyone in the valley has stopped planting for the moment. I was speaking with a farmer friend of mine yesterday and he’s worried that he’s going to lose his tomato crop. He’s working on some sort of irrigation system to help the plants along. In the meanwhile sweet corn harvest is advancing—maybe two weeks away— the lack of rain has slowed it down a bit. No lettuce today — the deer ate it :-( We’re going to start seeds in the greenhouse for fall cabbages, broccoli and more.
Vegetables / Recipes — Quelites
Quelites – a wild spinach our farmers love in a simple stew with garlic and onions maybe some chilies. Euell Gibbons writes about it in his book Stalking the Wild Asparagus but he calls it "Red Root." What exactly are “quelites” is a contentious issue amongst some because the plant most commonly known as “quelite” varies from region to region in Mexico, one grandmother’s quelites might not be another grandmother’s quelites. Even between our farmers there is much discussion as to which vegetable is the true quelites. Quelites are a pre-Columbian dish indigenous to the Americas. The name comes from the Nahuatl word "Quilitl" which translates roughly to ”tender and edible green.” The simple magic of this recipe is the feeling of nourishment when you eat it. You can make it with whatever greens you may have around, including amaranth, spinach, chard, collards, beet greens, turnip greens, arugula, kale, and the list goes on ...
NOURISHING GREENS
Ingredients
1 bunch of greens
(try chard, kale, amaranth, chaya, spinach, collards, beet greens, turnip greens, arugula…)
Olive oil
1 tsp coriander (ground)
1 tsp sea salt
black pepper (to taste)
2 cloves garlic (sliced)
1 handful of organic corn masa
1 cup water
lemon or lime
Instructions
1. Thinly slice your greens
2. In a pan (I prefer to use cast iron), drizzle a little bit of olive oil (maybe a tablespoon) and saute the garlic, coriander, salt and pepper for a minute.
3. add water to the pan, then sprinkle the masa into the pan immediately (before water gets too hot) while stirring so the masa dissolves and doesn’t clump up too much.
4. Bring to a low boil, add greens and cover to simmer for just a couple of minutes (unless you’re using some of the tougher greens like collards or chaya, which you’d want to cook for a few minutes longer).
5. Remove from heat, add a little squeeze of lime (or the juice of a whole lemon or lime, like me, depending your preferences!) and serve.
Source: https://www.alavueltafarm.com/recipes/2019/12/1/receta-de-quelites-de-mi-nanaita-my-great-aunts-quelite-greens-recipe
NEW MEXICAN QUELITES
New Mexican Quelites are a traditional Lenten food. Beans, spinach, onion and spices make a nutritious side dish or vegetarian powerhouse.
Ingredients
1 Tbsp. vegetable oil OR 2 strips bacon diced
¼ medium onion chopped
2 cloves garlic minced
15 oz. chopped spinach or other leafy green steamed anddrained
1 cup cooked pinto beans drained
2 Tbsp. Chile Powder
½ tsp. granulated garlic
½ tsp. salt
Instructions
Heat oil in a non-stick skillet. Sauté onion and garlic in oil.
Add spinach, beans, and coarse chile.
Stir in granulated garlic and salt.
Cover and cook over low heat 15 minutes.
Source: https://buenofoods.com/recipe/new-mexican-quelites/
For more recipes check out our farm recipe blog: https://blackdirtrecipes.wordpress.com
YouTube Channel: https://www.youtube.com/channel/UCPYfuRXgE6SgaLMmd_vYx9Q
Follow us on Instagram @yesifarm
Summer Share Week 3
It’s so incredible to watch the farm come to life. The seeds we planted months ago have been growing and gradually turning into gorgeous beautiful plants with bright orange and yellow blossoms peeking through the lush foliage. We’re going to start stealing baby potatoes, these are such an exquisite treat! I stole some the other night for dinner for my sister and I. Washed them, wrapped in foil, drizzled with oil, salt, pepper and a sprinkle of fresh rosemary and roasted at high heat. So so good. Along with the potatoes I braised some Swiss chard with garlic and oil, a handful of toasted walnuts, some raisins — my sister likes sweet flavors. A couple dollops of goat cheese on top to melt in and dinner was served!
Vegetables / Recipes — Verdolaga (aka Purslane)
Verdolaga has become more mainstream as folks have come to learn more about it. It’s something we kind of grew up with knowing it more as an invasive weed than edible vegetable. Our farmers introduced us to it as a source of food and what a source it is! One of the only land vegetables recognized for its high levels of Omega 3 fatty acids which are prevalent in fish like salmon! This plant does not like cold so it’s basically only available during the summer season. Raw, the flavor has hints of lemon and our farmers enjoy it in a simple salad.
FARMERS VERDOLAGA SALAD
Verdolaga (Purslane) washed chopped into bite size pieces, toss with lemon juice. Season to taste with salt and pepper. Enjoy!
Here’s a vegan version of another farmer favorite – they serve it with pork:
VERDOLAGAS, MUSHROOMS, & POTATOES IN A SALSA VERDE
Verdolagas or purslane are a popular food in Mexico often eaten with pork in a salsa verde. My version is completely vegan and makes a scrumptious Mexican vegan lunch or dinner.
Author: Nancy Lopez-McHugh & MexicanMadeMeatless.com
Ingredients
6.25 oz Purslane thoroughly rinsed
1/2 lb small red potatoes sliced in halves and boiled or baked or air fried
1 lb tomatillos husked removed and rinsed
1 jalapeño pepper
1 serrano chile stem removed
4 garlic cloves stem removed
1/2 small white onion cut into large pieces
1/2 cup cilantro leaves
1 teaspoon vegetable bouillon powder
15 button mushrooms it's 9.50oz or 225grams, sliced in half
6 cups water for boiling salsa ingredients
1/2 teaspoon granulated garlic
1 teaspoon granulate onion
1 teaspoon salt adjust to taste
1.5 Tablespoons olive oil or your favorite oil
Instructions
- Slice the potatoes in half then boil until soft or toss with olive oil and a little salt and either bake or air fry until soft. I air fried them at 370F for 10 minutes.
- Place the tomatillos, chile peppers, garlic and onion into a pot and pour in the water. Allow to simmer until all the vegetables are soft.
- While you wait for the salsa ingredients you can start on the dish. Make sure the purslane doesn't have any trapped dirt. Remove any damaged leaves. You can cut off a bit of the stem or the majority if you like. I personally cut off most of it because I don't love the texture of the stems. I leave the thinner stems though.
- Heat the oil in a large pan then add the mushrooms and sauté until they've softened through, about 8 minutes.
- Next add the purslane and sprinkle the granulated garlic, onion and sauté until the purslane leaves begin to wilt.
- Then mix in the cooked potato halves and stir until well combined.
- By this time the salsa ingredients should be softened, carefully scoop out of the pot into a blender. Add about 1/2 cup of the boiling broth. Then add the cilantro leaves then the vegetable bouillon powder and blend until smooth.
- Carefully pour 3/4s of the salsa into the pot and stir until well combined. You can add more salsa if you want a saucier dish. Also if the salsa is too thick you can add more water or vegetable broth into the pan. Simmer under medium-low heat for 10 minutes. Taste and adjust seasoning or salt if desired.- Serve with refried beans and warm corn tortillas. Enjoy!
To make the dish milder you can remove the seeds from the chilies, and use just jalapeños.
To make the dish spicier use only serranos and use as many as you like.
If you can't find purslane you could use baby spinach instead.
Source: https://mexicanmademeatless.com/verdolagas-purslane-in-salsa-verde/
For more recipes check out our farm recipe blog: https://blackdirtrecipes.wordpress.com
YouTube Channel: https://www.youtube.com/channel/UCPYfuRXgE6SgaLMmd_vYx9Q
Follow us on Instagram @yesifarm
Summer Share Week 2
Happy Fourth of July!!!!!!
Weeding, weeding, weeding, seems like we never stop weeding. Because we are a chemical-free farm the weeds are probably the biggest bane of our lives. Luckily some of the vegetables are able to “throw shade” and crowd out the weeds. Some plants like onions aren’t able to do that, they just don’t have the right leaf structure. So plants like onions get a lot of attention throughout the growing season. Leafy plants like tomatoes, potatoes and peppers will eventually grow enough to crowd out the weeds if we can stay on top of the first couple of waves of weeds. So off we go to keep on weeding!
Vegetables / Recipes — Baby Cauliflower
A special treat — baby cauliflower and those leaves!!! Most folks don’t realize that the leaves of cauliflower are edible too!
CRISPY ROASTED CAULIFLOWER LEAVES
Cauliflower leaves are actually really tasty when roasted until crispy with a little olive oil, salt, and pepper. The stalks taste a bit like actual cauliflower, but the leafy parts taste kind of like that crispy fried "seaweed" that you get from Chinese takeaways. Really yummy! They’re great as a snack and eating cauliflower leaves means less waste. You're eating for the planet in multiple ways. Go you!
Ingredients
Cauliflower leaves
Olive oil
Salt and pepper
Preparation
1. Preheat the oven to 400°F.
2. Trim off the woodiest parts of the stalks
3. Wash the leaves. Pat dry and arrange on a baking tray.
4. Drizzle with olive oil and season with salt and pepper.
5. Roast for 5-10 minutes or until the leaves are crispy.
Source: https://www.onegreenplanet.org/vegan-recipe/crispy-roasted-cauliflower-leaves/
CAULIFLOWER LEAF SALAD WITH CREAMY DRESSING
Ingredients
Dressing
· Vinegar. ¼ cup White wine vinegar. You could sub whatever vinegar you have on hand.
· Milk. ¼ cup.
· Mayonnaise. ¾ cup.
· Poppy seeds. 2 tablespoons. While we’re normally all about substitutions, poppy seeds are pretty essential to this recipe. Feel free to experiment without them, but if you don’t have them, Stacy suggests honey mustard or blue cheese dressings might be good alternatives.
· Sugar. 2 tablespoons.
· Salt. ½ teaspoon.
· Dry mustard. ½ teaspoon. If you don’t have dried mustard, use bottled mustard and add until you get a flavor you like.
Salad
· Cauliflower leaves. Enough to fill a 4-quart bowl when chopped. More or less is fine too, but you’ll want to adjust the amount of dressing.
· Dried cranberries. You can substitute dried cherries or another tart fruit if needed.
· Sunflower seeds. Roasted pecans, almonds or another nut could also work.
Instructions
1. Trim the leaves off the thick ribs. Set the ribs aside — you could pickle them or make them into a dip.
2. Stack the leaves and roll them in into “cigars.”
3. Position your knife perpendicular to the cigars and make narrow slices. This should net you some nice, thin ribbons of leaves.
4. Stir, shake or whisk the dressing ingredients together.
5. Use your hands to massage the dressing into the leaves. This will soften them (the oil dissolves the waxy covering on the leaf, and the massaging damages cells just enough to make them more supple and less tough, similar to kale.
6. Add the dried cranberries and sunflower seeds.
7. Play with the amount of dressing and additional dried cranberries and sunflower seeds until you get a ratio you like.
Source: https://www.eatortoss.com/cauliflower-leaves-are-excellent-salad-greens/
For more recipes check out our farm recipe blog: https://blackdirtrecipes.wordpress.com
YouTube Channel: https://www.youtube.com/channel/UCPYfuRXgE6SgaLMmd_vYx9Q
Follow us on Instagram @yesifarm
Summer Share Week 1
I am always in awe of nature, those tiny seeds we planted way back in March and April and how they have grown into such gorgeous lush plants. To walk through the fields and gaze on row after row of ever changing vegetation — corn knee high, leafy greens grazing your calf as they spill out over the rows till you can no longer see the soil in between. Buds of flowers popping up everywhere like fortune tellers portending a promise of the harvest to come. I’m never sure when I am the happiest walking the fields, in the early morning hours when the sun blushes over the horizon, or at dusk when the sun sweetly kisses the earth good night.
Vegetables / Recipes — Bok choy — it’s not just for stir fries. I often substitute it in many of my recipes that call for cabbage and yes, you can eat it raw!
BRAISED BOK CHOY WITH GARLIC SCAPES
Ingredients
1 tablespoon vegetable oil
3 garlic scapes (curly, green shoots at the top of garlic plants), cut into 1-inch pieces
1 tablespoon minced fresh ginger
2 bok choy, ends trimmed, halved lengthwise, then cut into 1-inch pieces
¼ cup lightly toasted cashews
1 cup water (approximate)
Sea salt and fresh ground black pepper
Directions
Heat the oil in a skillet over medium-high heat. Add the garlic scapes and ginger, and sauté for 1 minute, until fragrant. Add the bok choy, and stir a few times as it tenders and browns, about 2 minutes. Add enough water to cover all the ingredients — about a cup. Sprinkle in sea salt and fresh ground pepper. Cover, reduce heat and simmer until tender, about 5 minutes. While that's simmering, heat a nonstick pan over medium heat, and lightly toast the cashews. Serve the bok choy topped with cashews.
- You could sprinkle come cilantro over at the end as well.
- Makes four side-dish servings, or two entrée servings.
Source: https://www.democratandchronicle.com/story/lifestyle/rocflavors/recipes/2014/07/19/braised-bok-choy-garlic-scapes-recipe/12839505/
For more recipes check out our farm recipe blog: https://blackdirtrecipes.wordpress.com
YouTube Channel: https://www.youtube.com/channel/UCPYfuRXgE6SgaLMmd_vYx9Q
Follow us on Instagram @yesifarm
Spring Share Week 13
Nature put on quite the fireworks show late last night, early this morning. Had planned on the farmers weeding today but nature decided they needed a day off instead! This past weekend they took a mini vacay and drove up to Niagara Falls. They had such a good time, the pictures were awesome! Getting seed orders together for fall crops. I couldn't believe it but seed garlic is already in demand. We typically don't plant until November-ish so I really feel like they're jumping the gun!
Vegetables/Recipes — Garlic Scapes
What a treat! Only available this time of year. The seed stalk from the hard neck garlic. Try them roasted with olive oil and sea salt. Toss them with asparagus and radishes. Roast the whole lot and enjoy as a side treat, over salad greens, with poached eggs. So many ways and so little time!!
More ideas and recipes with Garlic Scapes: https://www.seriouseats.com/the-crisper-whisperer-what-to-do-with-garlic-scapes-recipe
For more recipes check out our farm recipe blog: https://blackdirtrecipes.wordpress.com
YouTube Channel: https://www.youtube.com/channel/UCPYfuRXgE6SgaLMmd_vYx9Q
Follow us on Instagram @yesifarm
Spring Share Week 12
Natures’ irrigation has turned on again this morning. The timing is good and so far the amount is ok too, we planted quite a bit last week— tomatoes, husk cherry tomatoes, tomatillos, eggplants, peppers and more. The crops are coming along — starting to see flowers on the potato plants, the cauliflower and cabbages are starting to “cup” indicating the heads will be forming soon — couldn’t find buds yet but they’re coming! Weeds are coming on like crazy. The farmers have their hands full, literally. Since we don’t use herbicides, all weed removal must be done with mechanical and hand tools and ultimately our hands. It is a valiant effort and the farmers give it their all!
Vegetables / Recipes—"Teenage" Lettuce + Radishes
Why teenage? Well, too big for mesclun or baby but too small for full size heads so teenage it is. Lettuce is so sweet now, I like to nibble on it right in the fields. Ever roasted radishes? Throw them into a hot oven in this unique easy side dish recipe: they come out vibrant and juicy, with a sweet, mild flavor!
ROASTED RADISHES
Ingredients
bunches radishes
1/2 tablespoon olive oil
1 garlic clove
1/8 teaspoon kosher salt
Fresh ground pepper
1 teaspoon fresh lemon juice (optional)
Instructions
- Preheat the oven to 450 degrees.
- Wash the radishes and trim off the greens, saving a few leaves for a garnish.
- Cut the radishes lengthwise. Toss them in a bowl with the olive oil, finely grated garlic clove, kosher salt and pepper.
- Line a baking sheet with parchment paper. Place the radishes on top cut-side down and roast for 16 to 20 minutes until the largest radish is tender when pierced with a fork at the thickest point (exact time depends on the size of the radishes).
- If desired, toss with lemon juice (we liked it both ways, so it’s not required). Very finely chop about 1 radish leaf into a garnish, and sprinkle over the top. Serve warm.
Source: https://www.acouplecooks.com/roasted-radishes/
For more recipes check out our farm recipe blog: https://blackdirtrecipes.wordpress.com
YouTube Channel: https://www.youtube.com/channel/UCPYfuRXgE6SgaLMmd_vYx9Q
Follow us on Instagram @yesifarm
Spring Share Week 11
That heat the other couple days was rough. In the fields the feel was like well over 100 degrees. Gave the farmers the day off Tuesday, I didn’t want anyone out there. I worked in the greenhouse as long as I could stand the heat, felt like it was almost as hot in there as it was in the fields. I wanted to have asparagus again this week but needed to give the plants a rest. If you continue to harvest it hard like we have been the plants will send up thin reed-like shoots that are a sign they’re done and need to be left alone until next season. Hoping that between us giving the patch a break and the right weather we’ll have another harvest or two this season. I was scouting the fields this morning and am so impatient. The romaine is about 5 inches tall but needs to fill in. I found some swiss chard that’s also about 5 inches tall but that’s from a random walk about and barely enough for my dinner never mind enough to harvest for you all just yet.
DEB'S KALE SALAD WITH APPLE, CRANBERRIES & PECANS
Ingredients
1/2 cup pecans
8 ounces kale
4 to 5 medium radishes
1/2 cup dried cranberries (or dried cherries)
1 medium Granny Smith apple
2 ounces soft goat cheese, chilled
Dressing Ingredients:
tablespoons olive oil
1 1/2 tablespoons apple cider vinegar (or white wine vinegar)
1 tablespoon smooth Dijon mustard
1 1/2 teaspoons honey or maple syrup
Sea salt and freshly ground pepper, to taste
Directions
– Preheat the oven to 350 degrees and spread the pecans on a baking tray. Toast them until lightly golden and fragrant, about 5 to 10 minutes, tossing them once or twice to make sure they bake evenly. Remove the tray from the oven and set them aside to cool.
– Pull the kale leaves off from the tough stems and discard the stems. Use a chef’s knife to chop the kale into small, bite-sized pieces. Transfer the kale to a big salad bowl. Sprinkle a small pinch of sea salt over the kale and massage the leaves with your hands by lightly scrunching big handfuls at a time, until the leaves are darker in color and fragrant.
– Thinly slice the radishes (this is easier to do if you first chop off the root end so you can place the base of the radish flat against your cutting board). Add them to the bowl.
– Coarsely chop the pecans and cranberries (or cherries) and add them to the bowl. Chop the apple into small, bite-sized pieces and add it to the bowl as well. Crumble the goat cheese over the top.
– In a small bowl, whisk the dressing ingredients together and pour the dressing over the salad. Toss until the salad is evenly coated with dressing. Serve immediately, or for even better flavor, let the salad marinate in the dressing for 10 to 20 minutes beforehand.
Source: https://cookieandkate.com/debs-kale-salad-with-apple-cranberries-and-pecans/
Recipe adapted from The Smitten Kitchen Cookbook by Deb Perelman.
Make it vegan: Omit the goat cheese, and use maple syrup instead of honey in the dressing.
For more recipes check out our farm recipe blog: https://blackdirtrecipes.wordpress.com
YouTube Channel: https://www.youtube.com/channel/UCPYfuRXgE6SgaLMmd_vYx9Q
Follow us on Instagram @yesifarm
Spring Share Week 10
My sister and I were chatting the other day about the mini financial report I posted last week, and during the course of the chat I realized that the number I used for an hourly rate was potentially misleading. I used $15 per hour for my rate while our farmers are paid between $17 and $20 per hour. Their wages are based on skills, experience and responsibility levels. How do you place a monetary value on all this? I don’t know and probably will always wonder ...
Potatoes are up, only planted two weeks ago and already there are vibrant rows of green down the field. Sadly it also means the Colorado potato beetles are making their presence known as well. Nature is a marvel — as soon as the food (potato plants) 'is on the table' the predators are never far behind. Those critters are the bane of my life on the farm. But we shall prevail!!!! With Memorial Day on the horizon this can only mean tomato, pepper and eggplant planting time is right around the corner. Need to start planting another rotation of lettuces, cabbages, broccoli and cauliflower. And not too soon to think about starting Brussels sprouts, fall brassicas and more. It’s going to be a great season!
Vegetables / Recipes — Radishes
Most folks don’t realize that the whole plant is edible and radishes themselves are good cooked or raw.
SAUTÉED RADISH GREENS
A quick and easy side dish on their own, but they’re also a great addition to stir fries, frittatas,
scrambled eggs, tacos and more.
How To: Heat a drizzle of olive oil in a small frying pan over medium heat. Add the radish greens and cook, tossing, until the greens are just wilted, 1 to 2 minutes. Remove them from the heat and season with a squeeze of lemon juice, salt, and pepper.
RADISH TOP PESTO
Ingredients
1/2 cup pine nuts or pepitas
1 small garlic clove
1/4 teaspoon sea salt
Freshly ground black pepper
2 tablespoons lemon juice
1 cup radish greens
1 cup basil
1/4 to 1/3 cup extra-virgin olive oil, more if desired
1/4 cup Parmesan cheese, optional
Instructions
In a food processor, combine the pine nuts, garlic, salt, and pepper and pulse until well chopped. Add the lemon juice and pulse again. Add the radish greens and basil and pulse until combined. With the food processor running, drizzle in the olive oil and pulse until combined. Add the Parmesan cheese, if using, and pulse briefly to combine. For a smoother pesto, add more olive oil.
Source: https://www.loveandlemons.com/radish-greens/
For more recipes check out our farm recipe blog: https://blackdirtrecipes.wordpress.com
YouTube Channel: https://www.youtube.com/channel/UCPYfuRXgE6SgaLMmd_vYx9Q
Follow us on Instagram @yesifarm
Spring Share Week 9
We wanted to say thank you to you all and let you know how much your support means to us here at the farm. Here is a snapshot of three projects we completed over the past two weeks. All this work has significantly improved the drainage and access to the farm.
For the three projects – Clean ditches, replace culvert pipe and repair entryway to fields
Excavator Rental (3 days) $1,600
Replacement Pipe for culvert $600
Gravel to patch entryway to fields $525
Benito helping me replace culvert $100
Fuel for excavator 10 gallons @$7/gallon $70
Subtotal $2,895
My time running excavator, sourcing/picking up pipe, sourcing gravel, about 35 hours – I’m never sure what $ to put on my time so if I use $15/hour = $525
These three projects total investment $3,420
I would be willing to swear that almost immediately after cleaning the drainage ditches you could see the fields sighing with relief, the pressure of the water that was bound in the fields was released and they were so much easier to work thereby ensuring a better growing season now and down the road.
Vegetables / Recipes
Watercress – might be last time you see it this spring. The heat coming on this weekend will seriously stress it and most likely send it into flower. The peppery bite of this leafy green is so refreshing on a hot day. Dressed with a simple vinaigrette as a side salad or as the leafy layer on a sandwich of egg or tuna or chicken salad.
ASPARAGUS AND WATERCRESS PIZZA
Ingredients
1 bunch asparagus, trimmed and thinly sliced on the diagonal
1 small red onion, thinly sliced
1/4 cup plus 1 tablespoon extra-virgin olive oil
Coarse salt and freshly ground pepper
1 pound store-bought pizza dough, preferably whole wheat
8 ounces ricotta
4 ounces mozzarella, shredded
2 cups watercress or upland cress, tough stems removed
Red-pepper flakes
Directions
Preheat oven to 450 degrees with rack in lower third. Toss together asparagus, onion, and 1 tablespoon oil in a medium bowl. Season with salt and pepper.
Brush a rimmed baking sheet with 2 tablespoons oil. Using your hands, gently stretch dough from all sides to approximate size of baking sheet. Place dough on baking sheet, stretching and fitting it to edges of sheet.
Brush dough with remaining 2 tablespoons oil, then spread with ricotta, leaving a 1/2-inch
Bake until crust is golden brown and asparagus is tender, about 20 minutes. Top with watercress, season with salt, and sprinkle with pepper flakes. Cut into pieces and serve.
Source: https://www.marthastewart.com/1106798/asparagus-and-watercress-pizza
For more recipes check out our farm recipe blog: https://blackdirtrecipes.wordpress.com
YouTube Channel: https://www.youtube.com/channel/UCPYfuRXgE6SgaLMmd_vYx9Q
Follow us on Instagram @yesifarm
Spring Share Week 8
Running like crazy this morning, farmers started work at 6 AM which meant I was out at 5 AM and working in the office at 4 AM. You should see the transformation that’s happening in the fields now! Digging those ditches last week made such a world of difference. The fields are dry so we can get in and plant. Row upon row of spinach, Swiss chard, kales, lettuces, cabbages, broccoli, cauliflower, onions, leeks and more seem to magically appear like thin green ribbons stretching down the beds. Today we’re planting potatoes hundreds and hundreds of pounds, a rainbow of colors and sizes. I’m already dreaming of the new crops and still so many more to be planted.
PERFECT ROASTED ASPARAGUS
Author: Cookie and Kate
Prep Time: 5 mins; Cook Time: 10 mins; Total Time: 15 minutes
Yield: 2 to 4 servings
It’s asparagus season, and I can’t get enough of it. Roasting asparagus brings out its best. The tips get a little crispy in the oven, which I love, and the flavor is more concentrated than it would be if you steamed or sautéed it. Roasted asparagus is the perfect springtime side dish, whether for brunch or dinner. As a bonus, it’s simple to throw together while your main dish cooks on the stove.
Ingredients
Basic roasted asparagus
- 1 large bunch (about 1 pound) fresh asparagus
- 1 to 2 teaspoons olive oil
- Salt, to taste
- Freshly ground black pepper, to taste
My seasonings (use one or all, like I did)
- Zest and juice of 1/2 medium lemon, preferably organic
- Lemon wedges, from the remaining 1/2 lemon
- Sprinkle of finely grated Parmesan cheese
- Small handful of fresh mint or parsley, finely chopped
- Light sprinkle of red pepper flakes
Other options
- Pat or two of butter
- Light drizzle of balsamic reduction or thick balsamic vinegar
- Toasted sliced almonds
Instructions
1. Preheat the oven to 425 degrees Fahrenheit and line a large, rimmed baking sheet with parchment paper for easy cleanup. Snap off the woody ends of the asparagus (if you sharply bend the asparagus near the base, it will snap in the right place). Discard the ends.
2. Place the asparagus on the sheet and drizzle with 1 to 2 teaspoons olive oil, just enough to lightly coat the asparagus. Sprinkle salt and pepper over the asparagus, and toss until the spears are lightly coated in oil. Arrange the spears in a single layer on the pan.
3. Bake just until the base of the asparagus is easily pierced through by a fork. Very thin asparagus, like the kind shown here, will take as little as 9 to 12 minutes, whereas thicker asparagus will need 15 to 20 minutes.
4. Transfer the roasted asparagus to a serving platter and season however you’d like. You could keep it simple with a squeeze of lemon juice, or a sprinkle of Parmesan, or add a pat of butter or drizzle of balsamic vinegar.
5. Roasted asparagus is best served when it’s fresh out of the oven, but it will keep at room temperature for up to 1 hour or up to 4 days in the refrigerator (gently reheat before serving).
Source: https://cookieandkate.com/perfect-roasted-asparagus-recipe/
For more recipes check out our farm recipe blog: https://blackdirtrecipes.wordpress.com
Follow us on Instagram @yesifarm
Spring Share Week 7
Umph! We spent two days on the excavator cleaning ditches and had to replace a culvert pipe. These drainage ditches are our lifeline, without them we would literally drown. Sounds simple right? Dig a trench that’s already there so you just follow the line. Well it’s not really that simple. You have to be careful not to dig too deep or too shallow. Don’t cut too close to the bank or you’ll cause the bank to collapse and then clog the ditch, undoing all your hard work and creating a hazard for the rest of the life of the ditch bank. You have to follow the rules of the ancient Romans and the aqueducts. Check the direction of the flow of water and dig accordingly start a bit shallow on the end you want the water to flow from and gradually increase the depth you dig until you get to the end of the line where the water will flow into the bigger drainage ditch that will transport the water away until it gets to the Wallkill River and ultimately the Hudson. If everyone in the Valley does their part and keeps their respective channels clean we all enjoy good drainage, if not ...
Vegetables / Recipes — Mustard Greens
Folks don’t often think of mustards as a salad green but they make a delightful yet peppery salad. Wash and tear into bite-sized pieces, dress with lemon juice, olive oil and salt to taste. You can also season with black pepper but I think the “zestiness” of the greens is enough. I like mustard greens dressed like this on a sandwich with egg salad!
SIMPLE SAUTÉED MUSTARD GREENS
Ingredients
1 Tablespoons vegetable oil
1 Cloves Garlic Minced
1 bunch Mustard Greens, stems removed and leaves chopped
1/8-1/4 cup vegetable broth
½ Tablespoon ground Mustard
Salt, Pepper
Directions
1. In a large pan with straight sides on medium heat add the oil. Add the garlic to the hot oil. Saute until garlic is softened and fragrant and has infused the oil.
2. Add the mustard greens. Season the greens with salt, and pepper, and saute while tossing to wilt. Once wilted add the broth and stir. Raise heat to a simmer, then lower and cook for about 5 minutes more.
3. Stir in the ground mustard. Serve warm.
Note: If you like heat you could also stir in a pinch of red pepper flakes. I enjoy these greens mixed into rice and will sometimes top them with a poached egg.
Original Recipe Source: https://www.foodnetwork.com/recipes/sunny-anderson/simple-sauteed-mustard-greens-recipe-1923232
For more recipes check out our Rogowski farm recipe blog: https://blackdirtrecipes.wordpress.com
Follow us on Instagram @yesifarm
Cheryl Rogowski's YouTube: https://www.youtube.com/channel/UCPYfuRXgE6SgaLMmd_vYx9Q
Spring Share Week #6
Spring — what does that really mean? The other day I was harvesting nettles, dandelion blossoms and wild violets. While doing so I kept thinking of how special the season is now. The sweet little violet blossoms with their heart shaped leaves, the raging glory of the dandelion blossoms, so aptly named with their bright yellow fringe like a lion's mane. Stinging nettles when raw in the field do have a fierce bite. If I keep harvesting them enough I will build up a tolerance and barely notice it. At this moment the wind feels like a gentle caress and the sun oh the sun I just keep lifting my face to it like a sunflower and soak in the rays. Watering the plants in the greenhouse I feel myself sighing with delight, it’s looking like a lush forest in there now. And so begins the timing game. Do we put transplants in the field now or wait? What can handle a shock of frost or hard freeze? Only time will tell.
Vegetables/recipes — Stinging Nettles
We don’t provide them often as they are a real specialty type of green. Stinging nettles are one of those potherbs that really do herald the advancement of the spring season. Raw they are as my farmers call them in Spanish – “PicaPica” and only eaten raw by the most fearless or reckless, blanched they become a real spring treat. As with so many wild edibles they are full of nutrients and so very good for you! Take a look at the stem and you will see it has four sides which indicates that it is related to mint. The sample I made you today is stinging nettle pesto. It’s a very simple thing to make but time consuming. I was working with taller stems which are too tough and woody so I stripped the leaves off them. Blanched them, tossed them in the processor and as they say the rest is history!
SAUTÉED NETTLES
Ingredients
stinging nettles
Olive Oil
Salt and Pepper to Taste
Instructions
- To clean the nettles you have two options. Wear gloves and swish them around in a large sink or basin filled with cool water. Lift the nettles out, leaving any grit behind, and drain them. Reserve.
- Alternatively, bring a pot of salted water to a boil and blanch the nettles for 4 minutes. Cool them quickly in a bowl of ice water. Squeeze the nettles as dry as possible before sautéeing them.- Once your nettles are cleaned or blanched, heat up a large pan over high heat—the wideness of the pan or skillet will help any liquid cook off quickly so the nettles sauté instead of steam.- Add the oil or preferred cooking fat. Add the nettles and cook, stirring frequently, until the greens are tender—about 2 minutes for blanched nettles and 5 to 8 for raw nettles.- If sautéing raw nettles, make sure to keep the heat high so the liquid they throw off as they cook evaporates quickly.- Sprinkle the nettles with salt to taste and serve immediately. Enjoy! Source: https://www.thespruceeats.com/sauteed-stinging-nettles-2217561
Fresh, raw stinging nettles sting! Wear protective gloves when handling them, until after they are blanched.
NETTLE SOUP: A SPRINGTIME CLASSIC
The most classic way to serve nettles is in nettle soup, made with potatoes, stock, and a little cream. Luxurious and vibrant green, this soup is a bowl-licker. You can easily make this soup without the cream, if you are avoiding dairy.
Ingredients
Fresh nettle tops
Salt
1 tablespoon extra virgin olive oil
1 teaspoon butter
1/2 cup chopped shallots
1/2 cup chopped celery
1 pound Yukon Gold or russet potatoes, peeled and chopped
4 cups chicken stock, homemade or store-bought
1 to 2 cups water
1 bay leaf
1 teaspoon dried thyme (or a couple sprigs of fresh thyme)
Freshly ground black pepper
1 1/2 tablespoons lemon juice
2 to 3 tablespoons heavy whipping cream
Directions
- Blanch the nettles: Bring a large pot of lightly salted water to a boil. Prepare a large bowl of ice water. Wearing protective gloves, transfer the nettle tops into the boiling water. Blanch for 2 minutes. Use tongs to lift the wilted blanched nettles out of the pot and transfer to the bowl of ice water to shock them. Strain in a colander.Cut away and discard any large stems from the nettles.(This should be easier to do now that the nettle stingers have lost their sting due to the blanching.) You should have 3 to 4 cups of blanched tender nettle tops and leaves for this recipe. Any blanched nettles not used at this point can be frozen for future use.
- In a 6-quart soup pot, heat the olive oil and butter on medium heat. Add the chopped shallots and celery and cook until softened, about 5 minutes.
- Add the chopped potatoes, the chicken stock, bay leaf, and thyme. If using unsalted or low sodium stock, add one teaspoon of salt. Bring to a simmer and simmer for 5 minutes. Roughly chop the blanched nettles. Add 3 to 4 cups of the chopped blanched nettles to the pot. Add enough water to just cover the nettles and potatoes, 1 to 2 cups. Return to a simmer and simmer for 15 minutes or until the potatoes are soft and the nettles tender. Remove the bay leaves (and thyme sprigs if using) from the pot. Using an immersion blender or working in batches with a standing blender, purée. Return to the pot and take off the heat. Add salt to taste. Depending on the saltiness of the stock you are using, you may need to add at least a teaspoon or more to the soup. Add 1/2 teaspoon of freshly ground black pepper. Add lemon juice. Right before serving, swirl in the cream. Adjust seasonings to taste.
- Sprinkle with black pepper and garnish with a sprig of fresh mint to serve.
Source: https://www.simplyrecipes.com/recipes/nettle_soup/
More recipes: https://www.bbcgoodfood.com/recipes/collection/nettle-recipes
For more recipes check out our farm recipe blog: https://blackdirtrecipes.wordpress.com
Follow us on Instagram @yesifarm
Spring Share Week #5
I cringe inside every time the farmers come to me and say “Hay malas noticias Charo.” Which translates to “Bad news Cheryl.” Yesterday it meant we may have hit the end of potato time. They were not happy with the quality of the potatoes they encountered as they were prepping your produce yesterday. They take so much pride in their work and seek to ensure that you get the best we can provide. Don’t remember where I heard the quote but it always resonates with me “The Farmers Lament” for me this translates to there are so many factors out of our control and quite perversely we, farmers, love to talk about them — rain or lack of, too much heat or cold, not enough heat or cold, time or not enough time. So this week as we make the hard steer out of winter and into spring the share is a bit lighter than you are used to seeing. I keep talking to the new produce coming in giving the plants as much nurturing as we can in all ways possible so that now while we lament the slow crawl of spring growing, soon we will be lamenting that there’s so much produce what are we going to do with it all.
Vegetables /Recipes
EASY VINAIGRETTE DRESSING — for the most part I enjoy my salad greens with a simple vinaigrette. Once again I have no “recipe” per say but this is about how I do it:
- A ratio of about 1/3 cider vinegar to 2/3 Extra Virgin Olive oil or your favorite oil; I’ll often use sunflower seed oil as it’s a bit lighter and the salad doesn’t end up with a “greasy” flavor/feel. I tend to make my vinaigrette on the sharp side. If it's too much for you, cut it with more oil. Again these quantities are approximations and totally flexible. I will also sometimes blend olive and sunflower seed oil for this and other recipes.
Note: As with most vinaigrettes this is pretty versatile and can also be used for a marinade!
- Cut up lettuce into bite size pieces, there is nothing worse than giant lettuce leaves dangling out of your mouth because they’re just too darn big. Sprinkle with salt and pepper. Toss with vinaigrette and toss again. I love this because it’s so darn simple and comes together in a heartbeat.
Variations: A lite sprinkle of red pepper flakes or squeeze of lemon juice, fresh dill, parsley or cilantro give a whole new dimension to this simple base! Spinach leaves (baby is best) or a mix of spinach and lettuce plus other greens.
Add-ins: Sun-dried tomatoes, hard boiled eggs, cheese, tuna, roasted chicken, olives, raw peppers, roasted peppers, cornichons, summer squash, grains like quinoa, rice, seeds or nuts. Fruit like mandarins, dried cranberries, shredded apples. A nice slice of a crusty bread or focaccia to finish.
Homemade vinaigrette keeps for 1 to 2 weeks in the refrigerator, so it’s worth the 5 minutes it takes to mix it up. Then you can keep it on hand for all of your salad needs.
For those who prefer a recipe with measurements here is a good one to follow:
BASIC VINAIGRETTE RATIO & INGREDIENTS — The traditional French vinaigrette formula calls for 1 tablespoon vinegar for every 3 tablespoons olive oil. Modern vinaigrettes often call for a bit more vinegar than that, but it’s always up to you. Kale salads can tolerate more zingy dressings, while you’ll want to use less vinegar for mild greens like spring greens.
Ingredients
1/2 cup extra-virgin olive oil
3 tablespoons vinegar of choice (balsamic vinegar, red wine vinegar, white wine vinegar)
1 tablespoon Dijon mustard
1 tablespoon maple syrup or honey
2 medium cloves garlic, pressed or minced
¼ teaspoon fine sea salt, to taste
Freshly ground black pepper, to taste
Instructions
- In a liquid measuring cup or bowl, combine all of the ingredients. Stir well with a small whisk or a fork until the ingredients are completely mixed together.
- Taste, and adjust as necessary. If the mixture is too acidic, thin it out with a bit more olive oil or balance the flavors with a little more maple syrup or honey. If the mixture is a little blah, add another pinch or two of salt. If it doesn’t have enough zing, add vinegar by the teaspoon.
- Serve immediately, or cover and refrigerate for future use. Homemade vinaigrette keeps well for 7 to 10 days. If your vinaigrette solidifies somewhat in the fridge, don’t worry about it—real olive oil tends to do that. Simply let it rest at room temperature for 5 to 10 minutes or microwave very briefly (about 20 seconds) to liquify the olive oil again. Whisk to blend and serve.
Notes:
- BALSAMIC VINEGAR: Makes a bold, slightly sweet dressing that is wonderful on green salads with fruit, such as apples, strawberries or peaches.
- RED WINE VINEGAR: Packs a punch and works well with other bold flavors and bright veggies, like tomatoes, bell peppers, cucumber, cabbage and more (think Greek salads).
- WHITE WINE VINEGAR: This is a more mellow vinegar and it’s especially nice with more delicate flavors like cucumber and sweet corn. It’s lovely on just about every green salad out there.
- GREEK/ITALIAN VARIATION: Use red wine vinegar. Add 1 to 2 teaspoons dried oregano and, optionally, a pinch of red pepper flakes.
Source: https://cookieandkate.com/how-to-make-vinaigrette-plus-variations/
For more recipes check out our farm recipe blog: https://blackdirtrecipes.wordpress.com
Follow us on Instagram @yesifarm
Spring Share Week #4
Finally a break in the weather! I consider us so very, very lucky. We’ve been plugging along in the greenhouse and hadn’t started to plant in the fields just yet and in spite of the anxiety caused by not being out there I am grateful we haven’t. This past Saturday the fields looked like they were covered in mirrors. There was so much water flooding over the ditch banks. One of our neighboring farmers lost over 3 acres of newly planted onion transplants. They drowned in the flooding. This is a terrible loss especially so early in the season. Our transplants are popping along and we’ll be getting them out to the fields now that the weather seems to have stabilized. We have broccoli, cauliflower, lettuces, Swiss chard, onions, leeks, herbs, radishes, spinach, bok choy, garlic, scallions, curly and dinosaur kales and so much more. I can’t wait!!!!!
BRAZILIAN COLLARD GREENS — These collard greens are quickly cooked in olive oil and finished with a squeeze of lemon juice. You’re going to love these healthy, vegetarian collards! Recipe yields 2 side servings. To make multiples, simply repeat the ingredients and instructions below (cook each batch separately for best results).
Ingredients
· 1 bunch collard greens
· 1 1/2 tablespoons extra-virgin olive oil
· 1/4 teaspoon fine sea salt
· 2 medium cloves garlic, pressed or minced
· Pinch of red pepper flakes (optional, scale back or omit if sensitive to spice)
· A couple lemon wedges, for serving
Instructions
1. To prepare the collards: Cut out the thick center rib out of each collard green. Stack the rib-less greens and roll them up into a cigar-like shape. Slice over the “cigar” as thinly as possible (⅛″ to ¼″) to make long strands. Shake up the greens and give them a few chops so the strands aren’t so long.
2. Heat a large, heavy-bottomed skillet over medium-high heat, then add the olive oil. Once the oil is shimmering, add all of the collard greens and the salt.
3. Stir until all of the greens are lightly coated in oil, then let them cook for about 30 seconds before stirring again. Continue stirring in 30-second intervals until the greens are wilted, dark green, and some are starting to turn browns on the edges (this is delicious). This will take between 3 to 6 minutes.
4. Once the collards are just about done, add the garlic and red pepper flakes (if using). Stir to break up the garlic and cook until it’s fragrant, about 30 seconds. Remove the pan from the heat.
5. Immediately divide the cooked collards onto plates, and serve with a lemon wedge each.
Notes: This recipe works for kale too, or you can mix kale and collards together for another yummy combo!!!!
How to Serve Brazilian Collard Greens
The flavors in these collard greens would go well with almost any hearty main dish. Here are some ideas:
· Thanks to the lemon and garlic, these greens taste Mediterranean. Serve them with pasta, lasagna, or other Italian/Greek entrées.
· These collard greens go great with cooked black beans and rice.
· Take inspiration from West African cuisine and add chopped peanuts.
· For an Asian spin, reduce the salt and substitute 1/2 teaspoon grated ginger for the garlic. Once the collards are done cooking, add a drizzle of teriyaki sauce to the pan, or add 1 teaspoon tamari or other soy sauce and 1/2 teaspoon toasted sesame oil. (Skip the lemon.) So good.
Source: https://cookieandkate.com/quick-collard-greens-recipe/
SPICY KALE AND COCONUT FRIED RICE
A vegetarian weeknight fried rice with sautéed kale, coconut flakes and rice. The dish is finished with Thai flavors like lime, cilantro and sriracha. For best results, cook your rice in advance and refrigerate until you’re ready to start cooking (see note). This dish comes together very quickly—be sure to have your ingredients prepped ahead of time and placed near the stove, along with a big empty bowl for the cooked components. Recipe yields 2 servings.
Ingredients
· 2 tablespoons coconut oil or quality high-heat oil such as avocado oil, divided
· 2 eggs, whisked together with a dash of salt
· 2 big cloves garlic, pressed or minced
· 3/4 cup chopped green onions (about 1 bunch)
· Optional: 1 cup chopped vegetables, like bell pepper, carrot or Brussels sprouts
· 1 medium bunch kale (preferably Lacinato but curly green is good, too), ribs removed and leaves chopped
· 1/4 teaspoon fine sea salt
· 3/4 cup large, unsweetened coconut flakes (not shredded coconut)
· 2 cups cooked and chilled brown rice
· 2 teaspoons reduced-sodium tamari or soy sauce
· 2 teaspoons chili garlic sauce or sriracha
· 1 lime, halved
· Handful fresh cilantro, for garnish
Instructions
1. Heat a large (12-inch or wider) wok, cast iron skillet or non-stick frying pan over medium-high heat. Once the pan is hot enough that a drop of water sizzles on contact, add 1 teaspoon oil and swirl the pan to coat the bottom. Pour in the eggs and cook, stirring frequently, until the eggs are scrambled and lightly set. Transfer the eggs to your empty bowl. Wipe out the pan if necessary with a paper towel (be careful, it’s hot!).
2. Add 1 tablespoon oil to the pan and add the garlic, green onions and optional additional vegetables. Cook until fragrant or until the vegetables are tender, stirring frequently, for 30 seconds or longer. Add the kale and salt. Continue to cook until the kale is wilted and tender, stirring frequently, about 1 to 2 minutes. Transfer the contents of the pan to your bowl of eggs.
3. Add the remaining 2 teaspoons oil to the pan. Pour in the coconut flakes and cook, stirring frequently, until the flakes are lightly golden, about 30 seconds. Add the rice to the pan and cook, stirring occasionally, until the rice is hot, about 3 minutes.
4. Pour the contents of the bowl back into the pan, breaking up the scrambled egg with your spatula or spoon. Once warmed, remove the pan from the heat.
5. Add the tamari, chili garlic sauce and juice of ½ lime. Stir to combine. Taste, and if it’s not fantastic yet, add another teaspoon of tamari or a pinch of salt, as needed.
6. Slice the remaining 1/2 lime into wedges, then divide the fried rice into individual bowls. Garnish with wedges of lime and a sprinkling of torn cilantro leaves, with jars of tamari, chili garlic sauce and/or red pepper flakes on the side, for those who might want more.
Source: https://cookieandkate.com/spicy-kale-and-coconut-fried-rice/
For more recipes check out our farm recipe blog: https://blackdirtrecipes.wordpress.com
Follow us on Instagram @yesifarm
Spring Share Week #3
Raining again not sure anymore if I’m happy, sad or frustrated by it all. The fields are such a shloggy (is that even a word?) mess so we keep plugging along inside the greenhouse. We’re quickly running out of room in there. So we keep looking at what we can move outside, where and how we can create more space and somehow we keep making it happen. The Swiss chard is 3+ inches tall, dinosaur kale is close behind it, lettuces are anywhere from half inch to three inches or more. I swear while I’m working at the potting bench behind me the plants are growing — I try to turn swiftly to see if I can catch them at it! Usually I throw on some kind of movie or documentary more as background noise than anything. I’m going to try different kinds of music and see how that works! Won’t even bother with audio books simply because my attention span isn’t there. I’ve always been that way. Back when we did city farmers markets one of my drivers would rent volumes from the library and listen to them on the drive. Me? I'd start a book and next thing the tape is at chapter 20 and I have to start all over again because I didn’t hear a thing! However these days the rows and rows of trays all seeded out show where my attention really was!
Vegetables / Recipes — This is probably the last of cipollinis until summer. We pulled squash from the freezer for you. We think it’s butternut, we're not 100% sure but definitely it's a winter variety.
BUTTERNUT SQUASH, SPINACH, CIPOLLINI ONION & PASTA
with ROASTED GARLIC BUTTERNUT CREAM SAUCE
This is a great comfort dish.
Ingredients
For the Butternut Cream Sauce:
6-8 cloves of garlic roasted
1 cup butternut squash roasted
1/4 cup raw cashews soaked in water for an hour or two
1 cup vegetable stock
1 1/2 Tbsp. white miso
2 Tbsp. nutritional yeast
1/2 tsp. Frank’s red hot sauce
juice of 1/2 lemon
1/2 tsp. kosher salt
For the Pasta:
1 cup butternut squash roasted, broken into large chunks
4-5 cipollini onions peeled, roasted whole
1/2 lb. baby spinach
1/2 lb. pasta
1 Tbsp. olive oil
Preheat the oven to 375° F
Directions
- Rub the squash with olive oil, salt, and pepper. Roast in the oven, cut side down, for 30-45 mins. or until squash is tender and cooked through.
- Peel the onions by dropping them in boiling water for a minute and then shock in ice water. Peel the loose skins and dry. Toss the onions with olive oil, salt, and pepper. Drizzle garlic with olive oil and wrap in aluminum foil. Place on pan with onions. Roast in the oven for 20-30 mins or until onions are cooked through and browned and the garlic is soft.
- Make the sauce: Put all the sauce ingredients in a blender and blend on high speed until completely smooth. 1-3 minutes.
- Cook the pasta according to the package. Drain and put back into the pot. Add the sauce and spinach and stir to incorporate.
- Scoop the pasta into bowls and top each serving with the roasted cipollini onions and chunks of the remaining butternut squash. Enjoy!
Source: https://onebitevegan.com/BUTTERNUT-SQUASH-SPINACH-CIPOLLINI-ONION-ROASTED-GARLIC-BUTTERNUT-CREAM-SAUCE/
For more recipes check out our farm recipe blog: https://blackdirtrecipes.wordpress.com
Follow us on Instagram @yesifarm
Spring Share Week #2
Finally the fields are drying, the rains are lessening, the temperatures are rising. Spring is really here! First crop to go in the ground will be potatoes. We have to clean and grade them. This is a process of sorting by size and checking for good healthy tubers. The small creamer size will go in the ground as whole tubers, the bigger ones will need to be cut. Each piece ideally should have around 3 sets of eyes. Some potatoes will be cut in halves, others in thirds and if really huge in quarters. There’s differing theories on when to cut them some, say you need to cut them and let them “scab over” so no disease can get in, others say no, no cut and plant. We do mostly the first method — plant and hold them, it’s really more because of the time factor than anything else and it’s also how my Dad did it so how I was trained.
Vegetable / Recipe
Cippolini shoots are delicate, soft, and crunchy. The color ranges from white and palest green to darker green. Raw they can have some bitter notes which I often think is one of the flavor notes of spring! Cooked they seem to have a nutty and slightly sweet, pungent flavor, but the flavor is milder and less potent than a full-grown onion. They can be used like scallions or chives.
This frittata recipe uses caramelized onions which yes do take time but the flavor is so so worth it! You can also break this recipe down into sections, read the notes — croutons can be made in advance and so can the caramelized onions. I’ll often make a batch of caramelized red onions and another of yellow ones and pop them in the freezer. Makes a quick addition of great flavor to a soup, stew, omelet!
FRENCH ONION FRITTATA — This frittata is loaded with all the best parts of a great bowl of French onion soup: velvety caramelized onions, melted Gruyere, even cubes of toast.
YIELD: Serves 6
Ingredients
2 tablespoons unsalted butter, divided
2 cups diced day-old bread
1 tablespoon olive oil
2 large yellow onions, thinly sliced
1 1/2 teaspoons kosher salt, divided
1 tablespoon balsamic vinegar
8 large eggs
1/4 cup whole or 2% milk
1 tablespoon Dijon mustard
1/4 teaspoon freshly ground black pepper
1/2 cup diced Gruyère cheese (2 ounces)
1 tablespoon finely chopped fresh chives
Directions
1. ARRANGE A RACK IN THE MIDDLE OF THE OVEN AND HEAT TO 400°F.
2. Heat 1 tablespoon of the butter in a 10-inch cast iron skillet over medium heat until bubbling. Add the bread cubes to the pan, toss to coat with the butter, and arrange in a single layer. Toast the bread, tossing every minute or so, until the bread cubes are golden-brown on all sides, about 5 minutes total. Transfer the croutons to a bowl; set aside.
3. Reduce the heat to low. Add the oil, onions, and 1/2 teaspoon of the salt to the same skillet. Cook, stirring every 5 to 10 minutes and scraping any browned build-up from the bottom of the pan, until the onions are soft and deeply browned, about 40 minutes total. Add the vinegar and scrape up the browned bits at the bottom of the pan.
4. Whisk together the eggs, milk, mustard, remaining 1 teaspoon salt, and pepper in a large bowl. Stir the remaining butter and croutons into the skillet, then spread in an even layer. Pour the egg mixture over the top. Tilt the pan to make sure the eggs settle evenly. Top with the cheese. Cook until the eggs at the edges of the skillet begin to set, 2 to 4 minutes.
5. Bake until the eggs are set, 8 to 10 minutes. To check, cut a small slit in the center of the frittata. If raw eggs run into the cut, bake for another few minutes; if the eggs are set, pull the frittata from the oven.
6. Cool in the pan for 5 minutes, top with chives, then slice into wedges and serve warm. A dollop of sour cream can take this over the edge!
Notes: Make ahead: The croutons can be made up to 1 week in advance and stored in an airtight container at room temperature. The caramelized onions can be made up to 3 days in advance and stored in an airtight container in the refrigerator, or up to 3 months in advance and stored in the freezer.
Storage: Leftovers can be stored in a covered container in the refrigerator for up to 5 days.
Source: HTTPS://WWW.THEKITCHN.COM/RECIPE-FRENCH-ONION-FRITTATA-246166
For more recipes check out our farm recipe blog: https://blackdirtrecipes.wordpress.com
Follow us on Instagram @yesifarm
Spring Share Week #1
Another wet spring day, the rain was coming down in buckets throughout the night. Just when you think it’s “safe” and the fields are dry enough to work another deluge comes. One good thing about it is we are crushing it in the heated greenhouse. So many seeds started! Once the weather breaks in earnest we’ll be pushing hard in the fields. We’ll have: Swiss chard, lettuces, cabbages, bok choy, tat tsoi, cilantro, scallions, spinach, kales, mustard greens, herbs and right behind those cool weather tolerant crops will come the tomatoes, peppers—hot and sweet, cucumbers, summer squash, melons, eggplants, more herbs; and then the crops we will plant directly in the fields — potatoes, winter squash, more cucumbers, summer squash and herbs. I’m salivating already!
Vegetables / Recipes
Did you know you can cook lettuce? I especially like romaine on the charcoal grill!
SAUTÉED SPRING GREENS WITH BACON & MUSTARD SEEDS
Ingredients
1 ounces thick-cut bacon, finely diced
1 tablespoons extra-virgin olive oil
1 medium shallot, thinly sliced
1 small hot red chile, seeded and finely chopped
½ tablespoon yellow mustard seeds
¾ pounds mixed young spring greens, such as dandelion, mustard, collards, lettuces, Tuscan kale and spinach—stems and inner ribs trimmed, leaves cut into ribbons
Salt
Freshly ground pepper
¾ tablespoon white wine vinegar
Directions
In a large skillet, cook the diced bacon in the olive oil over moderate heat, stirring, until golden, about 3 minutes. Add the shallot, chile and mustard seeds and cook until softened, 2 to 3 minutes. Add the greens, season with salt and pepper and cook, tossing frequently, until wilted and tender, 5 to 6 minutes. Stir in the vinegar and serve.
Make Ahead: The cooked greens can be refrigerated overnight.
Notes: Most any greens will work with this and is a great year round recipe
Source: https://www.foodandwine.com/recipes/sauteed-spring-greens-bacon-and-mustard-seeds
I love what I call stupidly simple recipes that taste insanely good while being ridiculously easy — this could be one of those — I’ll let you decide
SIMPLE LEMONY SPRING GREENS “A brilliant little side dish — the lemony dressing transforms these simple greens into a zesty delight.”
Ingredients
1 lemon
2 tablespoons extra virgin olive oil
sea salt and freshly ground black pepper
spring greens
Method - Dressing
1. Using a microplane, finely grate the lemon zest onto a chopping board, then transfer to a jam jar.
2. Cut the lemon in half.
3. Squeeze half the juice into the jar, using your fingers to catch any pips (keep the remaining lemon for another recipe).
4. Add the extra virgin olive oil to the jar with a tiny pinch of salt and pepper.
5. Put the lid securely on the jar and shake well.
6. Have a taste and see whether you think it needs a bit more lemon juice or oil – you want it to be slightly too acidic, so that it’s still nice and zingy once you’ve dressed your spring greens.
7. Half-fill a large saucepan with cold water and add a tiny pinch of salt.
8. Place on a high heat and bring to the boil. Meanwhile...
9. Trim and cut the spring greens in half lengthways, then finely slice them.
10. Once the water is boiling, carefully add the spring greens and cook for 3 to 4 minutes, or until tender but still bright green in colour.
11. Once cooked, drain the spring greens over the sink into a colander, steam dry for a minute, then tip back into the pan.
12. Give the dressing another good shake up, then drizzle it over the greens.
13. Using tongs, gently toss the spring greens in the dressing while they’re still hot to help them soak up all the dressing, then transfer to a bowl and serve straight away.
Tips: This zesty lemon dressing works nicely on fresh crisp salads as well as other boiled or steamed greens, such as savoy cabbage or pak choi.
This makes a fantastic side dish and you can serve it with almost anything - grilled meats or fish, stews, roasts – you name it!
Source: https://www.jamieoliver.com/recipes/vegetables-recipes/simple-lemony-spring-greens/
For more recipes check out our farm recipe blog: https://blackdirtrecipes.wordpress.com
Follow us on Instagram @yesifarm
Winter Share Week #13
Thank you all for your support. It means so much to a small farm like ours! Our farmers are profusely grateful for all you do and are so excited to begin working in the fields again soon! For a farmer Spring isn’t recognized by a date on a calendar or a groundhog's shadow. Not that these things don’t matter or aren’t taken into consideration. For a farmer Spring is marked by the level of frost in the ground, buds bursting out on fruit trees and pussy willows, animals like skunks out of hibernation busy foraging for food. Robins are flitting about looking for worms or some other tasty morsel. You can feel the anticipation in the air, tractors lined up on farm yards like horses ready to bolt from their stalls. Farmers and mechanics frantically tuning up equipment, fertilizer being delivered by the ton, 5-gallon pails of seed arriving almost daily. All this and more tells me Spring is HERE!!!!
Vegetables / Recipes — With today being the 17th of March we put together an Irish-themed share for you.
TRADITIONAL IRISH COLCANNON POTATOES AND CABBAGE — This traditional Irish Colcannon side dish is made with creamy mashed potatoes, swirled with fried cabbage, onions, crisp bacon and simply seasoned with salt and pepper. It’s the perfect addition to any comfort food meal. Author: Beth Pierce
Ingredients
3 large Gold potatoes peeled and chunked
3.1/2 tablespoons butter
1/4 cup heavy cream
1 small onion chopped
1/4 head green cabbage chopped
3 slices crispy cooked bacon coarsely chopped
salt and pepper to taste
Instructions
- Place potatoes in a large saucepan with enough lightly salted water to cover. Bring to a boil, and cook for 15 to 20 minutes, until tender. Drain well making sure to remove excess water. Add 2 tablespoons butter and cream. Cover and let the butter melt.
- Meanwhile melt 1 tablespoon of butter in a large skillet over medium heat. Add the onion and cook until tender. Add cabbage and cook until tender and lightly browned on the edges: approximately 7-8 minutes.
- Mash potatoes and gently stir in the cabbage mixture and half of the chopped bacon. Season with salt and pepper to taste. Top with remaining chopped bacon. Cut the remaining tablespoon of butter into pats. Make small well in top and add remaining butter.
Notes from the author Beth Pierce:
· I use a mixture of Russet and Yukon Gold potatoes for this recipe but you can use one or the other if desired.
· For aesthetic purposes and for the tradition of the recipe stick with green cabbage.
· Are you always pushed for time? Then cook the bacon up to 3 days in advance and store in a sealed zipper bag in the fridge. The potatoes can be peeled and soaked in cold water up to 4 hours in advance of boiling them.
· If cooking the bacon at the same time whether it be in the oven or in the skillet. Reserve 2 tablespoons of the bacon fat and use it in place of 2 tablespoons of butter for pan frying the cabbage and onion.
· This delectable dish reheats very well in the microwave at a reduced power.
· Store leftovers in an airtight container in the refrigerator for up to three days.
· You can freeze these potatoes in a heavy duty freezer bag for up to 3 months. Defrost overnight in the refrigerator. Because of the high moisture content in both potatoes and cabbage you may need to rework the mash with some butter, sour cream or cream cheese to get it back to its original texture and consistency.
Source: https://www.smalltownwoman.com/traditional-irish-colcannon-potatoes-and-cabbage
RUSTIC POTATO LEEK SOUP Yield:3 to 4 servings
This Rustic Potato Leek Soup recipe is kept nice and chunky, it’s naturally gluten-free and vegan (no cream), and it’s full of the coziest, comforting, simple flavors.
Ingredients
· 1 tablespoon olive oil (or butter)
· 1 small onion, peeled and diced
· 1-2 leeks, sliced into 1/2-inch half moons (white and light green parts only)
· 1/2 rib celery, thinly sliced
· 2-3 cloves garlic, minced
· 1/4 cup dry white wine
· 3/4 pounds Gold potatoes, cut into bite-sized chunks
· 3 cups vegetable stock
· 2 sprigs fresh thyme
· 1 bay leaf
· 1/8 teaspoon cayenne (or less, if you prefer)
· fine sea salt and freshly-cracked black pepper
· optional toppings: homemade croutons, grated Parmesan, chopped fresh chives
Instructions
1. Sauté the veggies. Heat olive oil (or butter) in a large stockpot over medium-high heat. Add the onion and sauté for 5 minutes, stirring occasionally. Add the leeks, celery and garlic and sauté for 3 minutes, stirring frequently.
2. Add the potatoes and broth. Add the white wine and use a wooden spoon to lift off any browned bits that are stuck to the bottom of the stockpot. Add the potatoes, vegetable stock, thyme, bay leaves, cayenne and stir to combine.
3. Simmer. Continue cooking until the soup reaches a simmer. Then reduce heat to medium-low, cover and simmer for 10 to 15 minutes, until the potatoes are tender.
4. Season. Remove and discard the bay leaves and thyme stems. Give the soup a taste and season with however much salt and black pepper you think it needs.
5. Serve. Serve warm, garnished with whatever toppings sound good, and enjoy!
Source: https://www.gimmesomeoven.com/rustic-potato-leek-soup/
For more recipes check out our farm recipe blog: https://blackdirtrecipes.wordpress.com
Follow us on Instagram @yesifarm
Winter Share Week #12
What a scramble yesterday was! 5:00 AM phone rings — school is closed for the day. My sister was thrilled she didn’t have to go into work! Sue is an Occupational Therapist in a local school district. For me it was an omen of things to come. 6:30 AM and Lupe arrived for work. We reviewed the day's agenda and we each got started on our chores for the day. 7:00 AM my cell is ringing — uh-oh, it’s Silvia, she can’t come in today because school is closed and she has no daycare. So it’s up to Lupe to get all your produce ready. Our crew is AWESOME! Lupe pulled it off and we were able to leave a bit earlier to get to the city. The further from home we got the better the roads were. Took a bit longer to travel but we made it to you and back safely!
Vegetables / Recipes
GARLIC PARMESAN ROASTED CARROTS — Garlic Parmesan Roasted Carrots with the addition of Panko breadcrumbs for added crunch! A simple recipe for your dinner table, or enjoy them as a snack!
Ingredients
- 2 pounds (1kg) carrots, washed and halved
- 1/4 cup olive oil
- 4 large cloves garlic, minced (or 1 tablespoon minced garlic)
- 1/4 cup grated parmesan cheese
- 2 tablespoons Panko bread crumbs, (or normal breadcrumbs)
- Salt and pepper, to taste
- Fresh chopped parsley, optional
Instructions
1. Preheat oven to 400°F (200°C). Lightly grease or spray a baking sheet with cooking oil spray.
2. Arrange carrots on baking sheet. Add the olive oil, garlic, parmesan, bread crumbs, salt and pepper. Toss all ingredients together to completely coat the carrots. Spread out and bake for 20-25 minutes or until tender. Toss with a spatula half way through.
3. Remove from oven and serve immediately. Top with fresh parsley if desired.
Source: https://cafedelites.com/garlic-parmesan-roasted-carrots/#recipe
20 Easy recipes for carrots: https://www.acouplecooks.com/carrot-recipes/
For more recipes check out our farm recipe blog: https://blackdirtrecipes.wordpress.com
Follow us on Instagram @yesifarm
Winter Share Week #11
Over time you develop “a feel,” an inner sense of “something.” For instance when the farmers are harvesting and I’m at the wash station waiting for them to come in from the fields. You're busy working, cleaning, planning, sorting, getting the rest of the orders together suddenly your radar is up, they’re late, should have been here already. Ok what are the possibilities? Harvesting took longer, I forgot something from the cut list and they remembered so there was more to do, the tractor broke down, the van got stuck ... Sure enough one of the above happened but they worked it out and arrived safe and sound. Yesterday morning at 1:00AM I had that sense of something wasn’t right, went to the greenhouse and discovered there was no electric. Started with the obvious, checked the circuit breakers, everything was ok there. Couldn’t do much in the dark, I hunted down extension cords and got the heaters connected to electric from the house and was able to keep everything from freezing. Once daylight arrived we began checking everything out. Turns out a cable shorted out, we replaced that and we were back in business. Thank goodness for having that “sense of something isn’t right!”
Vegetables / Recipes — Some things I keep on hand to help speed up prep time:
- I like to “roast” garlic in olive oil and/or sunflower seed oil in a pot on top of the stove. I’ll keep a quart of this in the fridge and use it for whenever I want an extra layer of flavor.
- I peel and slice a whole bunch of onions and keep them in the fridge. This way I can toss some in the sauté pan or chop them up finer depending on the recipe I’m using. Save the peels and freeze them.
- Parsley stems – quite frequently I need just the leaves and am left with the stems – into the freezer they go!
- I tend not to peel carrots but when I do I toss the peels into a Ziploc bag and freeze them.
- When I‘m ready to make a pot of stock I’ll add the frozen onion skins, carrot peels, and parsley stems to the broth for extra flavor. Just remember carrots are naturally sweet so the more you put in the broth the sweeter it will be.
- Other vegetable trimmings I’ll freeze are the tough green portion of leeks, the rooty portion of celery. All of these and more can add great flavor to your stocks and take your soups to another level.
A friend of mine has been recovering from COVID and I’ve been cooking for her and her family for a couple months now. This soup is in the top ten of their favorites and I make it almost every week for them.
BEST VEGETARIAN KALE SOUP
Ingredients
1 tbsp. extra-virgin olive oil
1/2 yellow onion, finely chopped
2 stalks celery, finely chopped
1 leek, cleaned and thinly sliced (white and pale green parts only)
3 cloves garlic, minced
2 tsp. thyme, freshly chopped
1/2 tsp. red pepper flakes (optional)
Kosher salt, Freshly ground black pepper
4 c. low-sodium vegetable broth
2 c. water
2 (15.5-oz.) cans cannellini beans, drained and rinsed
Juice of 1 lemon
1 large bunch kale, removed from stems and torn into medium pieces
Freshly grated Parmesan, for serving
Directions
1. In a large pot over medium heat, heat oil. Add onion, celery, and leek and cook until slightly soft, 6 minutes. Add garlic, thyme, and red pepper flakes (if using) and cook until fragrant, 1 minute more. Season with salt and pepper.
2. Add broth, water, and beans and bring to a simmer. Stir occasionally, mashing some beans in the pot to thicken soup. Let simmer 15 minutes, then stir in lemon juice and kale. Cook until wilted, 3 minutes.
3. Garnish with Parmesan before serving.
Notes: You can substitute celeriac for celery. I like to place a slice of lemon on top of the soup when I deliver it – looks so pretty and the lemon gives that extra burst of brightness
Source: https://www.delish.com/cooking/recipe-ideas/a25647805/vegetarian-kale-soup/
Back in the day when I used to frequent Panera the following was one of my absolute favorite “soup bowls.” I can make a meal out of just this!
LENTIL, QUINOA, AND KALE SOUP
Ingredients
· 1 onion, cut into large chunks
· 2 cloves garlic
· 2 stalks celery, cut into large chunks
· 3 carrots, cut into large chunks
· 3 roma tomatoes, cut in half
· 1 teaspoon oil
· salt and pepper
· 2 teaspoons Bouquet Garni herb blend (or ¼ tsp each of dried rosemary, thyme, and parsley)
· ¼ cup soy sauce
· 1 can (14.5 ounces) diced tomatoes
· ½ cup uncooked lentils
· ½ cup uncooked quinoa
· 4 cups vegetable broth
· 6 cups water
· 3 cups roughly chopped kale
· 3 cups fresh spinach
· juice of 1 lemon
· 4 hard boiled eggs (optional)
· 2 cups cooked, chopped chicken (optional)
Instructions
1. Place the onion, garlic, celery, carrots, and tomatoes in a food processor, blender, or Nutribullet. Blend until a puree forms.
2. Heat oil in a large stock pot over medium heat. Once heated, add the vegetable puree. Sprinkle with salt and pepper. Add the herbs. Cook the mixture for about 5 minutes, stirring occasionally. Add the soy sauce, diced tomatoes, lentils, and quinoa. Stir to combine.
3. Add the vegetable broth and water and stir. Bring the mixture to a boil. Then, reduce to a simmer.
4. Cover the pot and let the soup simmer for about 15 minutes. At the 15 minute mark, give the lentils a taste. If they're still a little firm, let the soup simmer for a few more minutes until the lentils are tender.
5. Uncover the pot and add the kale, spinach, and lemon juice. Stir until combined. Give the soup a taste and add salt, pepper, and/or additional lemon juice to taste.
6. Ladle soup into bowls and top with a hard boiled egg and/or chicken, if desired.
Notes: Serving size — 2 cups
My favorite add-in was the hard boiled eggs. I seldom requested chicken.
Source: https://www.destinationdelish.com/lentil-quinoa-kale-soup/
For more recipes check out our farm recipe blog: https://blackdirtrecipes.wordpress.com
Follow us on Instagram @yesifarm
Winter Share Week #10
I went down to the fields the other day just to get a “feel” for their condition. So soggy and wet, everywhere you look throughout the valley water is standing in puddles. Our fields are no different. I already know I will have to rent an excavator and clean the ditches. When the farmers and I were chatting yesterday Lupe reminded me about the watercress. Before I can run the excavator we will have to remove the watercress, set it on the side and then I will be able to clean the ditch to its proper depth so we will have good water flow. After this I’ll replace the watercress back in its bed and keep fingers crossed that it will take and grow again! That’s the funny (not really) thing about farming you’re always rolling the dice taking a chance that the seeds will germinate properly, crops will grow healthily, animals and insects will not devour the harvest, the rains will come at just the right time in just the right amounts, the winds will gently kiss the fields and crops, not viciously whip like an angry banshee across the valley. I always make a joke that this is why I don’t visit the casinos—I gamble enough already!
Vegetables / Recipes
I tend to have obsessive characteristics in my personality, I’ll fixate on a particular vegetable or type of recipe and lately it’s been celery root and hummus. I’m starting to think there isn’t a vegetable that can’t be turned into hummus, especially root vegetables. Went searching for a celery root hummus recipe and settled on this one.
A NOT SO SCARY RECIPE FOR CELERY ROOT HUMMUS
Ingredients
1 Celeriac (Celery Root), peeled and cut into 1 inch cubes (about 2 Cups total)
1/4 Cup Extra Virgin Olive Oil
1 Medium Yellow Onion, diced
1 Leek, white part only, cut into thin slices
8 Cloves Garlic, peeled and minced
1 Bay Leaf
2 Cups Vegetable Stock
2-3 Cups Water
1/2 Cup Sesame Tahini
1/4 Cup Fresh Lemon Juice
1 Teaspoon Freshly Ground Black Pepper
1/2 Teaspoon Cayenne Pepper Powder
1/2 Teaspoon Ground Cumin Seed
Toppings: Dukkah, Smoked Spanish Paprika, Lemon Infused Extra Virgin Olive Oil
Method
- With a large, sharp knife, peel the gnarly exterior from the celery root. Slice the root into 1 inch cubes (you don’t have to be too fussy about this--you just want the pieces roughly similar in size so they cook at the same rate).
- Heat one tablespoon of the olive oil in a stock pot and saute the onion, leek, and garlic until the onion is soft and translucent.
- Add the vegetable stock, water, and bay leaf to the pot and bring to a boil. Add the celery root. Simmer until the celery root is tender (about 20 minutes).
- Drain and reserve the stock and remove the bay leaf. Add the celery root mixture to a food processor. Add the remaining ingredients (excluding the topping ingredients of course), pulse until smooth. Add some of the reserved stock if the mixture is too thick.
Source: https://www.slowburningpassion.com/not-scary-recipe-celery-root-hummus/
EASY TO MAKE CELERIAC ROOT SLAW — Enjoy this sweet celeriac root slaw full of health benefits that can improve your health. It's easy and simple to make.
Ingredients
1 small celeriac
2 medium oranges or 1 big orange
few almonds (10-15)
few celery leaves (not celeriac leaves)
lemon
small piece of fresh ginger
Coleslaw dressing:
1/2 cup yogurt
chopped fresh dill or herb of your choice
1/2 teaspoon apple cider vinegar
1 tablespoon cold-pressed olive oil or a healthy oil
pinch of salt
dust of grounded black pepper
Instructions
Mix all the ingredients for coleslaw dressing and set them aside. Clean the celeriac, ginger and oranges. Peel the oranges with a knife and get the segments. Place the almonds on a chopping board and using your sharp knife, cut them into pieces. Cut the celeriac into two, peel one part and grate it on a bowl using a vegetable grater. (Get about 1½ cups). Grate ginger. I don't peel mine, but do so if you want to. Squeeze ½ the lemon all over the slaw and mix to avoid oxidation. Chop the green celery leaves. Bring everything in the bowl with celeriac slaw and mix gently. Serve the celeriac slaw or you can store to use it later during the day. Make sure to cover it tightly in a bowl and keep in your fridge.
Notes: Sub parsley for celery leaves, Mandarins or clementines are a nice swap for the oranges. If you have a favorite coleslaw dressing recipe that will work on this as well, just remember to keep that celeriac covered with lemon juice or lemon water to keep it white! Source: https://foodnheal.com/easy-to-make-celeriac-slaw-recipe/#recipe
CELERIAC & POTATO MASH
Serve this with stews, when you fancy a change from plain mashed potato
Ingredients
1 ½ pounds potatoes , cut into chunks
1 pound celeriac , peeled and cut into chunks
3 ounces salted butter, plus a knob to serve
4 bunches spring onions , about 550g, cut into 1cm slices (including the green parts)
4 ounces double cream
freshly grated nutmeg
Method
Boil the potatoes for 20-25 mins until tender, adding the celeriac after 5 mins. Drain and press through a potato ricer back into the pan once the surface water has evaporated, or mash well with a potato masher in the dry pan.
STEP 2
While the potatoes cook, melt the butter over a medium heat, then sweat the onions for about 5 mins until soft and silky, stirring occasionally. Add the cream and season with salt, pepper and nutmeg. Bring to a simmer, then cook for another few mins until this thickens a little. Stir two-thirds of the creamy onions into the potato and celeriac purée. Season to taste. If making in advance, cover the surface of the mash and the sauce with cling film, then set aside. Can now be frozen or made up to a day ahead. Just before serving, gently reheat the mash and reserved sauce. Spoon the mash into a serving bowl, pour the sauce on top and turn it over a few times to loosely mix. Make a well in the centre and drop in the remaining knob of butter. Source: https://www.bbcgoodfood.com/recipes/celeriac-champ-0
Notes: – no green onions? Substitute regular onions or shallots. Instead of double cream use heavy cream, crème fraiche, sour cream, I’ve even subbed cream cheese
For more recipes check out our farm recipe blog: https://blackdirtrecipes.wordpress.com
Follow us on Instagram @yesifarm
Winter Share Week #9
Beautiful, delicious, creamy, sweet, rich, buttery-soft, juicy, tender succulent, lush, robust, vigorous, ravishing, sparkling, fruity, umami, astonishing, brilliant, mouthwatering, unique, scrumptious, sugary, unique, delicate, pleasure, hearty. Words but not just words, I pulled all of these words from just one seed catalog. How could you not fall in love, or maybe even lust, when you read all of the descriptions? Choosing just a few varieties between the hundreds and thousands available is difficult for someone like me who wants to grow as many of them as I can. Always searching for the traits and qualities that are best for us. Flavor is always a top contender, Non-GMO, heirloom, how it will be used, disease resistance, color, storage qualities. What do our customers want or like? So off I go to continue dreaming and salivating about what our next harvest will be like!
Vegetables / Recipes — Turnips, (Frozen) Tomatoes
Turnips can be eaten raw or cooked. Roasting brings out their sweetness if you can imagine saying that about a turnip!
CREAMY TURNIP SOUP
Ingredients
4 large turnips
2 small onions, or leeks
2 cloves garlic
2 tablespoons olive oil , or butter
1 dash salt
4 cups chicken broth, or vegetable broth
1/4 to 1 cup heavy cream
Turnip greens, or parsley, for garnish
Directions
Peel the turnips, chop them into small chunks, and set them aside. Peel and finely chop onions or clean and finely chop leeks. Set aside. Chop garlic and set aside. Heat the oil or butter in a medium pot over medium-high heat. Add the onions or leeks, sprinkle with salt, and cook, stirring occasionally, until onions are soft, about 3 minutes. Add the garlic and cook, stirring, until fragrant, about 1 minute. Add the turnips and broth. Bring everything to a boil. Reduce the heat to maintain a steady simmer and cook until the turnips are very tender, about 10 minutes. In a blender, whirl the soup until very smooth, at least 2 minutes per batch. (Tip: Cover the lid of the blender with a kitchen towel to prevent burns.) Return the soup to pot and add the cream. Adding just 1/4 cup will smooth out the edges of the soup; the more you add the thicker and more luxurious the soup will become. Add salt to taste. Garnish with shreds of thinly cut turnip greens or parsley, if you like. Serve the soup hot.
Use Caution When Blending Hot Ingredients
Steam expands quickly in a blender, and can cause ingredients to splatter everywhere or cause burns. To prevent this, fill the blender only one-third of the way up, vent the top, and cover with a folded kitchen towel while blending.
Source: https://www.thespruceeats.com/creamy-turnip-soup-recipe-2217429
ROASTED TURNIPS & PEARS WITH ROSEMARY HONEY BUTTER
A sweet and savory turnip recipe that makes the perfect vegetarian side dish.
Ingredients
3 to 4 purple top turnips - small to medium, washed and cut into 1-inch pieces
4 Bartlett pears - cored and cut into 1-inch pieces
3 tablespoon olive oil
Sea salt - to taste
Black pepper - to taste
For the drizzle:
3 tablespoon butter
1 tablespoon honey
1 tablespoon fresh rosemary – chopped
Instructions
- Preheat oven to 425 degrees F and line a baking sheet with parchment paper. Toss the diced turnips and pears in olive oil, salt, and pepper. Transfer them to the lined baking sheet and spread out in an even layer. Bake for about 25-35 minutes, or until the turnips are tender, flipping halfway through.
- While the turnips and pears are cooking, heat the butter in a small saucepan over low heat. Add in the honey and rosemary and stir until smooth. Remove from heat.
- Transfer the cooked turnips and pears to a bowl and drizzle the honey butter dressing over them. Mix until they are covered. Enjoy warm!
- This is best served right away, but leftovers can be stored in an airtight container in the fridge for up to 3 days. Reheat in the microwave to make sure the butter gets re-melted
Source: Source: https://itsavegworldafterall.com/roasted-turnips-and-pears-with-honey-butter-and-rosemary/
ROASTED TOMATO SOUP
Ingredients
6 large roma tomatoes, peeled
1 Tbsp olive oil
2 cloves of garlic, peeled
handful of fresh basil
¼ tsp dried oregano
1 tsp kosher salt
¼ tsp black pepper
½ cup heavy cream
¼ cup shredded parmesan cheese, for garnish
1/8 cup shredded basil, for garnish
½ cup croutons, for garnish
How to Peel Frozen Tomatoes
Run the frozen tomato under cold water for about 15 seconds. Slide your nail under the peel, while in cold water, and the peel just FALLS OFF. Repeat and enjoy!
Directions
- Slice tomatoes in half and stir together with olive oil and cloves of garlic. Pour onto a roasting pan and sprinkle with salt and pepper. Roast in oven at 400°F for about 45 minutes.
- Remove from oven and add contents of roasting pan into a dutch oven or large soup pot. Add in basil. Using an immersion blender, puree until smooth. If desired, you can puree in a blender (instead of using an immersion blender) and pour pureed contents into the soup pot.
- Add oregano and heat over low heat, covered. Simmer for about one hour, stirring occasionally. When ready to serve, drizzle heavy cream into bowl and top with parmesan cheese, fresh basil, and croutons! ENJOY! Source: https://www.shugarysweets.com/roasted-tomato-soup/
For more recipes check out our farm recipe blog: https://blackdirtrecipes.wordpress.com
Follow us on Instagram @yesifarm
Winter Share Week #8
Something I heard on the radio the other day said that about 2 plus minutes — that’s all the time every day it takes for daylight to increase from the winter solstice until we reach the summer solstice and the longest day of the year. I have to make my full disclosure here that I have never measured it but a few quick Google searches gave me more random bits of info from all over the world about the science of it. So that’s the result of my very, very limited scientific research. What I can attest to is what I see from the plants around me and seedlings I start in the greenhouse. After February it’s like the plants are on steroids and they grow in leaps and bounds! This is all in direct response to the increase in daylight. Of course heat does play a part but it’s the light, it’s all about the light. I know I feel like I grow in leaps and bounds too as I spend more time in the greenhouse and start getting ready to break ground in the fields for planting. Like a sunflower in the field I find myself reaching, stretching and lifting up my face to soak in as much sun as I can!
Vegetables / Recipes — Sweet Corn, Beets
Frozen Sweet Corn — Brings back memories of warm sunny days
HERB BUTTER SKILLET CORN
· 8 ounces Frozen Corn
· 2 Tablespoons Unsalted Butter
· Salt/Pepper - to taste
· 1-2 Sprigs Fresh Thyme
· 1/2 to 1 Tablespoon Fresh Chopped Parsley
Instructions
1. Heat large skillet over medium/high heat. Add frozen corn and butter to pan. Pan fry for 5 minutes, stir frequently.
2. Add salt, pepper, thyme and parsley. Stir and cook 1 more minute. Serve.
Source: https://wonkywonderful.com/herb-butter-skillet-corn-recipe/
Beets are so good for you and so pretty to look at! And so useful in so many ways — raw grated into salads, blended into yogurt for a dip, juiced, roasted, I like to make borscht and hummus from my beets. I even like them simply roasted with a bit of melted butter and fresh thyme sprinkled over them.
LEMON DIJON BEET SALAD
Creamy Lemon Dijon Vinaigrette: Makes about ½ cup dressing
Beet Salad: Serves one, or two for an appetizer
Creamy Lemon Dijon Vinaigrette
Ingredients
1 1/2 tablespoons Dijon mustard
2 tablespoons light coconut milk (using regular coconut milk makes it even creamier)
1 tablespoon maple syrup or honey
Zest of 1 organic lemon
1 tablespoon extra-virgin olive oil
Juice of 1 organic lemon
1/4 teaspoon sea salt
Fresh ground pepper
Directions
1. In a 1 cup volume measuring glass add the Dijon, the coconut milk, sweetener, and lemon zest. Stir until combined.
2. Slowly drizzle in the extra-virgin olive oil while stirring. Once combined, add the lemon juice a splash at a time, stirring in between.
3. Add sea salt and fresh ground pepper to taste. Pour dressing into a sealable glass jar.
Beet Salad
Ingredients
Handful mixed greens (spring mix or spinach)
Creamy Lemon Dijon Vinaigrette
3 roasted beets, peeled and sliced thin
Cilantro sprigs as garnish (or basil, parsley and thyme will also work)
Directions
See how to roast beets here. Place mixed greens onto a serving plate, and drizzle with a little bit of the dressing (you don’t need much because the dressing is very flavorful). Top the greens with the sliced beets. Drizzle with a little more of salad dressing, once again a little goes a long way and garnish with fresh herbs.
Optional: Top with fresh goat cheese and/or chopped roasted walnuts.
Source: http://www.poppiesandpapayas.com/2013/11/a-power-outage-and-lemon-dijon-beet.html
For more recipes check out our farm recipe blog: https://blackdirtrecipes.wordpress.com
Follow us on Instagram @yesifarm
Winter Share Week #7
No matter what the groundhog says one thing we count on is that spring IS coming however in its own good time. If you follow the Almanac the official start of Spring will be here March 20th. So while thoughts of this keep us warm we ride the roller coaster of this winter’s weather. This week these temps at 7:30 AM were all over the place: 1 degree on Monday, 3 degrees on Tuesday, 22 degrees on Wednesday, and 32 degrees today. Getting ready for the next downward spiral which will have the temperatures plummeting again for the upcoming weekend.
That gnarly looking root in your share today is celery root aka celeriac or knob celery. Related to traditional celery, and while the tops which look like celery are edible it is most prized for its root. The flavor is delicate and sweetish when compared to stalk celery and so versatile. Enjoy it raw, mashed, as a noodle substitute, and it makes a great addition to a tray of roasted vegetables or soup. It is a bit of a pain to peel, but I have learned that it is so worth the effort!!! Here is a link to a youtube video showing how to clean and cut it: https://youtu.be/2HZL-1YVwu8. If you aren’t going to use it right away, put it in acidulated water or it will quickly turn brown – just like potatoes will!
Vegetables / Recipes — Celeriac
CELERIAC AND PARSNIP SOUP
Ingredients
3 tablespoons extra virgin olive oil divided
1 yellow onion diced
3 cloves garlic minced
½ teaspoon salt
¼ teaspoon pepper
3 cups sliced parsnips about 1 pound
2.5 cups diced celeriac about 1 pound
1 tablespoon maple syrup optional
4 cups vegetable broth
12 sage leaves
Parsnip peels save them from the parsnips you use
½ cup whole milk omit or sub plant-based milk for vegan option
Instructions
– When preparing the veggies for this recipe, peel the parsnips with a swivel peeler and save the peels for later use. Peel the celeriac with a paring knife before dicing.
– Warm a tablespoon of olive oil in a soup pot over medium heat. Add the diced onion and cook for a few minutes until fragrant. Stir in the garlic, salt, and pepper and cook for a few more minutes. Add the parsnips, celeriac, and maple syrup (if using) to the pot. Pour in the vegetable broth, and increase heat to bring to a boil. Reduce heat to maintain a simmer, cover, and cook for 15 minutes until the veggies are tender. In the meantime, heat the rest of the olive oil in a skillet over medium heat. Once warm, add the sage leaves in a single layer. Let them fry for 30 to 60 seconds until crispy. Transfer them from the pan to a plate lined with a paper towel. Add the parsnip peels to the skillet and cook for a few minutes until crispy. Transfer to the plate with the sage. When the soup is finished cooking, turn off the heat. Blend it with an immersion (handheld) blender until smooth. See notes for instructions on using an upright blender. Stir in the whole milk. Ladle the soup into bowls, and top with the crispy sage and parsnip peels. Enjoy!
Notes
– If you don't have an immersion blender, blend the soup in batches in an upright blender. Do not fill it all the way to the top. Leave the lid cracked or remove the plastic center from the lid and cover it with a dish towel to let steam escape while blending. Pour the blended soup into a large bowl so you can repeat the process to blend the whole soup.
– Leftovers will last for 3 to 5 days in an airtight container in the fridge. Reheat in a saucepan or in the microwave.
– To freeze, let the soup cool before transferring to freezer-safe containers. Leave an inch of headspace in case the soup expands while freezing. Let the soup thaw in the fridge before reheating or just reheat from frozen. It should last for up to 3 months in the freezer.
Source: https://itsavegworldafterall.com/celeriac-and-parsnip-soup/#recipe
For more recipes check out our farm recipe blog: https://blackdirtrecipes.wordpress.com
Follow us on Instagram @yesifarm
Winter Share Week #6
Lupe is back to work thankfully her ailment was just a sore throat and feeling the cold in her bones!!! That bitter cold had to catch up with us sooner or later. When the farmers began washing your produce we discovered the pipes had frozen. Keeping our fingers crossed that the freeze wasn’t severe enough to burst any, we began the process of hauling 5 gallon buckets of water so we could keep the process moving along. After a couple of hours passed the pipes thawed and no leaks anywhere! Trying to get the snow blower started before the storm comes in and we’re in another pickle. Looks like I need to change the spark plug as it won’t fire up, already checked the other obvious items – oil, fuel, plugged in to electric and charged. Luckily most of these things are relatively simple and easily dealt with. Hopefully with a bit of time to focus, the right tools and Napa having the parts I need in stock I’ll get that puppy running in no time!
Vegetables / Recipes
Potatoes this week are a variety of Russet called Caribou – these are akin to the famous Idaho baking potatoes! I’m going to make some today as a double stuffed potato.
I enjoy preserving food, it’s something I grew up with. Dad loved to put up pickles in a crock, Mom preferred to put up vegetables for the freezer, Babci went for the boiling bath method for her jams and jellies, and Grampy was famous for his use of the pressure cooker to make his pasta fagioli. I employ any and all of the above methods. I am a fan of freezing vegetables partly as a space saving method and also for speed. Peak harvest is when you want to be putting things away for later and of course that is when you have the least amount of time available.
This week we have frozen tomatoes for you. We removed the core, popped them into zip lock bags and into the freezer they went. The bags contain 1 pound of tomatoes. You can use them in soups, stews, make a sauce. I wouldn’t recommend them for salads as the tomatoes will release a fair amount of juice that will make for a soggy salad.
SAUCE
– Hold a frozen tomato under warm running water for 20 to 30 seconds to thaw the skin. Peel the tomato by pulling the loosened skin off and discarding it. Repeat the process for four to six large tomatoes or eight to 10 medium-sized tomatoes.
– Set the peeled tomatoes in a bowl to thaw until they are soft enough to crush. Smash the tomatoes with a fork or squeeze by hand to break the tomatoes down into small chunks.
– Cook 2 to 3 tbsp. olive oil, one medium chopped onion, and three to four minced garlic cloves — depending on your taste preferences — over medium heat in a large pot, stirring until the vegetables are a light golden brown. Add the crushed tomatoes to the pan along with 2 to 3 tbsp. fresh chopped herbs such as basil, thyme, marjoram and oregano. Season the mixture lightly with salt and fresh-ground black pepper, to taste.
– Stir continuously until the mixture boils. Reduce the heat to medium, and simmer for an hour, without a lid, for a chunky sauce to serve over pasta. For a smoother sauce, simmer an additional 30 to 45 minutes until the sauce thickens.
– Allow the mixture to cool, then puree it in a blender.
SOUPS & STEWS
– Thaw the outer surface of frozen tomatoes by placing them briefly under warm running water. Remove the skins by peeling them away.
– Chop frozen tomatoes before they thaw completely to keep the juice from dripping on your work surfaces. Cut the frozen tomatoes into large chunks for meat and bean stews that have long cooking times. Make smaller pieces of tomato for faster-cooking vegetable soups.
– Add chopped frozen tomatoes to light, broth-based soups about 10 to 15 minutes before serving to maintain the fresh-tomato flavor. Stir tomato chunks into hearty soups and stews made in the slow cooker at the beginning of the cooking process so that the flavor blends with other ingredients and seasonings.
Things You'll Need
· Cooking pot
· 2 to 3 tbsp. olive oil
· Onion, medium, chopped
· 3 to 4 garlic cloves, minced
· Basil leaves, fresh, chopped
· Thyme leaves, fresh
· Marjoram leaves, fresh, chopped
· Oregano leaves, fresh, chopped
· Salt
· Ground pepper
· Blender
Tip: Substitute peeled, frozen tomatoes for fresh tomatoes in gazpacho soup to enjoy the fresh flavor of tomatoes even when they are out of season.
Warning: Season tomato-based sauces very lightly with salt while cooking, because the flavors intensify when the moisture evaporates and the sauce thickens.
Source: https://www.livestrong.com/article/453889-how-to-cook-with-frozen-tomatoes/
For more recipes check out our farm recipe blog: https://blackdirtrecipes.wordpress.com
Follow us on Instagram @yesifarm
Winter Share Week #5
You know that old saying many hands make light work, so very true on a farm. Then there are the days when few hands are all you’ve got! During the winter, Silvia and Lupe both come in to get your produce ready. Getting ready means selecting, grading, washing, packing out. Unfortunately Lupe called out sick yesterday, which so rarely happens with her and all of our farmers. She had a sore throat so I’m hoping and praying for her that it’s just that and no more. I’m going to make chicken soup for Benito to take home to her later today. Thank goodness for Silvia, she has her hands full, between her children and grand-children it’s very rare during the middle of the week that she can work a full 8-hour day. She truly saved the day and prepped all your produce at lightning speed, all in good time for her to get home for the littles when they returned from school!
Vegetables / Recipes — Pinto beans are creamy and soft in texture with a nutty, earthy rounded flavor. Pintos will absorb the aromatics and flavors of the ingredients they’re paired with. Their soft texture makes them perfect for spreads and dips. Most folks know them as the key ingredient in refried beans!
HOW TO COOK PINTO BEANS – this is a basic recipe for a nice side dish: Allow time, read the recipe, don’t panic, cook!
Ingredients: pinto beans, onion, cumin, oregano, salt, pepper, chili powder, lime juice. Optional parsley, cilantro
Step One (Day One) Soak the beans. Start by placing the beans in a colander, rinse well then place in a large bowl. Cover with 2-3 inches of water, set aside to soak at least 8 hours or overnight.
Step Two (Day Two) Chop half a medium or one small onion. Sauté the onions in a large pot or Dutch oven over medium heat. Once the onions soften and turn a translucent color, stir in cumin, the soaked, drained beans, water, oregano, salt, and pepper. For a spicy flavor now is a good time to add jalapeños. Put on to simmer. The cooking time will depend on how you like them. Start checking after an hour and again every 15 minutes after that. Finally, season to taste. When the beans are cooked to your liking, season them with a squeeze of lime juice, more salt and pepper, and chili powder to taste. Top with some chopped cilantro or parsley.
PINTO BEANS & RICE
Ingredients
1/2 lb. dried pinto beans
4 cups water or broth , most Southerner's use chicken or beef broth
1 tablespoon salt, for soaking; table salt
1/2 cup fresh, diced onion
1 tablespoons garlic powder
1 cup rice, brown or white rice, cooked 1 smoked hamhock (optional)
salt and pepper to taste
Instructions
Quick Soak Method
– Rinse and drain beans
– Place beans in a large Dutch oven on the stove top; add enough water or broth to cover by 2 inches; add 1 tablespoon salt; bring to a rapid boil; boil for 15 minutes, turn off the heat and put a lid on; let them sit for about an hour
– After one hour add onion, garlic and 1 teaspoon of black pepper and bring the beans back to simmer or low heat , cover and cook until tender; additional water or broth may need to be added during the cooking process; taste for seasonings and adjust accordingly
Overnight Soak Method
– Rinse and drain beans; place them in a large bowl, add 1 tablespoon salt, add enough water to cover the beans by 2 inches; cover bowl with plastic wrap and allow beans to soak overnight on the counter
– The next day, drain the beans
Stove Top Method
Put beans in large Dutch oven with onion and garlic powder, water or broth and protein (optional). Cook on low for 4 hours, or until tender; check liquid level frequently; add more if needed; when tender, taste for seasonings and adjust accordingly
Slow Cooker Method
Place soaked beans in slow cooker; add garlic and onion powder, cover with water or broth; cook on medium 6-8 hours; season to taste with salt and pepper
Pressure Cooker Method
– Add soaked or unsoaked beans, garlic and onion powder and 4 cups of water or broth in pressure cooker
– Set Pressure cooker to "manual" or "pressure cook" and cook on high for 45 minutes (unsoaked beans) or 20 minutes (soaked beans.)
– After the cooking time, let the pressure cooker rest for 20 minutes; after 20 minutes, do a quick release on pressure cooker
– Taste for seasonings and serve.
Rice Preparation
Add water and rice to saucepan; bring to boil. Reduce heat to simmer, cover rice and simmer until rice is fluffy
Source: https://www.smartypantskitchen.com/rice-and-beans/
For more recipes check out our farm recipe blog: https://blackdirtrecipes.wordpress.com
Follow us on Instagram @yesifarm
Winter Share Week #4
Counting down the days to Spring. With each passing day, we gradually see and feel a little bit more of daylight. Thankfully the heaters behaved this week and the greenhouse is keeping warm. By warm we mean 45-50 degrees for now. Soon we will have to crank the heat up closer to 70 so the potting soil will get warm and the seeds will be able to germinate properly.
Vegetables / Recipes
'Tis the season of roots ... vegetables that is! So good for you, each bite of a root vegetable is packed with vitamins, minerals and phytonutrients. Phelps Hospital Northwell Health shares the following: "During the cold days of winter you should consider eating more carbohydrates like those from root vegetables — they help the body to sustain a little more weight, which is needed to insulate against the cold weather. Warming vegetables like potatoes, cabbages, carrots, onions, rutabagas, and winter squash all store well in cool, dark places, and can provide energy and comfort throughout the winter season."
Though it’s often mistaken for a member of the root family, the turnip comes from the cruciferous family with relations to Brussels sprouts, kale and broccoli, according to Medical News Today. In one medium-sized turnip there are just 34 calories, 4 grams of fiber when cooked and 1 gram of protein. It also contains more than half of your daily vitamin C needs. (Source: https://www.pritikin.com).
MASHED POTATOES & TURNIPS WITH CARMELIZED ONIONS
Ingredients
1 pound potatoes
1 pound turnips
1/4 cup milk (non-fat) very hot
1/8 cup sour cream (non-fat )
1 dash ground nutmeg
1/2 onion diced
1/2 tablespoon fresh garlic minced
Directions
Bring potatoes and turnips to a boil over medium-high heat for about 25 minutes, until tender. Once boiled, add potatoes and turnips to a large mixing boil and mash. Add hot milk, sour cream and nutmeg. Whip until mixture is light and fluffy. In a hot nonstick skillet, sauté onions till they are light brown, about 2 to 3 minutes. Add garlic. Cook over medium heat for 10 minutes. Fold caramelized onions into potatoes and turnips. Source: https://www.pritikin.com/health-benefits-of-turnips
HOW TO CARMELIZE ONIONS
I use a lot of onions when I cook and caramelized onions are a wonderful dish to have on hand in the fridge or freezer. Topping on pizzas, mixed in with mashed potatoes, in sour cream as a dip, the possibilities are endless. Quantities depend on how much caramelized onions you wish to make. In this example, 5 large raw onions yielded about 2 cups of caramelized onions.
Ingredients
Several medium or large onions, yellow, white, or red
Extra virgin olive oil
Butter, optional
Kosher salt
Sugar, optional
Balsamic vinegar, optional
Directions
Cut the onions root to tip: Slice 1/2-inch off the stem ends of the onions and the roots off of the root end. Place the onions cut side down on the cutting board. Cut them in half through the root end. Peel back the peels from the onions.Lay the onions cut side down and make angled cuts into each onion, aimed at the center, cutting almost all the way, but not completely through the root end. Make the cuts to your desired level of thickness. The root end will help hold the onion together as you cut it, making it easier to cut. Then cut a V in the root end to cut out the tough root holding the slices together.
Heat the olive oil and add the onion: Use a wide, thick-bottomed sauté pan for maximum pan contact with the onions. Coat the bottom of the pan with olive oil, or a mixture of olive oil and butter, if using (about 1 teaspoon per onion).
Heat the pan on medium high heat until the oil is shimmering. Add the onion slices and stir to coat the onions with the oil. Spread the onions out evenly over the pan and let cook, stirring occasionally. Depending on how strong your stovetop burner is you may need to reduce the heat to medium or medium low to prevent the onions from burning or drying out.
After 10 minutes, sprinkle some salt over the onions, and if you want, you can add some sugar to help with the caramelization process. One trick to keeping the onions from drying out as they cook is to add a little water to the pan. Stir the onions every few minutes: Let the onions cook for 30 minutes to 1 hour more, stirring every few minutes. As soon as the onions start sticking to the pan, let them stick a little and brown, but then stir them before they burn. The trick is to leave them alone enough to brown (if you stir them too often, they won't brown), but not so long so that they burn. After the first 20 to 30 minutes you may want to lower the stove temperature a little, and add a little more oil, if you find the onions are verging on burning. A metal spatula will help you scrape up the browned bits from the bottom of the pan as the caramelization proceeds. As the onions cook down, you may find you need to scrape the pan every minute, instead of every few minutes. Continue to cook and scrape, cook and scrape, until the onions are a rich, browned color. At the end of the cooking process you might want to add a little balsamic vinegar or wine to help deglaze the pan and bring some additional flavor to the onions. Store refrigerated for several days in an air-tight container. Freeze up to one month.
Source: https://www.simplyrecipes.com/recipes/how_to_caramelize_onions/
For more recipes check out our farm recipe blog: https://blackdirtrecipes.wordpress.com
Follow us on Instagram @yesifarm
Winter Share Week #3
Hello, there is no tasting sample today as I wasn’t able to make one due to lack of time and sleep. Tuesday evening the main heater in the greenhouse started acting up. It would keep shutting down and I had to continuously restart it manually. Of course it was one of the colder nights of late, because that’s how life goes! I spent the entire night restarting it, every hour I was out there checking it. In between I spent the rest of my time researching how to fix it and where to find parts. Knew it wasn’t the sparkplug because it would pop off almost every time I started it. That left fuel issues. Found the sensor, figured out how to clean that, next is the fuel filter. My choices: purchase a new one and replace, or clean the old one and reuse. Wednesday AM began my search for the treasure, went to Tractor Supply where I originally bought the heater – “No, we don’t carry the parts, just the heater, you have to go direct to the manufacturer.” Knowing what I was dealing with I also knew I had to purchase a back-up heater since I couldn’t find a replacement filter and who knows how long it will take to dismantle the unit to get to the filter so it can be removed and cleaned.
Units that are of an appropriate size are either completely sold out or available in two or three weeks and not available for pickup at the store. Finally found a unit at Home Depot in Newburgh. Went straight to customer service, “computer says we have 1 in stock, but I’m not sure that’s right, I don’t think we have any.” We take a walk to the heater aisle and there it was the only one in inventory! The customer service attendant guarded it for me while I ran outside for a flatbed to carry my treasure out! In the meantime the weather had started turning, A 45-minute drive back to the farm turned into an hour and a half white knuckle slip and slide.
Meanwhile as I was chasing heaters and parts, Lupe was back at the farm getting your produce ready! And as Murphy’s law goes, the main heater sort of behaved most of the day and night. Today I only had to restart it once around 1:00 AM. Heater time check: 3:00 AM, and at 5:30 AM the unit is still working! After I finish this newsletter I will be busy installing the backup heater, continuing my quest for replacement filters and begin the work of tearing apart the main unit and cleaning the existing filter. I am also researching an alarm system that will alert me when something is awry, it should alleviate some of the worry/and running at the wee hours!
I’ll have samples next week and please if there is anything in particular you would like to try let us know and I’ll see what I can do!
Vegetables / Recipes Frozen zucchini – we gave you a reminder of summer today! (Pure zucchini – no salt) How do you thaw frozen zucchini?
To Thaw or Not to Thaw
They do not need to be cooked for long, just long enough to heat through. To thaw, simply place in fridge overnight or soak the bag of frozen zucchini in a bowl of warm water. Or, use the microwave on half power so it thaws but doesn't cook.
Source: https://findanyanswer.com/how-do-you-thaw-frozen-zucchini
I wouldn’t use frozen zucchini in baked goods due to the high moisture content. Best suited to soups, stews or casseroles.
GARLIC PARMESAN ZUCCHINI CASSEROLE
This Garlic Parmesan Zucchini Casserole is an easy side dish recipe that pairs beautifully with just about any family meal! If using zucchini frozen allow time for squash to defrost.
Ingredients
2 cups zucchini if using frozen defrost first
1/4 teaspoon salt
1/4 cup finely diced onion
1/2 tablespoon minced garlic
1 egg
1/4 cup grated Parmesan cheese plus an additional 1 tablespoon
1/2 cup shredded mozzarella cheese
1/4 cup shredded cheddar cheese
1/4 cup Panko breadcrumbs
1 tablespoons melted butter
Instructions
1. Preheat oven to 375 degrees F. Spray a small baking dish with cooking spray and set aside.
2. Defrost zucchini.
3. In the prepared dish, combine zucchini, onion, garlic, egg, 1/4 cup of the Parmesan cheese, the mozzarella cheese, and the cheddar cheese. I like to use my hands to make sure that it’s all completely combined, and then gently press the mixture evenly into the prepared dish.
4. Bake uncovered for 20 minutes.
5. Meanwhile, in a small bowl, pour melted butter over breadcrumbs and 1 tablespoon of Parmesan cheese. Stir until completely combined.
6. After 20 minutes, remove zucchini from the oven. Sprinkle buttered breadcrumbs over the zucchini and return the dish to the oven. Continue baking for about 5-10 more minutes, or until the top is golden brown and crispy. Source: https://www.theseasonedmom.com/garlic-parmesan-zucchini-casserole/
For more recipes check out our farm recipe blog: https://blackdirtrecipes.wordpress.com
Follow us on Instagram @yesifarm
Winter Share Week #2
Was listening to NPR earlier today, the story was about how expensive farm equipment has become. Of course the story was focused on the big Midwest farms and how one farmer, I think 600 acres, could not afford to purchase new gear for his operations and if he could the equipment wouldn’t be available until sometime in 2023. His alternative was used equipment and auctions. A couple years back new, modern equipment was deemed unaffordable due to the fancy computers and specialized tools needed to diagnose and repair, as well as proprietary technology that required special training and licenses on the part of the mechanic. All this has driven prices for old, used equipment up considerably. Luckily if you’re handy you can do a lot of the repairs yourself, pick up a busted tractor here or there and strip it for the parts, because those too are hard to come by. That’s what this time of year is for — fixing, building, planning, getting ready. All around the valley you see mechanics at nearly every farm working frantically to get ready for spring! Seems strange in a way you would think we all would be so exhausted and we indeed were! But the energy of the land and thoughts of new beginnings are like a magic elixir and a font of eternal hope for the new season to come.
Vegetables / Recipes
CHERYL'S CHILI
This is how I make my chili and I have no real measurements because I cook with my senses so here goes:
Ingredients
Black beans, Onions, Chili powder, Cumin, Cocoa powder, Jalapeños, Dried chilies, Tomatoes (fresh or canned)
Directions
If using dried beans (about 1 pound) after soaking and draining them and I put them in a large pot, peel and chop onions, throw a couple handfuls into the beans (I like a lot of onion and you can use scallions if you prefer). Chop a few tomatoes and throw those in – peel and all. Now season to taste — light sprinkle of chili powder, especially if using fresh /dried chilies. Sprinkle of Cumin gives those earthy notes, Cocoa Powder for a velvety, mole like finish, jalapeños and/or dried chilies more or less depending on your “heat” tolerance/requirement. Taste as you go and take it easy on the spices, remember you can always add more but you can’t take it out! Here’s where you can really play. If I’m in the mood and have stuff around I’ll add corn, mushrooms, other kinds of beans even cauliflower and again this tastes best as it sits! Serve with toppings of choice — sour cream, shredded cheese, scallions salsa … A slice of cornbread always hits the spot too!!!
THE BEST CLASSIC CHILI RECIPE
Ingredients
1 tablespoon olive oil
1 medium yellow onion -diced
1 pound 90% lean ground beef
2 1/2 tablespoons chili powder
2 tablespoons ground cumin
2 tablespoons granulated sugar
2 tablespoons tomato paste
1 tablespoon garlic powder
1 1/2 teaspoons salt
1/2 teaspoon ground black pepper
1/4 teaspoon ground cayenne pepper* -optional
1 1/2 cups beef broth
1 (15 oz.) can petite diced tomatoes
1 (16 oz.) can red kidney beans, drained and rinsed
1 (8 oz.) can tomato sauce
Instructions
1. Add the olive oil to a large soup pot and place it over medium-high heat for two minutes. Add the onion. Cook for 5 minutes, stirring occasionally.
2. Add the ground beef to the pot. Break it apart with a wooden spoon. Cook for 6-7 minutes, until the beef is browned, stirring occasionally.
3. Add the chili powder, cumin, sugar, tomato paste, garlic powder, salt, pepper, and optional cayenne. Stir until well combined.
4. Add the broth, diced tomatoes (with their juice), drained beans, and tomato sauce. Stir well.
5. Bring the liquid to a low boil. Then, reduce the heat (low to medium-low) to gently simmer the chili, uncovered, for 20-25 minutes, stirring occasionally.
6. Remove the pot from the heat. Let the chili rest for 5-10 minutes before serving.
Notes: I typically skip the cayenne pepper because I have a young kiddo. Then, I put out some hot sauce for those adults that want to add some spiciness to their chili.
Source: https://www.thewholesomedish.com/the-best-classic-chili/#recipe
THE BEST CORNBREAD RECIPE
Ingredients
1 cup all-purpose flour
1 cup yellow cornmeal
2/3 cup granulated sugar
1 teaspoon salt
3 1/2 teaspoons baking powder
1/3 cup neutral oil or melted butter
1 large egg
1 cup milk
Instructions
1. Grease a 9-inch round cake pan or cast iron skillet well and set aside. Preheat the oven to 400 degrees.
2. In a medium mixing bowl, add the flour, cornmeal, sugar, salt, and baking powder. Whisk to combine well.
3. Make a well in the center of your dry ingredients and add your oil or butter, milk, and egg. Stir just until the mixture comes together and there are only a few lumps remaining.
4. Pour the batter into the prepared pan and bake for 20-25 minutes until the top is a deep golden brown and a toothpick inserted into the center comes out clean.
5. Serve hot.
Notes
– You can make it in a 9-inch round cake pan, square baking dish, or 9-inch cast iron skillet. Bonus! You can also make these into muffins or double the recipe and toss it in a 9×13-inch baking pan. You’ll just need to adjust the baking time if you are making muffins or doubling the batch. Muffins take around 15 minutes to bake and a doubled recipe takes 35-40 minutes to bake.
– Use yellow cornmeal in this recipe. White works fine, but it just doesn’t look the same. Golden yellow cornbread is a must. Also, don’t try to sub any of the cornmeals used for making tamales — they are a different grind and the texture doesn’t come out the same.
– To make this recipe gluten free simple sub the all-purpose flour for a gluten free 1:1 baking flour.
Source: https://www.blessthismessplease.com/the-best-cornbread-recipe/
For more recipes check out our farm recipe blog: https://blackdirtrecipes.wordpress.com
Follow us on Instagram @yesifarm
Winter Share Week #1
Just two days into the winter solstice and the weather really has got the 'feels' of winter. Frosty cold, scatter shots of ice and snow. Fierce winds that feel like the big bad wolf huffing and puffing against the doors of the greenhouse. Steady streams of white smoke from the greenhouse heaters puff against skies that are more the color of greys and steely blues. As I look out the window and take all this in I am thinking of our Christmas celebration. We still follow customs our family brought from Poland. On Christmas Eve we have a special dinner with kasha, different kinds of pierogi, Christmas borscht, pea soup, fish, babka, mazourek, cruchki and perhaps most importantly opłatek. Opłatek is a special wafer that we share with each other before the start of the meal. Essentially it’s our way of breaking bread, sharing wishes and thoughts for the upcoming year and celebrating thanks for all we received and shared this past year. So with that in mind — wishing you all the best for this Christmas season!🎄
Vegetables / Recipes
SAUTÉED POTATOES WITH KALE
Ingredients
1 pounds potatoes, cubed
1/4 cup extra-virgin olive oil, divided
1/2 bunch kale, stemmed and torn into pieces
1/2 large onion, chopped
2 cloves garlic, minced
salt and ground black pepper to taste
Directions
Place potatoes into a large pot and cover with salted water; bring to a boil. Reduce heat to medium-low and simmer until tender but still holding their shape, about 15 minutes. Drain.
Meanwhile, heat 2 tablespoons of olive oil in a large frying pan over medium-high heat until quite hot. Toss in pieces of kale; reduce heat to medium. Cover and cook, stirring often, until kale begins to soften and crisp slightly, about 5 minutes. Add onion; cook until softened and translucent, 2 to 3 minutes. Stir in garlic.
Add remaining olive oil when onions are beginning to brown. Stir in potatoes and season with salt and pepper. Cover and cook until potatoes are completely softened, about 5 minutes. Remove lid; cook and stir until potatoes just begin to brown, about 10 minutes more.
Source: https://www.allrecipes.com/recipe/272903/sauteed-potatoes-with-kale/
CHRISTMAS ROASTED PARSNIPS & CARROTS
Ingredients
1 pound parsnips, peeled
1 pound carrots, peeled
butter
1-2 tbsp runny honey
Parmesan, grated (optional)
Method
1. Cut the vegetables in half lengthways and again across the width. Cook in a pan of boiling salted water for 5 minutes. Drain.
2. Meanwhile, melt the butter in a roasting tin by heating in the oven at 350° for 3-4 minutes. Add the honey and mix well.
3. Increase oven temp to 400°. Add the parsnips to the honey and butter in the tin and toss and roast for 30 minutes. Turn the parsnips, add the carrots to the parsnips and toss well. Roast for a further 20 minutes, until golden. Toss with the cheese to serve.
Source: https://www.deliciousmagazine.co.uk/recipes/christmas-roast-parsnips-and-carrots/
For more recipes check out our farm recipe blog: https://blackdirtrecipes.wordpress.com
Follow us on Instagram @yesifarm
Fall Share Week #12
This morning was so gorgeous. Ribbons of pinks, purples, mauves and blue just layered across the sky in the West like the old fashioned ribbon candy I remember my Babcia always kept on the table for Christmas. The weather is so warm today, but we’re already mentally bracing ourselves for the weather to come this weekend. Creeping up on the shortest day of the year and the marking of the solstice. After the 21st, subtle yet not so subtle, the length of daylight will increase and before you know it we will be scrambling in the greenhouse and fields to get growing! The farmers are looking forward to a couple of quiet weeks for some well deserved R&R. I've slowly been placing orders for seeds, as beginning in January and February we need to start planting onions and more, inside the greenhouse.
PAN FRIED BRUSSELS SPROUTS WITH BACON & CRANBERRIES
Author: Lisa MarcAurele
You’ll win them over with these delicious pan fried Brussels sprouts with bacon and cranberries. Adding chopped walnuts makes it even better!
Prep Time: 2 mins
Cook Time: 14 mins
Total Time: 16 mins
Servings: 4
Ingredients
3 slices no sugar bacon about 6.25 ounces
12 ounces Brussels sprouts cut in half lengthwise
¼ cup sugar free dried cranberries
2 tablespoons water
¼ cup chopped walnuts optional
Instructions
- In a large skillet, cook bacon until crisp. Remove onto a paper towel-lined plate.
- Place Brussels sprouts in hot bacon grease cut side down. Cook Brussels sprouts until bottoms have browned.
- While Brussels sprouts are cooking, chop up bacon.
- Add cranberries and water. Cover and cook until Brussels sprouts are tender (about 2-3 minutes).
- Remove cover, stir in walnuts (if using) and stir fry until nuts are toasted. Add in bacon pieces.
Source: https://lowcarbyum.com/pan-fried-brussels-sprouts-bacon-cranberries
For more recipes check out our farm recipe blog: https://blackdirtrecipes.wordpress.com
Follow us on Instagram @yesifarm
Fall Share Week #11
Feeling happy, the farmers are accomplishing so much work in the greenhouse. Benito has built new washing stations for us. It will make our work so much easier! I have been checking out prices for rocks, to fill in the “fissures” on the entryway to the farm so we can fix the driveway. I’ve spoken of it before, how the pitch of the entry (about 45 degrees) makes it very challenging. Some folks refuse to even go down it because they’re afraid and every new storm erodes the surface just a little bit more. Checking out rental prices for an excavator that we will use to help place the rocks and grade the surface as well as dig the ditches so we’ll have a jump start on spring work! We have one culvert I may have to replace too. It’s looking pretty rough and I’m worried that come spring we won’t be able to cross over it. It’s a bridge between two fields, luckily we can access the fields from the upper end so it’s not a total disaster. The pipe is probably 20 years old so you can’t really complain about it. As long as the weather holds like it has we can still get these outdoor chores done as the ground has not really frozen solid yet.
Vegetables/Recipes
SMASHED POTATOES
Ingredients
1 pound potatoes – cut into one inch chunks – do NOT peel
1/4 cup half n half
1/4 cup butter
1 scallion, sliced
2 garlic cloves, crushed
1 teaspoon minced fresh rosemary
Directions
Bring a large pot of salted water to boil, add potatoes. Boil until a fork can pierce them easily. This takes about 10 minutes. Drain and keep them in the pot to keep them warm. In a small saucepan over medium heat, combine the rest of the ingredients. Once butter is melted, pour liquid over potatoes and mash until all liquid is incorporated into the potatoes. Don’t over mash, you want to see chunks and bits of the colored skin throughout. Note: Any color potato can be used for this dish!
Original source: The CSA Cookbook by Linda Ly
WINTER SQUASH WITH PARMESAN & BROWN BUTTER
Ingredients
1 pound peeled winter squash (if skin is not edible), cut into ½ inch slices or a bit thinner
Salt, Pepper, Olive Oil
Pinch of crushed red pepper
6 sage leaves – roughly chopped
Chopped Parsley
Parmesan for shaving, Lemon Wedges
Directions
Heat oven to 400 degrees. Place squash slices in bowl, season with salt and pepper. Drizzle with olive oil to coat. Toss squash with your hands to evenly coat with seasoning. Transfer to baking sheet, spreading out the slices, using two pans if necessary. Roast until squash is cooked through and you see brown edges, about 15 minutes. Arrange the squash on a warm platter.
Brown butter sauce: Melt butter in a small skillet over medium heat. Add crushed red pepper and sage. Season with salt and pepper. Whisk the butter until it’s foamy and nutty smelling. Keep an eye on it – it doesn't take long to go from brown to burnt! Spoon over squash. Garnish with parsley and shave parmesan cheese over squash. Serve with lemon wedges.
This can be served as an entrée or an appetizer or salad. Also amazing served with pasta — topped with some bread crumbs! Source: David Tanis Market Cooking, by David Tanis
For more recipes check out our farm recipe blog: https://blackdirtrecipes.wordpress.com
Follow us on Instagram @yesifarm
Fall Share Week #10
Missed you! This is the time of year when we work on getting all those “'round to it” chores done, or at least as many as we can. Reorganizing the greenhouse; improving the washing stations; making room to start growing microgreens; sorting through planting trays — recycling those that aren’t suitable for planting; repairing crates, heaters, fans. Getting ready to do a scrap yard run with any metals we can no longer use. Perusing seed catalogs and dreaming of spring and summer! Finally knuckling down to working on the recipe blog. I’m putting up a soup recipe which has quickly become a favorite of my sister's and mine. It’s called AUTUMN ROOTS and is pretty reflective of how I cook. It’s also a very forgiving recipe that makes use of whatever is laying around the kitchen — check it out!
AUTUMN ROOTS: https://blackdirtrecipes.wordpress.com/2021/12/02/autumn-roots-soup/
Vegetables/Recipes — Dry Black Beans
We gave you dry beans this week, which if you’ve never had fresh shell beans before you’re in for a special treat! In some ways it’s so hard to believe the difference in flavor and texture. I usually don’t soak them but you can If you’re more comfortable doing so. Since they are from this year's harvest they are still moist and if you put them in a sealed container like a glass jar they could start to sprout. Just keep them in the paper bags we sent them in until you’re ready to use them.
BLACK BEANS & RICE
Ingredients
1 ½ cups cooked (1/2 cup dry) white long grain rice
1/2 medium sweet onion
1/2 green bell pepper
3 garlic cloves
1 ½ cups cooked or Instant Pot black beans (Can also use canned beans about 15 oz)
1 tablespoons salted butter (substitute olive oil for vegan)
1/2 tablespoon olive oil
1 teaspoons cumin
1 teaspoons oregano
1/2 teaspoons kosher salt
1 tablespoons lime juice (juice of 1 lime)
Fresh cilantro, for a garnish
Instructions
1. Cook the beans. Cook the rice. Mince the onion. Chop the pepper into a small dice. Mince the garlic.
2. Drain and rinse the beans.
3. In a large skillet, heat the butter and olive oil over medium high heat. Once melted, add the onion, bell pepper, and garlic. Cook for 10 minutes, stirring occasionally until the onions are translucent and lightly browned. Add the beans, cumin, oregano, and kosher salt and stir to combine. Cook for 3 minutes until warmed and fragrant, then stir in rice for 1 minute until heated through.
4. Remove from the heat and add the lime juice. Serve garnished with fresh cilantro.
Source: https://www.acouplecooks.com/black-beans-and-rice/
Found this recipe for Sautéed Cabbage with Browned Butter and Walnuts. I am so making it for my lunch today. I might put some goat cheese on it or a poached egg. Depends on “the feels” when I start cooking.
SAUTÉED CABBAGE WITH BROWNED BUTTER AND WALNUTS
Ingredients
¼ cup butter
1 pound of finely shredded cabbage
½ cup walnuts (chopped, toasted if you want)
¼ teaspoons salt adjust to your taste
Pepper
Instructions
Toast Nuts: Do these first if you plan on using them in this recipe! Chop the nuts into whatever size pieces you want. Cook the walnuts in a skillet over medium-low heat, stir frequently and watch them closely, they will burn in seconds if you’re not careful! As soon as you smell their “nuttiness” remove from heat.
Brown Butter: In a skillet, melt butter over medium-low heat. While gently swirling the pan, cook the butter until it foams and the color is a deep golden brown. This part does require attention and can take up to 10 minutes, but is so worth it. The butter will develop a nutty smell and you’ll see little specks of browned milk solids in the bottom of the pan.
Once butter is browned, immediately add shredded cabbage and nuts. Sprinkle with ¼ teaspoon salt. Stir to get everything coated with the browned butter. Keep cooking for about 2 ½ - 3 minutes. Cooking time is determined by how fine the cabbage is shredded and how cooked you want it. Crunchy side is better! Remove from heat, season to taste with salt and pepper. Enjoy!
Source: https://twohealthykitchens.com/sauteed-cabbage/
For more recipes check out our farm recipe blog: https://blackdirtrecipes.wordpress.com
Follow us on Instagram @yesifarm
Fall Share Week #9
So hard to believe that next week is Thanksgiving! As I reviewed this past season in my head and pondered what to write this week, I googled gratitude phrases and these struck a chord in my heart.
“When you arise in the morning, give thanks for the food and for the joy of living.” —Tecumseh
“When eating fruit, remember the one who planted the tree.” —Vietnamese Proverb
I am so very grateful for the food that comes from our fields and farm kitchen. I don’t know how to express the soul satisfying feeling that possesses me as I am in the fields and watch the tiny seeds we plant line up in rows like little soldiers and grow up into beautiful vegetables of all sorts of colors, shapes and flavors. How comforting it is as I’m kneading bread and feeling the dough rolling beneath my hands in the satisfaction of knowing the work of my hands will feed you. It is truly a feast for all the senses. And our farmers, we must not ever, ever forget them. It is the work of their hands and the spirit of their souls that makes our farm sing, that makes it possible for us to bring a piece of the farm to you all. So with eternal gratitude for you all, Thank you and Happy Thanksgiving!
Vegetables/Recipes — Turnips
A great vegetable which is often bypassed as so many consider it to have a bitter taste. Most often the bitterness is in the skin so by peeling it you can lose a lot of that flavor note. Low in calories and carbs these can be a great alternative to potatoes!
Like with so many root vegetables, roasting is one of the best ways to enjoy them. Preheat oven to 400 degrees. Peel turnips, cut into bite-sized pieces. Toss with olive oil, season with salt and pepper. Place on a sheet pan, you can line the sheet pan with parchment paper to make cleanup easier if you wish. Roast for about 30 minutes until tender. Serve as a side, mix with other roasted root vegetables, toss into salad, serve with a poached egg. Possibilities are endless!
GARLIC MASHED TURNIPS — These garlic mashed turnips are a creamy and comforting side dish that comes together easily in one pot on the stovetop; no special equipment needed. Enjoy them as a delicious low-carb replacement for mashed potatoes.
Ingredients
2 medium purple-top turnips
2 cloves garlic, minced
3 ounces cream cheese
2 tablespoons butter
1 tablespoon finely chopped fresh chives
1/2 teaspoon table salt
1/2 teaspoon ground black pepper
Instructions
1) Cut Turnips: Peel turnips. Cut into roughly 2-inch chunks, about 16 chunks per turnip.
Boil Turnips: Add chopped turnips to 3 quart or larger pot, and fill with water. Cover with lid, and bring to boil. Boil turnips until very soft, about 30 minutes. Drain turnips in colander, emptying pot of water. Let turnips sit for about 5 minutes to steam out, then transfer turnips back to pot.
2) Combine Ingredients: Mash turnips in pot (Note 1). Add all other ingredients, and stir over medium-low heat for a few minutes until incorporated (Note 2) If mixture appears too thin, proceed to next step to thicken; otherwise, skip next step.
Thicken: Increase to medium heat so that mixture starts to bubble. Stir nearly constantly (to prevent sticking to bottom of pot) for a few minutes until mixture thickens and resembles mashed potatoes. Source: https://www.savorytooth.com/mashed-turnips/
For more recipes check out our farm recipe blog: https://blackdirtrecipes.wordpress.com
Follow us on Instagram @yesifarm
Fall Share Week #8
The saga of the potato harvest continues! It’s still not done and Benito asked me to order more sacks. Even though it may sound like it, I am not complaining, this is one of those crops that will help carry us through the winter. If the weather holds steady like it has been, in another couple of weeks I’ll see if I can rent an excavator to clean out the ditches. This will help push the field work ahead for the springtime. I have been sporadically checking out the farm auctions for “gently used” (but new to us) equipment. We need mowers— a sickle bar and a brush hog would be of great use, as well as a land leveler, more refrigeration equipment, and a new plow would be awesome since I have been unable to find parts for the one we have. That’s the mixed blessing of having old equipment, generally it is easy to fix — I can do quite a bit of it myself — but finding the right parts can be a serious challenge. Once upon a time and not all that long ago, there were local businesses that specialized in these old-timey parts but as it happens, either the shops have gone out of business and/or the business owners have passed away. I’ve been lucky to be able to find things online in Vermont in a tractor junk yard as well as other places in the middle part of the country. The tricky part is finding the right parts for the model you have. Our Allis Chalmers D-14 is particularly challenging as it seems there were two models manufactured the same year ours was (1964). Each has its own nuances, and as per Murphy’s law we have the odd model for which parts are not as common. Still it is so cool to know that a tractor or implement manufactured 40–50 years ago is still being used and providing generally reliable service!
Vegetables/Recipes
Brussels sprouts!!! Yes it is seriously fall when Brussels sprouts arrive at the CSA! I never like to harvest these before hard frost. Sugar is a natural “anti-
freeze” and in certain vegetables the colder weather elevates the sugars in the plants and makes them taste sweeter. One of my favorite ways to enjoy
Brussels sprouts is roasting, I practically have to hide them from my sister as she will devour the entire pan in a heartbeat.
ROASTED BRUSSELS SPROUTS
Directions
Preheat the oven to 400 degrees. If sprouts are smaller in size, cut in half and rinse. Some folks will peel each individual leaf from the little head but I personally do not have the patience for that! Toss the sprouts with some olive oil, season with a sprinkle of salt and pepper. Place in preheated oven and roast for about 10 minutes, remove from oven, stir and return to oven for about another 10-20 minutes until Brussels have nice bits of char on them. I enjoy eating them just like this. I do try and make extra if possible and will toss them into my salads, serve with eggs for breakfast, mix in with some pasta like orzo or orecchiette. Optional seasonings/add-ins: garlic, red pepper flakes, parmesan cheese, bacon, sundried tomatoes ... you get the idea!
ALL BLUE POTATOES — These are an heirloom variety that has been around for over 100 years. They are a good all-purpose potato and make terrific mashed potatoes!
For more recipes check out our farm recipe blog: https://blackdirtrecipes.wordpress.com
Follow us on Instagram @yesifarm
Fall Share Week #7
These last two mornings frost wasn’t only on the pumpkin but everywhere. It was the scraping ice off windows kind of frost too! If there was anything tender out there it’s gone now, but oh how beautiful the valley is. Between the brilliant colors of the foliage, the glaze of white from the frost and the almost stained-glass look of the patches of ice here and there, Mother Nature is putting on quite the show for us. And I for one am loving it! As far as the field work goes we’re still digging potatoes, the farmers think one more week and we should be finished with them. We’re putting row covers over the leeks, spinach and other greens so we can extend that harvest a while longer. Seed companies are already emailing notices about ordering for next year and the seed catalogues are gradually coming in the mailbox. I am always on the lookout for new and exciting things to grow, for instance that baby butternut you’re getting is called 898. As seeds are developed they typically have numbers assigned to them for identification purposes and don’t get a name until they’re officially deemed a “keeper.” 898, another release from Dan Barber’s seed company (Row 7), is bred for single serving size, concentrated sweetness, flavor and a high amount of beta-carotene.
Vegetables/Recipes — Cabbage
I often say it but I really do believe it — cabbage is one of the more underappreciated vegetables. Cabbage is not only tasty but so good for you too, full of fiber and very high in Vitamins C and K among many other nutrients. And it’s not just for coleslaw or sauerkraut! My family being originally from Poland, we grew up on sauerkraut with kielbasa and in pierogis. Another favorite cabbage dish of ours was goɫombki (aka stuffed cabbage rolls). My Dad often called the goɫombki "pigeons" because as folklore goes they resemble the breasts of pigeons. My Mom would love to make them for us because of how much we enjoyed them, but at the same time she dreaded it not only because they truly are a labor of love but my Dad would devour so many there would be very few left over after he ate his fill!
SAUTÉED CABBAGE — Sautéed cabbage is an easy, DELICIOUS vegetable side that's healthy and goes with so many dishes! Vinegar is the secret ingredient to making it taste great.
Ingredients
1 small head green cabbage
1 tablespoon extra virgin olive oil
1 tablespoon unsalted butter
1 1/2 teaspoons kosher salt
1/2 teaspoon freshly ground black pepper
½ tablespoon apple cider vinegar
1 tablespoon chopped fresh thyme optional
Directions
- Cut the cabbage in half from its top down through its core. Place the cut-side down on your cutting board, then slice it as thinly as possible around the core so that you have fine ribbons. Discard the core.
- Heat a large saute pan or similar heavy-bottomed pot over medium-high heat. Add olive oil and butter. Once the butter is melted, add the cabbage, salt, and pepper. Saute for 10 to 15 minutes, stirring occasionally, until the cabbage is tender and begins to brown. Don't feel like you need to constantly stir it. Leaving cabbage undisturbed for a minute or two as you go is what will allow it to develop brown caramelized bits or frond (aka FLAVOR).
- Remove from the heat and stir in the apple cider vinegar. Taste and add a bit of additional salt and pepper if you like, or a splash more vinegar if you'd like to add more zippy and acidic flavors. Sprinkle with thyme. Serve warm.
Optional add’ins: Any of these can be added to the cabbage when sauteeing — mushrooms, onions, leeks, carrots (slice thinly or shred into cabbage so they cook in same time frame as the cabbage.) You could also toss in some shredded kale when the cabbage is almost done. The possibilities are almost limitless, you could toss the cabbage with roasted cauliflower, broccoli. Roasted garlic is a nice treat to mix in as well. Top the sautéed cabbage with roasted sweet potatoes or squash! Optional seasonings are dill seed, caraway seeds. Sautéed cabbage is also good added to mushroom soup or as a side for pork roast and alternatively served with barley or faro for a vegetarian meal.
Tips: TO STORE—Store Sautéed Cabbage in an airtight container and place in the refrigerator for up to one week. TO REHEAT—Place Sautéed Cabbage in a microwave-safe bowl or on a plate and reheat gently until warm. You can perk your leftovers up by adding another sprinkle of salt and a splash of apple cider vinegar after reheating. TO FREEZE—Sautéed Cabbage can be frozen if placed in a freezer-safe container. The texture of the cabbage may change slightly while frozen, but will still taste delicious when thawed.
Source: https://www.wellplated.com/sauteed-cabbage/
STUFFED CABBAGE ROLLS — This is a good project for a chilly fall weekend or a snowy winter day. This recipe kind of reminded me of my mom's. This stuffed cabbage rolls recipe is cabbage leaves filled with beef and rice, coated in a homemade tomato sauce and baked to perfection. A comfort food classic that's hearty, delicious and simple to make.
For the tomato sauce
2 tablespoons butter
1/2 cup onion finely chopped
1 teaspoon garlic minced
28 ounce can crushed tomatoes do not drain
15 ounce can tomato sauce
salt and pepper to taste
2 tablespoons brown sugar
1 tablespoon red wine vinegar
For the cabbage rolls
1 pound ground beef (I use 90% lean)
1 cup cooked rice
1/2 cup onion finely chopped
1 teaspoon garlic minced
1 teaspoon salt
1/2 teaspoon pepper
1/4 cup fresh parsley leaves chopped, divided use
1 egg
1 head cabbage
cooking spray
Instructions
For the tomato sauce: Melt the butter in a large pot over medium heat. Add the onion and cook for 4-5 minutes or until translucent.
Add the garlic and cook for 30 seconds. Add the crushed tomatoes, tomato sauce, salt and pepper to the pot.
Stir in the brown sugar and red wine vinegar. Bring to a simmer.
Cook for 10-15 minutes, stirring occasionally.
While the sauce is simmering, assemble the cabbage rolls. Bring a large pot of water to a boil.
Immerse the cabbage head in the boiling water. Cook for 3-5 minutes or until cabbage leaves are pliable. Peel 12 large leaves off the cabbage.
Place the ground beef, rice, onion, garlic, salt, pepper, 2 tablespoons of parsley and egg in a bowl. Add 1/2 cup of the tomato sauce to the bowl. Stir to combine.
Lay each cabbage leaf on a flat surface. Use a small knife to cut a V-shaped notch to remove the thick part of the cabbage rib.
Shape 1/3 of a cup of the meat mixture into a log shape and place in the center of a cabbage leaf. Roll the cabbage leaf around the meat mixture. Repeat with remaining meat and cabbage leaves.
Preheat the oven to 350 degrees F.
Coat a 9"x13" pan with cooking spray. Place 1/2 of the tomato sauce in the bottom of the baking dish. Place the cabbage rolls, seam side down, in the dish. Top with remaining sauce.
Cover with foil. Bake for 60-90 minutes or until cabbage is tender and meat is cooked through.
Sprinkle with remaining 2 tablespoons of parsley, then serve.
Instead of tomato sauce Mom would pour a couple cans of tomatoes over the rolls. And she didn’t put eggs or garlic in her “stuffing”. Also instead of ground beef you could sub barley for a vegetarian version. Source: https://www.dinneratthezoo.com/stuffed-cabbage-rolls/#recipe
For more recipes check out our farm recipe blog: https://blackdirtrecipes.wordpress.com
Follow us on Instagram @yesifarm
Fall Share Week #6
And so it goes, not sure how you all fared with the Nor’Easter the other day and we are hoping you all made it through OK. It was brutal here, the rain just never seemed to stop. I gave my farmers the day off on Tuesday, it wasn’t fit for man or beast. Yesterday everyone was back at it but not down in the fields. We couldn’t get into them as there was so much water and a gloppy goo of mud. As a result the only greens we were able to harvest was the baby spinach which is up on higher drier ground. Couldn’t get close to the kales, turnips, beets and carrots and other vegetables and herbs unless you had a boat! But this too shall pass and as soon as it dries out a bit we’ll be back at it. Fingers crossed that the newer plantings will survive. Also had a bit of frost, not too much just enough to knock back some of the weeds and make the leaves on some of the plants look not so pretty. But they still taste amazing!
Vegetables/Recipes — Happy Halloween!!! So hard to believe this is the end of October! In my humble opinion, sugar pumpkins are one of the cuter ones. They look great on the table, are super tasty and make a great tureen for soups, stews and chilies!
How to clean a pumpkin for cooking: Cut off the stem, then cut the pumpkin in half (from top to bottom). Use a spoon to scrape out any fibers and seeds out of each half. A serrated grapefruit spoon or an ice cream scoop work great for this. Clean and save the seeds for roasting, if you like. Depending on my recipe, I will cut the pumpkin into wedges like a melon and peel away the skin with a potato peeler. Don’t worry about getting every last bit as the skin is edible and it will blend into whatever dish you’re making! Then cut the wedges into cubes. The resulting pieces can be roasted, steamed, sautéed or put into a soup or chili like the following recipe!
DRUNKEN PUMPKIN CHILI
There’s a lot going on in this recipe making it perfect for one of those rainy autumn, snowy winter days or even a Halloween potluck!
This pumpkin chili recipe is full of spicy, smoky, rich, savory fall-inspired flavors! Healthy too (includes both ground beef and vegan options)
Ingredients
· 1 pound 93% lean pastured, organic ground beef (optional)
· 2 cloves garlic, minced
· 1/3 small onion, chopped
· 2 large carrots, diced
· 1 yellow bell pepper, diced (doesn’t have to be yellow, do like I do and use what you’ve got!)
· 2 bay leaves
· 2 teaspoons cumin
· 2 teaspoons dried oregano
· 1 teaspoon cinnamon
· 1/4 teaspoon allspice
· 1 tablespoon tomato paste
· 2 tablespoons apple cider vinegar
· 2 tablespoons pure maple syrup
· 1 cup dark beer (3)
· 3 cups of cubed pumpkin (4)
· 15-ounce container diced tomatoes
· 2 canned chipotle peppers in adobo sauce, seeds removed and minced (for mild heat — add more for additional heat)
· 15-ounce container black beans, drained and thoroughly rinsed
· 15-ounce container cannellini beans, drained and thoroughly rinsed (optional)
· Sea salt
Instructions
1. Add the ground beef to a dutch oven or large stock pot and adjust heat to medium-high.
2. Break up the meat using a wooden spoon, and immediately add the minced garlic, diced onion, diced carrots, and diced bell pepper. Season with salt.
3. Cook for about 7 minutes, or until the meat is nicely browned and the veggies are softened.
4. Reduce the heat to medium. Add the bay leaves, cumin, oregano, cinnamon, allspice, tomato paste, vinegar, and maple syrup. Stir to combine.
5. Add the pumpkin ale and stir to deglaze the bottom of the pan. Allow the pumpkin ale to cook and reduce for about 5 minutes.
6. Add the pumpkin purée and diced tomato. Season with salt. Add the minced chipotle peppers, and stir to combine.
7. Partially cover the pot, reduce the heat to low, and allow the chili to cook for about 45 minutes.
8. Add the beans, stir, and allow the chili to cook for another 10 minutes. Season to taste with salt, and serve.
Notes
1. For a vegan pumpkin chili, leave out the ground beef and add both black beans and cannellini beans to bulk up the chili.
2. If you’d like to use ground beef in this chili, you can skip the cannellini beans.
3. Original recipe calls for 1 cup pumpkin ale I find I like a really dark beer like a brown ale or stout for rich flavor
4. Original recipe calls for a 15-ounce container pure pumpkin puree, I like to use sugar pumpkins or other winter squashes like butternut, kabocha, koganut, you get the idea!
5. This pumpkin chili is the perfect slow cooker recipe! Add all ingredients – aside from the beans – to the slow cooker set to Low heat. Cook for about 5 hours -stirring occasionally – until all veggies are softened. Add the beans, remove the slow cooker cover, and cook for another 1-2 hours. (Removing the cover will allow extra liquid to evaporate.) Be sure to season thoroughly with salt, as this recipe makes A LOT of chili!
Source: https://jenelizabethsjournals.com/2012/10/24/drunken-pumpkin-chili/
For more recipes check out our farm recipe blog: https://blackdirtrecipes.wordpress.com
Follow us on Instagram @yesifarm
Fall Share Week #5
Like the little engine that could, we just keep chugging along. The potato harvest has blessed us indeed this year. Our farmers just keep digging and digging. Thankfully the weather has been holding. While a cold snap won’t hurt the potatoes, as the weather continues to cool down and we experience cooler temperatures, eventually the cold will penetrate deep into the soil and freeze the ground and anything under it. We’re just about half way done with the patch and over 3,500 pounds are in storage now. The next challenge is to keep them cool and dry and to keep the temperatures from fluctuating to extremes as this could cause them to break down more quickly. If all goes well we’ll have potatoes until spring!
Vegetables/Recipes
ROASTED ONIONS, POTATOES, AND SPINACH
Ingredients
1 large onion, halved and peeled
3/4 lb potatoes, scrubbed
1 clove garlic, peeled and partially crushed
1 1/2 tablespoons olive oil
1/2 tablespoon balsamic vinegar
1 small bay leaf
1/2 teaspoon chopped fresh rosemary
1 tablespoon vegetable broth or 1 tablespoon water
2 cups spinach, rinsed and chopped
salt and pepper
Directions
• Preheat the oven to 400 degrees Fahrenheit.
• Lightly oil a large roasting pan.
• Mix oil and vinegar in a bowl, add garlic, salt, and pepper.
• Trim ends off onions, and cut into wedges from end to end.
• Cut potatoes in wedges.
• Place potatoes and onions in a bowl with dressing, toss well.
• Spread potatoes and onions in a single layer in a roasting pan, and sprinkle with water or vegetable broth.
• Roast 30 minutes, stirring only once or twice and adding more water or broth if needed.
• Add spinach, and cook for about 10 minutes more.
• Alternatively: Sautee spinach and top with potatoes and onions.
Source: https://www.food.com/recipe/roasted-onions-potatoes-and-spinach-74072
LEMON AND GARLIC NEW POTATOES
Ingredients
• 1 pound small red potatoes
• 2 tablespoons olive oil
• 2 garlic cloves, minced
• 1/4 cup shredded Parmesan cheese
Directions
Cut scrubbed potatoes into wedges; place in a large saucepan. Add water to cover; bring to a boil. Cook, covered, until tender, 10-15 minutes; drain. In the same pan, heat oil over medium-high heat. Add potatoes; cook until browned, 4-6 minutes. Add garlic; cook 1 minute longer. Remove from heat.
Stir in remaining ingredients:
2 tablespoons lemon juice
1/4 teaspoon salt
1/4 teaspoon pepper
For more recipes check out our farm recipe blog: https://blackdirtrecipes.wordpress.com
Follow us on Instagram @yesifarm
Fall Share Week #4
Got all the winter squashes out of the fields, now we have to grade, clean and get them in for winter storage. The cold wave predicted for next week will have us scrambling to get them all inside and under cover so they don’t freeze. Still digging potatoes, Tuesday we brought in around 1,500 pounds with thousands more to go!!! Took down all the stakes and twine from the tomato plants. Cleaning up the weeds and dead plants wherever we can, which for us means we turn them back into the soil and they become food for the crops to come. Keeping an eye on the late plantings of carrots, beets, turnips and spinach—so far so good!
Vegetable — Spaghetti Squash I don’t understand why Spaghetti squash is called a winter squash, I mean yes botanically I do, it’s not really a summer squash nor does it have great storage qualities where we could keep it until January or February, so since there is no special category for ‘fall squashes’ I guess it has to go into the winter bin. It never was a favorite of mine. The first year Dad grew it, Mom roasted it and covered it with an awful tasting jarred tomato sauce. For me it was a terrible culinary experience, at the time I think I thought I was scarred for life, LOL. I would refuse to eat it and even found myself resistant to growing it since I disliked it that much! Well given time I have discovered that while I might not love it, I do like and enjoy eating it. I’ve made it for dinner a couple times just this past week!
My favorite way to cook it is to poke some holes in it, place on a sheet pan, roast at high heat until it’s fork tender like a baked potato. Slice open, scoop out seeds, then scrape out flesh using a fork to shred it into spaghetti like strands. Season with butter or olive oil, salt and pepper, sprinkle with some parmesan and done! You can also cut the squash in half while still raw, scoop out the seeds, then roast it.
Below is a link for Spaghetti Squash Recipes – scroll down to bottom of the page for the list:
https://www.delish.com/cooking/a20086127/how-to-cook-spaghetti-squash/
For more recipes check out our farm recipe blog: https://blackdirtrecipes.wordpress.com
Follow us on Instagram @yesifarm
Fall Share Week #3
The perfume from the vegetables was almost intoxicating yesterday — cilantro, parsley, anise aka fennel, bok choy and oh those leeks!!!! I am always amazed at how beautiful things are right before they are about to perish. The oils from the herbs and plants seem to float on the cool damp misty fog in the early morning and then stay with you all day! This week we finally got the old “skin” off the greenhouse and put the new one on. So amazing what a new skin (the plastic that goes over the ribs) can do for you! Over time the plastic degrades from the constant exposure to the sun and wind. Not only does it rip and tear, it becomes opaque and no longer allows the sunlight to enter as we need it too, especially for the new plants and seedlings. With luck this cover will last us at least 4 years hopefully more!
Vegetables/Recipes — For so many folks acorn is a particularly favorite squash of fall and winter. Acorn squash are known for their sweet flesh that some would describe as slightly “nutty,” low in calories, high in nutrients and a good source of fiber. I think this was my first “bowl food.” One of the simplest ways to prepare it is to split it in half, scoop out the seeds, place upside down on a parchment lined sheet pan and roast at high heat about 400 degrees until fork tender, start checking it after about 30-35 minutes. Scoop out the flesh and season to taste:
Go sweet with: Honey or Maple syrup
Go savory with: Butter or Olive Oil and salt and pepper
Use the squash halves as a bowl, fill with your favorite chili. You can do this before or after you roast the squash. A scoop of the spicy chili with the sweet flesh of the squash is so good! You could also fill with a rice stuffing — I like to use a wild rice blend.
How to Cut Acorn Squash
· The easiest way to cut acorn squash is from stem to end.
· Lay your squash on its side, and use a sharp chef’s knife to carefully make a cut on one side between two of the ridges. Keep pressure on the knife until you feel it reach the hollow center. If you feel your knife getting stuck, pull it out and start your cut again. Continue cutting on the same line, repositioning and flipping your squash over as needed, until you’ve cut all the way through around the bottom of the squash on both sides. Unless you’re using a very sharp knife, do not cut through the stem. Instead, lay your knife down, and grab the bottom end of the two halves, pulling them apart. You can also score the flesh first. Using the sharp tip of the knife make a series of incisions in the shape of a dotted line down the valley between the ribs. Then cut all the way through the dotted line. Safety tip: when using a large knife for cutting, put a thick towel over the tip of the blade before applying downward pressure – this will help to keep you from cutting your hand on the knife tip.
HERB ROASTED PARMESAN ACORN SQUASH
Ingredients
· 1 large acorn squash (or 2 small)
· 1/3 cup shredded parmesan cheese + more for garnishing
· 2–3 Tbsp. fresh herbs or 1 tsp. dried (we suggest: thyme, sage, rosemary, or oregano)
· 1 Tbsp. ghee or butter, melted
· 1/2 tsp. garlic powder
· 1/4 tsp. salt + more to taste
· 1/8 tsp. black pepper
Instructions
1. Preheat oven to 400℉.
2. Cut acorn squash in half and scoop out the seeds. Then slice each half into ½-inch thick slices. In a large bowl, combine all of the ingredients and toss to combine. Transfer to a large sheet pan. Using your hands, gently press parmesan cheese onto the squash for maximum coverage. Bake in the oven for 25 minutes or until squash is cooked through and parmesan cheese is crispy and slightly browned. Garnish with additional parmesan cheese and herbs, if desired. Source: https://therealfooddietitians.com/herb-roasted-parmesan-acorn-squash/
SAUSAGE STUFFED ACORN SQUASH
This cozy, hearty Sausage Stuffed Acorn Squash with apples, mushrooms, and herbs is a fantastic blend of sweet and savory flavors.
Ingredients
For The Squash:
· 1 acorn squash halved through from the stem to the base and seeds removed
· 2 teaspoons olive oil
· Kosher salt and ground black pepper
· 3/4 teaspoon olive oil
For The Filling:
· 1/2 pound Italian chicken or turkey sausage about 1 links, casings removed, sweet or spicy (we use spicy)
· 4 ounces cremini baby bella mushrooms finely chopped
· 1/2 small yellow onion chopped
· 1/2 medium sweet-crisp apple cored and finely diced (peel off or on; I left it on)
· 1/4 teaspoon kosher salt
· 1/8 teaspoon ground black pepper
· 1/8 teaspoon ground nutmeg
· pinch ground allspice
· 1 clove minced garlic
· 1/2 tablespoon chopped fresh sage thyme, or a mix (plus additional for serving)
· 1/4 cup shredded Parmesan cheese divided
Instructions
Bake the squash: Place a rack in the center of the oven and preheat the oven to 400 degrees F. With a sharp, sturdy chef’s knife, carefully cut the squash in half from stem to base. Scoop out and discard the stringy core and seeds. Arrange the halves cut-sides up on a rimmed baking sheet. Brush each half with 1/2 teaspoon olive oil and sprinkle with salt and pepper. Place in the oven and bake for 40 minutes, until the edges begin to wrinkle and the flesh is fork-tender. Set aside. Reduce the oven temperature to 375 degrees F.
While the squash bakes, prepare the filling: Heat the olive oil in a large skillet over medium-high heat. Add the sausage. Brown the meat, breaking it apart into small pieces for 3 minutes.
Add the mushrooms, onion, apple, salt, pepper, nutmeg, allspice, and minced garlic. Cook, stirring frequently, until the sausage is cooked through, the vegetables and apple are softened, have given up liquid, and the liquid has cooked off, about 8 additional minutes.
When the squash is cool enough to handle, scoop out its flesh, leaving a wall all the way around that is about ¼-inch thick. Add the scooped squash to the pan with the sausage. Add the herbs and Parmesan. Stir to combine. Taste and adjust salt and pepper as desired. Mound the filling inside of the hollowed squash halves. Sprinkle the remaining Parmesan over the top. Place the pan in the oven and bake until the cheese is melted and the filling is nice and hot, about 15 minutes. Sprinkle with additional fresh herbs as desired. Serve hot. Source: https://www.wellplated.com/sausage-stuffed-acorn-squash/
For more recipes check out our farm recipe blog: https://blackdirtrecipes.wordpress.com
Follow us on Instagram @yesifarm
Fall Share Week #2
How gorgeous the weather has been lately, I just want to soak up all the warmth and sunshine and pack it away to bring out in February! The days are getting shorter in daylight but the workload just seems to never change. Had the chance to catch up with some fellow farmers this week and we all have the same look on our faces and are saying the same thing. We all get up around 3:30-4:00 AM and just wonder ...
What day is it? Where are we going? What are we doing?
Oh yes it’s Market Day—
Pick the peppers, dig the potatoes, pick the squashes and pumpkins,
Clean out the greenhouse to make room for the storage crops,
Done with this equipment—clean it up and put it away till next season.
Did we drain all the water out of unused pumps and tractors?
One of these nights it’s going to drop below freezing
and we won’t have time to do everything in one day,
Already starting to plan for next season — in my head at least —
What did we forget to plant? What was a crop failure?
What did our customers LOVE? Make sure we plant that again,
What did they like not so much? Get rid of that or plant less,
What did our customers wish they had more of? Order more of that seed!
What company sold out of that seed, better order it now so you have it!!
RAW CORN & RADISH SALAD WITH SPICY LIME DRESSING
Ingredients
· 2 tablespoons fresh lime juice
· 1 small jalapeño, seeded and coarsely chopped
· 1 1/2 teaspoons honey
· 1/4 teaspoon cumin
· 1/4 cup vegetable oil
· Kosher salt and freshly ground pepper
· 4 cups fresh corn kernels (from 4 ears)
· 6 medium radishes, halved and thinly sliced crosswise
· 1/2 cup coarsely chopped cilantro
· red onion scallions, thinly sliced – if you use the whole scallion about 2 pieces only using the red portion then use most of the whole bunch
Directions
· Step 1: In a blender, puree the lime juice, jalapeño, honey and cumin. With the machine on, add the oil. Season with salt and pepper.
· Step 2: In a large bowl, toss the corn with the radishes, cilantro, red onion and dressing. Season the salad with salt and pepper, transfer to plates and serve.
Notes: original recipe called for parsley
Source: https://www.foodandwine.com/recipes/raw-corn-and-radish-salad-spicy-lime-dressing
BOK CHOY AND COCONUT CORN — Not just for stir fries!! Try the bok choy in this salad with Thai inspirations.
Ingredients
1 T plant-based butter
1 medium onion, diced
1 T sliced garlic (about 3 cloves)
1 T ginger, minced
3/4 lb baby bok choy, rinsed and chopped
2 lb corn, fresh or frozen, thawed
1/4 C water chestnuts, sliced
5 oz. coconut cream
2 T sesame oil
2 t coarse salt
2 t black pepper
5 –6 chili peppers (chopped or whole)
1/2 Lime, juiced over top when complete
to garnish (optional): cilantro, lime wedges, mint
Instructions
1. Preheat oven to 400.
2. On stove top heat saute pan on high heat. Add buttah, onion, garlic and ginger and sauté for 3 minutes.
3. Remove from the heat and set aside.
4. In a large bowl, add bok choy, corn and the rest of the ingredients.
5. Toss to coat, then pour the onion-butter mixture over it and gently toss again.
6. Transfer the mixture to an oven-safe dish, cover with foil, and bake for 15 minutes.
7. Remove the foil, stir and bake for an additional 5 minutes.
8. Serve warm, garnished with cilantro, lime and mint, if desired.
Original Source: https://wickedhealthyfood.com/2017/01/15/baby-bok-choy-and-coconut-corn/
For more recipes check out our farm recipe blog: https://blackdirtrecipes.wordpress.com
Follow us on Instagram @yesifarm
Fall Share Week #1
My favorite time of year — Autumn is here! I do love all the seasons and the changing weather but hands down, fall is at the top of my list. Between the colors, sounds and smells of autumn it’s also peak harvest. You scramble to get the last of the summer tomatoes while picking the winter squashes all before that first killing frost settles in the valley. About this time last year our shell beans were about one week away from harvest then one night the temps dropped below freezing and killed everything. To work so hard for months, weeding, caring for the plants and then nothing but blackened sticks, not one bean to show for your efforts. This is part of the deal you get when you choose to be a farmer or like me farming chooses you! In spite of these challenges there is nothing so soul satisfying as the incredible harvest that we do get to do and share with you all!
The vegetables this week are stunning. The tomatoes are cherry, which is really a description of their size. Don’t let the green ones fool you, all the tomatoes are ripe and ready to eat now! There’s Sun golds, yellow and red pear, Brad's atomic (a long deep purple almost black with red coloring appearing as they ripen), yellow and red striped ones, and so many more. It's like a magic jewel box of colors, shapes and flavors. The potatoes this week are a fingerling called Magic Molly. Everyone gets a chuckle out of the name, saying it takes them back to the 70’s! A very richly colored purple fingerling, the flesh is as dark as the skin. Best of all they hold their color when you cook them!
Cherry tomatoes — Snack on them just like they are. Halve them, sprinkle with some salt, pepper, drizzle with olive oil – the perfect salad! You could also sprinkle with some chopped fresh herbs like parsley, chives or cilantro. Toss with feta and add some fresh mint. That trick where you take 2 delitainer lids, put the cherry tomatoes in between them and then run a knife through the lot really does work!
ROASTED CHERRY TOMATOES
I’ve been roasting vegetables for years and cherry tomatoes have been one of my favorites before it was a “thing.”
Ingredients
16 ounces cherry tomatoes (halved)
2 tablespoons olive oil
1 teaspoon minced garlic
1/2 teaspoon Italian seasoning
salt and pepper to taste
2 tablespoons fresh minced herbs such as parsley, basil or chives
Cooking Spray or Parchment Paper
Instructions
– Preheat the oven to 400 degrees F. Either spray sheet pan with cooking spray or line with parchment paper. Place the cherry tomatoes in a single layer on the sheet pan. Drizzle with the olive oil, tossing to coat evenly. Bake for 25 minutes. In a small bowl, mix together the garlic, Italian seasoning, salt and pepper. Pour tomatoes and juices into a bowl. Sprinkle the fresh herbs over the tomatoes, then serve.
– Eat them just like this as a side dish, use as a sauce over pasta, you could even mix with some sour cream and use as a dip. I practically have to hide them from my sister otherwise she’ll eat the whole plan in a blink!
Original Source: https://www.dinneratthezoo.com/roasted-cherry-tomatoes/#recipe
Magic Molly Purple Potatoes – The antioxidant activity of purple potatoes is two to three times higher than that of white potatoes! Eating purple potatoes may also help reduce blood pressure and have less of an effect on raising blood sugar compared to other types of potatoes.
Ingredients
1 pound purple potatoes
1/4 cup whole milk
1 Tablespoon butter or more to your taste
Salt
Pepper
Fresh Herbs like Parsley or Chives for garnish
Directions
– Prepare the potatoes by peeling them if desired (you can also leave the peels on), removing any bruised areas, and cutting them into 2-inch pieces. Place them in a large pot, cover with water, add up to 1/2 teaspoon of salt, and bring to a boil. Let them boil for 15 to 17 minutes until fork-tender.
– In the meantime, combine the milk and butter in a small saucepan over low heat. Cook until the butter is melted, then remove from heat, being careful not to let the mixture boil.
– When the potatoes are cooked, drain and return them to the pot. Pour in the milk and butter mixture, and mash the potatoes with a handheld masher or a handheld electric mixer (for a creamier texture) until smooth. Taste, and add salt, pepper, more butter, and fresh herbs as desired. For additional flavor, consider adding up to 1/2 cup sour cream. Enjoy warm!
Note: Some folks find that the purple potatoes are “earthier” in flavor and you may want to add more milk and/or butter
Nutrition and recipe originally sourced from: https://itsavegworldafterall.com/mashed-purple-potatoes/
For more recipes check out our farm recipe blog: https://blackdirtrecipes.wordpress.com
Follow us on Instagram @yesifarm
Summer Share Week #13
And so it begins, the leaves on the trees are starting to change color, it’s cooler in the early morning so much so that we are all wearing sweatshirts and stripping down to t-shirts as the day warms up. Then there are the smells and sounds in the air that are unmistakably fall — dry dust, aroma of the crispy crunch of leaves that have fallen, the sweet smell of onions being harvested, the crackle of pods from beans being shelled, the snap of the stems of kale and chard as we snip them off their stalks, the thud of pumpkins and squashes as we pile them in mini-mountains in the fields, the sugary sweetness of the corn as we shuck and pull it from the stalks. We don’t need all the fancy coffee shops, store displays and advertisements to tell us it’s pumpkin time — nature decrees when it’s right and ready and nature is beginning to burst with the news that autumn is near, get ready for it! Enjoy the tomatoes and corn now we are getting near the end of those harvests!!!!
SHAKSHUKA
Of North African and Middle Eastern origins, Shakshuka is a meal of poached eggs in a simmering tomato sauce with spices. It's easy, healthy and takes less than 30 minutes to make. I love it for any time of day but I also will eat breakfast for dinner and vice-versa!
Ingredients
2 Tablespoons olive oil
1 medium onion, peeled and diced
1 bell pepper, seeded and diced (green or any color will work you can also sub out Sweet Italian frying peppers or other sweet peppers I will often mix them depending on what’s around the farm and kitchen)
4 garlic cloves, finely chopped
1 teaspoon cumin
1/4 teaspoon chili powder
1 pound tomatoes chopped (I use the whole tomato and be sure to save the juice)
6 large eggs
Salt and pepper to taste
Fresh parsley or cilantro or both, chopped
Directions
Heat olive oil in a large sauté pan on medium heat. Add the chopped pepper and onion and cook for 5 minutes or until the onion becomes translucent. Add garlic and spices and cook an additional minute. Add the tomatoes and juice into the pan and break down the tomatoes using a large spoon. Season with salt and pepper and bring the sauce to a simmer. Use your large spoon to make small wells in the sauce and crack the eggs into each well. Cover the pan and cook for 5-8 minutes, or until the eggs are done to your liking. Sometimes I will put the sauté pan into the oven and finish the dish off by baking it. (350 degrees)
I like a soft poach so the runny yolk will mix with the sauce. Add a nice thick slice of a crusty bread to sop up the juices, occasionally a glass of wine or hard cider to chase it down! And don’t forget to garnish with the chopped cilantro and parsley!
This will also work with spinach instead of tomatoes!!
Original Source: https://downshiftology.com/recipes/shakshuka/
For more recipes check out our farm recipe blog: https://blackdirtrecipes.wordpress.com
Follow us on Instagram @yesifarm
Summer Share Week #12
'Tis the season of when we hold our breaths, harvest like mad and pray the weather holds! Now that September has arrived, with it comes the threat of frost and heavy rains. Our storage is beginning to swell with the fall crops — potatoes, onions, winter squashes. These all need time to cure and dry before we can share them with you. All the while still harvesting summer crops of tomatoes and peppers and on rainy days the farmers are busy shelling beans. I’ve been drying herbs and putting tomatoes and sweet corn in the freezer for wintertime—and crazy as it sounds, I'm already thinking about next year's season!
Vegetable — Lacinato Kale is known by many names such as Tuscan kale, Italian kale, dinosaur kale, kale, flat back kale, palm tree kale, or black Tuscan palm and has been grown in Italy for centuries. In my opinion it is one of the more tender varieties and delicious raw in salads yet sturdy enough to hold up for kale chips.
PALEO SAUTÉED LACINATO KALE (Whole30, Keto)
Ingredients
• 10 oz. Lacinato kale stems removed and dice to 1-inch pieces (see notes)
• 0.4 oz. cloves garlic finely minced (about 2 large cloves)
• 2 tbsp olive oil divided
• ¼ tsp coarse sea salt or to taste
• ½ tbsp vegetable or chicken stock
Instructions
– Rinse and wash the lacinato kale thoughtfully. Pat dry. Lay a kale leaf on a cutting board and run a paring knife along each side of the center stem. Repeat until all the stems have been removed. Stack 4-5 layers of kale leaves and roll them up to slice into 1-inch pieces. You want to keep the kale leaves with as little water as possible so use a salad spinner, if necessary.
– Mince garlic and set aside ready to use. In a well-heated large stainless steel or cast iron skillet, lower the heat to medium. Add 1 tbsp oil and saute garlic with a pinch of salt for 3-5 seconds. Add kale leaves and 1 extra tbsp olive oil. Toss and saute for 2 to 3 minutes further. Cover with a lid and cook for 1 minute. Open the lid, season with salt and stock. Saute for 30 seconds. Off heat, serve warm or room temperature.
Notes – If the leaves are smaller I don’t bother removing the stem. For spice add some chili pepper flakes. This recipe can be used for most any kind of leafy green.
Source: https://iheartumami.com/paleo-sauteed-lacinato-kale-recipe/
DINOSAUR KALE WITH BABY POTATOES
The potatoes are cooked in stock here, which looks wasteful but it's not: You can reuse the potato-enriched stock in another recipe. It is great as a base for polenta or rice. Try to find the smallest potatoes you can for this recipe. It will still be good with larger potatoes, but you lose the pretty "eggs in a nest" effect.
Ingredients
• 2 cups vegetable or chicken stock (use vegetable stock for vegan option)
• 2 cups water
• 1 pound baby potatoes of various colors
• 3 tablespoons extra virgin olive oil, divided
• 1 pound dinosaur kale or Swiss chard, chopped roughly
• 3 garlic cloves, chopped
• 1/4 teaspoon red pepper flakes
• Salt and black pepper
• Grated zest of a lemon
• Lemon juice to taste
Instructions
Bring the stock and water to a boil and add the potatoes. Turn the heat down to simmer gently until the potatoes are tender, about 20-30 minutes. Drain (you can reserve the stock and water to cook rice or polenta with later) and coat the potatoes with 1 tablespoon olive oil. Salt well and set aside. Heat the remaining olive oil in a large sauté pan over medium-high heat for 1-2 minutes. Add the kale and turn to coat with the oil as it wilts. Add the garlic and toss to combine, then add the red pepper flakes and some salt and black pepper. Stir-fry this for 2 minutes, then turn off the heat and cover the pan. Wait 2-4 minutes before uncovering.
To serve: Lay down a "nest" of kale on the plate and arrange the potatoes in the center. Squeeze some lemon juice over everything right as you serve.
Source: https://www.simplyrecipes.com/recipes/dinosaur_kale_with_baby_potatoes/
For more recipes check out our farm recipe blog: https://blackdirtrecipes.wordpress.com
Follow us on Instagram @yesifarm
Summer Share Week #11
Yikes! What a day and night weather wise. We hope you are all safe and sound!!! There is flooding here in the valley; the drainage ditches are struggling to handle the water and get it out of the fields. Since the fields are inaccessible we carry on with other projects. The plastic has to be replaced on the greenhouse so we’ll work on that. It will take most of the day to get it done, between moving all the “stuff” around the perimeter and inside, running to the lumber yard for wood and screws to fasten the plastic. But when it’s done it will be great!!!
Vegetable / Recipe: Shishito Peppers — originating in Asia, these thin-skinned little peppers are amazing. You can use them in most any dish that calls for peppers, but cooking them up in a skillet is the easiest and quickest way to enjoy them. The fun thing about them is that 9 out of 10 are supposed to be mild — it’s that tenth one that will get you! But you have no way of knowing which one is hot until you eat it!!!
BLISTERED SHISHITO PEPPERS: Blistered shishitos are easy to make and totally irresistible! You’ll just need shishitos, olive oil, a skillet, and this simple recipe.
Ingredients
· 4 ounces (1 ½ heaping cups) shishito peppers
· 1 teaspoons extra-virgin olive oil or avocado oil
· Lemon wedge, optional
· Salt, preferably flaky sea salt or kosher salt, to taste
Directions
1. Rinse and pat the peppers dry on a clean tea towel. Transfer the peppers to a medium bowl, drizzle in the oil, and toss until the peppers are evenly coated. Set aside.
2. Preheat a medium skillet over medium heat until it’s hot enough that a drop of water sizzles and evaporates quickly on contact. Add the peppers and let them cook, stirring every minute or so (not too often), until they are tender with charred spots, about 8 to 12 minutes.
3. Transfer the peppers to a serving plate. Spritz with a lemon wedge, if desired. Sprinkle with salt, to taste (don’t skimp). Serve with a little bowl on the side for the pepper stems.
Notes: This recipe will also work with Padrón peppers and guindilla peppers.
Source: https://cookieandkate.com/blistered-shishito-peppers-recipe/#tasty-recipes-34298-jump-target
Cooking options: There are several different ways you can cook shishito peppers. I say try them all because each method is terrific! Here are a few ideas:
· Grilled - Char them on the grill and serve them with steak, chicken, or any other meat.
· Air Fryer - Toss them in the air fryer with some oil spritzed on them and cook for 5-6 minutes at 375º F. This is another option for blistering them.
· Baked - Toss in avocado oil and bake for 5-7 minutes at 450º F.
8 Delicious Shishito Pepper Recipes
BLISTERED SHISHITO PEPPERS WITH GARLIC I love these simple pan-fried blistered shishito peppers with garlic. These peppers are cooked in a hot cast-iron skillet with lots of minced garlic and oil. Go ahead and eat the seeds and all. Just don't eat the stem!
SAUTED CHICKEN WITH SHISHITO PEPPER SAUCE OVER CHEESY POLENTA This sautéd chicken over cheese polenta and topped with a shishito pepper sauce is a fancy dinner recipe that is made to impress! Cheesy polenta and shishito peppers are a match made in heaven.
ROASTED SHISHITO PEPPER SAUCE This quick and easy roasted shishito pepper sauce is perfect for drizzling over chicken or fish!
CHILLED SHISHITO PEPPER SOUP This cold shishito pepper soup was my very first introduction to these peppers. There is a tangy spice to this soup, making it perfect for someone who loves bold flavors.
CHARRED CAULIFLOWER AND SHISHITO PEPPERS WITH PICADA SAUCE Another fancy way to cook shishito peppers. Here these peppers bring this cauliflower side dish to life.
EASY SHISHITO SWEET RED PEPPER SOUP Shishito peppers also come in a vibrant red color! They are perfect to make this red shishito pepper soup recipe!
ONE-PAN CHICKEN WITH BASIL-ANCHOVY BUTTER & SHISHITO PEPPERS This fun shishito peppers recipe includes healthy anchovy!
PALEO MONGOLIAN CHICKEN WITH SHISHITO PEPPERS (WHOLE30)
Source: https://www.fearlessdining.com/8-ways-to-fall-in-love-with-shishito-peppers
For more recipes check out our farm recipe blog: https://blackdirtrecipes.wordpress.com
Follow us on Instagram @yesifarm
Summer Share Week #10
First off we hope you are enjoying the corn, it really has been perfect corn weather this year. Each week the ears seem to get fatter and fatter! On the flip side blight should really be a four letter word. We were all so excited about the basil crop earlier and had planned on bringing it to you sometime like now. Sadly nature decreed uh-uh and thanks to the humid, hazy, hot weather conditions a nasty blight has settled into it. (Check out the picture below.) Basil is one of those more sensitive crops, doesn’t like it too cold, too dry, too wet, too hot. So even though we planned for the perfect harvest it didn’t turn out that way. And so goes the life on the farm!!! The peppers we sent this week are all in the sweet family. The narrow twisted horn-like ones are a variety called Jimmy Nardello. A slow food Ark of Taste choice, this pepper is extraordinarily sweet when ripe. The seed came to this country in 1887 via Giuseppe and Angella Nardello from Ruoti, Italy. After settling in Naugatuck , CT they grew and named this pepper after their fourth son Jimmy! This pepper will also dry very well, so if you want to put them away for some sweet memories of summer on a cold winter day go for it!!!
Vegetable — Red Tomatoes, Sweet Corn
Red Tomatoes – One of the best ways to eat them is on sandwiches! Bread, mayo, salt and pepper—YUM!
SWEET CORN FRITTERS
Ingredients
• 3/4 cup flour
• 1 1/2 tsp baking powder
• 1/2 tsp salt
• 3 eggs
• About 2 cups sweetcorn kernels
• 2 leeks, finely sliced
• 4 1/2 teaspoons chopped cilantro (could swap parsley)
• 2 1/4 teaspoons finely diced green chilli (Optional)
• Butter for frying
• Charred red pepper relish
• 1 red onion
• 1 red pepper (doesn’t have to be red but the color is nice – the cippolini onions are a nice addition to this)
• 30 cherry tomatoes or two medium slicing tomatoes
Avocado topping
• 2 ripe Hass avocados
• 4 teaspoons lemon juice
• 2 ¼ teaspoons chopped cilantro
• Spoonful of crème fraiche to serve (can sub sour cream, yogurt)
Directions
1. First, make the charred red pepper relish. Thinly slice the onion and sweat with oil.
2. Take the seeds out of the pepper and chargrill until it has a good color.
3. Scorch the cherry tomatoes until cooked and dice the pepper.
4. Add the pepper and cherry tomatoes to the onions and cook down to a chutney. Set aside for dressing.
5. Make the avocado topping. Peel and roughly chop the avocados.
6. Smash the avocado with the lemon juice and season so it is like a rough puree, or guacamole. Mix the cilantro through and set aside.
7. Next, make the fritter. Combine all of the fritter ingredients together and place in a hot frying pan with a knob of butter. When the bottom side turns golden brown, flip over and finish cooking on the other side.
8. Turn the fritter out onto a plate and garnish with the red pepper relish, smashed avocado and a spoonful of crème fraiche.
Notes from Cheryl – original recipe was in grams I converted to cups and spoons. These would make a great platter with fried green tomatoes and potato pancakes. A lot of frying but so good in the summer!!!
Source: https://www.gordonramsayrestaurants.com/recipes/sweetcorn-fritter/
For more recipes check out our farm recipe blog: https://blackdirtrecipes.wordpress.com
Summer Share Week #9
Legacies — I often think of those who came and went before me. How much they shared with me, taught me, gave of themselves to me. For the most part I don’t think they even knew what they were doing. It might have been showing me the right way to thin lettuce, how to tillivate so you killed the weeds and not the plants, how to harvest tomatoes, how to read the air and know if frost was coming, which onion to choose to save for seed. How to drive a stick shift, the importance of stopping the onion harvester and the whole crew sitting together enjoying our version of a tailgate party. Of how so much they shared with me has become a part of me.
VEGETABLE — Green Tomatoes
There’s unripe green tomatoes and then there’s ripe tomatoes that are green like the green zebra stripe. The following recipes use unripe green tomatoes. This is especially important for the fried green tomatoes. The green tomato toast could be made with most any tomato. When I had the restaurant on my farm one of my favorite breakfasts was eggs benedict served on a fried green tomato instead of an English muffin!
FRIED GREEN TOMATOES
Ingredients
2 large green tomatoes
1 Eggs
1/4 Cup Milk
1/2 Cup All-purpose flour
1/4 Cup Cornmeal
1/4 cup bread crumbs
1 teaspoon coarse kosher salt
1/8 teaspoon black pepper
2 cups vegetable oil for frying
Directions
Slice tomatoes 1/2 inch thick. Discard the ends. Whisk eggs and milk together in a medium-size bowl. Scoop flour onto a plate. Mix cornmeal, bread crumbs and salt and pepper on another plate. Dip tomatoes into flour to coat. Then dip the tomatoes into milk and egg mixture. Dredge in breadcrumbs to completely coat. In a large skillet, pour vegetable oil (enough so that there is 1/2 inch of oil in the pan) and heat over a medium heat. Place tomatoes into the frying pan in batches of 4 or 5, depending on the size of your skillet. Do not crowd the tomatoes, they should not touch each other. When the tomatoes are browned, flip and fry them on the other side. Drain them on paper towels.
Recipe Source: https://www.allrecipes.com/recipe/16760/best-fried-green-tomatoes/
GREEN TOMATO TOAST
Ingredients
· 2 large green tomatoes
· 1/4 small red onion
· 1 handful fresh chives, fresh basil or oregano
· 4 slices crusty bread
· 4 ounces goat cheese
· Garlic salt*
· Fresh ground pepper
Directions
1. Slice the green tomatoes. Thinly slice the red onion, then rinse the slices several times under cold water. Chop or thinly slice the herbs.
2. Toast the bread slices.
3. On each slice of bread, spread goat cheese. Top with tomatoes, onion slivers, and herbs. Sprinkle the top of the tomatoes with garlic salt and fresh ground pepper. Serve immediately.
Recipe Source: https://www.acouplecooks.com/green-tomato-tartines/
For more recipes check out our farm recipe blog: https://blackdirtrecipes.wordpress.com
Follow us on Instagram @yesifarm
Summer Share Week #8
Nature, I think (No, I really know) ... I am in love with her. I am always in awe of her mercurial attitude. The silence — when you remain still, quiet and you feel and hear the whisper of her breath. Smell her perfume in the oils wafting in the air from the herbs, vegetables and yes even the soil. The fresh brightness of cilantro, licorice scent of anise and hyssop, honey notes of sunflowers, the smell of pickles and you just know it’s the dill. Fresh minty aromas, earthy ones (not dirty, there is a difference) of the beets and amaranth. Spicy notes of radishes and turnips. Then there’s the vicious way she lashes out in wind and rain. As though she has to furiously clean the air. Afterwards the sky and atmosphere smell and feel like fresh laundry. You can actually see the plants sigh in relief after receiving a drink of refreshing rain. Suddenly rows begin to appear, next thing you know there’s a new crop ready to harvest. Nature needs no time clock, she knows exactly what to do and when we just need to watch, listen and learn!
Vegetable / Recipe: Cipollini Onions — Cipolla, Cipollini, or Italian onions are a bit sweeter and milder than other onions typically found in stores and or markets. They are awesome on the grill, as kabobs. The skin can be red, yellow or white and you can use them in pretty much any recipe calling for onions.
BALSAMIC GLAZED CIPOLLINI ONIONS (Cipollini Agrodolce) by Karen Tedesco
Tender, tangy cipollini onions in a sweet and sour balsamic glaze. They make a delicious side dish as well as a savory topping for pizza and pasta.
Ingredients
1 pounds cipollini onions
2 tablespoons butter
1 tablespoon olive oil
1 tablespoon granulated sugar
1/2 teaspoon kosher salt
1/3 cup (75 ml) water
1/4 cup (60 ml) balsamic vinegar
1 teaspoon chopped fresh thyme or rosemary leaves
Directions
1. Bring a saucepan of water to a boil. Drop in the onions and boil 2 minutes. Drain and cool slightly. Use a small, sharp knife to slice off the top of the onions, then slip off the skins. Trim any hairy roots, but leave the stem end intact so that the onions don't separate. If the onions are larger than 1 1/2-inches diameter, slice into halves or quarters.
2. Heat the butter and oil in a medium (8-10-inch) nonstick skillet over medium-high heat. When the butter stops foaming and begins to smell nutty, add the onions to the pan. Cook 5 minutes, or until the onions are browned, stirring occasionally.
3. Sprinkle the onions with the sugar and salt. Pour the water and vinegar over them (the pan will sputter). Turn the heat down to medium and cover the pan. Cook 5 minutes.
4. Uncover the pan and continue cooking until the liquid in the pan looks syrupy and has large bubbles, another 2-3 minutes. Sprinkle with the thyme and serve.
Note: The glazed onions will keep refrigerated for 3-5 days.
Recipe Source: https://familystylefood.com/wprm_print/15973
ROASTED CIPOLLINI ONIONS — Sweet caramelized cipollini onions, sauteed in butter and olive olive until golden brown.
Step 1: Peeling the Onions
· 1 lb cipollini onions
Method — Peel cipollini onions and set aside.
Some say soaking the onions in warm water for a few seconds makes them easier to peel. Some also believe blanching them first makes them easier to peel. I have tried both ways and still the easiest way for me, is just to peel them like any other onion. And yes, there will still be some crying while peeling … but it is all worth it because these onions “kick butt.” My only trick is to do them outside in the fresh air.
Step 2: Frying the Onions
· 3/4 tablespoons extra-virgin olive oil
· 1 tbsp non dairy butter, or unsalted
Method — To start, preheat your oven to 375° F.
Next, heat a large oven-proof pan over medium high heat. Once hot, add the oil and butter and let melt. Then add the onions and toss to coat in the fat. Let cook without touching for a few minutes, so they get a nice color. Then toss and let brown on the other side. This should take about 8 to 10 minutes, depending on the size of the onions.
Step 3: Roasting the Onions
· kosher salt (to taste)
· freshly ground black pepper (to taste)
Method — Once the onions are nice and golden on all sides, place the fry pan into the oven and let cook for about 10 minutes, or until a paring knife goes into one of the larger onions easily.
Note: If you do not have an oven-proof fry pan, simply transfer the onions to a casserole dish and place into the oven.
When done, season with salt and pepper to taste and serve. These sweet and tender onions go well with steaks and chicken. In fact, they make a beautiful and impressive side dish. Note: Add a few tablespoons of balsamic vinegar to the onions before placing them into the oven. This gives another dimension of flavor.
Recipe Source: https://rouxbe.com/recipes/1188-roasted-cipollini-onions/print
For more recipes check out our farm recipe blog: https://blackdirtrecipes.wordpress.com
Follow us on Instagram @yesifarm
Summer Share Week #7
The carrots are on the skinny side as this week it was a race between us and the deer, so we picked them on the young side. Good news is no peeling required. Give them a good scrub and use just like that! Tomatoes are coming, it’s a slow crawl. I’m hoping in the next week or two we’ll have enough for fried green tomatoes! The farmers think so too, so keep those fingers crossed. Sweet peppers are getting closer as well. Eggplant is taking it’s good old time and that harvest is a bit further off. I always think of them as more of a fall crop anyway. Benito is digging potatoes so we can build up some inventory, I’m craving some corn chowder and thinking of that for dinner one of these days soon.
VEGETABLES — Corn, Watercress
RAW CORN & RADISH SALAD WITH SPICY LIME DRESSING
Yield: 4
Ingredients
2 tablespoons fresh lime juice
1 small jalapeño, seeded and coarsely chopped
1 ½ teaspoons honey
1/4 teaspoon cumin
1/4 cup vegetable oil
Kosher salt and freshly ground pepper
4 cups fresh corn kernels (from 4 ears)
6 medium radishes, halved and thinly sliced crosswise
1/2 cup coarsely chopped flat-leaf parsley
1/4 small red onion, thinly sliced
Directions
Step 1. In a blender, puree the lime juice, jalapeño, honey and cumin. With the machine on, add the oil. Season with salt and pepper.
Step 2. In a large bowl, toss the corn with the radishes, parsley, red onion and dressing. Season the salad with salt and pepper, transfer to plates and serve. Source: https://www.foodandwine.com/recipes/raw-corn-and-radish-salad-spicy-lime-dressing
SAUTÉED WATERCRESS WITH GARLIC
Yield: 3-4 (side dish) servings
Ingredients
2 tbsp olive oil
6 garlic cloves, minced or grated
2 bunches watercress, trimmed and rinsed thoroughly
1/2 tsp kosher salt, or to taste
Directions
1. Heat oil in a skillet or wok over medium heat. Add garlic and saute until fragrant.
2. Add watercress and salt; cook, stirring constantly, for about 40 seconds.
3. Add 2 tablespoons water and stir. Cover and cook for 25 seconds, or until leaves are wilted.
Source: https://salu-salo.com/sauteed-watercress-garlic/
For more recipes check out our farm recipe blog: https://blackdirtrecipes.wordpress.com
Follow us on Instagram @yesifarm
Summer Share Week #6
I had planned on harvesting carrots for you all but the @#$! deer got to them. Folks have been saying how sweet the white ones are and the deer discovered that as well. Sadly it’s part of the deal to battle the wildlife for our share of the harvest. I’ve spoken with some other farmers and they too are suffering the ravages of deer in their carrots. Maybe fence in a section in the hopes of keeping them out. The upfront investment is pretty intense but if it would keep the crop safe it would pay off over time! For now at least they seem to dislike beans, cilantro and parsley. I found a handful of green tomatoes this morning and the peppers are coming on strong.
VEGETABLE—New Potatoes
New potatoes are so special, the texture and flavor can’t be beat! Simply boiled or roasted, dressed in butter with a sprinkle of chopped parsley over top makes a dish in itself. Add an egg or two and you’ve got dinner!
CORN CHOWDER
Ingredients
2 tablespoons butter
4 scallions, white bulbs and green tops chopped and reserved separately
1 red bell pepper, chopped
2 ribs celery, chopped
1 pound boiling potatoes (about 3), peeled and cut into 1/2-inch dice
4 cups fresh corn kernels (cut from about 8 ears)
1 bay leaf
1 quart canned low-sodium chicken broth or homemade stock
2 teaspoons salt
2 cups milk
1/4 teaspoon fresh-ground black pepper
Sour cream, for serving (optional)
Directions
Step 1: In a large saucepan, melt the butter over moderately low heat. Add the scallion bulbs, bell pepper, and celery and cook, stirring occasionally, until the vegetables start to soften, about 10 minutes. Stir in the potatoes, 2 cups of the corn, the bay leaf, broth, and salt. Bring to a boil. Reduce the heat and simmer, stirring occasionally, for 15 minutes.
Step 2: In a blender or food processor, puree the remaining 2 cups corn with the milk. Stir the puree into the soup along with the black pepper. Simmer until the soup thickens slightly, 5 to 10 minutes. Remove the bay leaf. Stir in the scallion greens. Top each serving with a dollop of sour cream, if using. Source: https://www.foodandwine.com/recipes/corn-chowder
GARLIC HERB COMPOUND BUTTER
Fresh garlic and herbs make a delicious compound butter. Perfect for steaks, corn on the cob or to spread on fresh bread! Would also be yummy on potatoes, beans and squash.
Ingredients
1 stick butter (1/2 cup softened)
1 ½ teaspoons lemon juice
½ teaspoons salt (or to taste)
1 clove garlic minced
3 Tablespoons fresh parsley chopped
1 ½ Tablespoons fresh chopped herbs eg basil, oregano, rosemary, thyme, etc
¼ teaspoon black pepper
Directions
Combine all ingredients in a bowl and mix until well combined. Place on a piece of plastic wrap and roll into a log. Twist ends to seal well. Refrigerate for at least 1 hour. Slice into rounds and enjoy on steaks, vegetables or bread. Can be kept frozen for several months. Source: https://www.spendwithpennies.com/garlic-herb-compound-butter-steak/
For more recipes check out our farm recipe blog: https://blackdirtrecipes.wordpress.com
Follow us on Instagram @yesifarm
Summer Share Week #5
Finally it’s beginning to feel a little like summer on the plate. Sweet corn is here!! We picked from the corn that was ready so you may find all yellow or bicolored kernels. That’s one of the key differences between a big farm that harvests with machinery and a small farm that harvests by hand. Because most of our work is done by hand we are able to select only the ripe, ready to eat vegetables which may mean a mixture of varieties, that I think is pretty cool. I love to mix different varieties of the same vegetable when I cook, I feel that results in a layer of flavors that is most often subtle but definitely present. I hope you are getting to see that in the different carrot varieties. Baby leeks are ready now also — the best thing about these is that you are able to eat the whole plant. Those leafy green parts are very tender right now, I made a sort of casserole the other night for dinner and used the whole leek in it. Enjoy them now as once they mature those leaves get tough and fibrous, at that stage I use them in stocks but really don’t enjoy them on their own.
Vegetable / Recipe: Baby Leeks
Baby leeks are such a special treat and only available in late spring, early summer. Use them like spring onions or chives; their flavor is similar to the fully grown leeks but slightly sweeter. Can be used raw or cooked, when cooked they reduce to a buttery consistency.
BABY LEEK GUMBO
Courtesy of chef Jared Rogers of PawPaw Restaurant in Charleston, South Carolina
Serve solo or top with grilled shrimp
Ingredients
· 1/2 cup peanut oil
· 1/2 cup flour
· 3 cups onion, chopped
· 6 cloves garlic, chopped
· 3 cups bell peppers, diced
· 2 1/2 cups baby leeks, diced
· 1 bay leaf
· 2 tablespoons marjoram
· 2 cups bacon lardons
· 3 cups vegetable stock
· 3 tablespoons parsley, plus more for garnish
Directions
1. Heat peanut oil in skillet and add flour to make a roux. Stir until the roux thickens.
2. Add all vegetables and cook down until they are fork soft.
3. Add bacon to the pot and cook until bacon is browned.
4. Add bay leaf, marjoram, parsley and vegetable stock and simmer for 45 minutes.
5. While gumbo is cooking, grill baby leeks in grill pan (or even an open flame) until cooked, about 5-8 minutes. If you are adding shrimp, grill it with the leeks.
6. When gumbo is ready, serve in shallow bowl and top with grilled shrimp, baby leeks, and extra parsley.
Source: https://www.foodrepublic.com/2017/03/15/cook-baby-leeks/
LEEK SALAD WITH BALSAMIC & WALNUTS
In this Leek Salad, tender baby leeks are cooked in balsamic vinegar until caramelised. They are then added to some crisp salad greens and roasted walnuts for some added crunch.
YIELD: 2 servings as a side
Equipment: Salad Spinner
Ingredients
For the balsamic leeks …
- 125 grams baby leeks (approximately 3-4 small)
- 1/8 cup olive oil
- 5 1/3 Tablespoons balsamic vinegar
For the salad …
-75 grams mixed salad leaves
- 1/2 cup roasted walnuts
For the vinaigrette …
- 2 tbsps olive oil
- 1 tbsps balsamic vinegar
- Sea salt and cracked black pepper
Directions
1. Trim your leeks and wash them thoroughly then cut them into 10 cm batons (approximately 4 inches).
2. Heat a large heavy based, non-stick frypan until hot, add the oil and add the leeks in batches until golden and soft. Once all the leeks have been cooked then add all the leeks back into the frypan, add the balsamic then cook until caramelized. Allow to cool.
3. Wash the mixed salad leaves then either pat or spin dry
4. Place the salad leaves in a mixing bowl add the dressing ingredients, then season with salt and pepper.
5. Arrange the salad leaves on a salad platter, add the leek mix on top, scatter with the roasted walnuts and serve.
Source: https://saladswithanastasia.com/wprm_print/17114
For more recipes check out our farm recipe blog: https://blackdirtrecipes.wordpress.com
Follow us on Instagram @yesifarm
Summer Share Week #4
What a crazy time of year, feels like we’re all running in circles on the farm. What to do first? Weed the herbs, thin the lettuce, harvest the carrots, dig the potatoes, plant the cabbage …
It takes many hands to pull this all together. Our crew of farmers is amazing, they love what they do and work so hard all the time. I am profoundly grateful to each of them for all they do for us! Benito is busy with trellising tomatoes, peppers and eggplants. As well as planting lettuce, harvesting potatoes, weeding beets, tillivating all the crops (Tillivating is a mechanical means of weeding.) Lupe is transplanting herbs, cabbages, weeding and harvesting. Silvia is weeding and harvesting. As the saying goes “Time waits for no man or woman” — farm life is proof positive of that!
Vegetable — Spigarello
That funny oak leaf-looking vegetable is Spigarello. Looks like kale but tastes like broccoli, hence it’s other name leaf broccoli. Originating in Italy this leafy green has been around for ages but only fairly recently becoming more well known. Can be used/subbed for like/for kale in most any recipe!
SPIGARELLO AND GOAT CHEESE SCRAMBLE
If a super savory breakfast is your thing, this is for you. Spigarello stems are delicate, and more like broccolini than less-palatable kale stems, so you can just roughly chop and cook the whole thing. Its broccoli-esque flavor is well matched with rich eggs and tangy goat cheese.
YIELD: serves 2 to 3
Ingredients
2 tablespoons olive oil
1 medium shallot, thinly sliced
1 bunch spigarello
kosher salt
1 tablespoon butter
5 eggs, beaten
3 ounces goat cheese, crumbled
Aleppo pepper
Directions
1. Heat the olive oil in a nonstick pan over medium heat. Add the shallots and sauté for about 5 minutes so they develop some golden color. Add the spigarello and a pinch of salt and stir to combine. Let that cook for another couple of minutes or until the leaves and stems are starting to get tender.
2. Just before adding the beaten eggs, add the butter and let it melt in the pan. Pour the eggs all over the mixture in the pan and reduce the heat to medium-low. Stir gently, and just before the eggs are set (maybe a minute and a half) sprinkle the goat cheese over the top and gently fold it in. Remove from the heat just as the eggs appear set, and plate. Sprinkle a little more salt and Aleppo pepper on top and serve.
Recipe Source: https://goop.com/recipes/spigarello-and-goat-cheese-scramble/
For more recipes check out our farm recipe blog: https://blackdirtrecipes.wordpress.com
Follow us on Instagram @yesifarm
Summer Share Week #3
Seems as a farmer all I do is talk about the weather, but it is what rules my life. The fierce heat has given the big Romaine lettuce quite the sunburn. That rain last Saturday was a real soaker, our farmers slogged through soil that was like sloppy soup while the heavens just kept pouring down on us. I sent a picture of our entryway to the farm, it’s pitched at about a 45 degree angle and the rainwater cascaded down the road above (which also is pitched and we are on the downward side) then down our entryway like it was poured through a funnel. This resulted in the roadway being washed out with gulley’s almost a foot deep in places. So now we have to rebuild our drive. The upshot of the rain is that prior it was so, so dry the vegetables are now doing a happy dance in the fields. The colors are so vibrant and the leaves of the broccoli and kohlrabi are looking so healthy and strong. Fingers crossed Hurricane Elsa treats us kindly! The farmers are harvesting your vegetables as I write this and I will see you all later today!
Vegetables — Beets & Verdolaga
This week you are receiving Chioggia — the candy stripe beet. It’s a variety originally from Italy and is quite stunning. It is called the candy stripe beet due to the white rings inside the root. These make it look similar to a peppermint candy. The outer skin is almost a rosy pink color and the leaves are quite stunning. Use them as you would any other beet. These don’t bleed like the dark red ones do and the flavor is sweeter with an earthy note. They may be eaten raw and if you want to highlight the white rings this is the best way to enjoy them.
Verdolaga — This is a super important vegetable and has gradually become more mainstream. Usually only found at farmers markets as the life span is short — so use this sooner than later. Verdolaga is the Spanish name that means green water. It is one of the only land vegetables that contains the omega 3 fatty acids like those found in fish. Our farmers love this vegetable and can’t wait for it to come in season. I asked them how they like to eat it and this is what they shared:
VERDOLAGA CON JUEVOS (VERDOLAGA WITH EGGS)
This recipe is based on our conversation and it is home-cooking at its best so I have no quantities.
Ingredients
Verdolaga
Eggs - scrambled
Onion - chopped
Salt and Pepper
Directions
In a sauté pan heat some oil till it shimmers, add chopped onion, sauté till translucent and turning golden — keep an eye on it so it doesn’t burn! Toss in verdolaga, cook till wilted. Stir in scrambled eggs and cook till desired doneness. I like my scrambled eggs soft. Season to taste with salt and pepper.
Notes:
- You could season with chilies, garlic, serve on toast, so many options!!!
- I have used it as a salad green – dressed with lemon juice, salt and pepper – Done!
- added it to my potato salad
- dipped it in batter and fried it like tempura or squash blossoms
For more recipes check out our farm recipe blog: https://blackdirtrecipes.wordpress.com
Follow us on Instagram @yesifarm
Summer Share Week #2
Wow to say it’s been hot is quite an understatement. The black dirt being what it is, acts like a giant sponge, the soil just soaks up all that energy from the sun and as you look across the valley you see the shimmer of heat radiating in waves in the distance. And this is at 7 in the morning. If the thermometer reads 90 add 20 for the "feels-like!" At 5pm we were over 100. We try to get into the fields as early as possible to avoid being out in the middle of the day when the heat is at its worst. Sometimes we’ll work till mid-morning, stop for a few hours, and go back out in the evening when the heat has dissipated a bit. Bags and bags of ice, bottles of water, chunks of watermelon, and other fresh fruit are on the menu. Move a little slower, take more frequent breaks then suddenly a massive cloud rolls through the sky shading the sun, providing us a brief respite. Now it’s evening and in the distance the sky is black, the air feels cooler as the temperature drops, rain is on the way.
BEETS - This week's are a baby red. We grew up on beets, it’s a Polish thing — borscht, pickled, roasted with olive oil or butter and seasoned with salt and pepper. And don’t throw away those greens! Here’s a simple recipe for sautéing them. This recipe can also be used for spinach, swiss chard, kale, collards, basically most any leafy green! A splash of cider vinegar can be used in place of the lemon juice!!
SAUTÉED BEET GREENS
Ingredients
Olive Oil to coat pan1 Bunch beet greens, washed and cut into 2-inch pieces1 clove garlic, minced½ teaspoon crushed red pepper flakesZest and juice of ½ lemonKosher salt and freshly ground black pepper
Directions
Heat a medium sauté pan coated with oil over medium heat until the oil shimmers. Add the beet greens and garlic, and toss until the greens are wilted and tender, 5 to 8 minutes. Add the red pepper flakes and lemon zest and juice, and toss. Season with salt and pepper.
Source: https://www.foodnetwork.com/recipes/food-network-kitchen/sauteed-beet-greens-3363462
BORSCHT aka BEET SOUP — Most every European cuisine features some version of beet soup. Some like it hot; some like it cold! Sour cream or yogurt can be added or not. This is one version of how my Mom used to make it (sorry no measurements this is just how she did it and taught me the same way.)
Ingredients & Directions
Bunch of Beets – lop off the tops set the tops aside
Small pot about 4 quarts in size
Roast beets in oven or boil until tender. Set aside to cool. Peel carrots, celery, onions. Dice into even sized pieces. After the beets have cooled, peel and dice into pieces about the size of the other vegetables. Chop stems of beet greens. Put all vegetables and stems in pot, cover with water or vegetable broth. Cook until tender. Season to taste with salt and pepper. Can be served just like this. Options: Puree the vegetables with an immersion blender. Add a dollop of sour cream and top with some fresh dill.
Let chill and serve cold with or without sour cream/yogurt, this is especially refreshing on a hot summer day.
QUELITES — That’s the bunch of greens in today's share that sort of reminds you of spinach. Euell Gibbons, an early health food advocate known for his wild foraging, refers to it as Red Root, as kids we grew up knowing it as pigweed and our farmers refer to it as delicious!!! As with so many foods it has an interesting history. Back in the day like the 12-1300s, it was considered a food source for the aristocracy. Then as travel and trade evolved and other cuisines were introduced, quelites was considered peasant food and of course as part of the greater evolution of food became fodder for pigs hence the name “pigweed.” We would see our farmers taking bushels of “weeds” home and finally out of curiosity asked the big question: What are you doing with that? Turns out this weed that I spent hours and days yanking out of the onion and lettuce fields is a member of the amaranth family and considered a delicacy in many food cultures! Who’da thunk? It only grows in warm weather and there is a season as to the best times to eat it—so enjoy it now!!!
SAUTÉED GREENS
This is kind of how our farmers make the quelites but they don’t put tomatoes in it. As you can see this recipe is good for pretty much any green
Author: Pamela
Serves: 4
Ingredients
1 Tablespoon unrefined, cold-pressed, extra-virgin olive oil
1/2 onion, finely diced
1 jalapeno, thinly sliced (remove seeds to make it milder)
1 cup cherry tomatoes, halved
1 pound kale, stems removed and leaves cut into strips or 10 ounces baby greens such as baby kale, Swiss chard and spinach
Sea salt and freshly ground black pepper to taste
1 Tablespoon fresh lemon juice
Instructions
1. In a large sauté pan, heat the oil over medium heat. Add the onion and jalapeno and cook until onion is tender and translucent, about 3 minutes.
2. Add tomatoes and cook for another 2 minutes, or until tomatoes just start to lose their shape.
3. Add the greens and a sprinkle of sea salt and black pepper. Cook, stirring frequently, until greens are wilted and just tender. Sturdier greens will take longer than baby greens.
4. Pour lemon juice on top and taste for seasoning. Serve immediately.
Source: https://pamelasalzman.com/mexican-style-sauteed-greens-recipe/
You can also mix the different greens
For more recipes check out our farm recipe blog: https://blackdirtrecipes.wordpress.com
Follow us on Instagram @yesifarm
Summer Share Week #1
There are some things I think I will never understand. We’re always told to plant peas on St. Patricks’ Day, March 17th, and they are a spring crop. Here we are only a few days into summer and we just picked our first harvest last week so I guess that counts as a spring harvest. We planted in April because in March we couldn’t get into the fields — too wet and cold. Then we lost our first plantings of cilantro, radishes and some onions to the fierce winds and bitter cold nights. So that being said we are now making up for lost time. The soil is nice and warm. We’ve been getting rain at just the right time and in just the right amounts so our tomatoes, peppers, and eggplants are happily growing. We’ll start harvesting baby beets and carrots, the next crop of lettuces are looking so gorgeous right now. Everyone is wearing huge smiles that all the hard work of early spring is paying off with a beautiful harvest and we’re hunkering down to the work of early summer and dreaming of the fall!!!
AMARANTH — I usually only provide this once or so. Most folks are becoming more familiar with it as an ancient grain. A member of the beet family, when it’s more mature like now it definitely falls in the category of bitter green. Which of course means it’s one of those healthy but under-appreciated greens. Very popular in Greece where it is used in lasagna and makes a wonderful tea. The flavor notes in the tea hint of lemon.
BLACK BEANS WITH AMARANTH — Throughout Mexico, wild and cultivated greens of all kinds are added to beans and to meat dishes. Amaranth is a favorite choice. The pretty leaves are red, or green with red veins. While they’re a bit tough and bitter when uncooked, they’re sweet and tender after blanching.
Ingredients
· 1 pound black beans, washed, picked over and soaked for six hours or overnight in 2 quarts water (You can substitute canned beans.)
· 1 large onion, chopped
· 4 garlic cloves, minced
· Salt to taste
· 2 to 4 tablespoons roughly chopped cilantro, or a few sprigs fresh epazote
· 3/4 pound amaranth, stemmed (stems discarded) (You can combine other greens like quelites and spinach)
Directions
1. Place the beans and their soaking water in a large, heavy soup pot or Dutch oven. If necessary, add water to cover by two inches. Bring to a boil and skim off foam. Add the onion and half the garlic, and reduce the heat to low. Add salt, cover and simmer one hour. Add the remaining garlic, the epazote (optional) and more salt if desired. Simmer for another 30 minutes. Add the cilantro, and simmer for another 30 minutes, until the beans are tender and the broth aromatic.
2. While the beans are simmering, wash the amaranth leaves in two changes of water. Bring a large pot of water to a boil, and fill a bowl with ice water. When the water comes to a boil, salt generously and add the amaranth. Blanch for two minutes, and transfer to the ice water. Drain, squeeze out excess water (it will be a beautiful plum color) and chop coarsely.
3. About five minutes before serving, taste the beans and adjust seasoning. Stir in the amaranth, simmer very gently for five to 10 minutes, and serve.
Tip— Advance preparation: The beans will taste even better if you make them in advance, and they can be made up to three days ahead of serving. The blanched amaranth will keep for three days in the refrigerator.
Original recipe by: Martha Rose Shulman can be reached at martha-rose-shulman.com.
Source: https://cooking.nytimes.com/recipes/1012811-black-beans-with-amaranth
For more recipes check out our farm recipe blog: https://blackdirtrecipes.wordpress.com
Follow us on Instagram @yesifarm
Spring Share Week #12
What stunning weather we’ve been having lately and the vegetables are absolutely loving it. The fennel is showing a beautiful root, finding beets the size of half dollars, carrots are about the size of pencils. Dill starting to show their umbrella heads. Seeing rows of winter squashes appear like ribbons down the field. The potatoes are proudly wearing their crowns of flowers. Inside the greenhouse we are seeding out fall crops like cabbages, cauliflower and broccoli. We planted basil in between the tomato plants, they say this makes the tomatoes taste better. I don’t have scientific evidence for this but we definitely have some pretty fabulous tasting tomatoes!!
GARLIC SCAPES — Those snake-like string bean looking things in your share this week are garlic scapes. An extra special treat as they are only available when the garlic is in “bloom.” This is actually the flower head/seed stalk of the hard neck garlic. These can be used anywhere you are looking for garlic flavor, pestos, sautés, stir fries, pickles, quiches—and they make great accents in your flower bouquets too! When swapping scapes out for garlic cloves the general rule of thumb is that a scape is supposed to be equal to one clove of garlic. If you can’t use them all up they will keep in the fridge for a while and you can also freeze them.
SCRAMBLED EGGS WITH GARLIC SCAPES
Ingredients
4 large eggs
1 teaspoon butter
3-4 garlic scapes, sliced into small pieces (smaller pieces will cook faster and your butter won’t be so apt to burn)
¼ teaspoon kosher salt (or to taste)
1⁄4 teaspoon black pepper (or to tate)
Directions
Beat eggs with a whisk or immersion blender until pale yellow. Melt butter in medium skillet until foamy. Stir the sliced garlic scapes into butter. Sauté over low heat until tender. Add beaten eggs to skillet. Stir slowly with a rubber or silicone spatula. As soon as eggs begin to form clumps,t urn the heat to low and start to fold the curds over on themselves. Continue to push eggs around the skillet until they look fluffy and still runny on top. Immediately divide between 2 plates and sprinkle with salt and pepper. Let rest for a minute or two before serving.
Original Source: https://www.food.com/recipe/scrambled-eggs-with-garlic-scapes-538923
GREENS WITH GARLIC & PROSCIUTTO
A few chopped green garlic stalks or garlic scapes add a springy sweetness to collard greens, kale, or Swiss chard. You can even use spinach, just cook the garlic an extra few minutes before adding the spinach and reduce the greens' cooking time to just 3 or 4 minutes.
*The prosciutto is completely optional—vegetarians or people without some extra prosciutto kicking around in the fridge should feel free to leave it out. You could also sub in shiitake mushrooms for the prosciutto.
Ingredients
1 bunch Greens (could be collards, kale, Swiss chard, spinach or any other leafy green)
3 green garlic stalks (or garlic scapes)
1 to 2 tablespoons olive oil (or other cooking oil)
1/8 teaspoon sea salt (plus more to taste)
2 slices prosciutto*
Optional: dash freshly ground black pepper
Directions
1. Cut out the thick stems from the greens. You can either use them in this recipe or save for another use. Rinse the leaves clean of any dirt or grit in cool running water. Shake off any excess water. Lay the leaves in a stack and cut them into thin ribbons (you can simply chop them coarsely, if you prefer). Set aside.
2. Trim the green garlic or garlic scapes, discarding any yellowed or browned parts, and finely chop them.
3. Finely chop the prosciutto as well. Slice shiitakes in thin slices if using them.
4. Heat a large frying pan (with a fitting lid) over medium-high heat. Add the oil. Swirl the pan so the oil coats the bottom of the pan. When the oil is hot, add the garlic and salt. Cook, stirring, until the garlic is wilted/soft, about 1 minute.
5. Add the prosciutto/mushrooms, if using, and cook, stirring, about 1 minute. Add the stems and cook for 3-4 minutes till softened. Add the greens (they should still have a bit of water clinging to them, which is a good thing) and stir to combine them with the green garlic and prosciutto. There should be a bit of water on the bottom of the pan, if there isn't, add a tablespoon or so. Cover, reduce heat to medium low and cook until the greens are well wilted, about 3 minutes. Stir again, cover, and cook until the greens are tender.Depending on the greens used, this will take anywhere from 3 minutes (for chard) to up to 8 minutes (for hearty collard greens).
6. Add salt, pepper, and lemon juice to taste, as you like. Serve hot or warm.
Recipe Variation: Feel free to use a slice of bacon instead of prosciutto; you'll just need to cook it before anything else. Depending on how much fat it renders, you can use the bacon fat instead of the cooking oil for greens with tons of flavor!
If you do not have access to garlic scapes, use 5 cloves of minced garlic instead.
Source: https://www.thespruceeats.com/greens-green-garlic-and-prosciutto-2217321
For more recipes check out our farm recipe blog: https://blackdirtrecipes.wordpress.com
Follow us on Instagram @yesifarm
Spring Share Week #11
The farm is definitely shifting gears. I had hoped to have asparagus this week for you all but the fierce heat pushed it and there were mostly ferns in the patch as a result. We are starting to harvest garlic scapes and we will have those next week. As I walked through the fields this morning you could see a noticeable difference in the vegetables. The red and white beet greens are about 6-8 inches tall and you can see little balls beginning to form at their base. Carrot tops range in height from about 6 to 10 inches and their thread-like roots are shaping up nicely with the promise of an abundant harvest to come. Sweet, if you can call a radish sweet, are forming the cutest little roots. Summer squash and cucumber plants are shaping up nicely and little buds are starting to form. The pea plants are covered in blossoms, the onion plants are standing proud like little soldiers. We spent the last couple days transplanting tomatoes, peppers and eggplants. The evening rains were perfect conditions for this. So now as we get ready to begin the harvest of these amazing vegetables we also get ready to plant the next round with the hopes of a continuous harvest.
Swiss Chard – Right now it’s of a size we like to call “teenage” not baby but not yet full adult size either. This could possibly be the best size to eat it. The leaves melt like butter when you cook them. Think of Swiss chard like spinach or kale, they all can be swapped out for each other fairly easily in most recipes.
EASY SWISS CHARD
Ingredients
· 1 bunch of fresh Swiss chard
· 2 tablespoons extra virgin olive oil
· 1 clove garlic, sliced
· Pinch of dried crushed red pepper
· 1/4 teaspoon of whole coriander seeds (optional could substitute cilantro)
Directions
Rinse out the Swiss chard leaves thoroughly. Either tear or cut away the thick stalks from the leaves. Keep the stalks and leaves separate. Cut the stalks into 1-inch pieces. Chop the leaves into inch-wide strips. Sauté the garlic and crushed red pepper flakes. Heat the olive oil in a sauté pan on medium high heat. Add garlic slices, crushed red pepper, and coriander seeds (if using), and cook for about 30 seconds, or until the garlic is fragrant. Add the chopped Swiss chard stalks. Lower the heat to low, cover and cook for 3 to 4 minutes. Add the chopped chard leaves, toss with the oil and garlic in the pan. Cover and cook for 3 to 4 more minutes. Turn the leaves and the stalks over in the pan. If the chard still needs a bit more cooking (remove a piece and taste it), cover and cook for a few more minutes.
Serve immediately. Recipe Source: https://www.simplyrecipes.com/recipes/swiss_chard/
13 Creative Swiss Chard Recipes: https://www.bonappetit.com/recipes/slideshow/swiss-chard-recipes
For more recipes check out our farm recipe blog: https://blackdirtrecipes.wordpress.com
Follow us on Instagram @yesifarm
Spring Share Week #10
When I walked into the fields this morning I found myself sighing. Sighing with pleasure, happiness and gratitude. Seeing the lush leafy greens against the rich black soil I couldn’t help but smile at the verdant picture. The aromas of garlic and mint permeated the air. I felt a sense of peace and serenity that reached straight through to my soul. Our farmers have been working so diligently, planting, weeding and soon harvesting those lush greens especially for you. Benito wears a smile a mile wide in satisfaction of seeing a job well done. Lupe and Silvia race to get back to the fields after they wash and pack out produce for you and our markets. I am so grateful for them and you. You make such a difference to us here on the farm and help ensure that our farm survives against what at times feel like impossible odds. For all that and more I am eternally grateful.
In addition to the cilantro in your bags this week is a random selection of herbs. You may find spearmint, peppermint, rosemary, thyme or lemon thyme.
Cilantro aka Coriander appears in many different cuisines. For some this is a love/hate herb. If you’re like my sister she absolutely loathes it — says it tastes like soap. If you’re like me you can’t get enough! In Mexico where it is known as cilantro it seems no dish is made without it. In Asian cuisine this popular herb is called coriander or sometimes Chinese Parsley. And the whole entire plant is edible including the roots!
5 INGREDIENT CILANTRO VINAIGRETTE
· 1 bunch of fresh cilantro (2 cups packed)
· 1/2 cup olive oil
· 2 tablespoons white vinegar (can use cider vinegar, white wine vinegar)
· 1 clove garlic
· 1 teaspoon kosher salt
· 1/2 teaspoon red pepper flakes
· 1/4 to 1/2 cup water, if needed
Instructions
1. Blend everything up for about a minute until smooth. Add the water if you need more volume in the blender to make it run smoothly. Season to taste!
2. PUT ON EVERYTHING! I actually do mean everything. So delicious.
Keep this in a jar in the fridge for 3-4 days!
Source: https://pinchofyum.com/5-ingredient-cilantro-vinaigrette
15 more cilantro recipes: https://www.acouplecooks.com/cilantro-recipes/
For more recipes check out our farm recipe blog: https://blackdirtrecipes.wordpress.com
Follow us on Instagram @yesifarm
Spring Share Week #9
Those showers that came through yesterday were truly a gift from above and thankfully no hail. You could almost hear the plants gulping in the drops as they fell. It’s been pretty dry out in the fields, we are so very grateful that it’s nothing like out West where they’re forecasting conditions like the great Dust Bowl. I am hunting around my storage looking for my “trash” pump. Basically it’s a pump with it’s own motor that we can use to pull water from the drainage ditches to irrigate the crops with. We are as always in a race against time. Dad used to say never plant lettuce in June because it would “burn out." This means that even if a seed germinated, the heat from the soil would burn the tender sprouts and effectively kill the plant. By starting seeds in the greenhouse and irrigating the transplants we have the potential to circumvent this. We continue to seed out squashes — winter and summer, transplant tomatoes, peppers and eggplants, weeding, weeding and more weeding. The work continues as we race against the clock of Mother Nature.
CHIVE BUTTER
Ingredients
– 1/2 lb unsalted butter, divided (2 sticks)
– small handful chive blossoms (optional)
– 1/4 cup chives, diced
– 1 tsp garlic powder (or finely minced garlic)
– 1/2 tsp sea salt
Instructions
Fully soften the butter by leaving it at room temperature for 30-60 minutes before proceeding. If using chive blossoms, dip the blossoms in a bowl of water to clean, and then set on a towel to dry. Melt about 1 tablespoon of butter on medium-low heat in a pan. Add the chives (but not the blossoms), garlic, and salt to the butter, and gently heat until the chives soften and the garlic is fragrant (about 2-3 minutes). As soon as the garlic is fragrant, turn off the heat. Do not allow the chives to brown. If swapping fresh garlic for garlic powder, do not allow the garlic to brown. Set aside and allow to cool until slightly hardened. Use a rubber spatula to fold the softened butter into the chive and butter mixture. Break the chive blossoms apart into small, individual flowers, and fold those into the butter.
Tip: If your pan is too hot, you might accidentally melt all of the butter. If that happens, simply set it aside and let it cool and harden before trying to form it into a log.
To serve the same day: Pour butter into a serving bowl and refrigerate for at least an hour before serving. Note that butter will harden again in the fridge, so if you want it to be spreadable, take it out of the fridge a few minutes before serving.
Refrigerate leftovers and use within 5 days.
To store for later: (Awesome on Sweet Corn) Chill butter until it's cool enough to form, and then roll it into a log. Use parchment paper or a rubber spatula to help you form the log. Wrap in parchment paper or plastic wrap, and store in an airtight container, and freeze for up to 6 months. When you're ready to use the butter, simply slice off the amount you want to use and put the rest back in the freezer.
Notes: Avoid wrapping the butter in wax paper, which (in my experience) tends to stick to the butter (especially when softening the whole log).
Original Source: https://champagne-tastes.com/chive-butter/
BABY GREENS SALAD WITH ASPARAGUS, SWEET AMARANTH
& GREEN GARLIC DRESSING
Ingredients
· 1/4 cup amaranth grain (or other whole grain)
· 3/4 cups stock or water
· 1/2 pound asparagus, trimmed to bite-size (or green beans, sliced summer squash, etc.)
· 1 tablespoon nut oil (or olive oil)
· Sea salt
· 1 tablespoon olive oil
· 1/4 cup currants
· 1/2 medium purple onion, finely chopped ( can sub scallions)
· Young greens (lettuce, spinach, etc.) to fill a medium-sized salad bowl
· Handful sprouts
· 2 tablespoons toasted sesame seeds
· 1/2 cup edible flower petals (Optional – can use the chive blossoms)
For the dressing:
· 1/3 cup olive oil
· 3 tablespoons lemon juice
· 1 stalk green garlic
· Pinch cayenne
· One-finger pinch sea salt
Instructions
1. Preheat the oven to 350°F.
2. To prepare the amaranth, combine with the liquid in a saucepan and simmer over low heat for 15 minutes. Don't let it get gloppy. Drain through a cheesecloth or super-fine mesh sieve and lay out to cool on a baking sheet. (If using another whole grain instead of amaranth, prepare the grain according to package instructions to yield about 1/2 cup cooked.)
3. Meanwhile, on a small baking sheet, toss the asparagus with the nut oil and a one-finger pinch sea salt. Roast for about 8 minutes, agitating the pan halfway through. Remove and set aside to cool.
4. Heat the olive oil over medium heat in a fry pan and sauté the currants and onion with a one-finger pinch sea salt, stirring until fragrant and the onions begin to brown, about 3-4 minutes. Set aside to cool, then toss with the cooked grains.
5. Place all the dressing ingredients in a blender and whiz until foamy and all of the garlic is processed into fine bits.
6. To assemble the salad, place the greens and sprouts in the bowl and toss with all but 2 tablespoons of the dressing. Arrange the cooled amaranth mixture across the top, then the roasted asparagus. Drizzle the remaining dressing across the top and sprinkle with any garnishes. Original Source: https://www.thekitchn.com/washtub-salad-148663
For more recipes check out our farm recipe blog: https://blackdirtrecipes.wordpress.com
Follow us on Instagram @yesifarm
Spring Share Week #8
Patience is always a virtue especially when it comes to farming. Seems like it takes forever for seeds to germinate and grow to a size that is harvestable. The Swiss chard in the field is still so tiny, less than 3 inches tall, you can’t even call it "baby" yet. The peas are around 8 inches tall but we have a muskrat that is eating them. I feel like we’re in an old Bugs Bunny cartoon. Overnight they disappear and we keep replanting. This critter's appetite seems to know no bounds. Putting out traps in the hopes of capturing him or he will soon eat the entire crop. Also looking into some of those applications that are a combo of garlic, eggs, and chilies to put around the crop and see if that will deter him. I had my first sighting of Colorado potato beetles and egg masses in the potato field the other day so we’ll have to get busy harvesting those bugs too.
ASPARAGUS — Over 90% water and full of fiber asparagus is considered a very useful vegetable. Evidence of its culinary use goes back to Egypt around 3000 B.C.
ROASTED ASPARAGUS
This is my favorite way to cook asparagus. When I cook it I either have to grab however much I want first or hide it from my sister as she will devour the entire pan in
a blink of an eye.
Ingredients: Asparagus, salt, pepper and olive oil
Method: Preheat oven to 400 degrees F. You can either leave the spears whole or cut into smaller pieces whichever will suit how you plan to serve them. I drizzle with olive oil, sprinkle with salt and pepper right on the sheet pan I am going to roast them on. This saves an extra pan or dish from washing. Toss gently. Put in oven and roast. I start checking oven after about 20 minutes. Time will vary depending on the thickness of the stalk and how crispy you want them.
For more recipes check out our farm recipe blog: https://blackdirtrecipes.wordpress.com
Follow us on Instagram @yesifarm
Spring Share Week #7
With these warmer temperatures forecasted, the soil should continue to get nice and warm which is great for plant growth and seed germination. The downside is that weeds love it too. It’s like an old tapestry out there full of shades of red and green everywhere you look. Sometimes it feels like you just finished weeding a bed and right behind you is a new crop of weeds. Currently we’re waiting on a delivery of fertilizer. We use certified organic chicken poop and the store where I buy it had none in stock. They reached out to their supplier and it will take ten days or more to come in. The local supplier told me they were having a very difficult time getting inventory this year between, covid, trucking issues and now pipeline supply issues — it’s a royal mess. Seed orders either sold out with a blink or take a month or longer to arrive. If you want a particular seed you have to jump on it or forget about it. I find myself already thinking about 2022 and what seeds can I safely store that I should purchase earlier than normal just to make sure we have the varieties I want.
Watercress — Said to be one of the oldest known vegetables consumed by humans, it’s not just for afternoon tea sandwiches. It’s a part of the cruciferous family which means it’s a cousin to kale, broccoli, arugula and Brussel sprouts. The flavor is on the peppery side. Loaded with nutrients, it makes a great addition to salads, smoothies and sandwiches. Sauté with some extra virgin olive oil, season to taste with salt, pepper and parmesan cheese. Keep an eye on it — because the leaves are so fragile it will wilt in a heartbeat on heat.
WATERCRESS OMELETTE
Ingredients
· 3 free range eggs
· salt and freshly ground black pepper
· 1 Tablespoon butter
· ½ cup chopped watercress plus more for filling/side salad
· A little cheddar to sprinkle (optional)
· A little vinaigrette dressing to serve
Method
- Beat the eggs with 1 tsp cold water, a pinch of salt and plenty of ground black pepper. Heat a frying pan, add the butter and when it's sizzling, add the chopped watercress and stir to coat in butter.
- Pour the eggs into the pan, and stir well to mix. Now shake the pan and cook over a medium high heat for 1 minute until the egg begins to set. Use a wooden spatula to push the cooked egg towards the center of the pan, so that the raw egg runs to fill its place. Continue until no raw egg remains.
- Now cook for a further 20 seconds or so until the top of the omelette has just set. Remove from the heat, scatter half the remaining watercress and the cheese (if using) down the centre, then tip and fold the omelette onto a warm plate. Serve with the remaining watercress drizzled with a little vinaigrette dressing if liked.
Notes from Cheryl – the original recipe was in grams I converted quantities as best I could. This is also the kind of recipe that’s forgiving a little more or less won’t matter. You can also use other cheeses in place of the cheddar.
Original source: https://www.watercress.co.uk/blog/2018/10/29/watercress-omelette
Spring Garlic — A special treat only available in Spring! The flavor is a bit milder, some say sweet. Can be substituted for leeks and scallions in recipes.
MINI POTATO PANCAKES WITH GREEN GARLIC & CHIVES
Yield: Makes 24 (2-inch) pancakes
Ingredients
1 1/2 pounds potatoes
3 tablespoons chopped green garlic (white and light green parts only)
2 tablespoons chopped chives
1/2 teaspoon salt
Vegetable oil for frying
24 flat-leaf parsley leaves
Dipping sauce to serve (recipe below)
Directions
- Peel and finely grate the potatoes with a Microplane or the small holes of box grater. Place the potatoes in a fine-mesh strainer over a bowl and press with the back of a spoon to drain as much liquid as possible. (Alternatively, you can wrap the grated potatoes in a tea towel or fine cheesecloth and wring out all the water into a bowl.)
- After a minute or two, the starch will settle to the bottom of the bowl. Carefully pour away the liquid and mix the starch with the grated potatoes, green garlic, chives, and salt.
- Heat a tablespoon of oil in a skillet over medium heat. Drop a tablespoon of the potato mixture into the pan, using the back of a spoon to flatten and shape it into a 1/4-inch-thick pancake. Gently press a parsley leaf into the top. Cook until the bottom turns crisp, then flip over with a spatula and continue cooking until crisp.
- Repeat the process with the rest of the mixture and add more vegetable oil to the pan as needed.
- Serve warm or at room temperature with dipping sauce.
Dipping Sauce Ingredients
3 tablespoons soy sauce
1 tablespoon rice vinegar
1/2 teaspoon sugar (optional)
Recipe Source: https://www.thekitchn.com/recipe-mini-potato-pancakes-with-green-garlic-and-chivesrecipes-from-the-kitchn-168860
For more recipes check out our farm recipe blog: https://blackdirtrecipes.wordpress.com
Follow us on Instagram @yesifarm
Spring Share Week #6
In a perfect world, everything is well, perfect. Farming is by no means perfect, like this past week the winds were so fierce we had mini blackouts on the local roads as the soil was swept across the valley, then came super chilly temperatures and the cilantro that was about 3-4 inches tall and would be harvested in 2 or 3 weeks is no more. Obliterated, wiped off the face of the earth, if it wasn’t for the flag marking the bed you would never even know the plants were there. Onion plants ripped out of the ground by their roots. Soil blown away, exposing the roots of young baby plants that had just sprouted now gone. Almost sounds apocalyptic. And yet there is the perfect — onions direct-seeded sprouted, and looking like loops of thread as they break ground. Pea plants and broccoli raab growing and thriving in the chillier temps. Carrots, Swiss Chard, and Beets all sprouting and lining up like little soldiers in their beds. Turnips and radishes coming on strong. So while this world isn’t perfect, there is still the satisfaction of a kind of perfection in seeing seeds germinate and thrive in spite of the universe around them. Last of the sweet potatoes this week!
Note on Vegan Pantry Share: Rancheros Dulcitos—aka sweet little cowboys—candied jalapeños. I like to eat these right out of the jar but I do enjoy spicy food. Great on tacos, nachos, eggs, hot dogs, cottage cheese ...
STIR FRY MESCLUN LETTUCE — Mesclun or salad mix is not just for salads—here’s a quick stir fry recipe
Ingredients
6 cups mesclun – rinsed and still damp
1 tablespoon butter
3 Tablespoons slivered almonds
1 cup mushrooms, sliced thinly
2 garlic cloves minced
2 shallots minced
Directions
Over medium heat, in a skillet large enough to hold the lettuce, melt the butter. Once melted add almonds, mushrooms, garlic and shallots. Stir fry for about 2 minutes. Add lettuce stir till wilted and warm. Goes very quickly so be careful not to overcook.
Note: You can turn this into a whole meal by adding some chickpeas or shrimp, or roast those sweet potatoes this week and add to the stir fry!
Recipe Source: https://www.food.com/recipe/stir-fry-mesclun-lettuce-for-2-64979
ROASTED SWEET POTATOES STUFFED WITH QUINOA AND SPINACH
Ingredients
· 2 medium sized sweet potatoes
· 6 cups of baby spinach – roughly chopped
· 1 clove of garlic – minced
· 1 tbs olive oil
· 1 1/2 cups of cooked quinoa
· 1/4 cup of pecan pieces
· 1/4 cup dried cranberries
· 1 to 2 ounces of feta cheese – diced
· 6 twists of black pepper from a pepper mill
· A pinch of salt
Directions
1. Preheat oven to 400 degrees.
2. Slice sweet potatoes evenly in half length wise. Coat them with a little olive oil and place face down on a parchment lined baking sheet.
3. Roast sweet potatoes for 30 to 40 minutes until the sweet potatoes are tender and soft.
4. I used pre-cooked quinoa that I had on hand. If you are making the quinoa, prepare 1/2 cup of dry quinoa as per the package instructions. I usually cook quinoa in vegetable broth or add a 1/2 a bouillon cube for extra flavor.
5. While the sweet potatoes are roasting, add olive oil to a large sauté pan and heat over medium heat. Add garlic and half the spinach and cook until wilted and then add the rest of the spinach to the pan and cook until it’s wilted – about 4 minutes. Remove from heat.
6. Stir cooked quinoa, pecans, cranberries, black pepper and salt into spinach mixture.
7. Gently toss feta into quinoa spinach mixture.
8. When sweet potatoes are ready, remove from the oven and let cool slightly. Test for doneness – they should be soft and indent slightly when squeezed. If they are not done, put them back into the oven for an extra 5 or 10 minutes.
9. Let the sweet potatoes cool slightly so they are easy to handle. With a small spoon, gently press down on the center of the sweet potatoes to create a small indentation that is the length of the sweet potato.
10. Spoon quinoa and spinach mixture evenly over sweet potatoes and serve.
Recipe Source: https://greenvalleykitchen.com/roasted-sweet-potatoes-stuffed-with-quinoa-and-spinach/
For more recipes check out our farm recipe blog: https://blackdirtrecipes.wordpress.com
Follow us on Instagram @yesifarm
Spring Share Week #5
Vegan Pantry share note: This week it's Sauerkraut—it is salty so you might want to rinse before using. I call this a “soft ferment” as it only fermented a couple weeks so the sour flavor is soft. I scooped some out of the crock and my sister and I were eating it just like that!
“Timing is everything in life” I don’t know who to credit for that bit of wisdom but the saying is never so true as in farming. I was scouting the fields this morning and the potato field is looking a little scary right now. Since we don’t spray, weeds must be eradicated with machinery or hands. The potatoes haven’t broken ground yet so we can’t really tell where the rows are. Unfortunately this means we have to go out with hoes and get rid of the weeds that way. If we don’t stay on top of them now we won’t have a good growing season and as a result a lousy harvest. The new crops are looking good. Almost everywhere you look there are whispery threads breaking ground. This might be the last week for potatoes from the fall harvest. I know some of you will be relieved and some of you will be sad. But the good news is this makes room for new things to try and enjoy while their season lasts!
Kapusta – the Polish word for Cabbage
My family is originally from Poland so we grew up on cabbage, potatoes and beets. Here is a crockpot recipe for Kapusta and Kielbasa (Polish Sausage). If you don’t eat meat you can sub in shiitake mushrooms or dried wild mushrooms and a good quality oil for the bacon drippings.
Ingredients
2 Tablespoons butter
2 Tablespoons bacon drippings
2 ½ cups sweet yellow onions finely chopped
1 head cabbage shredded
1 teaspoon salt
1/2 teaspoon freshly ground black pepper
1/2 cup light brown sugar
1 3/4 cups water
3 pounds kielbasa cut into 2-inch slices
Directions
1. In a large skillet over medium heat melt butter and bacon drippings until foaming subsides, about 2-3 minutes. Add onions and cook, stirring occasionally, until onions are translucent and edges begin to brown, about 8-10 minutes.
2. While onions cook add cabbage to slow cooker. Then add onions, salt, pepper, brown sugar, water, and kielbasa. Give everything a good stir and cover. Cook on high for 1 hour, then reduce to low and cook for an additional 6 hours, stirring occasionally. Serve.
Notes – this recipe called for sauerkraut – I’ll often use sauerkraut or do half kraut and fresh cabbage or use fresh cabbage. My family never used sugar so I wouldn’t add that.
Serve with boiled potatoes that have been tossed in melted butter and some chopped parsley. Recipe Source: https://foodfolksandfun.net/kielbasa-kapusta/
For more recipes check out our farm recipe blog: https://blackdirtrecipes.wordpress.com
Follow us on Instagram @yesifarm
Spring Share Week #4
Wow this weather is challenging — gorgeous beautiful sunny days, then a wicked storm blows through with hail in the city — thankfully that part missed us. And now the temperature dropped like a rock sending freeze warnings our way and it was flurrying snow like feathers this morn. Fingers crossed the vegetables that are up in the fields can stand up to this bitter cold. We only planted cold tolerant crops so far so they should be fine. It’s that time of year – Spring – and that means chives and nettles. Chives are a beautiful herb, at this time of year they do not have the purple blossoms yet but their flavor is amazing. They can be dehydrated for use later in the winter.
Stinging nettles need a caution sign attached! They have very fine hairs on the stem and underside of the leaf that can be very irritating. They should NOT be eaten raw.
Keep it from stinging:
The stinging nettle will no longer sting you if you do any of the following:
1. Cook it
2. Crush the needles
3. Let it wilt enough
4. Dehydrate it
5. Blend it into a sauce/paste/smoothie
ROASTED POTATOES WITH CHIVE OIL — The roasted potatoes are crispy on the outside and soft on the inside, served with a bit of bright green chive oil and sour cream.
Ingredients for the roasted potatoes
· 1 pound potatoes
· 2 cloves garlic
· 2 tablespoons olive oil
· ½ teaspoon kosher salt
· Fresh ground black pepper
Ingredients for the chive oil
· 1 bunch chives or green onions
· ¼ cup olive oil
· 2 pinches kosher salt
· Creme fraiche, sour cream, or Greek yogurt, to serve (or vegan sour cream or cashew cream)
Directions
1. Preheat oven to 450°F.
2. Wash the potatoes and cut any larger potatoes in half. Mince the garlic. In a medium bowl, combine potatoes, garlic, olive oil, kosher salt, and plenty of fresh ground black pepper.
3. Place the potatoes on a baking sheet lined with parchment paper (for easy cleanup). Roast for about 35 to 40 minutes, stirring frequently.
4. To make the chive oil, place the chives (or substitute 1 bunch green onions, top green parts only) in the bowl of a food processor and process briefly to chop. Add the olive oil and kosher salt and process again until fully combined. Pass through a fine mesh sieve. (Chive oil can be stored refrigerated for up to 5 days.)
5. Serve potatoes with chive oil and creme fraiche.
Recipe Source: https://www.acouplecooks.com/roasted-potatoes-with-chive-oil-and-creme-fraiche/
EGGS WITH CHIVES — These 5-ingredient eggs with chives make a simple breakfast, brunch, lunch, or light dinner.
Ingredients
· 2 tablespoons olive oil
· 3 chive stems (with chive flowers, if available)
· 2 eggs
· Kosher salt
· 1 multigrain English muffin
Directions
1. In a small skillet, heat the olive oil over medium low heat. Roughly tear the chives and blossoms into 2 to 3-inch pieces and place them in the olive oil to heat for 30 seconds. Crack the eggs into the skillet, add a sprinkle of kosher salt, and continue cooking over medium low heat until the egg whites are cooked but the yolk is still runny, about 2 to 3 minutes (at 1 minute, shake the pan gently to distribute the eggs).
2. Meanwhile, toast the English muffin. When the eggs are done, slide them onto the English muffin halves and eat with a knife and fork.
Recipe Source: https://www.acouplecooks.com/chives-vs-green-onions/
STINGING NETTLE SOUP — This is a dense and delicious dark green nettle soup. Make it when nettles show up at the farmers markets in the Spring. Be sure to wear gloves when handling the nettles or they'll sting ya!
Ingredients
· ½ pound stinging nettles
· 1 teaspoons salt
· 1/2 tablespoon extra virgin olive oil
· 1/2 white onion, diced
· 1/8 cup basmati rice
· 2 cups chicken broth
· salt and pepper to taste
Directions
– Bring a large pot of water to a boil with 1 teaspoon of salt. Drop in the stinging nettles, and cook 1 to 2 minutes until they soften. This will remove most of the sting. Drain in a colander, and rinse with cold water. Trim off any tough stems, then chop coarsely.
– Heat the olive oil in a saucepan over medium-low heat, and stir in the onion. Cook until the onion has softened and turned translucent, about 5 minutes. Stir in the rice, chicken broth, and chopped nettles. Bring to a boil, then reduce heat to medium-low, cover, and simmer until the rice is tender, about 15 minutes. Puree the soup with an immersion blender, and season to taste with salt and pepper.
Recipe Source: https://www.allrecipes.com/recipe/165071/stinging-nettle-soup/
FORAGED, TROPICAL STINGING NETTLE SMOOTHIE — Don’t let its sting scare you away, the stinging nettle packs a powerful nutritional punch, and is a great addition to smoothies like this foraged, tropical stinging nettle smoothie.
Ingredients
1/4 cup coconut milk homemade coconut milk works well here!
1/2 banana
1/4 pineapple cut in chunks
1 handful stinging nettle leaves (work up to 2 or more, if you like.)
1/2 cucumber optional, peeled and cubed
1/2 avocado optional, for a creamier smoothie
Directions
Prepare the nettles
1. Harvest the stinging nettle plants carefully with gloved hands. You can either clean them and use them immediately, or let them wilt overnight to reduce the sting factor while working with them.
2. Rinse the nettle plants under running water or soak in the sink. Once clean, remove excess water. (I use a salad spinner to dry the leaves.) If using a larger plant, remove any large stems.
Blend the smoothie
1. Add the coconut milk to the blender, followed by the clean nettles leaves. Finish by adding the fruit chunks and blending all of the ingredients together. Make sure to blend long enough to end up with a smooth mixture. (Once they are well blended, the nettle plants will no longer sting.)
Notes
– Nutritional information is based on using all of the above ingredients in one smoothie. The calorie count can be brought down significantly by using a lighter coconut milk (homemade coconut milk is normally much lighter) and by not adding the avocado. You can also use slightly less pineapple and more cucumber.
– A simple tropical smoothie can be made with just pineapple chunks, coconut milk, and nettles. Adding other optional ingredients can change the flavor, texture, and nutritional profile:
– For a lower sugar, less sweet smoothie, add peeled cucumber chunks. Cucumber adds bulk to the smoothie which fills you up without adding much sugar or calories. I usually add half of a cucumber.
– Avocado adds healthy fats and makes for a creamier smoothie. I recommend adding half of an avocado.
–To sweeten the smoothie, add ripe banana. Using half of a banana will slightly sweeten it. Adding a full banana sweetens even more.
– Mango is another delicious fruit that can add a bit of sweetness and tropical flair.
– To thicken the smoothie, either use less liquid or use frozen fruit chunks. Frozen pineapple and/or banana chunks work well here. If you don’t have frozen fruit ready, add ice cubes instead.
– Blend thoroughly to ensure a creamy smoothie.
Recipe Source: https://thethingswellmake.com/foraged-tropical-stinging-nettle-smoothie/
For more recipes check out our farm recipe blog: https://blackdirtrecipes.wordpress.com
Follow us on Instagram @yesifarm
Spring Share Week #3
Seeing progress, teeny tiny plants slowly germinating and breaking ground. Got all the potatoes planted. We are working on beets, carrots, lettuces, onions, spinach, kohlrabi, spring turnips, greens, herbs and more. I am so excited about the carrots — I know I say that all the time but seriously if all goes according to plan (Ha! I know) we will have all kinds of colors — purple, red, yellow, white, and of course orange. Same with the beets; I was able to find Detroit gold beet seed and a gorgeous white beet seed — albino. I love these varieties for their great flavor and color. Crazy how you have to think about now and then at the same time. Have to think about what can be planted in the fields now — can the plants handle cold and frost and who knows about that possible late spring Robins snowfall? What do we need to have planted in the greenhouse for transplanting in the near now? At the end of May the tender plants like tomatoes, peppers, eggplants, and herbs can go out to the fields. We can direct seed the beans both fresh and shell. And in the even later then what do we want to have ready for harvest in late fall — pumpkins, winter squash, rutabagas, parsnips, fall turnips and radishes. Quite a few of the then and later then crops require well over 100 days to grow. Dad always made sure to have pumpkins and winter squashes in the ground by middle of June so they would have time to grow and be ready for harvest in late September early October.
Recipes etc:
SAUTÉED SPRING GREENS WITH BACON & MUSTARD SEEDS
Ingredients
· 2 ounces thick-cut bacon, finely diced
· 2 tablespoons extra-virgin olive oil
· 1 large shallot, thinly sliced
· 1 hot red chile, seeded and finely chopped
· 1 tablespoon yellow mustard seeds
· 1 pound mixed greens, such as dandelion, mustard, collards, kale and spinach—stems and inner ribs trimmed, leaves cut into ribbons
· Salt
· Freshly ground pepper
· 1 tablespoon white wine vinegar
Directions
· In a large skillet, cook the diced bacon in the olive oil over moderate heat, stirring, until golden, about 3 minutes. Add the shallot, chile and mustard seeds and cook until softened, 2 to 3 minutes. Add the greens, season with salt and pepper and cook, tossing frequently, until wilted and tender, 5 to 6 minutes. Stir in the vinegar and serve.
Recipe Source: https://www.foodandwine.com/recipes/sauteed-spring-greens-bacon-and-mustard-seeds
SAUTÉED KALE WITH ONION AND CARROT
Ingredients
· 1-2 tablespoons Ghee, or other healthy cooking fat such as Coconut Oil or Avocado Oil
· 1 medium Yellow Onion, Cut in half lengthwise and then sliced to create half circles
· 1/2 teaspoon Salt
· 3 Carrots, Peeled and cut into bitesize pieces
· 1 teaspoon Red Pepper Flakes, optional
· 1/2 cup Broth, Can be any low-sodium broth - vegetable, chicken stock, or some kind of bone broth.
· 1 bunch Kale, Cleaned and roughly chopped
· 1-2 tablespoons Lemon Juice
Directions
· Preheat a large pot or dutch oven over medium-high heat.
· Add the sliced onions and salt to the pot. Saute stirring occasionally for about 8 minutes (or until translucent).
· Add the carrots and Red Pepper Flakes (if using) and saute for another 4 minutes, stirring occasionally.
· Add the broth to the pot and stir to deglaze the pot and make sure nothing is stuck to the bottom.
· Gently stir the kale under the veggies. It will seem like too much at first but they wilt quickly. Do it in batches if needed, as soon as you have one batch in start with the next.
· Once all the kale is in cook over medium-high heat, stirring occasionally, for about 10 minutes or until the broth has reduced down to nearly nothing.
· Pull the pot off the heat and add in the lemon juice. Give it a good stir and then taste for seasoning.
· Serve either on a plate or in a bowl. You can top with more lemon juice if desired or my favorite...a good splash of red wine vinegar.
Recipe Source: https://tasteofgood.com/sauteed-kale-with-onion-and-carrot/
For more recipes check out our farm recipe blog: https://blackdirtrecipes.wordpress.com
Follow us on Instagram @yesifarm
Spring Share Week #2
Steadily working at it—planting and planting and planting. Such an exciting time of year to know those precious tiny seeds we are planting now will grow up to be carrots, beets, radishes, lettuces and more! I find myself counting the days from planting to germination, from germination to harvest. Funny (ironically) that even though I grew up on the farm, I still am learning new things every day. It took a bit for me to understand that those days to harvest they put in the seed catalogues aren’t calculated from when you plant the seed but from germination—when you see the first new leaves breaking ground. The germination period can be so different from vegetable to vegetable. Radishes may pop up after a week or so depending on how warm the soil is and then 20–25 days later you have your first dime to nickel sized radishes. Parsley takes FOREVER to germinate—2+ weeks and then another month plus before harvest. Most of your roots—beets and carrots will take 50–60 days; lettuce can be 25 days for baby, 50+ for full-sized heads.
Recipes etc:
Slowly I turned and there they were—dandelion greens!!! A sure harbinger of Spring, these greens are so good for you. “Compared to spinach, one of our present-day 'superfoods,' dandelion leaves have eight times more antioxidants, two times more calcium, three times more Vitamin A, and five times more vitamin K and vitamin E (Eating on the Wild Side by Jo Robinson, pg. 23)” Source: https://www.abeautifulplate.com
SAUTÉED DANDELION GREENS WITH EGGS
YIELD: ABOUT 2 SERVINGS
Ingredients
· 2 cups chopped dandelion greens, thick stems removed (about 1 small, ½ medium bunch)
· 1 tablespoons unsalted butter, clarified butter, or ghee
· 1 medium leek, white and light green parts only, finely chopped (Can sub onions, scallions or shallots)
· 2 large eggs
· 1/8 cup crumbled feta cheese
Directions
1. Bring a large pot of salted water to a boil. Add the chopped dandelion greens and blanch for 1 to 2 minutes. Drain the greens thoroughly, using a wooden spoon to drain and press out as much liquid as possible.
2. Melt the butter or ghee in a 10-inch sauté pan set over medium heat. Sauté the leeks until tender, about 5 minutes, stirring occasionally. Add the drained dandelion greens one handful at a time. Cook each handful until wilted, then add more.
3. When the greens are wilted, crack the eggs into the pan on top of the greens. Top with feta cheese and cook uncovered until the whites of the eggs are set, about 5 minutes.
Tips for Success
· Blanching the dandelion greens removes some of their natural bitterness.
· Younger and more delicate dandelion greens will be more delicate in flavor than tougher, thicker greens.
Recipe Source: https://www.abeautifulplate.com/sauteed-dandelion-greens-with-eggs/
SIMPLE GREEN SALAD
This is how I enjoy my salad greens
Ingredients
- Mesclun
- Dressing — Sunflower seed oil or Extra Virgin Olive Oil and cider vinegar – I keep a squeeze bottle of this close by at all times. Ratio of about 1/3 cider vinegar to 2/3 oil. Shake well. The ratios can easily be adjusted to taste – just add more or less vinegar.
- Salt and Pepper
Directions
Take a bowl, add cleaned mesclun or torn up lettuces. Sprinkle with salt and pepper. Toss with tongs or your hands (I wear gloves if using hands). Shake dressing in squeeze bottle, pour over top of salad, put as much or as little as you like. Toss again and serve! This salad is the base for so many meals for me – I’ll poach eggs and put them on top letting the oozy yolk become part of the dressing. For lunch or dinner I might add hard boiled eggs, dried fruit, cheese, herbs, scallions, radishes, olives, sunflower or pumpkin seeds. You can add meat – cold cuts, chicken breast, beef, tuna, the possibilities are endless!!!
Recipe Source - Cheryl Rogowski
For more recipes check out our farm recipe blog: https://blackdirtrecipes.wordpress.com
Follow us on Instagram @yesifarm
Spring Share Week #1
Even though the calendar says Spring we still haven’t fully left winter yet. Saturday Benito was in the fields planting cold tolerant crops like radishes, lettuce, cilantro, parsley (too cold for basil yet), spring turnips, and cabbage. The garlic has germinated and is peeking out of the soil, chives are up, watercress is just barely visible. Nettles will be up soon and other wild edibles will make their presence known. This is where the real season begins — one of patience. We are all so hungry for fresh new green things and Mother Nature says it will come but in her own good time.
Formulas for Naturally Dyed Easter Eggs
Per cup of water use the following:
· 1 cup chopped purple cabbage = blue on white eggs, green on brown eggs
· 1 cup red onion skins = lavender or red eggs
· 1 cup yellow onion skins = orange on white eggs, rusty red on brown eggs
· 1 cup shredded beets = pink on white eggs, maroon on brown eggs
· 2 tablespoons ground turmeric = yellow eggs
· 1 bag Red Zinger tea = lavender eggs
· Add one tablespoon white vinegar to every cup of strained dye liquid.
· For every dozen eggs, plan on using at least four cups of dye liquid.
· White distilled vinegar (1 tablespoon per cup of strained dye)
· Liquid neutral oil, such as vegetable or grapeseed
Equipment
· Saucepan with lid
· White dish
· Fine-mesh strainer
· A second saucepan or bowl
· Baking dish or other container
· Paper towels
Instructions
1. Gather your ingredients: You can make separate batches of different colors or one large batch of a single color. Follow the ratios given above for each ingredient to make more or less dye.
2. Add water to a saucepan: Pour the amount of water you need for the dye you’re making into a saucepan.
3. Start making the dye: Add the dye matter (purple cabbage, onion skins, etc.) and bring the water to a boil.
4. Adjust the heat: Turn the heat down to low and simmer, covered, for 15 to 30 minutes.
5. Check the color: The dye is ready when it reaches a hue a few shades darker than you want for your egg. Drip a little dye onto a white dish to check the color. When the dye is as dark as you like, remove the pan from the heat and let the dye cool to room temperature. (I put the pot on my fire escape and it cooled off in about 20 minutes.)
6. Strain the dye: Pour the cooled dye through a fine-mesh strainer into another saucepan (or into a bowl then back into the original pan if that’s all you have).
7. Add vinegar: Stir the vinegar into the dye — use 1 tablespoon of vinegar per cup of strained liquid.
8. Pour the dye over the eggs: Arrange the room-temperature eggs in single layer in a baking dish or other container and carefully pour the cooled dye over them. Make sure the eggs are completely submerged.
9. Put the eggs in the fridge: Transfer the eggs in the dye to the refrigerator and chill until the desired color is reached.
10. Dry and oil the eggs: Carefully dry the eggs, and then massage in a little oil to each one. Polish with a paper towel. Store the eggs in the refrigerator until it is time to eat (or hide) them.
Recipe Source: https://www.thekitchn.com/how-to-make-vibrant-naturally-dyed-easter-eggs-holiday-projects-from-the-kitchn-112957
KALE, BEAN, AND WINTER ROOTS SOUP
Ingredients
3 tbsp olive oil
3 carrots, peeled and diced
3 parsnips, peeled and diced
2 celery sticks, diced
1 onion, diced
2 tsp finely chopped rosemary leaves
3 garlic cloves, crushed
1.5-2 quarts vegetable or chicken stock, hot
1 bunch kale, de-stalked and chopped
2 x 15.5 oz cans cannellini beans, rinsed and drained
To serve
Parmesan Cheese or vegetarian alternative, shaved
1 tbsp finely chopped rosemary leaves
Step by step
- This keeps in the fridge for 2-3 days, or can be frozen.
- Place a large, heavy-based saucepan or flameproof casserole dish over a low heat and pour in the olive oil, then add the carrots, parsnips, celery, onion, rosemary and garlic. Season and stir well. Cover the pan with a lid and leave the vegetables to sweat for 15 minutes, stirring every 5 minutes or so.
- Stir in hot stock and bring to the boil, then leave to cook for 10-15 minutes, or until all the vegetables are tender.
- Transfer the soup to a blender or food processor (or use a hand blender), and blend to a smooth consistency, adding extra stock to thin it down if required.
- Return to the pan if necessary. Stir in the kale and cannellini beans and cook for 3-4 minutes until the leaves have wilted and the beans are heated through. Taste for seasoning.
- Divide the soup between warmed bowls and sprinkle with the Parmesan shavings and rosemary.
Recipe Source: https://www.sainsburysmagazine.co.uk/recipes/soups/kale-bean-and-winter-roots-soup
Winter Share Week #15
As with most good things they eventually come to an end. This week is the last of the Brussels sprouts. It’s funny how things change during your life. I never really remember liking Brussels sprouts, frankly I don’t really remember eating them much at all except for the token side dish at Thanksgiving. For some reason this winter I fell in love with them and am really feeling sorry to see the end of their season come. While their time is ending other vegetables are coming into their own. We are about to begin the start of a new season — Benito is going to be plowing and disking the fields on Saturday, Lupe and Silvia are planting seeds in the greenhouse, seed potatoes will be delivered next week. Yesterday morning the neighborhood felt like a bee hive must. There were vehicles, tractors and people running in every direction, I chuckled to myself thinking that everyone must start work at the same time and indeed we all do. Spring to a farmer is like the call of the siren to which we must answer!!!
VEGETABLES — Spinach, Onions
THE BEST SAUTÉED SPINACH
A fresh spinach sautéed with garlic and onions in olive oil and butter. This easiest and fastest spinach side dish is healthy and low-carb diet friendly.
Ingredients
· 1/2 tablespoon olive oil
· 1/2 medium white onion chopped
· 2 teaspoons minced garlic see note
· 1/2 tablespoon unsalted butter
· 1/2 teaspoon soy sauce
· 4 oz fresh spinach
· 1/4 teaspoon salt
· 1/8 teaspoon black pepper
Directions
1. In a large skillet, heat up olive oil. Add onion and saute for 4 minutes. Add garlic and butter and saute until the onion is starting to brown.
2. Add soy sauce and stir well. Add spinach and gently toss to mix with sauteed onion.
3. Cook until spinach is wilted. Season with salt and pepper.
4. Serve immediately.
Recipe Source: https://www.crunchycreamysweet.com/best-sauteed-spinach/
95 Ways to Use Up a Bag of Fresh Spinach
https://www.tasteofhome.com/collection/superfood-spinach-recipes/
CARAMELIZED ONIONS
I use a LOT of onions when I cook and caramelized onions done right just take things over the top. If you find yourself with a surplus of onions this is a great way to prepare them for so many uses!! To do it right requires patience and time; allow about an hour for cooking time. Once caramelized the onions can be frozen — fill an ice cube tray with them, freeze, then put in a freezer bag and take out as you need them.
YIELDS 2 cups
Quantities depend on how much caramelized onions you wish to make. In this example, 5 large raw onions yielded about 2 cups caramelized onions. They really reduce as they cook.
Ingredients
· Several medium or large onions, yellow, white, or red (If I have different ones laying around I’ll mix them for different layers of flavor)
· Extra virgin olive oil
· Butter (optional)
· Salt
· Sugar (optional – this recipe uses it, I do not)
· Balsamic vinegar (optional – I will sometimes use it but if I’m making a batch to freeze I won’t as I’m not sure in what recipe I’ll be using them and the balsamic will give a sweetness to them)
Directions
Cut the onions root to tip:
– Slice 1/2-inch off the stem ends of the onions and the roots off of the root end. Place the onions cut side down on the cutting board. Cut them in half through the root end. Peel back the peels from the onions.
– Lay the onions cut side down and make angled cuts into each onion, aimed at the center, cutting almost all the way, but not completely through the root end. Make the cuts to your desired level of thickness.
– The root end will help hold the onion together as you cut it, making it easier to cut. Then cut a V in the root end to cut out the tough root holding the slices together.
Heat olive oil and butter, add onion slices:
– Use a wide, thick-bottomed sauté pan for maximum pan contact with the onions. Coat the bottom of the pan with olive oil, or a mixture of olive oil and butter (about 1 teaspoon per onion). Heat the pan on medium high heat until the oil is shimmering. Add the onion slices and stir to coat the onions with the oil. Spread the onions out evenly over the pan and let cook, stirring occasionally.
– Depending on how strong your stovetop burner is you may need to reduce the heat to medium or medium low to prevent the onions from burning or drying out.
– After 10 minutes, sprinkle some salt over the onions, and if you want, you can add some sugar to help with the caramelization process. (I add only about a teaspoon of sugar for 5 onions, you can add more.) One trick to keeping the onions from drying out as they cook is to add a little water to the pan.
Cook, stirring every few minutes:
– Let cook for 30 minutes to an hour more, stirring every few minutes. As soon as the onions start sticking to the pan, let them stick a little and brown, but then stir them before they burn.
– The trick is to leave them alone enough to brown (if you stir them too often, they won't brown), but not so long so that they burn. After the first 20 to 30 minutes you may want to lower the stove temperature a little, and add a little more oil, if you find the onions are verging on burning.
– A metal spatula will help you scrape up the browned bits from the bottom of the pan as the caramelization proceeds. As the onions cook down, you may find you need to scrape the pan every minute, instead of every few minutes.
– Continue to cook and scrape, cook and scrape, until the onions are a rich, browned color. At the end of the cooking process you might want to add a little balsamic vinegar or wine to help deglaze the pan and bring some additional flavor to the onions.
– Store refrigerated for several days in an air-tight container.
Here is a time-lapse video I made of the caramelization process, to show how the onions cook down and caramelize over the course of an hour: https://vimeo.com/2917598
Suggested uses: on pizza, tacos, eggs, salads, hot dogs, nachos, just like that, with cheese and fruit.
Recipe Source: https://www.simplyrecipes.com/recipes/how_to_caramelize_onions/
For more recipes check out our farm recipe blog: https://blackdirtrecipes.wordpress.com
Follow us on Instagram @yesifarm
Winter Share Week #14
Can hardly believe that this Saturday is the official first day of Spring. The valley is slowly waking up, tractors and farmers starting to enter fields. Ditch diggers and excavators seem to be everywhere. There’s dampness in the air that feels like Spring and it’s not just the rainy forecast for today. Daffodils and other Spring bulbs are slowly showing their presence. Trees have that rosy cast to their branches of all the new buds that will soon be leafing out. Maple syrup farmers are busy collecting and boiling sap for that sweet nectar. I will be checking the stream for the first watercress in the next couple days. Once we get some heat, watercress and the other perennial herbs will be pushing their way out into the world!!!
VEGETABLES — BEETS, KALE, & CARROTS
ROASTED BEET AND KALE SALAD WITH MAPLE CANDIED WALNUTS
Ingredients
· 1 lb. beets, peeled and quartered (or cut into bite sized pieces if you're using large beets)
· 1 teaspoon extra virgin olive oil
· 1 cup walnut halves
· 3 tablespoons pure maple syrup
· ¼ teaspoon sea salt
· ⅛ teaspoon fresh cracked pepper
· 4 cups of curly kale, washed and torn into bite sized pieces
· Optional: ¼ cup goat or Boursin cheese (a diced avocado makes a great vegan and paleo alternative to creamy cheeses in salads!)
For the Dressing:
· 3 tablespoons apple cider vinegar
· 2 tablespoons honey (use maple syrup for vegan)
· 1 teaspoons balsamic vinegar
· ½ teaspoon Dijon mustard
· 1 garlic clove grated on a microplane or very finely minced
· A pinch of sea salt
· ¼ cup extra virgin olive oil
Directions
1. Preheat the oven to 425 degrees. Line a baking sheet with parchment paper
2. Place the beets on the prepared baking sheet and drizzle the oil over top. Use your hands to toss them in the oil. Cover the baking sheet with aluminum foil and bake in the oven for 30-40 minutes, or until they can be pierced using some pressure with a fork.
While the Beets are Roasting Prepare the Rest of the Salad
Directions
1. Add the walnut halves to a small frying pan over medium-high heat. Let them cook until they are fragrant and start to brown in places, shaking the pan frequently. Pour over the maple syrup and sprinkle with sea salt and fresh cracked pepper. Let them cook, stirring constantly, until the maple syrup has almost evaporated, about 1 minute. Remove the walnuts from the pan and place them on a piece of parchment paper, separating them from each other as much as possible.
2. Add the kale, candied walnuts, and, if using, the cheese or avocado to a large bowl. When the beets come out of the oven let them cool slightly then add them to the bowl too. Pour the dressing over top and toss well so that everything is coated.
To Make the Dressing:
Combine all the ingredients EXCEPT the oil in a medium-sized bowl. Slowly add the oil in a thin steady stream while whisking the dressing constantly. If the oil starts to build up at all stop pouring it and whisk the dressing vigorously. It will take you about 1 minute to whisk in the oil. Taste the dressing and season it with extra salt, to taste.
Recipe Source: https://www.theendlessmeal.com/roasted-beet-and-kale-salad-with-maple-candied-walnuts/
ROASTED BEET AND CARROT KALE SALAD
Yield: 2 Servings
Ingredients
1 medium beet trimmed, peeled, quartered and sliced a 1/4 inch thick
1 large carrots sliced 1/4 inch thick
1 ½ tbsp olive oil divided
1/4 tsp salt
1/4 tsp freshly ground black pepper
2 medium shallots peeled and quartered lengthwise
1/8 cup unsalted pumpkin seeds
4 cups chopped kale stems removed and cut into smaller pieces
1 tbsp lemon juice
1/2 tbsp maple syrup
1/2 tbsp Dijon mustard
1/4 cup dried cranberries
Optional Add In: 2 oz goat cheese
Directions
1. Preheat the oven to 425 degrees F. In a large bowl, combine beets, carrots, 1 tablespoon olive oil, salt and pepper. Add carrots and beets to a baking sheet and roast in oven for 15 minutes.
2. Remove from oven and toss the shallots and pumpkin seeds with the beets and carrots on the baking sheet. Roast for an additional 10-15 minutes or until the vegetables are just tender.
3. Meanwhile, place the chopped kale in the same bowl where the beets and carrots were. Add remaining ½ tablespoon olive oil and massage into kale leaves with your hands until the leaves are bright green and tender, about 2-5 minutes.
4. In a small bowl, mix together the lemon juice, maple syrup and Dijon mustard until combined.
5. Remove vegetables from the oven and allow them to cool for 5 minutes. Add vegetable mixture to the bowl with the kale and toss with the dressing until well combined. Add the dried cranberries. Allow salad to sit for at least 30 minutes to allow the flavors to combine. Serve cold or at room temperature.
Notes
1. Be sure to cut the vegetables (i.e. carrots, beets and shallots) into roughly the same size pieces so that they cook evenly.
2. Make sure that you massage the kale for a few minutes before combining with the rest of the ingredients (I like to do this with some olive oil) to reduce the bitterness and toughness of the leaves. This step alone softens the leaves and makes such a difference in the overall taste and texture.
3. Keep an eye on the shallots and pumpkin seeds when they're roasting in the oven as they can burn easily. I found that 10 minutes in the oven was just the right amount of time to roast them and get them lightly browned without burning, but it will depend on your oven.
4. Allow the salad to sit in the dressing for at least 30 minutes (or longer). It tends to taste better the longer that it sits.
Recipe Source: https://www.hauteandhealthyliving.com/roasted-beet-carrot-kale-salad/
For more recipes check out our farm recipe blog: https://blackdirtrecipes.wordpress.com
Follow us on Instagram @yesifarm
Winter Share Week #13
We’re all champing at the bit here on the farm. This week’s warmer temps have us thinking of all the field work we’ll need to do to get ready for planting — cleaning the drainage ditches, replacing drainage pipes, discing, plowing and then begin planting cooler weather crops like lettuces, radishes, Swiss chard, leafy greens, onions, leeks, and so much more. With St. Patrick's Day less than a week away we have sent down all the fixin’s for an Irish style dinner, except the beef of course!
IRISH STYLE DINNER FIXIN'S
PARSNIP AND POTATO MASH
Ingredients
1 1/2 lb. potatoes (about 3 medium), peeled and cut into 2-inch pieces
1 1/2 lb. parsnips (about 3 medium), peeled and cut into 2-inch pieces
Kosher salt
Pepper
2 lemons
1 1/2 c. milk
12 sprigs thyme
4 cloves garlic, smashed
4 tbsp. unsalted butter
Directions
1. Place potatoes and parsnips in large saucepan, add enough cold water to cover and bring to a boil. Add 1 teaspoon salt, reduce heat and simmer until just tender, 15 to 20 minutes.
2. Meanwhile, using vegetable peeler, remove 8 strips lemon zest and place in small saucepan. Add milk, thyme, garlic and butter and bring mixture to a boil. Reduce heat and simmer 2 minutes. Remove from heat.
3. Drain vegetables and return to pot. Strain milk mixture into pot with vegetables and mash to desired consistency. Squeeze in 4 tablespoons lemon juice, season with 3/4 teaspoon each salt and pepper and mix to combine.
Recipe Source: https://www.goodhousekeeping.com/food-recipes/easy/a24130222/parsnip-and-potato-mash-recipe/
IRISH POTATO NACHOS
Irish Potato Nachos are a fun twist on traditional nachos, made with thinly sliced potatoes, crispy bacon, melted cheese and all of your other favorite toppings!
Ingredients
1.5 pounds potatoes (cleaned, and sliced 1/4 inch thick)
2 tablespoons olive oil
.5 teaspoon dried rosemary (crushed)
.5 teaspoon dried thyme leaves (crushed)
sea salt and black pepper (to taste)
1 cup shredded sharp cheddar cheesse
5 slices bacon (cooked and chopped)
.25 cup sour cream or Greek yogurt (plus more for serving)
.25 cup pico de gallo style salsa (plus more for serving)
2 minced green onions
1 tablespoon chopped cilantro leaves
Directions
1. Preheat oven to 450 degrees.
2. Wash and dry potatoes, leaving skin on.
3. Slice potatoes into .25-inch rounds and place in a large bowl.
4. Drizzle olive oil, rosemary, and thyme over potatoes. Stir to combine.
5. Place potatoes, in a single layer, on a greased baking sheet. Bake for 20 minutes, turn over, and continue baking for an additional 20 minutes.
6. Remove potatoes from baking sheet and place on a flat-sided cast iron skillet, slightly overlapping the edges.
7. Sprinkle with cheese and bacon, and return to the oven for 3 to 4 minutes, or until cheese is completely melted.
8. Sprinkle with green onions and cilantro, and serve with Greek yogurt or sour cream and salsa.
Notes
Greek yogurt and pico de gallo could also be served on the side.
Recipe Source: https://cookingwithcurls.com/2014/03/05/irish-nachos/#wprm-recipe-container-76907
IRISH COLCANNON MAC AND CHEESE
Ingredients
8 slices thick-cut bacon, diced
1 large yellow onion, thinly sliced
3 garlic cloves, minced
4 cups shredded cabbage
2 leeks, sliced and cleaned
2 large baking potatoes, cleaned and cooked until fork tender
1½ teaspoons salt
1½ teaspoons black pepper
¼ teaspoon red pepper flakes
½ teaspoon paprika
3 cups whole milk
3 tablespoons butter
3 tablespoons all-purpose flour
1 cup Monterey Jack cheese, shredded
1 cup Sharp White Cheddar cheese, shredded
1 cup Havarti, shredded
½ cup panko or plain bread crumbs
½ cup scallions, sliced
1 pound elbow macaroni, cooked until tender
Directions
1. Preheat oven to 350 degrees F.
2. Cook the potatoes in the microwave, in the oven or in a pot of boiling water until fork tender. Allow to cool down completely. Peel with a pairing knife and shred with a box grater. Set aside.
3. Heat a large pot over medium-high heat. Add the bacon and cook until crispy and browned. Remove with a slotted spoon and transfer to a plate lined with paper towels, to catch the excess fat. Remove all but 1 tablespoon of the bacon grease from the pot. Stir in the onions and garlic and sauté for about 5 minutes, until soft and translucent. Add the cabbage and leeks. Season with ¾ teaspoon salt, ¾ teaspoon black pepper, and the red pepper flakes. Stir and cook for about 5 minutes more until soft. Fold in the shredded potatoes and remove from heat. Transfer to a large bowl and set aside.
4. Place the milk in a medium saucepot and bring to barely a simmer, over medium heat.*
5. Return the large pot to the stove and place over medium-high heat. Add the butter and allow to melt. Whisk in the flour and cook for about 10 seconds to cook the flour a bit. Carefully pour in the warm milk, while whisking continuously until all of the milk has been added and the butter/flour mixture has completely dissolved. Lower the flame to medium and cook until thickened. Season with ¾ teaspoon salt, ¾ teaspoon black pepper and the paprika. Once thick, remove from heat.
6. In a medium bowl, toss together the shredded Wisconsin cheeses. Add the cheeses to the hot thickened milk, reserving about ½ cup for topping later on. Stir with a wooden spoon, until the cheese has melted. Fold in the cooked noodles, the cooked cabbage mixture, the crispy bacon and the scallions, until evenly combined. Pour the mixture into a 9x13 baking dish or into individual baking dishes and top with the breadcrumbs and reserved cheese. Bake for about 25 to 30 minutes, until bubbly. Place under the broiler for a few seconds to crispy up the top. Serve warm and garnish with sliced scallions on top. Enjoy!
Note
*Tip: Warm up the milk in a saucepot before whisking it into the roux. This will allow the béchamel to cook more evenly and it’ll thicken faster!
Recipe Source: https://www.thecandidappetite.com/irish-colcannon-mac-and-cheese/
For more recipes check out our farm recipe blog: https://blackdirtrecipes.wordpress.com
Follow us on Instagram @yesifarm
Winter Share Week #12
How’s that saying go? "If March comes in like a lion it goes out like lamb?" Well it certainly came roaring through our way — the winds were howling so badly they ripped the gutter off the back of the house and the downdraft in the fireplace chimney sounded like a tornado and blew so much ash back into the house there was a thin film everywhere inside. Only good thing, if the saying holds true—we are in for a mild finish to this month which means planting in the fields sooner YEAH!!!!
SLOW SAUTÉED CARROTS WITH TURNIPS, KALE, & PARSLEY-MINT SAUCE
Ingredients
4 ½ Tbl Xtra Virgin Olive Oil
1 Tbl chopped fresh parsley
1 Tbl Chopped fresh mint
1 Tbl finely chopped pitted Spanish green Olives
2 tsp. rinsed, drained, and finely chopped capers
1-1/2 tsp. sherry vinegar
1/2 tsp. finely grated lemon zest
1/4 tsp. ground cumin
1/4 tsp. granulated sugar
Freshly ground black pepper
1 lb. medium carrots, peeled and cut into medium dice (about 3-1/2 cups)
10 oz. purple-topped turnips (about 2 medium), scrubbed, trimmed, unpeeled, cut into medium dice (about 2 cups)
Kosher salt
5 small shallots (about 5 oz.), stems trimmed but kept intact, cut lengthwise into 6 wedges each
2 oz. kale, stemmed, leaves halved lengthwise, then thinly sliced crosswise 1/4 inch thick
Directions
Combine 1-/2 Tbl. of the olive oil with the parsley, mint, olives, capers, sherry vinegar, lemon zest, cumin, sugar, and several grinds of pepper in a small bowl. Mix well and set aside.
In a 12-inch nonstick skillet, heat the remaining 3 Tbl. olive oil over medium-high heat. Add the carrots, turnips, and 1-1/2 tsp. salt. Toss well to coat the vegetables with the oil. (The pan will look crowded.)
Reduce the heat to medium, cover partially, and cook, stirring and flipping every 3 to 4 minutes with a spatula, for about 10 minutes. Add the shallots and 1/4 tsp. salt and stir well. Cover partially and continue to cook, stirring every 1 to 2 minutes, until the vegetables are tender and well-browned, 18 to 20 minutes. Reduce the heat if the vegetables brown too quickly.
Reduce the heat to medium low and add the kale, gently mixing until wilted. Stir in the parsley-mint sauce to taste, and remove the pan from the heat. Season to taste with more salt and pepper, and serve.
Recipe Source: https://www.finecooking.com/recipe/slow-sauteed-carrots-with-turnips-kale-and-parsley-mint-sauce
ORECCHIETTE WITH CARAMELIZED TURNIPS, KALE, & CRACKED PEPPER
Ingredients
· Salt
· ½ pound orecchiette
· 1/8 cup canola oil
· 1 medium turnips, peeled and cut into 1/4-inch dice
· ½ pound kale, stems and center ribs removed, roughly chopped
· 1 garlic cloves, minced
· 1/4 teaspoon red pepper flakes
· Freshly cracked black pepper
· 4 tablespoons (2 ounces) unsalted butter
· 1/3 cup grated Parmigiano-Reggiano cheese, plus extra for garnish
Directions
Bring 6 quarts of salted water to a boil in a large pot over medium-high heat. Add the pasta and cook until al dente, about 8 minutes. Drain the pasta, reserving 3/4 cup of the pasta water. Set aside.
Meanwhile, heat the oil in a large saucepan over medium-high heat until hot but not smoking. Add the turnips and reduce the heat to medium. Cook, stirring often, until the turnips are tender and golden, about 6 minutes.
Add the kale and cook, stirring often, until the kale is very tender, about 8 minutes. Add the garlic and red pepper flakes, and cook, stirring often, 1 minute. Add the reserved pasta water as needed and season with cracked pepper to taste. Add the butter and stir gently until melted.
Add the pasta to the kale mixture and toss with tongs until the pasta is well coated. Stir in the Parmigiano-Reggiano. Season with salt and additional cracked pepper to taste.
Divide the pasta into warm bowls, sprinkle with additional cheese, if desired, and serve.
Recipe Source: https://www.seriouseats.com/recipes/2013/09/orecchiette-caramelized-turnips-kale-pepper-from-vermont-farm-table-cookbook.html
For more recipes check out our farm recipe blog: https://blackdirtrecipes.wordpress.com
Winter Share Week #11
We made it, made it through February that is. I always say that for February being the shortest month of the year it is most definitely the hardest. Between the snow and cold and melting to ice it most certainly challenges us. With the sun shining now we are busy cleaning out more space in the greenhouse for more plantings and continue working on crop plans so we can properly rotate the field plantings. Now we wait for the ground to thaw so we can begin again.
VEGETABLE — Beets
ROASTED BALSAMIC BEETS
Ingredients
3 cups of beets peeled & diced
1 Tbls Olive Oil
½ tsp sea salt
1 Tbls Balsamic Vinegar
1 Tbls Honey
Directions
Preheat oven to 425 degrees Fahrenheit. Grease a large baking sheet or dish, set aside. Peel and cut beets into 1” cubes. Toss beets with 1 TBS olive oil and ½ tsp sea salt. Spread onto a greased baking dish in an even layer. Bake in preheated oven for 15-20 minutes.
After 15-20 minutes, stir and bake for 10 minutes more or until beets feel soft to the touch.
Mix together balsamic vinegar and honey. After 30 minutes (or when beets are soft to the touch), remove beets from the oven and add the honey/vinegar mixture to the baking dish.
Stir until all the beets are evenly coated. Return to the oven for 10 minutes, stirring once halfway through. Roast until the balsamic/honey mixture coats the beets (and isn’t runny). Remove from the oven and serve warm or store and serve later over your favorite salads. Also good over cottage cheese.
Original recipe source: https://joyfoodsunshine.com/roasted-beets/#wprm-recipe-container-15748
Alternative Roasting Method
Instead of peeling and cutting the beets, you could roast them whole in the following way:
1) Wrap beets individually in aluminum foil and set on a baking sheet.
2) Roast in an oven set to 450 degrees F until the beets are soft to the touch, 50-70 minutes depending on the size of the beets.
3) Remove skin from beets with your hands or a vegetable peeler. (at this point you can store the roasted beets until later when you’re ready to add the rest of the ingredients, dice and roast)
4) dice and toss with recipe ingredients.
5) Roast for 10-15 minutes at 425 degrees F until beets are soft and the balsamic mixture is thick and coats the beets.
BEET FRIES
Ingredients
· 1/2 cup reduced-fat mayonnaise
· 1 teaspoon pink peppercorns, crushed
· 1/2 teaspoon green peppercorns, crushed
· 1/2 teaspoon coarsely ground pepper, divided
· 2 tablespoons olive oil, divided
· 1/2 teaspoon sea salt, divided
· 1 pound fresh beets
Options: 1 pound sweet potatoes
Directions
· In a small bowl, combine the mayonnaise, peppercorns and 1/4 teaspoon ground pepper. Cover and refrigerate until serving.
· Peel and cut beets in half; cut into 1/2-in. strips. Transfer to the same bowl; add the remaining oil, salt and pepper. Toss to coat. Spread onto another parchment paper-lined baking sheet.
· Bake beets, uncovered, at 425° for 20-30 minutes or until tender, turning once.
· Serve with peppercorn mayonnaise.
If using sweet potatoes: Peel and cut sweet potato in half widthwise; cut each half into 1/2-in. strips. Place in a small bowl. Add 1 tablespoon oil, 1/4 teaspoon salt and 1/8 teaspoon pepper; toss to coat. Spread onto a parchment paper-lined baking sheet.
Original recipe source: https://www.tasteofhome.com/recipes/beet-and-sweet-potato-fries/
For more recipes check out our farm recipe blog: https://blackdirtrecipes.wordpress.com
Follow us on Instagram @yesifarm
Winter Share Week #10
As we were getting ready for this week I was thinking that with the next storm(s) on their way, the forecast was definitely for soup. With the wintry weather I’ve been in cooking mode — baking bread, making soups and stews — all the things that in a few short months there will be minimal time for. Benito’s coming in on Saturday, I’ve asked him to sort and choose the potatoes in our inventory that we would possibly use for seed this spring. We’ll begin planting our alliums in the greenhouse over the next couple weeks. Alliums are the family including leeks, shallots, scallions and onions. By seeding out in the greenhouse this will give us baby plants aka transplants to set out in the fields once the weather breaks and the frost is gone from the ground. We will still plant seed directly into the soil to give us an extended harvest season.
BASIC VEGETABLE SOUP
Ingredients
· 1 Tbsp olive oil
· ¾ cup chopped yellow onion
· 1 cups peeled and chopped carrots
· ¾ cup peeled and chopped parsnips
· ¾ cup peeled and chopped turnips
· ¾ cups chopped celery
· 2 cloves garlic , minced
· 2 (14.5 oz) cans low-sodium chicken broth* or vegetable broth
· 1 ½ cups peeled and 1/2-inch thick diced potatoes
· ¼ cup chopped fresh parsley
· 1 bay leaf
· ¼ tsp dried thyme
· Salt and freshly ground black pepper
Optional add-ins:
· 1 (14.5 oz) cans diced tomatoes (undrained)
· ¾ cups chopped frozen or fresh green beans
· ¾ cups frozen or fresh corn
· ½ cup frozen or fresh peas
Directions
– Heat olive oil in a large pot over medium-high heat.
– Add onions, carrots, and celery and saute 4 minutes then add garlic and saute 30 seconds longer.
– Add in broth tomatoes, potatoes, parsley, bay leaves, thyme and season with salt and pepper to taste*.
– Bring to a boil, then add green beans.
– Reduce heat to medium-low, cover and simmer until potatoes are almost fully tender, about 20 - 30 minutes.
– Add corn and peas and cook 5 minutes longer. Serve warm
Original recipe source: https://www.cookingclassy.com/vegetable-soup/
HEARTY VEGETABLE STEW
Ingredients
YIELD: 6 servings
· 2 tablespoons olive oil
· 10 oz baby bella mushroom, quartered
· 1 yellow onion, diced
· 3 carrots, chopped
· 2 celery stalks, chopped
· 2 cloves garlic, minced
· ½ teaspoon dried rosemary
· ½ teaspoon dried thyme
· ½ teaspoon pepper
· 3 tablespoons tomato paste
· 2 tablespoons low sodium soy sauce
· ¼ cup flour
· ¾ cup dry red wine
· 4 cups red potato, diced
· 4 cups vegetable broth
· 2 leaves bay leaf
Directions
– In large pot or Dutch oven, heat the olive oil over medium heat. Once the oil begins to shimmer, add the mushrooms and cook for about 5 minutes, or until most of their juices have been released.
– Add the onions, carrots, and celery, and cook for 4-5 minutes, or until onions are semi-translucent.
– Add the garlic, rosemary, thyme, pepper, tomato paste, and soy sauce, and cook for 2-3 more minutes, until the herbs are fragrant.
– Add the flour and stir until fully incorporated. Add the wine and stir until mostly absorbed.
– Add the potatoes, vegetable broth, and bay leaves, and bring to a boil. Reduce the heat to medium-low and simmer for 45 minutes, stirring occasionally, until the potatoes are tender and the stew has thickened.
– Remove the bay leaves.
Enjoy!
Optional add-ins:
Chick peas or other beans – use canned or dry. If using canned, drain them and add to stew, dry beans will have to be soaked before adding to stew. Shiitake mushrooms add a “meaty” texture and of course you can always add beef or chicken – I like thighs. If using beef, brown the cubes first then add to vegetables.
Original recipe source: https://tasty.co/recipe/hearty-vegetable-stew
For more recipes check out our farm recipe blog: https://blackdirtrecipes.wordpress.com
Follow us on Instagram @yesifarm
Winter Share Week #9
It’s so peaceful for the moment, busy researching equipment — looking for a plastic laying machine and a new (well new to us) plow. Who knew that Facebook would become a place to look for farm equipment! It’s also a time to take advantage of conferences. This year I was able to sit in on one in Virginia, and an online symposium throughout January on Organic—what it means today. Next month will be a three-day conference including topics like NYS Ag and Market rulings, farmers markets updates, and just a chance to connect with other farmers and managers.
VEGETABLE — Brussels Sprouts
BRUSSELS SPROUTS GRATIN
This Brussels sprouts gratin is an excellent choice for an everyday meal or holiday dinner. A rich fontina cheese sauce and buttery fresh bread crumbs bring out the naturally sweet flavor of the Brussels sprouts in this delicious side dish. Cheddar cheese is a good alternative to the fontina cheese, so don't hesitate to substitute if necessary. Crumbled bacon is called for, but feel free to skip that ingredient if you need a vegetarian-friendly casserole. Pancetta or 3 or 4 tablespoons of finely diced ham would also be nice additions if you'd like to add some smoky flavor.
Ingredients
1/2 pound Brussels sprouts
1 clove garlic (cut in half)
1 1/2 tablespoons butter (divided)
1 tablespoons minced shallots
1 tablespoons all-purpose flour
1/4 teaspoon kosher salt (or to taste)
Pinch freshly ground black pepper
Dash ground nutmeg
1/2 cup milk or half-and-half
1/4cup (1 ounces) shredded fontina cheese
1 or 2 strips of bacon (cooked and crumbled)
1/4 cup fine soft bread crumbs
Directions
1. Cut off the core ends of the Brussels sprouts. Remove loose outer leaves and any damaged or discolored leaves. Quarter or halve the sprouts
lengthwise. Rinse well under cold running water.
2. Heat the oven to 400 F (200 C/Gas 6).
3. Rub a 1 to 1 1/2-quart gratin dish or baking dish with the cut side of the garlic halves. Spray with nonstick cooking spray or lightly butter the dish.
4. Bring a large saucepan of salted water to a boil. Add the Brussels sprouts and boil for 3 minutes. Drain and set aside. In a medium saucepan or saucier over medium-low heat, melt 2 tablespoons of the butter. Add the minced shallots and saute, stirring, until then are translucent. Add the flour, 1/2 teaspoon of salt, the pepper, and nutmeg to the saucepan and cook, stirring, for 2 minutes longer. Gradually stir in the milk or half-and-half. Continue cooking, stirring, until the sauce has thickened. Stir in the shredded cheese and bacon and cook, stirring until the cheese has melted.
5. Gently fold the Brussels sprouts into the sauce.
6. Spoon the mixture into the prepared baking dish.
7. Melt the remaining 1 tablespoon of butter and toss with the bread crumbs. Sprinkle over the casserole.
8. Bake the casserole for 20 to 25 minutes, or until the topping is nicely browned and the filling is bubbling.
Original Recipe Source: https://www.thespruceeats.com/brussels-sprouts-gratin-3572981
For more recipes check out our farm recipe blog: https://blackdirtrecipes.wordpress.com
Follow us on Instagram @yesifarm
Winter Share Week #8
Wow that was a whomper of a storm! We’re still digging out from it. Luckily we didn’t lose power and the heater in the greenhouse is guzzling fuel like there’s no tomorrow. I am so grateful for good friends and neighbors. Ray, one of the neighboring farmers came with his plow truck and cleared the driveway. The snow from the plow trucks passing by was close to 4 feet high and packed with salt. Would have taken me hours just to do that patch and he cleared it in minutes, all told I think he spent a half hour clearing the drive. We bought a snow blower Sunday for which I am profoundly grateful. Was pretty simple to use and fix. Yup worked great all day Monday, not so much on Tuesday – snapped the shear bolts which is actually a good thing. If the shear bolts hadn’t snapped the axle might have bent. Yesterday the farmers came in. They helped me continue clearing snow and prep your vegetables. After I finish this I will be headed back out to continue clearing snow so I can get my vehicle out. Wish me luck!!!!
VEGETABLE — Potatoes
EASY CAESAR POTATO SALAD
Ingredients
1 Pound Potatoes, rinsed
1 tablespoon white vinegar
Kosher Salt
¾ Cup Mayonnaise
¾ tablespoon freshly squeezed lemon juice
¾ tablespoon Dijon mustard
¾ teaspoon sugar
1 anchovy, chopped
1 clove garlic, minced
1 ½ tablespoons extra-virgin olive oil
¼ cup panko bread crumbs
Flat leaf parsley, chopped
Directions
1. Put the potatoes in a saucepan with enough water to cover by 2 inches. Bring the water to a boil and cook the potatoes until tender, 15 to 20 minutes. Drain and let cool for 5 minutes. Peel the potatoes and cut them into chunks. Put in a medium bowl and sprinkle with the vinegar while still warm; season with 1/4 teaspoon salt.
2. Whisk together the mayonnaise, lemon juice, mustard, sugar, anchovies, garlic and ½ teaspoon salt in a large bowl. Add the potatoes and toss to coat.
3. Heat the oil in a skillet over medium heat. Add the panko and cook until brown, about 3 minutes. Stir in the parsley.
4. Transfer the potatoes to a serving dish and sprinkle with the parsley breadcrumbs.
Original recipe source: https://www.foodnetwork.com/recipes/food-network-kitchen/easy-caesar-potato-salad-5482557
MELT IN YOUR MOUTH POTATOES
Ingredients
1 pound gold potatoes, peeled
2 tablespoons butter, melted
1/4 teaspoon dried thyme
1/8 teaspoon dried rosemary
1/3 teaspoon salt
Pinch pepper
1/3 cup chicken broth
1 clove garlic, peeled and crushed
2 teaspoons chopped parsley
Directions
1. Place oven rack in upper-middle position. Preheat oven to 475 degrees. Spray a large rimmed baking sheet with non-stick cooking spray.
2. In a small bowl, combine melted butter, thyme, rosemary, salt, and pepper.
3. Cut potatoes into 3/4 to 1 inch thick slices. Toss potatoes in butter mixture. Arrange in a single layer on prepared baking sheet.
4. Roast potatoes for 15 minutes. Remove from oven and flip potatoes over. Return to oven and roast for an additional 15 minutes.
5. Remove potatoes from oven and flip one more time. Add the broth and garlic to the pan and carefully return to oven. Roast for an additional 10-15 minutes, or until potatoes are tender. Sprinkle with parsley and serve.
Original Recipe Source: https://letsdishrecipes.com/melt-in-your-mouth-potatoes/
For more recipes check out our farm recipe blog: https://blackdirtrecipes.wordpress.com
Follow us on Instagram @yesifarm
Winter Share Week #7
Bitter, bitter cold in the forecast. Have to get extra fuel for the heater in the greenhouse. These are the days when you make sure every door is sealed shut, no crack left unplugged and you hunker down to making soup or stew and bread. In a way it’s like taking a break. I’ll be pouring through seed catalogues (yes, still) to see if there is anything new and exciting to grow this coming spring. In my quest for vegetables to grow I am always on the lookout for heirloom varieties, tomatoes higher in lycopene, carrots with a higher Brix reading, potatoes with lower glycemic content. Why these characteristics? Heirlooms are basically older varieties that have been bred for flavor not for transportation. That higher Brix reading in carrots? Means a higher sugar content and a sweeter carrot, one of my favorite varieties is Sugarsnax, the name says it all! And that lower glycemic content in those potatoes, Vivaldi, means folks with dietary concerns can enjoy with a little less worry.
VEGETABLE — Brussels Sprouts
BRUSSELS SPROUTS SOUP
Ingredients
1 tablespoons butter or 2 tablespoons oil
½ finely sliced onion
1 pound Brussels sprouts
2 cups chicken stock
1/8 cup cream
Directions
– Melt butter in a saucepan and sauté onion until tender. Add brussels sprouts and stock and bring to boil. Reduce heat and simmer for 15-20 minutes or until sprouts are cooked.
– Puree in a food processor or put the soup mixture through a sieve.
– Reheat and serve with swirls of cream.
Notes – can sub out vegetable broth for chicken, and if you add a potato and cook it with the onions, you could eliminate the cream.
Original recipe source: https://www.food.com/recipe/brussels-sprouts-soup-214796
ROOT VEGETABLE SOUP
Ingredients
6 tablespoons unsalted butter
1 large onion
2 to 3 celery stalks, diced
3 garlic cloves, finely chopped
3 rosemary or thyme branches
2 bay leaves
3 ½ pounds mixed root vegetables (carrot, parsnip, turnip, rutabaga, sweet or regular potato), peeled and cut into 1-inch chunks
2 teaspoons fine sea salt, more as needed
½ teaspoon black pepper, more as needed
Juice of 1/2 lemon, more for serving
Extra-virgin olive oil
Flaky sea salt
Crushed Aleppo, Urfa or other chile flakes, optional
Grated Parmesan or pecorino, optional
Directions
1. Melt butter in a large, heavy-bottomed pot. Stir in onion and celery. Cook, stirring occasionally, until vegetables are tender, about 10 minutes. Stir in garlic, rosemary and bay leaves; cook 1 minute more. Add root vegetables, 8 cups water, salt and pepper. Bring to a boil; reduce heat to medium and simmer, covered, until vegetables are tender, 30 to 40 minutes.
2. Remove and discard rosemary branches and bay leaves. Using an immersion blender, purée soup until smooth. (Alternatively, you can purée the soup in batches in a blender or food processor.) If the soup is too thick, add a little water. Season with lemon juice and more salt to taste.
3. To serve, ladle soup into bowls and top with a drizzle of olive oil, a few drops of lemon juice, flaky salt and crushed chile or grated cheese, if desired.
Original recipe source: https://cooking.nytimes.com/recipes/1015087-root-vegetable-soup
For more recipes check out our farm recipe blog: https://blackdirtrecipes.wordpress.com
Follow us on Instagram @yesifarm
Winter Share Week #6
My Dad was first generation, his parents came from Poland and settled here as onion farmers. Dad would often talk about how his Mom, my Babcia, would have a bunch of chicks in the kitchen behind the stove where they were kept nice and warm until big enough to go outside. The homemade yogurt that was on the kitchen counter, the fistful of black walnuts Babcia would toss into a cake to give it that extra special flavor. Vegetables from the fall harvest stored in the root cellar for soups and stews in the cold days of winter. Crocks of pickles and sauerkraut fermenting with brines of salt and water. Dad even planted a grape vine not only for the grapes but the leaves which he put in the bottoms of the crocks of pickles to keep the pickles firm. I still harvest leaves and grapes from that same vine! When I was a kid Dad would send me down to the basement which was our version of a root cellar to bring up carrots, potatoes and onions so he could make soup or stew. In the freezer we would have what seemed like tons of corn from the fall harvest. These are some of the practices that we still carry on today in different ways. When the sweet corn was streaming out of the fields this past fall we would take sacks of corn, strip the husks and cut the kernels off the cobs. Truly a labor of love by our farmers, it’s a lot of work as it is all done by hand. We packed it away in freezers in anticipation of the winter that was to come. Today you are receiving the benefits of that late fall work!
The corn is frozen – defrost it when you’re ready to use it. The bags contain pure corn – no salt, sugar or other ingredients. Toss in chilies, soups or serve as a side. Can be a little sketchy in salads due to the high moisture content.
VEGETABLE – Sweet Corn
BIRDS EASY SWEET CORN
Ingredients
¼ cup Butter
1 Bag frozen corn
1 Tablespoon sugar
½ Teaspoon Black Pepper
Pinch of Salt
Directions
Melt butter in a saucepan over medium heat. Add remaining ingredients.
Simmer covered and stir occasionally for about 10 then uncovered an additional 10 minutes.
Recipe source: https://www.food.com/recipe/birds-easy-sweet-corn-298871
CREAMED CORN
Ingredients
2 cups frozen corn
1/4 cup half-and-half cream
2 tablespoons butter
1 tablespoon sugar
1/2 teaspoon salt
Directions
In a large saucepan, combine all ingredients. Bring to a boil over medium heat; reduce heat. Simmer, uncovered, for 6-8 minutes or until heated through.
Recipe source: https://www.tasteofhome.com/recipes/creamy-sweet-corn/
CORN CHOWDER
Ingredients
4 slices bacon, diced
1 Tbsp unsalted butter
½ medium yellow onion, diced
1/8 cup all-purpose flour
1 cloves garlic, minced
2 ½ cups water - (chicken broth or vegetable broth may be substituted)
1 bag frozen corn
½ lb. yukon gold or baby red potatoes - , sliced into 1/2 inch pieces
1/8 tsp dried thyme
1/8 tsp smoked paprika
salt and black pepper, to taste
½ cup half and half or heavy cream
handful of chopped fresh chives or parsley
Directions
– Take bag of corn out of freezer to defrost.
– Cook bacon pieces in large heavy bottomed pot (like a dutch oven) over MED heat. Cook about 5-8 minutes, or until bacon is crisp. Use a slotted spoon to remove to a paper towel lined plate and set aside.
– Use a clean paper towel to absorb some of the bacon grease, reserving about 1/2 Tbsp of grease in the pot. Add butter and melt over MED heat.
– Add diced onions and cook about 5 minutes, until soft and translucent. Add garlic and flour and cook about 1 minute, stirring often.
– While whisking, pour in water and increase heat to MED-HIGH. Add in corn, potatoes, thyme, smoked paprika, and salt and pepper. Stir and bring to a low boil, then reduce heat to MED-LOW and simmer.
– Simmer, stirring every so often, for 15-20 minutes, until potatoes are fork tender.
– Use an immersion blender to blend about half the soup until smooth. Alternatively, remove about 3 cups of the soup to a blender and blend until smooth. Stir the blended soup back into the pot.
– Add in half and half, reserved corn juice, and about half the chives or parsley. Stir in and heat through.
– Serve sprinkled with remaining chives/parsley and cooked bacon pieces, if desired.
Recipe Source: https://www.thechunkychef.com/hearty-homemade-corn-chowder/
For more recipes check out our farm recipe blog: https://blackdirtrecipes.wordpress.com
Follow us on Instagram @yesifarm
Winter Share Week #5
The "UGH" side of farming. Every type of farm produces waste of some sort or another, for animal farmers it might be manure, on a dairy farm it may also be milk, orchards might be fruit or branches from pruning. For us vegetable farmers it’s surprise – vegetables! This is probably one of the least fun jobs on the farm and it never ends. No matter what the season or time of year we are always culling and cleaning produce. Some of the culled produce goes to my brother's chickens but most of it goes back into the fields where we turn it under into the soil. As it breaks down it enriches the land helping to provide more nutrients to the vegetables at a later time. This really aids us, the soil and of course the vegetables. Some like corn are what we call “heavy feeders” and require a lot of nutrients and pull that out of the soil, in a way draining it. Lettuce takes almost nothing out of the soil for food so we will often rotate a crop like lettuce after corn to minimize the stress on the soil. So even though this may be one of my least favorite chores — it can be sloppy, wet and pretty smelly especially in the summer — I take comfort in knowing that we are continually making the soil a richer, better thriving element in this universe of ours.
VEGETABLE — Parsnips
Originating in Europe and Asia parsnips have been around for ages. I call them the “elegant carrot.” Parsnips are related to carrots and parsley, with a nuttier, sweeter flavor than carrots. Great not only in savory dishes but sweet as well. In fact parsnips were at one time used as a source of sugar before sugar cane was readily available! They can be eaten raw but are often roasted, boiled, fried, or steamed and are at their sweetest when roasted. Parsnips like potatoes will turn brown when their flesh is exposed to light. After peeling, keep in acidulated water (water & a bit of lemon juice) until ready to use.
CREAMY POTATO AND PARSNIP SOUP
Ingredients
2 tablespoons extra-virgin olive oil
1 tablespoon butter
1 1/2 cups peeled and chopped parsnips (from about 2 medium parsnips)
1 cup peeled and chopped onion
4 garlic cloves, peeled and chopped
6 cups peeled and chopped gold potatoes
1 tablespoon fresh rosemary, chopped
2 tsp. fresh thyme leaves
1 1/2 tsp. salt
3/4 tsp. black pepper
1/4 cup white wine
4 cups vegetable broth
1 bay leaf
3/4 cups sour cream
2-3 scallions, trimmed and thinly sliced
Red pepper flakes
Directions
1. In a large stockpot over medium heat, warm the olive oil and butter. Add the parsnips, onion and garlic and cook, stirring occasionally, for 5 minutes. Add the potatoes, rosemary, thyme, salt and pepper and cook, stirring occasionally, for an additional 5 minutes.
2. Add the white wine and turn up the heat so it simmers, scraping up any browned bits from the bottom of the pot with a wooden spoon. Then stir in the vegetable broth and bay leaf. Cover the pot and bring the soup up to a boil. Then turn down the heat to maintain a simmer. Cook until the parsnips and potatoes are very soft, about 25-30 minutes. Then turn off the heat and allow the soup to cool slightly. Remove and discard the bay leaf.
3. Once the soup is cool enough to handle safely, purée it until it’s completely smooth using either a blender, an immersion blender or a food processor fitted with the blade attachment. You will most likely need to work in batches.
4. Return the puréed soup to your pot and re-warm it over medium heat. Add the sour cream and stir until it’s fully incorporated. Taste and adjust for salt and pepper, if necessary.
5. Ladle the warm soup into bowls. Top with sliced scallions and a sprinkle of red pepper flakes before serving. Enjoy immediately.
6. Leftovers can be stored in an airtight container in your refrigerator for 2-3 days.
Recipe Source: https://www.floatingkitchen.net/wp-json/mv-create/v1/creations/249/print?id=249
MAPLE-GLAZED PARSNIPS ON KALE
Ingredients
1/4 cup plus 1 tablespoon unsalted butter, divided
2 pounds medium parsnips, cut into 1/2-in. slices
2/3 cup maple syrup
1 medium shallot, thinly sliced
1 pound kale, stems removed, cut into 1-in. strips
1/2 teaspoon salt
1 tablespoon apple cider or juice
Directions
1. In a large skillet, melt 1/4 cup butter over medium heat. Add parsnips and maple syrup. Cook, uncovered, for 15-20 minutes or until syrup is almost evaporated and parsnips are caramelized, stirring frequently.
2. Meanwhile, in a Dutch oven, melt remaining butter over medium heat. Add shallot; cook for 4-5 minutes or until tender. Add kale; sprinkle with salt. Cook and stir for 3-5 minutes or until slightly wilted. Add cider; reduce heat to low. Cover and steam for 5 minutes.
3. To serve, spoon kale onto a large plate; top with parsnips.
Recipe Source: https://www.tasteofhome.com/recipes/maple-glazed-parsnips-on-kale/
Here’s a link for some more recipes to play with: tasteofhome.com/collection/parsnip-recipes/
For more recipes check out our farm recipe blog: https://blackdirtrecipes.wordpress.com
Follow us on Instagram @yesifarm
Winter Share Week #4
Monday morning – so exquisitely beautiful, fresh fallen snow sparkled as it lay in inches covering the ground and tree branches. Bits of ice gleamed like diamonds in the sunlight. Mother Nature certainly came out all glamorous for the day. In the morning the neighborhood sounds like winter – plows scraping and pushing snow to make safe passages for tractor and truck alike. It’s afternoon now and the neighborhood sounds like spring. Motors running as the farmers’ mechanics tune up tractors, the banging of hammers as dents in dinged metals are pounded back into shape and gears and rods put into their proper place. Time passes so quickly, in a blink we went from winter “feels” to spring and the inner farmers’ urgency of getting ready. Soon planting will commence in the greenhouse, then in the fields and before you know it we’ll be weeding and harvesting like mad in the fields.
VEGETABLE — Beets
Beets – for those of you not familiar with fresh beets I can understand your hesitation. One time my Mom tried to cheat and use canned beets, I don’t remember what the dish was but I do remember my response – BLEGH!!! They tasted like the tin can they came in. Beets or beetroots are touted as one of the superfoods of today. One cup of beets has only 59 calories and 0.2 grams of fat besides being packed full of vitamin C, folate (AKA vitamin B9), potassium, iron and manganese not to mention lots of good-for-you fiber.
My family heritage is from Poland and as such we grew up on beets mostly in the form of Borscht and pickles. Typically eaten cooked, beets can also be eaten raw. Peel and shave into salads or over cottage cheese and of course juiced.
SPINACH BEET SALAD
Ingredients
2 medium fresh beets
4 ounces baby spinach
2 medium navel oranges, peeled and sliced
1 small fennel bulb, halved and thinly sliced
1/4 cup chopped hazelnuts, toasted
Dressing:
3 tablespoons olive oil
2 tablespoons orange juice
1 tablespoon balsamic vinegar
2 teaspoons grated orange zest
1/4 teaspoon onion powder
Directions
Preheat oven to 425°. Cut slits in beets; place on a baking sheet. Bake until tender, about 1 hour.W hen cool enough to handle, peel beets and cut into wedges. Divide greens among salad plates; top with beets, oranges, fennel and hazelnuts. Combine dressing ingredients in a jar with a tight-fitting lid; shake well. Drizzle over salads.
Editor's Note: To toast nuts, bake in a shallow pan in a 350° oven for 5-10 minutes or cook in a skillet over low heat until lightly browned, stirring occasionally.
Recipe Source: https://www.tasteofhome.com/recipes/spinach-beet-salad/
BORSCHT aka Beet Soup. There are so many variations of beet soup – Polish, Russian, Lithuanian just to name a few. This “recipe” is kind of how my Mom made borscht.
Directions
Roast or boil beets till tender. Let cool and slip skins off. Cut into bite-sized pieces. Mom would then fill a saucepan with water, add the cut-up beets. Cook until heated through, then season to taste with salt and pepper. Serve hot or cold with a dollop of sour cream.
This is how I’ll do it when I have a bit more time: There’s almost always a quart or two of homemade vegetable broth in my freezer. I pull one or two quarts out so they have time to defrost. Roast or boil the beets till tender. Let cool, peel and cut into bite-sized pieces. While the beets are cooling I sauté onions, carrots and celery until translucent, basically mirepoix. Next I add the broth and some of the beets, holding a few back to sprinkle over top of soup. Bring the broth and veg mix to temp. Then using an immersion blender or countertop blender, process the broth and veg mix to a smooth consistency. You can also use a food processor – but the texture will be coarser and some food processors do not have a high enough post in the center and liquid may spill out (trust me on this one). After blending, return to sauce pot, season to taste with salt and pepper. Depending on my mood I sometimes serve it at this point or let it chill for a cold soup. I also like to serve it with a dollop of sour cream or plain yogurt and/or a sprinkle of fresh dill.
This soup can be frozen if you leave out the dairy.
Nutrition Info source: https://www.tasteofhome.com/collection/beets-health-benefits/
For more recipes check out our farm recipe blog: https://blackdirtrecipes.wordpress.com
Follow us on Instagram @yesifarm
Winter Share Week #3
As I sit here and ponder what to write, I find myself reflecting over this past year. How we adapted to the new protocols of our normal daily lives. And of how we will continue to evolve, not just in COVID practices, but in our daily practices on the farm. I love to research and glean. Now with the internet there is so much more easily accessible info than 30+ years ago. Back in the day, my Dad would get his information at one of the local bars. Many deals were made over handshakes and much information traded over sips of frosty beverages. At other times farmers would gather at farm auctions and share info as they waited for their lot to come up for bid. Sometimes I joined my Dad at the bar or auction yard and would quietly listen in on their conversations. As I grew older — conferences became a big part of my life in sharing and learning. Our communities were connected in so many ways, on very personal levels. Thanks to modern day tools like Instagram, Facebook, and Zoom among others, we have forged new communities not just locally but globally. I now am able to communicate and share with farmers around the globe, there’s so much to learn and so much work to do!!! I am so eager and hungry to learn and share. Here’s to a New Year and a new season of growth!!!
VEGETABLES — Leeks, Potatoes, Brussels Sprouts, Turnips
POTATO LEEK SOUP
By Jennifer Segal
A French classic, this creamy potato leek soup is quick, easy, and delicious!
Ingredients
1 ½ tablespoons unsalted butter
2 leeks, white and light green parts only, roughly chopped (about 2 ½ cups)
2 cloves garlic, peeled and smashed
1 pound gold potatoes, peeled and roughly chopped into ½ inch pieces
3 ½ cups low sodium chicken or vegetable broth
1 bay leaf
2 sprigs fresh thyme
½ teaspoon salt
¼ teaspoon ground black pepper
½ cup heavy cream
Herbs, finely chopped for serving
Directions
1. Melt the butter over medium heat in a large soup pot. Add the leeks and garlic and cook, stirring regularly, until soft and wilted, about 10 minutes. Adjust the heat as necessary so as not to brown.
2. Add the potatoes, broth, bay leaves, thyme, salt and pepper to pot and bring to a boil. Cover and turn the heat down to low. Simmer for 15 minutes, or until the potatoes are very soft.
3. Fish out the thyme sprig and bay leaves, then purée the soup with a hand-held immersion blender until smooth. (Alternatively, use a standard blender to purée the soup in batches; see note.) Add the heavy cream and bring to a simmer. Taste and adjust seasoning with salt and pepper. If soup is too thin, simmer until thickened. If it's too thick, add water or stock to thin it out. Garnish with fresh herbs if desired.
Notes:
4. How to clean leeks: Cut off dark green portion of leaves. You can reserve these for stock. Some folks have told me they like to eat them but I find them to be a bit tough. You can slice the leeks in half lengthwise and then crosswise. Place into a bowl of cold water and swish them around. Soil and grit will fall to the bottom of the bowl. Strain.
5. If using a standard blender to purée the soup: be sure not to fill the jar more than halfway; leave the hole in the lid open and cover loosely with a dishtowel to allow the heat to escape; and pour blended soup into a clean pot.
6. Not peeling the potatoes will result in a more tannish colored soup.
7. Optional herbs for topping the soup – parsley, chives, thyme
8. Freezer-Friendly Instructions: The soup can be frozen, without the cream, for up to 3 months. Defrost the soup in the refrigerator for 12 hours and then reheat it on the stovetop over medium heat until hot. Once heated through, add the cream and bring to a simmer before serving.
Recipe Source: https://www.onceuponachef.com/recipes/potato-leek-soup.html
BRUSSELS SPROUTS MASHED TURNIPS WITH BACON
This has become a favorite dish for my sister and I. I like this not only as a side but as a main dish with a salad and/or soup.
Ingredients
1 pounds turnips, rinsed, peeled, and quartered
1 ½ tablespoons butter, divided
2 slices bacon, diced
1 small yellow onion, finely chopped
2 cloves garlic, minced
1 cup thinly shaved Brussels sprouts
1/3 cup heavy whipping cream
½ teaspoon salt
¼ teaspoon freshly ground black pepper
Directions
– Preheat oven to 350˚F.
– Lightly grease a 2-quart baking dish with cooking spray and set aside.
– Place quartered turnips in a large saucepan or stockpot; cover with water and add 1/4 teaspoon salt.
– Set the stockpot over medium-high heat and bring to a boil; continue to cook at a steady boil for 10 minutes, or until very tender.
– Drain the turnips; then, return them to the stockpot and set aside.
– In the meantime cook the diced bacon in a skillet set over medium heat. Cook until crispy, about 5 to 6 minutes.
– Using a slotted spoon, remove bacon from the skillet; do not discard the bacon grease. Set bacon aside.
– Set the skillet back over medium-high heat and add 1/2 tablespoon butter to melt.
– Add onions to the skillet and cook for 2 to 3 minutes, or until just starting to soften. Stir in garlic and cook for 20 seconds.
– Add shredded Brussels sprouts to the skillet and continue to cook for 4 minutes, or until tender. Remove from heat and set aside.
– Place heavy cream, tablespoon butter, salt, and pepper in a microwavable bowl or cup; microwave on HIGH for 1 to 1½ minutes, or until butter is melted and mixture is hot.
– Mash the turnips with a potato masher.
– Add the hot cream mixture to the turnips and continue to mash until combined and fluffy.
– To the turnips add the Brussels sprouts mixture and half of the bacon; stir to combine.
– Transfer turnip mixture to previously prepared baking dish.
– Bake for 20 minutes, or until lightly browned and crispy on top.
– Remove from oven; let stand 5 to 8 minutes.
– Top with reserved bacon crumbles.
Serve.
For more recipes check out our farm recipe blog: https://blackdirtrecipes.wordpress.com
Follow us on Instagram @yesifarm
Winter Share Week #2
We did it – made it through the winter solstice, December 21st, the shortest day of the year. I don’t know about you but this past season I have been particularly affected by the lack of daylight, which seems so foreign to me as I live my life by it. It had me thinking back to farmers of yore who between no electricity and the shorter natural day light thrived in those dark days of winter. The changing light gives so much to celebrate and for my family we will do so with our traditional Polish meal, the Wigilia, this Christmas Eve evening. Beginning with the breaking of the oplatek and then on to pierogis, borscht, mushroom soup, sauerkraut, stewed prunes, fish, sledzi (herring), Kasha (Buckwheat), potatoes and caramelized onions. Finished off with chrusciki and polish tea cakes. What is not traditional is that we will not have the whole family at the same table but in spite of this we will celebrate this Christmas Eve with our old family customs and create new memories to cherish this special time together!!! Wishing you all the best!! Happy Holidays!!
VEGETABLE — Rose Finn Apple Potato
The Rose Finn Apple potato is an heirloom English spud in cultivation since the 1840’s, and was little known in America until recently. It has a distinctive pink thin skin and yellow flesh. The taste of Rose Finn has often been described as “unique” with modifiers such as “nutty” or “fruity.” The organic gardening pioneer Alan Chadwick was very fond of Rose Finns and supposedly smuggled them into America so he could begin planting them.
OVEN ROASTED FINGERLING POTATOES WITH PARMESAN & FRESH HERBS
Ingredients
1 lb Fingerling potatoes, washed and cut in half lengthwise
1/8 c Olive oil
1/8 c All purpose flour
1/8 c Reggiano parmesan cheese, grated
1/2 tsp Sea salt, fresh ground or regular table salt
1/2 tsp Black pepper, fresh ground
sprigs Fresh rosemary and thyme, a few sprigs to taste
(try this with a clove of garlic and other herbs if you like)
Directions
– Preheat oven, (rack toward the top), to 475 degrees fahrenheit.
– In a small glass bowl, (or in a large plastic bag), measure in olive oil, flour and parmesan. Add salt and pepper. Stir or shake to mix well.
– In a large bowl, toss cut fingerlings with 1 tbs olive oil to lightly coat. Add dry mix to the large bowl, (or add potatoes to the large plastic bag), and toss with hands, (or shake bag). Be sure the potatoes are thoroughly and evenly coated.
– Coat an oven-to-table baking dish with the remaining olive oil and arrange the potatoes cut -side up. Sprinkle with fresh rosemary and thyme.
– Roast for approximately 15 minutes, Turn the potatoes and roast for approximately 15 more minutes more. Turn one last time and roast until crisp and golden brown, (approximately 10-15 more minutes).
– Cool dish for a few minutes, garnish with a few more sprigs of herbs and serve hot with a tablespoon of sour cream if you like.
Recipe Source: http://www.thegardenerseden.com/tag/rose-finn-apple-fingerling-potatoes/
ROSEMARY ROASTED FINGERLING POTATOES
Fingerling potatoes dusted with rosemary and roasted on a cast iron pan for a crisp, yet slightly chewy texture to serve with dips, appetizers, or fondue.
Author: Judy Purcell
Ingredients
1 pound fingerling potatoes -- sliced in half (larger potatoes quartered lengthwise)
1 – 2 Tablespoons avocado oil (or duck fat, coconut oil)
1 heaping teaspoon dried rosemary crushed or chopped
½ teaspoon dried thyme
½ teaspoon sea salt plus more for dusting before serving
½ teaspoon freshly ground black pepper
Directions
1. Heat oven to 400°F.
2. In a large bowl, toss the halved potatoes with enough oil to thinly coat. Sprinkle the herbs, salt and pepper over the potatoes and toss again to evenly cover.
3. Arrange on a cast iron pizza stone or rimmed baking sheet and bake 20 to 30 minutes, until golden brown. For more even browning, turn the potatoes over on the pan halfway through the roasting process.
4. Remove from the oven and season again with sea salt, to taste. Serve warm with dipping sauce.
Recipe Source: https://savoringtoday.com/rosemary-roasted-fingerling-potatoes-gochujang-aioli/
GOCHUJANG AIOLI
The savory, earthy spice of this unique red chile paste blends seamlessly with the subtle garlic notes of aioli. Use as a dip, garnish or sandwich spread.
Author: Judy Purcell
Ingredients
1 large whole *egg
1 large egg yolk
1 ½ tablespoons lemon juice
2 teaspoons gochujang chile paste
1 teaspoon Dijon Mustard
1 teaspoon minced garlic – about 1 clove
¼ teaspoon sea salt
¾ cup avocado oil or olive oil
Directions
1. If using an immersion blender: Add all ingredients to a tall (6-inch) cup or jar large enough at the base for the blender to fit with at least an inch of space around the blender. Immerse the blender in the ingredients in the jar, using the blender to gently lift and stir while processing on high until well blended and creamy.
2. If using a food processor: Add all ingredients except oil to food processor bowl and pulse to combine. Then, while the machine is running, slowly pour oil in a steady stream while processing until well blended and creamy.
3. Taste and add more chile paste or salt, as desired.
Notes
– *Raw egg is not recommended for infants, the elderly, pregnant women, and people with weakened immune systems. To minimize the risk of salmonella, use pasteurized eggs available in some supermarkets or easily pasteurize eggs at home.
– Although a food processor does a fine job, an immersion blender is ideal and foolproof as the ingredients can all go in together so "slowly adding the oil" isn't necessary.
– The aioli will thicken even more when refrigerated. Use within one week.
Recipe Source: https://savoringtoday.com/rosemary-roasted-fingerling-potatoes-gochujang-aioli/
For more recipes check out our farm recipe blog: https://blackdirtrecipes.wordpress.com
Follow us on Instagram @yesifarm
Winter Share Week #1
How fitting that we begin the winter share with a blizzard! For us they are predicting about 15” of snow mostly during the night. There’s an anticipation in the air – you can feel the moisture and soon you’ll be able to smell the snow as it encroaches. We’ve already begun preparing and have stocked up on firewood, salt and extra fuel for the greenhouse. Made sure the snow shovels are close at hand. Searching for my insulated bibbed overalls and found my favorite snow shoveling gloves. And at the same time looking forward to the wonderland that will show itself in the morning!!
ROASTED ROOT VEGETABLES
You can’t go wrong with a sheet pan of roasted vegetables. The recipe is pretty much always the same. Peel (optional depending on the vegetables) cut (small dice for a hash, bigger for a simple side, in between for a salad topper), toss with olive oil, salt and pepper. Roast at high heat (I set my oven at 400-425 degrees). Serve!
Some tips:
– If you are roasting multiple varieties keep in mind that not all vegetables are alike and may require different cooking times. Unless I am looking to accomplish something specific this doesn’t bother me as I like the varying textures. So either keep the vegetables separate on the pan or roast on individual pans.
– If you like those crispy charred edges like I do keep the vegetables separated so there is space around each piece.
– A drizzle of balsamic vinegar can turn these roasted vegetables into an amazing salad!
PARMESAN-CRUSTED CRUSHED TURNIPS
Ingredients
About 6 medium turnips, peeled ( I peel mine with a potato peeler)
Salt
2 tablespoon olive oil
3 cloves garlic, minced
Freshly ground black pepper
1 cup freshly grated Parmesan cheese (or as needed)
Chopped fresh parsley
Directions
– Place peeled turnips in a pot of salted water to cover. Bring to a boil. Cook 20 to 30 minutes or until turnips can be pierced easily with a paring knife. Drain. Let cool slightly.
– Preheat oven to 375 degrees.
– Place the turnips on a clean kitchen towel or double layer of paper towels. Gently press each one down until it's approximately 1/2-inch high. Let them drain for 15 minutes then carefully flip them over onto a dry section of the towel or onto fresh paper towels so the other side drains and dries a bit.
– Combine garlic, olive oil and salt and black pepper, to taste in a small bowl.
– Line a baking sheet with parchment paper or nonstick aluminum foil. Place the flattened turnips on the lined baking sheet. Brush each turnip with a little of the olive oil and garlic combination. Sprinkle Parmesan cheese over each turnip, gently pressing it down.
– Carefully and quickly flip each turnip over. Repeat with the remaining olive oil and garlic combination and then the cheese.
– Bake for 20 to 25 minutes. Flip each turnip and bake an additional 15 minutes. Garnish with chopped fresh parsley and serve.
Notes:
TO MAKE IN THE INSTANT POT:
• Place the rack inside your 6-quart Instant Pot and add 1 1/2 cups water. If using the 8-quart, use 2 cups.
• Peel the turnips and place them on the rack.
• Close and lock the lid.
• Using the "Steam" setting, steam whole medium turnips for 5-6 minutes with natural release, small turnips for 3-5 minutes with natural release. THE COOKING TIME WILL DEPEND UPON THE SIZE OF THE TURNIPS.
MAKE AHEAD: The turnips can be boiled and crushed up to a day in advance. Leave on the towel and refrigerate.
Source: https://www.fromachefskitchen.com/parmesan-crusted-crushed-turnips/
PUMPKIN STEW
Ingredients
2 pounds beef stew meat, cut into 1-inch cubes
3 tablespoons canola oil, divided
1 cup water
3 large potatoes, peeled and cut into 1-inch cubes
4 medium carrots, sliced
1 large green pepper, cut into 1/2-inch pieces
4 garlic cloves, minced
1 medium onion, chopped
2 teaspoons salt
1/2 teaspoon pepper
2 tablespoons beef bouillon granules
1 can (14-1/2 ounces) diced tomatoes, undrained
1 sugar pumpkin
Directions
• In a Dutch oven, brown meat in 2 tablespoons oil. Add water, potatoes, carrots, green pepper, garlic, onion, salt and pepper. Cover and simmer for 2 hours. Stir in bouillon and tomatoes. Wash pumpkin; cut a 3 to 4 in. circle around top stem. Remove top and set aside; discard seeds and loosen fibers from inside.
• Place pumpkin in a shallow sturdy baking pan. Spoon stew into pumpkin and replace top. Brush outside of pumpkin with remaining oil. Bake at 325° for 2 hours or just until the pumpkin is tender (do not overbake). Serve stew from pumpkin, scooping out a little pumpkin with each serving.
Source: https://www.tasteofhome.com/recipes/pumpkin-stew/
CINNAMON APPLE TURNIP SOUP
Yield: Serves 4
Ingredients
2 tablespoons extra virgin olive oil, plus more for serving
1 medium onion, peeled and chopped
2 cloves garlic, smashed
1 – 1 ½ pounds turnips, peeled and diced
1/2 pound Granny Smith apples (2 or 3) peeled and diced, plus more for serving
2 tablespoons packed dark brown sugar
1 1/2 teaspoons kosher salt
3/4 teaspoon freshly ground black pepper
3/4 teaspoon cinnamon, plus more for serving
1/8 teaspoon cayenne pepper (optional)
4 cups low-sodium chicken or vegetable stock
2-4 tablespoons heavy cream, plus more for serving
Directions
Heat the oil in a large pot over medium-high heat. Add the onion and garlic and sauté until the onion is translucent, 4 to 5 minutes. Add the turnips, apples, sugar, salt, pepper, cinnamon, and cayenne and sauté until fragrant, about 2 minutes. Add the stock and bring to a boil. Reduce the heat, partially cover the pot, and simmer until the turnips and apples are fork-tender, about 20 minutes. Remove from the heat and puree the soup with an immersion blender (or in batches in a regular blender). Stir in the cream. Top with a drizzle of olive oil and cream, some chopped apples, and a sprinkle of cinnamon before serving.
Source: http://turniptheoven.com/cinnamon-apple-turnip-soup/
For more recipes check out our farm recipe blog: https://blackdirtrecipes.wordpress.com
Follow us on Instagram @yesifarm
Fall Share Week #13
Well here we are — the final fall distribution. On behalf of all of us here I want to express our gratitude for your support and participation in our farm. You have made such a difference to us, every week our farmers are so excited to prepare your vegetables for you. So as the daylight continues to decrease our excitement continues to increase as we think of each of you with gratitude and wish you all the best!
VEGETABLES — Potatoes, Leeks, Kale
POTATO & LEEK GRATIN
Made this for dinner for my sister and I last week, we both decided this one is a keeper!! Leftovers were for breakfast the next morning with poached eggs and a side salad, so, so good!!!
Ingredients
2 1/2 cups whole milk
1 1/2 pounds Yukon Gold potatoes, peeled and very thinly sliced (Mandolin works great for this)
2 garlic cloves, smashed
1 tablespoon unsalted butter
1 large leek, trimmed, halved lengthwise, and sliced (about 2 cups)
1 teaspoon kosher salt, divided
2 ounces Gruyère cheese, shredded (about 1/2 cup)
1 ounce Parmesan cheese, grated (about 1/4 cup)
1/2 teaspoon freshly ground black pepper
Directions
– Preheat oven to 375°F.
– Combine milk, potatoes, and garlic in a large saucepan; bring to a boil. Reduce heat and simmer 5 minutes or until potatoes are almost tender. Drain in a colander over a bowl, reserving 1/2 cup milk mixture.
– Melt butter in a 10-inch cast-iron skillet over medium heat. Add leek; cook 8 minutes or until tender, stirring occasionally.
– Remove pan from heat; place leek mixture in a bowl. Arrange half of potato slices in a single layer in bottom of skillet or a gratin dish; top evenly with half of leek mixture. Sprinkle with 1/2 teaspoon salt and 1/4 cup Gruyère cheese. Repeat layers with remaining half of potatoes, remaining half of leek mixture, remaining 1/2 teaspoon salt, and remaining 1/4 cup Gruyère. Drizzle with reserved 1/2 cup milk mixture; sprinkle with Parmesan.
– Cover pan with foil; bake at 375°F for 25 minutes or until cheese melts.
– Remove foil from pan. Turn on broiler (do not remove pan from oven). Broil 5 minutes or until bubbly and golden brown.
– Remove pan from oven, and sprinkle with pepper; cool. Cut into 10 wedges.
Notes from Cheryl: I didn’t peel my potatoes and you could use shallots or onions in addition or in place of the leeks. A sprinkle of parsley or chives can be added, if you want to play!!
Recipe Source: https://www.cookinglight.com/recipes/potato-leek-gratin
POTATO SAUSAGE & KALE SOUP
This was dinner last night and it was the perfect choice for a chilly snowy day. See end of recipe for suggestions and changes.
Ingredients
· 3/4 pound Italian sausage links
· 3 thick slices bacon, diced
· 3 tablespoons butter
· 1 large onion, chopped
· 1 cup sliced carrots
· 1 tablespoon fresh thyme
· 1 clove garlic, finely minced
· 3 bay leaves
· 1/4 cup all-purpose flour
· 4 cups vegetable stock
· 4 cups diced potatoes
· 1 1/2 to 2 cups chopped kale
· 2 tablespoons chopped parsley
· 1 cup heavy cream
· 1 teaspoon kosher salt (or to taste)
· Freshly ground black pepper (to taste)
· Optional Garnish: Shredded or grated Parmesan cheese
Directions
– With a fork, prick the sausages in several places. Place in a medium pot. Add water to cover and bring to a boil over high heat. Reduce the heat to low, cover the pan, and cook the sausages for about 20 minutes. Remove the sausages to a cutting board and slice them thinly. Set aside.
– Put the diced bacon in a Dutch oven or large pot over medium heat; cook until it is crisp and browned, turning and stirring frequently. Remove the bacon to paper towels to drain.
Remove all but 1 tablespoon of the bacon drippings from the pot. Add the butter to the pot and place it back over medium heat. When the butter has melted, add the chopped onion and sliced carrots. Cook until the onions are tender, stirring frequently. Add the thyme, bay leaves and garlic and continue cooking for 1 minute longer, stirring constantly.
Add the flour to the pot and stir to blend. Continue cooking for about 2 minutes, stirring constantly. Flour will cling to the vegetables and seemingly disappear from the pan this is a good thing.
– Add the vegetable stock and bring to a boil, stirring frequently. Cover the pot and reduce the heat to low; simmer for 10 minutes.
– Add the reserved browned sausage slices and potatoes; cover and cook for 15 minutes longer. Add the kale; cover and cook for 5 to 10 minutes longer, or until the vegetables are very tender.
– Add the heavy cream to the soup and stir to blend. Taste and add salt and pepper, as needed. Continue cooking until the soup is hot.
– Crumble the reserved bacon over the soup and garnish with cheese, if desired. Serve the soup with crusty bread or croutons
Notes from Cheryl: You can substitute turkey or chicken sausage, kielbasa for the Italian sausage, Use chorizo or hot Italian sausage for a bit of heat. As usual I didn’t peel my potatoes. Keep an eye on the consistency, I needed to add another quart of stock to keep it soup like but I didn’t really measure so I probably had way more veg than the recipe called for. The caveat being this would make an awesome stew so taste, and see how “soupy” you want it. I forgot to put the bacon on top and it was fine. If you’re looking for a “kick” add some red pepper flakes. No kale? Spinach, swiss chard or escarole work wonderfully here!
Recipe source: https://www.thespruceeats.com/sausage-and-potato-soup-with-kale-3059798
For more recipes check out our farm recipe blog: https://blackdirtrecipes.wordpress.com
Follow us on Instagram @yesifarm
Fall Share Week #12
I’m feeling like Christmas, seed catalogues are pouring into the mailbox and notices of new varieties and special “you must grow this” notices are filling up my email. I’m making my own lists of “have to remember” and a wish list of new-to-us seeds and plants to grow this coming season. It seems crazy to be focusing on next year when this one isn’t done yet, if we want to get the seeds/plants of our choice we have to be early or miss the boat. Some of my seeds come from Italy and one of my seed companies had to shut down early last year due to inability to get his orders into this country. Another of my seed companies had been impacted by the fires out West and temporarily closed. Other seed companies I source from had to shut down websites and stopped answering phone calls last year as they were unable to keep up with the orders from farmers and gardeners that were pouring in. So much of this was attributable to the virus. Fortunately things seem to be resolving themselves, the seeds from Italy should arrive any week now, our other seed companies have figured out how to deal with COVID and their respective operations. And the Western seed company impacted by the fires has combined resources with a sister company to keep us growing.
VEGETABLE — Koginut Squash
Koginut Squash was just “created” a couple of years ago as a collaboration between Dan Barber (of Blue Hill and Stone Barns) and Michael Mazourek a seed breeder. A cross of butternut and kabocha it produces a flavor that’s mildly sweet, buttery with a smooth, creamy texture. The skin is edible as well as the seeds. *From the website, row 7 seed company: Robin’s Koginut was named in memory of our friend Robin Ostfeld, a collaborator on the project and guru of organic farming in the Finger Lakes who had always wanted to name a new variety.
I prefer it roasted at 400-425°F with olive oil, salt and pepper. ou can add maple syrup, honey or brown sugar to taste but I find the natural sweetness to be enough.
ROASTED KOGINUT SQUASH SALAD
Ingredients
· 1 koginut squash
· 2 tablespoons avocado oil
· 1 teaspoon Kosher salt
· 1/2 teaspoon black pepper
· 1/2 teaspoon cinnamon
· 1/2 teaspoon garlic powder
· 1 tablespoon maple syrup
· 3/4 pound Brussels sprouts, trimmed and thinly sliced
· 1/4 cup pecan halves
· 2 tablespoons pomegranate arils
For the Dressing
· 1 tablespoon extra virgin olive oil
· 1 shallot, minced
· 1/4 cup apple cider
· 1 tablespoon apple cider vinegar
· 1 tablespoon maple syrup
· salt and pepper to taste
Directions
1. Preheat the oven to 425°F. Grease or line a baking sheet with parchment paper or a silicone baking mat.
2. Slice the squash in half lengthwise. Remove the seeds then slice into wedges about 1/3"-1/2" thick. Place on the prepared baking sheet.
3. Drizzle the squash with the avocado oil then season with salt, pepper, cinnamon and garlic powder. Drizzle the maple syrup evenly on top of the squash slices then roast for 35-40 minutes flipping each piece halfway through roasting. Squash should be fork tender and caramelized along the edges when done.
4. While squash roasts, place the sliced Brussels sprouts in a large bowl.
5. Make the dressing by adding the olive oil and shallots to a small skillet over medium heat. Sauté until shallots are softened, about 3 minutes. Add the apple cider, apple cider vinegar, maple syrup, salt and pepper. Stir together and bring to a high simmer. Cook for 1-2 minutes until flavors are melded together.
6. Pour the hot dressing into the bowl with the Brussels sprouts and toss until well combined.
7. Add the pomegranates and pecans to the bowl, toss and transfer to a serving bowl/platter.
8. When the squash is done roasting, arrange slices on top of the salad. Season to taste with additional salt and pepper and serve warm.
Recipe source: https://www.runningtothekitchen.com/roasted-koginut-squash-salad/
SIMPLE KALE & POTATO SOUP
YIELD: Serves 1 generously or 2 modestly
Ingredients
· 1 medium (8 ounce) yellow or russet potato, scrubbed clean and chopped
· 1 clove garlic, minced
· 1/2 teaspoon kosher salt
· 2 cups vegetable stock, chicken stock, or water
· 1/2 bunch kale (6 to 8 big leaves), preferably dino, lacinato, or Tuscan
· 1 teaspoon lemon juice or cider vinegar
· 1 to 2 large eggs, depending on your appetite
· Salt and pepper
· Grated Parmesan cheese, extra-virgin olive oil, or yogurt, to serve
Directions
1. Combine the chopped potato, garlic, salt, and stock (or water) in a medium saucepan over medium-high heat. Bring to a boil, then reduce the heat to simmer.
2. While the potatoes start to cook, chop the kale. Remove any thick, tough stems and chop them into small pieces. Add the chopped stems to the pot with the potatoes and simmer for 2 minutes.
3. Stack the leaves of kale on top of each other. Slice them crosswise into thin ribbons, and add them to the pot with the potatoes and kale stems. If necessary, add more stock or water to the pot to just about cover the kale.
4. Cover the pot and let the soup cook for 8 to 10 minutes. The soup is ready when the potatoes are easily pierced with a fork, and when a ribbon of kale has become tender, but has not yet become stringy or pulpy. Stir in the lemon juice or vinegar. Taste and season with more salt and fresh cracked pepper. Also add more stock or water if a more brothy soup is desired.
5. To finish, crack the eggs into measuring cups, and then gently slide them into the soup. Ladle some of the soup broth on top of the eggs to submerge them. Put the lid back on the pot and cook for 4 minutes. When done, the whites of the eggs should be opaque, but the yolk should still be soft. If the eggs break into the soup before they are poached, just use a fork to swirl them into the soup, like egg drop soup.
6. Carefully spoon the eggs into a soup bowl. Ladle the soup on top. Finish with a sprinkle of Parmesan cheese, a drizzle of olive oil, or a spoonful of yogurt.
RECIPE NOTES
· If you have extra time, enrich your soup by sautéing some chopped onions, celery, or carrots before adding the potato and broth, or by adding cooked bacon or sausage. You can also flavor your soup with a few sprigs of fresh oregano or thyme.
· Serving More Than One: This soup can, of course, be multiplied to serve several people. If poaching more than three eggs, I recommend poaching them in a separate pot before adding them to individual bowls.
Recipe Source: https://www.thekitchn.com/recipe-simple-kale-potato-soup-weeknight-dinner-recipes-from-the-kitchn-13802
For more recipes check out our farm recipe blog: https://blackdirtrecipes.wordpress.com
Follow us on Instagram @yesifarm
Fall Share Week #11
How different Thanksgiving will be this year. This is my holiday, I love it for the opportunity it provides me to cook for my family and show my appreciation for all they do and because I love them so! Our farmers who are so dedicated and without whom we wouldn’t have the amazing crops we do. Our customers who support us in so many ways and give us fortitude to keep going forward especially when you’re having “one of those growing seasons.” To all those folks who toil behind the scenes on our behalf so that we can get our produce to the CSA and farmers markets. Instead of my family coming here for Thanksgiving Day dinner I will be dropping off Mom’s stuffing, cranberry sauce and a whole bunch of other goodies to my brother and Sister-in-law. I will somehow restrain myself to cooking for two which on an eating holiday like this is darn near impossible for me. But most of all I will be giving thanks—thanks for you who are a huge part of my life and enable me to do what I love each and every day!
VEGETABLE – Sweet Potatoes
Sweet Potatoes can be notoriously hard to cut. Here are some hints on how to make it easier:
Peeling the sweet potato is optional, I like the peel and don’t remove it but again this is personal preference. Cut off the ends and then cut a lengthwise strip from the potato. Doing this will give you a stable surface to do your other prep work. Place the potato on your cutting board with the “flat side” down. The rest depends on your recipe and how you need the potato cut. I’ll cut them into a small dice, roast them with oil, salt, pepper and use them for a salad topping, as a side with my eggs, or just like that for a tasty snack!
ROASTED SWEET POTATOES — 2 WAYS:
ROASTED SWEET POTATOES (PLAIN)
Ingredients
1 pound sweet potatoes peeled and cut into 1/2-inch pieces
1 tablespoons melted coconut oil
¼ teaspoon fine sea salt (kosher salt; use less if using table salt)
½ tablespoon light brown sugar, lightly packed
Directions
Preheat the oven to 425 degrees F. Peel and cube the sweet potatoes into 1/2 inch pieces. Add to your largest sheet pan and add the melted coconut oil, salt, and brown sugar on top. Toss to coat all the sweet potatoes and then spread out to arrange in an even layer. You don't want any potatoes overlapping or you'll end up with steamed potatoes instead of roasted potatoes. Flip every 10-15 minutes cooking for a total of 27-35 minutes. (I flip every 10 minutes and bake around 30 minutes)
Recipe Source: https://www.chelseasmessyapron.com/roasted-sweet-potatoes/
SEASONSONED ROASTED SWEET POTATOES
Ingredients
1 pound sweet potatoes, peeled and cut into 1/2-inch pieces
1 tablespoons olive oil
¼ teaspoon fine sea salt (kosher salt; use less if using table salt)
1/8 teaspoon freshly cracked pepper
1/4 teaspoon ground chili powder*
1/4 teaspoon paprika
1/4 teaspoon ground cumin
1/4 teaspoon garlic powder
Directions
Preheat the oven to 425 degrees F. Peel and cube the sweet potatoes into 1/2 inch pieces. Add to your largest sheet pan and add the olive oil, salt, pepper, chili powder, paprika, cumin, and garlic powder on top. Toss to coat all the sweet potatoes and then spread out to arrange in an even layer. You don't want any potatoes overlapping or you'll end up with steamed potatoes instead of roasted potatoes. Flip every 10-15 minutes cooking for a total of 27-35 minutes. (I flip every 10 minutes and bake around 30 minutes)
RECIPE NOTES
*Use chipotle chili powder and/or smoked paprika for a smokey flavor. If you want to make your sweet potatoes even spicier, add 1/8 to 1/4 teaspoon cayenne pepper.
Recipe Source: https://www.chelseasmessyapron.com/roasted-sweet-potatoes/
For more recipes check out our farm recipe blog: https://blackdirtrecipes.wordpress.com
Follow us on Instagram @yesifarm
Fall Share Week #10
I wish you could see the fields now. As full and lush with vegetables as they were in the summer and fall, now they are black, dark and rich as they get ready to sleep for the winter until spring beckons and once again we bury our hands in that luscious, soft soil. The other night I found a pile of seed catalogs from this season and started to poke around them. They’ve got me dreaming of the next growing season already!
VEGETABLE — Brussels Sprouts
Before you nay-sayers go eew, Brussels sprouts are pretty amazing – I like them pickled, shaved raw in a salad and especially roasted with some olive oil, salt and pepper. I pretty much have to hide them from sister or she will eat the whole sheet pan and leave me nada!!!
SAUTÉED BRUSSELS SPROUTS
Ingredients
1/2 pound Brussels sprouts trimmed and halved
1 tablespoons extra virgin olive oil
¼ teaspoon kosher salt
1/8 teaspoon black pepper
½ tablespoon balsamic vinegar or lemon juice
½ to 1 tablespoons raw pine nuts or chopped raw walnuts, almonds, or pecans (optional)
Chopped fresh herbs like parsley cilantro or mint (optional)
A handful of Parmesan feta, or goat cheese (optional)
Directions
– Heat a large cast iron or similar sturdy bottomed skillet over medium high for 4 minutes. Add the oil. As soon as the oil is hot and shining (but before it starts smoking), swirl to cost the pan, then add the halved Brussels sprouts. Shake the skillet a little and prod them so that as many as possible are cut-side down. Let sit completely undisturbed for 5 to 8 minutes, until they develop a dark, tasty, caramelized sear.
– Add the salt and pepper. With a wooden spoon or spatula, stir the Brussels sprouts. Continue cooking, stirring every few minutes, until the Brussels sprouts are browned all over and just turning tender inside, about 6 to 8 additional minutes.
– Remove the pan from the heat. Stir in the vinegar, then the pine nuts or almonds. Let the residual heat of the skillet toast the nuts, stirring them very often so that they toast evenly on all sides and do not burn (if they aren’t toasting, return the skillet to low heat). As soon as the nuts are toasted, transfer the sprouts to a serving plate and sprinkle with fresh herbs. Enjoy hot.
Recipe Source: https://www.wellplated.com/sauteed-brussels-sprouts/
CAESAR SHAVED BRUSSELS SPROUTS SALAD WITH CRISPY CHICKPEA CROUTONS
Servings: 3–4 servings, about 4 cups
Ingredients
Roasted Chickpea Croutons
1 1/2 cups cooked chickpeas or 1 15-ounce can low-sodium chickpeas
1/2 tablespoon extra-virgin olive oil
1/2 teaspoon garlic powder
1/2 teaspoon kosher salt
1/8 teaspoon cayenne pepper optional
Shaved Brussels Sprouts Salad
1/4 batch Homemade Caesar Dressing*
1/2 pounds Brussels sprouts
1 ½ tablespoons finely ground Parmesan cheese or 1/8 cup shredded Parmesan
Freshly ground pepper
Directions
– Place a rack in the center of your oven and preheat the oven to 375 degrees F. Rinse and drain the chickpeas; lay them on a double layer of paper towels and dry them as much as you can. Transfer the dried chickpeas to a baking sheet and drizzle with the olive oil. Sprinkle with garlic powder, salt, and cayenne (if using). Toss to combine, then spread into an even layer. Bake for 30 to 40 minutes until brown and crispy, shaking the pan once or twice throughout. Set aside to cool.
While the chickpeas are roasting, make the Caesar dressing.
– For the fastest possible shredding, cut the end of the bottom off of the Brussels sprouts, then shred them using a food processor slicing blade. Alternatively, you can carefully slice the Brussels sprouts with a mandolin, taking care to watch your fingers. I recommend holding the stem, slicing from the top, and discarding the bottom stem. If you do not have a food processor or a mandolin, you can use a sharp chef's knife: remove the stems and any wilted outer leaves, then slice the sprouts into very thin ribbons. For all methods: once the Brussels sprouts are sliced, place the shreds in a bowl, then toss and fluff them with a fork or your fingers.
– Add half of the chickpeas, two-thirds of the dressing, and Parmesan to the bowl. Toss to evenly moisten, then add a little extra dressing as desired. Taste and season with black pepper as desired. Sprinkle with the remaining chickpeas. Serve immediately or refrigerate for up to 4 hours.
Notes & Tips:
– This salad tastes even better if it sits for a few hours. You can make it up to 1 day ahead for a party. I recommend lightly moistening it with half the desired amount of dressing, then adding the remaining dressing right before serving. I also recommend storing the chickpeas separately and adding them just before serving so that they stay extra crisp.
– Make the chickpeas up to 1 day in advance. Store in an airtight container at room temperature.
– Leftover salad can be stored in the refrigerator for up to 3 days. I recommend waking it back up with a squirt of lemon juice and an extra drizzle of Caesar dressing.
– Dressing tip: You'll only need about half of the full amount of the homemade Caesar dressing. I ended up making a whole batch, then using the extra with the leftover salad and throughout the week.
Recipe Source: https://www.wellplated.com/shaved-brussel-sprouts-salad-caesar/
CAESAR DRESSING
An easy, healthy recipe for homemade creamy Caesar dressing made with Greek yogurt. It comes together in minutes and tastes so much better than store-bought!
Ingredients
3/4 cup non-fat plain Greek yogurt
1/2 cup freshly grated Parmesan cheese
3 tablespoons extra-virgin olive oil
3 tablespoons freshly squeezed lemon juice
1 1/2 teaspoon anchovy paste or 2 anchovy fillets
1 1/2 teaspoons Dijon mustard
1 large garlic clove
Directions
– Place all ingredients (Greek yogurt, Parmesan, olive oil, lemon juice, anchovy, mustard, and garlic) in a blender or food processor.
– Puree until smooth and emulsified.
Notes: Store in an airtight jar or container in the refrigerator for up to 1 week. Shake or mix gently before serving. A while back I invested in a mini mandolin, like the one mentioned below. It is great for shaving Brussels sprouts and slicing garlic into paper thin shards (taking care to watch your fingers!)
”Joseph Joseph Handi-Grate 2-in-1 Grater & Slicer”
For more recipes check out our farm recipe blog: https://blackdirtrecipes.wordpress.com
Follow us on Instagram @yesifarm
Fall Share Week #9
Holy cow is this weather crazy. From freezing conditions, rain and ice Friday night and Saturday morning to Sunday ending with drenching cold rain. Monday fierce, fierce winds and sooo cold, I started a fire in the fireplace to warm up the living room. Today the forecast is in the high 60s from now and through the weekend. Meanwhile the farmers are keeping busy cleaning squashes. Seems like we just brought them in from the fields and now we’re gutting, cleaning and putting a bunch up in the freezer for January and February! We’re also cleaning and sorting seeds we glean from them for planting next spring. I was reading an article the other day about how many folks think the garden planning starts in May or June but in reality we’re already thinking now of how we want the farm to grow next season. I can’t wait!!!!
VEGETABLE — Acorn Squash, Chilies
ROASTED ACORN SQUASH WITH PECAN VINAIGRETTE
This hearty fall salad combines the flavors of roasted squash, creamy goat cheese, warm farro, and an easy pecan vinaigrette to make a power-lunch salad.
Ingredients for Squash
1 small acorn squash
1 tablespoon olive oil
1/4 teaspoon sea salt
Ingredients for dressing
1/2 cup pecan pieces
1/4 cup olive oil (or pecan oil, if available)
2 tablespoons apple cider vinegar
1 tablespoon maple syrup
1/4 teaspoon sea salt
Ingredients for salad
3 to 4 handfuls baby spinach
1 1/2 cups cooked farro
1 medium shallot, thinly sliced
1 ounces crumbled goat cheese
Directions
Preheat oven to 425˚F. Slice a small part of one of the sides of the squash to create a base. Trim the ends from the squash, cut it in half lengthwise and scoop out the insides. Place the cut-sides down and cut the squash into ¼” thick slices. Place on a sheet tray and toss with olive oil and salt. Roast until the squash and peels are tender, 30 to 40 minutes.
While the squash is roasting, heat a small skillet over medium heat. Add the pecans and toast, shaking the pan, until the nuts are fragrant. Transfer 1/3 cup of the pecans to a bowl and save the remaining pecans to use as a topping. Add the olive oil, vinegar, maple syrup, and salt while the nuts are still warm. Stir vigorously and set aside.
In a large bowl combine the spinach, cooked farro, shallot, half the squash, and half the dressing. Toss to combine the salad then lay the remaining squash on top of the salad. Drizzle with remaining dressing and sprinkle with goat cheese and remaining toasted pecans before serving.
Tips & Tricks: Acorn squash skin is edible but needs to be roasted long enough to make it tender. If you’re unsure, switch to using delicata squash or butternut squash (without the skin).
Stock up: get the pantry ingredients you will need: pecans, acorn squash, farro
Cheryl’s notes – you can sub out walnuts or hazelnuts for the pecans and other grains will work nicely if you don’t have farro.
Recipe Source: https://naturallyella.com/roasted-acorn-squash-salad/
CHILI VINEGAR
Ingredients
7 red or green chilies
8 garlic cloves, thinly sliced
1 1½" piece ginger, peeled, thinly sliced
2 cups distilled white vinegar
1 Tbsp. sugar
1½ tsp. kosher salt
Special Equipment: A heatproof 1-qt. jar
Directions
Place chilies, garlic, and ginger in a jar. Bring vinegar, sugar, and salt to a boil in a medium saucepan, stirring to dissolve sugar and salt. Pour hot brine into jar; let cool 30 minutes. Cover and chill at least 4 hours before using.
Do Ahead: Garlic-chile vinegar can be made 4 weeks ahead. Keep chilled.
Recipe Source: https://www.bonappetit.com/recipe/garlic-chile-vinegar
For more recipes check out our farm recipe blog: https://blackdirtrecipes.wordpress.com
Follow us on Instagram @yesifarm
Fall Share Week #8
Finally got all the potatoes harvested! Sweet potatoes are curing and now it’s time to grade, clean, and sort the winter squashes. Lupe has been shelling beans and we’ve been drying seeds for next year's season. The pace has definitely slowed a bit and we can all breathe a little more easily. Soon seed catalogues will begin arriving and it will be time to start planning and dreaming about next season's crops ...
VEGETABLE — Sugar Pumpkin & Pumpkin Seeds
Sugar Pumpkins also known as pie pumpkins or sweet pumpkins, are smaller and less fibrous than the larger pumpkins commonly used for jack-o-lanterns. Part of the winter squash family, they are prepared in similar ways. Once cooked their texture becomes creamy and their flavor works well with sweet or savory ingredients—and don’t throw away those seeds!! Roasted, they make a tasty snack.
SIMPLE ROASTED SUGAR PUMPKIN
Preheat the oven to 350 degrees. Cut the pumpkin in half from top to bottom. Scoop out the seeds and fibers, set the seeds on the side for now. Place the pumpkin cut side down on a sheet pan. You can keep the pumpkin halves whole or slice into wedges. Roast for about 30-45 minutes until tender when poked with a fork. Once done, pull from the oven, let cool, and scrape flesh from the skin. This is the most basic way to roast a pumpkin or winter squash. If you know how you’re going to use it before roasting, you can go savory and drizzle it with olive oil, salt and pepper. Sweet? Drizzle with honey, maple syrup, or brown sugar.
Pumpkin Seeds
The easiest way to clean them is to toss them into a colander and run some warm water on them. Then strain the seeds through your hand as you detach them from the orange strings.
ROASTED PUMPKIN SEEDS
Ingredients
1 cup pumpkin seeds
1 tablespoon oil
1/2 teaspoon salt
1/2 teaspoon cumin, curry powder, cayenne, or black pepper (optional)
Directions
Preheat the oven to 350 F. Line a rimmed baking sheet with tin foil. Remove strings from pumpkin seeds and put in a small bowl. Dry with a paper towel and mix in oil, salt, and spices. Put the seeds on a baking sheet and roast for 20 minutes (or until golden brown). Toss seeds after about 10 minutes to cook evenly (or you can skip it).
Recipe source: https://www.thekitchn.com/how-to-roast-pumpkin-and-squash-seeds-4687
PUMPKIN PASTA
Sugar pumpkins, which are full of fiber, vitamin C, and beta-cartone, are delicious roasted.
SERVES: 4 people
Ingredients
· 1/2 small sugar pumpkin
· 4 tablespoons extra-virgin olive oil, plus more for drizzling
· Kosher salt and freshly ground pepper
· 2 tablespoons honey
· 1/2 pound whole-grain pasta
· 2 teaspoons minced garlic
· 2 minced anchovies (optional)
· 1/2 cup finely chopped toasted walnuts
· 1/4 cup chopped parsley
· 1/2 cup finely grated Parmesan cheese
Directions
Preheat the oven to 425 degrees. Peel pumpkin and cut into 1-inch chunks (about 4 cups). Toss with 2 tablespoons of the olive oil, ½ teaspoon salt, and the honey. Roast on a baking sheet until tender, about 45 minutes. Meanwhile, bring a pot of well-salted water to a boil. Add pasta and cook according to package directions. While pasta is cooking, heat remaining 2 tablespoons olive oil, garlic, and anchovies (optional) in a skillet over medium-high heat until fragrant, about 1 minute. Add walnuts and pumpkin. Toss to combine and heat through. Set aside. Drain pasta, reserving 1 cup cooking water. Toss pasta with ½ cup cooking water and stir in parsley and Parmesan cheese. Season with salt and pepper, and drizzle with olive oil. Transfer to a bowl, and toss well with walnut and pumpkin mixture. Serve immediately.
Recipe source: HTTPS://NESFP.ORG/WORLD-PEAS-FOOD-HUB/WORLD-PEAS-CSA/PRODUCE-RECIPES/PUMPKIN-PASTA
SUGAR PUMPKIN, FETA, & CILANTRO QUESADILLAS
Ingredients
· 3 cups 1 1/2-inch cubes peeled seeded sugar pumpkin or butternut squash (from about half of a 2-pound whole pumpkin)
· 1 finely chopped seeded jalapeño (about 2 tablespoons)
· 12, 8-inch-diameter flour tortillas
· 10 ounces feta cheese, crumbled
· 1 1/2 cups coarsely chopped fresh cilantro
· 2 limes, each cut into 6 wedges
Directions
Cook pumpkin in a large saucepan of boiling salted water until tender but not falling apart, about 10 minutes. Drain and cool for 10 minutes. While pumpkin is still warm, transfer to processor; puree until smooth. Stir in jalapeño; season with salt and pepper. Divide pumpkin mixture equally among 6 tortillas (about ¼ cup per tortilla) and spread evenly. Sprinkle feta over each. Top each with ¼ cup cilantro and sprinkle with black pepper. Top with a second tortilla. Heat heavy large skillet over medium-high heat. Cook quesadillas until golden and dark char marks appear, about 1 minute per side. Serve with lime wedges.
Recipe Source: HTTPS://NESFP.ORG/WORLD-PEAS-FOOD-HUB/WORLD-PEAS-CSA/PRODUCE-RECIPES/SUGAR-PUMPKIN-FETA-CILANTRO-QUESADILLAS
For more recipes check out our farm recipe blog: https://blackdirtrecipes.wordpress.com
Follow us on Instagram @yesifarm
Fall Share Week #7
Still harvesting potatoes, we should get the last of them out of the ground this weekend. We had a pretty bad infestation of those */$% Colorado Potato Beetles this year and in spite of that we have harvested well over 3,000 pounds this year. We are all marveling at what the harvest could have been if we didn’t have the “bug” issue. Next crop to work on is planting garlic. In this area late October, early November is the best time to get it in the ground. We have to take the head of garlic and separate it into individual cloves. These are then planted about 2-3 inches deep and about 6 inches apart. They must be deep enough so when the frost comes it won’t heave the bulb out of the ground, but not so deep that it takes forever to break through to the surface in springtime.
VEGETABLE — Japanese Red Mustard
Japanese Red Mustard, in spite of the name actually originated in the Himalayan region of India over 5,000 years ago. Its mustardy, peppery zing, almost like fresh horseradish is tempered, but not too much, by a quick sauté. Leaves may also be pickled, juiced or substituted for lettuce on a sandwich.
PASTA WITH CARAMELIZED ONIONS & BITTER GREENS
Ingredients
1 tablespoon olive oil
1 to 2 tablespoons unsalted butter
4 medium onions, peeled and cut into 1/4-inch-thick rings
1 teaspoon sugar
4 cups chicken broth
Salt and freshly ground pepper
1 pound fettuccine
1 bunch mustard greens, kale, or arugula, washed, with tough ribs removed and leaves torn into pieces
Directions
Heat oil and 1 tablespoon butter in a large, heavy skillet over medium-high heat. Add onions and sugar and cook, stirring once or twice, until well browned, about 10 minutes. Turn heat to low; continue to cook, stirring occasionally, until very soft, about 10 minutes. Remove half the onions and set aside. Add broth or water to the pan and bring to a boil. Cook over high heat, scraping the bottom of the pan, for 10 minutes. Season to taste with salt and pepper. Cook pasta in boiling salted water until a little underdone, and drain. Add to broth; simmer for 2 to 3 minutes. Add greens; cook, covered, until wilted, about 1 minute. Stir in additional tablespoon of butter, if desired. Divide among 4 shallow bowls, garnish with reserved onions, and serve.
Original recipe source: http://adamsheirlooms.com/recipes/mustard-green-recipes/
MUSTARD GREENS WITH POTATOES
Ingredients
•4 to 5 medium potatoes, quartered
•3 tablespoons of butter
•1 tablespoon bacon drippings, or use more butter
•salt and black pepper, to taste
•dash red pepper, optional
•4 cups (about 1 pound) shredded mustard greens
Directions
Boil potatoes until just tender; cool and slice. Melt butter with bacon drippings in a large heavy skillet over medium heat; add potatoes. Season with salt, pepper, and red pepper, if using. Cook until potatoes are heated through, about 3 to 4 minutes. Add greens and stir until wilted, about 1 minute.
Original recipe source: http://adamsheirlooms.com/recipes/mustard-green-recipes/
SIMPLE SAUTEED MUSTARD GREENS
Ingredients
1 tablespoons vegetable oil
1 cloves garlic, minced
1 bunch mustard greens, stemmed and chopped
Kosher salt and freshly ground black pepper
1/4 cup chicken stock
½ tablespoon stone-ground mustard
Directions
1. In a large pan with straight sides on medium heat add the oil. Add the garlic to the hot oil. Saute until garlic is softened and fragrant and has infused the oil.
2. Add the mustard greens. Season the greens with salt, and pepper, and saute while tossing to wilt. Once wilted add the chicken stock and stir. Raise heat to a simmer, then lower and cook for about 5 minutes more.
3. Stir in the ground mustard. Serve warm.
Recipe source: https://www.foodnetwork.com/recipes/sunny-anderson/simple-sauteed-mustard-greens-recipe-1923232
Ten ways to use Mustard Greens
https://www.foodandwine.com/vegetables/greens/10-ways-use-mustard-greens
For more recipes check out our farm recipe blog: https://blackdirtrecipes.wordpress.com
Follow us on Instagram @yesifarm
Fall Share Week #6
How stunning the weather has been. I am always in awe at how extraordinarily beautiful the sky is after a rain storm — it’s like the rain has washed the sky and everything is that much more brilliant. As we find ourselves winding down the fall season we are getting ready for winter. Taking a chance and doing some late fall planting in the hopes of harvesting in November and December. We will be stripping the shade cloth off the greenhouse so we can change the plastic sheeting underneath. This is the protective covering that helps keep the heat in so we can start seeds and grow indoor crops. All summer there have been pots of turmeric and ginger growing inside there. These plants LOVE the heat and are definitely not for the impatient, they take FOREVER to grow and are still not ready to be harvested. Now we’ll turn this greenhouse into a storage facility of sorts for the root crops and will do some winter planting as well.
We gave you the Black Futsu pumpkin this week — upside of this pumpkin is that the skin is so tender you can eat it — the downside is that because of the tender skin it won’t store well. By that I mean into January or February like a Butternut will. This is what I love about eating in the seasons — food tastes so much more special when it is only available at select times of the year!
VEGETABLE — Cabbage
FRIED CABBAGE
Ingredients
· 6 slices bacon, chopped
· 1 onion, diced
· 2 cloves garlic, minced or chopped
· 1 large head green or red cabbage, cored and sliced
· Salt and cracked black pepper, to taste
· 1/4 teaspoon Cajun seasoning or smoky paprika
Directions
1. Cook bacon in a large skillet over medium heat until crispy. Transfer bacon to a plate with a slotted spoon. Do not discard bacon drippings.
2. Sauté the onion in the bacon grease until the onion caramelizes (about 8 minutes). Add the garlic and cook until fragrant (30 seconds).
3. Stir in the cabbage and cook for a further 8 minutes while stirring occasionally. Season with salt, pepper and Cajun seasoning (or paprika).
Original Recipe Source: https://cafedelites.com/fried-cabbage/
CHERYL'S CABBAGE
This is a go-to of mine for which I don’t really have a recipe. It’s another one of those "clean the fridge out" things I do.
Ingredients & Directions
1. Onions – peeled and diced – Put in dutch oven, sprinkle with some salt. Cook over medium-high heat stirring frequently until translucent and turning golden. Add a bit of oil, I use sunflower seed oil. I will also add a bit of butter because why not? Wasn’t it Julia Child who said everything tastes better with butter?
2. While this is happening I chop up my cabbage. Once the onions are that light golden color I start throwing in the cabbage – may not fit all at once so I just keep adding as it wilts down.
Now here is where I start changing things:
– You could add carrots to the onions while they are cooking before adding cabbage, celery too.
– I might add apples — chop into half inch or so pieces, add a splash of cider vinegar season to taste with salt and pepper.
– Mushrooms are a nice addition — I like to use dried ones that I soak in hot water or sherry. That liquor from the soaked mushrooms goes in the cabbage too!
3. Boil some potatoes, once tender toss them into the onions and get crispy on the edges then add cabbage.
(HINT – my Dad taught me this after potatoes are cooked and drained put back in the pot you cooked them in, gently shake the pot over a bit of heat, this will help give you a drier, fluffier potato that those glistening onion bits will just have to cling too)
4. Optional spices you can use: Caraway seed, celery seed, bay leaves. I love the versatility of cabbage and in a simple recipe like this so many variations are possible! If you want a sweeter version you can also reduce the recipe in apple cider—I like to use hard cider if I’m going to add sausage.
5. You can also add a couple spoons of heavy cream or sour cream for a "saucy" dish, this is especially nice if you're using the dried mushrooms.
For more recipes check out our farm recipe blog: https://blackdirtrecipes.wordpress.com
Follow us on Instagram @yesifarm
Fall Share Week #5
The air has a slight chill this morning and it feels good!!! Like autumn should feel. The farmers are out in the fields today cleaning up the aftermath of the tomatoes so we can remove the trellising stakes and continue to work on clearing the potato foliage so we can dig the rest of the crop. All the squashes have been harvested and we brought in as much of the shell bean crop as we could. Unfortunately those freezing nights in September cut that harvest short. The lima beans were about 2 weeks from harvest and we lost the whole crop to the cold. So frustrating but this is how it goes some years.
VEGETABLE — Acorn Squash
A perennial favorite of many, sometimes called pepper squash. Why? I have no clue. Acorn ranks at the top of the list of winter squashes in terms of nutrition and fiber. Sweet flesh, the natural shape of acorn squash lends itself to “bowl” meals. One of my favorite ways to enjoy acorn squash is to stuff it with chili, roast it and serve it, using the squash as the bowl. The spice of the chili with the natural sweet of the squash is a great combo! Sometimes a dollop of goat cheese or sprinkle of cheddar is a nice complement as well. A rice stuffing or grain like quinoa is also a nice complement to the squash. Can you eat the skin of acorn squash? Once it’s roasted yes you can! Some folks may find it on the thicker side and not like the texture, if that’s you just scoop the flesh out and you’re good to go!
SOME HELPFUL TIPS ON HOW TO CUT ACORN SQUASH (AND OTHER WINTER SQUASHES)
Source: https://www.simplyrecipes.com/recipes/classic_baked_acorn_squash/Like most winter squashes, acorn squashes are dense and can be challenging to cut. Here are some tips to help:
· Stabilize the squash: Knife skills 101, right? Make sure what you are cutting is stable on the table. If the stem is short, the most stable position for the squash is likely to prop it up with the stem end down. If the stem is too long, and you can’t easily remove it, lay the squash on its side and roll it until you find the most stable position for it.
· Use a sharp, heavy chef’s knife: A sharp knife will really help getting through the squash, a dull one is at risk of slipping while you cut. A heavy chef’s knife has the heft and length you need to cut through the squash.
· Rubber mallet: Have a rubber mallet? Using one to tap on the knife can help it go through if it gets stuck.
· Microwave: If you have a microwave, zap the squash for a minute (each) before cutting into it. That will soften the peel and flesh just enough to make it easier to cut through.
BAKED ACORN SQUASH WITH BUTTER AND BROWN SUGAR
Prep time: 10 minutes
Cook time: 1 hour, 15 minutes
Yield: Serves 2 to 4, depending on how much squash you like to eat.
Ingredients
1 Acorn squash
1 Tbsp Butter
2 Tbsp Brown Sugar
2 teaspoons Maple Syrup
Dash of Salt
Directions
1. Preheat your oven to 400°F (205°C).
2. Prep the squash:
– If you have a microwave, microwave the squash for a minute each, to make it easier to cut. Stabilize the squash on a cutting board as best you can, stem end down if the stem is short enough, otherwise on the side. Using a sharp, sturdy chef's knife, carefully cut the acorn squash in half, from tip to stem. If on its side, the squash can rock back and forth, so take care as you are cutting it.
– Use a sturdy metal spoon to scrape out the seeds and stringy bits inside each squash half, until the inside is smooth.
– Take a sharp paring knife and score the insides of the acorn squash halves in a cross-hatch pattern, about a half-inch deep cuts.
– Place the squash halves cut side up in a roasting pan. Pour 1/4-inch of water over the bottom of the pan so that the squash doesn't burn or get dried out in the oven.
3. Add butter, salt, brown sugar, maple syrup: Rub a half tablespoon of butter into the insides of each half. Sprinkle with a little salt if you are using unsalted butter.
– Crumble a tablespoon of brown sugar into the center of each half and drizzle with a teaspoon of maple syrup.
4. Bake: Bake at 400°F (205°C) for about an hour to an hour 15 minutes, until the tops of the squash halves are nicely browned, and the squash flesh is very soft and cooked through.
– It's hard to overcook squash, it just gets better with more caramelization. But don't undercook it.
5. Remove from the oven, spoon brown sugar butter sauce over squash: When done, remove the squash halves from the oven and let them cool for a bit before serving.
– Spoon any buttery sugar sauce that has not already been absorbed by the squash over the exposed areas.
Notes from Cheryl:
– Honey, agave or other sweeteners may be used in place of maple syrup.
– You don’t have to use any sweeteners if you prefer savory, sometimes I feel there’s just too much “sweet” especially this time of year. Olive oil with some salt and pepper works fine for me!
– And you could always roast it plain so the flesh can be used in most any recipe without compromising the flavors.
– Once roasted the flesh can be packed into a Ziploc bag and frozen till you’re ready to use it!
Original recipe source: https://www.simplyrecipes.com/recipes/classic_baked_acorn_squash/
Nutrition sources: https://www.theglobeandmail.com/life/health-and-fitness/health/i-love-to-eat-squash-this-time-of-year-is-one-healthier-than-the-others/article21352343/
For more recipes check out our farm recipe blog: https://blackdirtrecipes.wordpress.com
Follow us on Instagram @yesifarm
Fall Share Week #4
The fall equinox has descended upon us and here we are in Autumn. I love the fall. Yesterday the sky was that fierce steely blue with wisps of white swirling across here and there like wayward streaks of whipped cream. The colors of the changing leaves seem even more brilliant against that canopy. Today we’re hauling in all the winter squashes, the #$%* deer have discovered our piles and are starting to eat them—they just show no mercy! We dug the sweet potatoes—they need some time to cure—and we’ll have those available soon. We’re harvesting the dry beans too. I had hoped for fresh lima beans for you all but those freezing nights about 2 weeks ago wrecked those plans. We’re seeing what we can salvage as a dry bean instead but no promises.
VEGETABLES — Sweet Corn, Habanado Pepper, Russian Banana Fingerling Potatoes, Black Futsu Squash
So excited for the flavors in todays’ share – that’s the last of the corn – it was a good season and right now it tastes the best ever, and that is thanks to the freeze of two weeks ago!!! The Habanado pepper is from Dan Barbers seed company Row 7. I am so wishing I had more of these!!!! Just as he promised it has all the fruitiness of the habanero and at the very end just the slightest hint of heat. I so cannot wait for February to plant these again and in way more quantity! The Russian Banana fingerlings are from our own seed stock and are one of my absolute favorite potatoes – so rich in flavor and easy to cook. Do not waste time peeling them — they were dug on Saturday and the skins are still tender. Rub them together like marbles under running water to clean them. Put in a pan, drizzle with olive oil, salt and pepper cover with foil. Roast at high heat—400 degrees—and start checking after half an hour. When tender they are ready to eat!!! This is the simplest way to eat them. I can make a meal out of these! For other flavors add rosemary or thyme when seasoning. The fingerlings with the corn, tomatillos, habanados and red onions – would make a fabulous chowder!!!
The Black Futsu Squash is a Japanese heirloom cultivated since the 17th century. This ancient variety was believed to have been introduced to Japan from Portuguese explorers in the 16th century. Short, squat and a heavily ribbed variety of pumpkin. It is rich, creamy and tastes distinctly like roasted hazelnuts, some say chestnuts. The more brown the skin, the richer the flavor. If yours is green let it ripen more by leaving it on the counter. This squash can be eaten raw or cooked. For raw, you can shave it thinly into salads, delicious julienned and quick-cured with salt in a winter slaw! Or thinly sliced raw as part of a fruit tray or with cheese and prosciutto. It is an excellent choice for tempura or for pickling. Below is a great recipe for roasting them.
ROASTED BLACK FUTSU WITH JASMINE-KALE RICE
Ingredients
One medium black futsu squash, quartered and sliced
Olive oil
Salt & pepper
1/2 teaspoon paprika
1/2 teaspoon cinnamon
1/4 teaspoon cayenne pepper
1 cup brown jasmine rice or other fragrant variety, prepared according to instructions
2-3 whole cloves
2 tablespoons fennel seeds
1/4 cup golden raisins
1 1/2 cups of kale (any kind), finely chopped
1/2 cup dry toasted pumpkin seeds, from your pumpkin of course (optional, but: seriously?)
Directions
Start by getting that squash in the oven. Preheat your oven to 400 degrees and arrange your squash pieces (skin on) in a single layer on a large baking sheet. Toss them in your olive oil, salt, pepper, paprika, cinnamon and cayenne until evenly coated. Transfer to the oven for about 35-40 minutes or until the squash has softened and easily peels away from the skin, rotating halfway through.
Meanwhile, get your rice started according to package instructions. Add your cloves, fennel seeds, salt and pepper to taste and just a touch of olive oil. As always, I'm super partial to the jasmines or basmati. I don't know, they just add a little something extra and make the food feel a little fancier, plus they pair beautifully with the headier spices like cinnamon and cloves.
In a small skillet over low heat, add your (rinsed and dried) pumpkin seeds. These will toast up quickly and can burn if you don't watch them closely. Stir them often until just barely browned, then remove from the pan and set aside.
When the rice is just about done, stir in your chopped kale. You want to just wilt it down, not cook it, so wait until you're just about ready to serve. Toss in your golden raisins. Serve alongside your beautiful slices of black futsu and top with your toasted pumpkin seeds. You could peel the skins off of the pumpkin before serving, but that way you may risk losing a lot of the glorious goodness within them. Besides, the skin gets beautiful and almost reddish in color.
Notes from Cheryl – Substitutions: Most any winter squash or variety of kale will work in this recipe. Rice can be subbed out as well. Instead of raisins use craisins
Original recipe source: http://www.greengirleats.com/2014/11/roasted-black-futsu-with-jasmine-kale.html
Other sources: https://specialtyproduce.com/produce/Black_Futsu_Squash_16782.php
https://www.field-goods.com/2017/09/22/black-futsu-whats-inside-counts/
https://greatlakesstapleseeds.com/products/black-futsu
For more recipes check out our farm recipe blog: https://blackdirtrecipes.wordpress.com
Follow us on Instagram @yesifarm
Fall Share Week #3
What a difference a week makes. Last weekend icy overnight conditions wiped out the tomato, pepper and snap bean plants. Hardier vegetables like kale and bok choy fared pretty well and I wasn’t too sure how the corn was going to handle the cold but it came through OK. We have new crops of leafy greens planted and are just waiting for them to size up for harvesting. Today the farmers are busy harvesting the dry shell beans — black, white, hopefully cranberry and limas too. We’re also busy putting up corn in freezer bags for January and February CSA shares. Crazy how as a farmer even though you work in the present — harvesting, weeding and planting — you’re always working in the future at the same time, planning and preparing for what’s to come.
VEGETABLE – Fennel
The fennel you’re receiving today was grown from seeds I bought from a seed company that sources directly from Italy. It doesn’t look like the fat round bulbs you typically see in the grocers. But it still has that great licorice-like flavor. The whole plant is edible. Use the fronds to stuff a fish or roast with potatoes and/or corn.
One way to get started cooking with fennel is to use it anywhere you would use celery. It’s a natural in soups, sauces, and stews, particularly tomato-based recipes. When chopped or sliced, it makes a great raw addition to salads. It is luscious when roasted. You can also try braising quartered bulbs for a hearty, plant-based entrée to pair with beans and grains. The flavor of fennel is not overly intense and rather more delicate.
RICE SALAD WITH FENNEL, ORANGE, & CHICKPEAS
Ingredients
1½ cups brown basmati rice
2 cups cooked chickpeas, or one 15-ounce can, drained and rinsed
1 fennel bulb, trimmed and diced
1 orange, zested, peeled, and segmented (zest and segments reserved)
¼ cup plus 2 tablespoons white wine vinegar
½ teaspoon crushed red pepper flakes
¼ cup finely chopped parsley
Directions
– Rinse the rice under cold water and drain. Add it to a pot with 3 cups of cold water. Bring it to a boil over high heat, reduce the heat to medium, and cook, covered, for 45 to 50 minutes, or until the rice is tender.
– While the rice cooks, combine the chickpeas, fennel, orange zest and segments, white wine vinegar, crushed red pepper flakes, and parsley in a large bowl and mix well. When the rice is finished, add the rice to the bowl and mix well.
Original Source: https://www.forksoverknives.com/recipes/vegan-salads-sides/rice-salad-with-fennel-orange-and-chickpeas/
LEMON FRESH FENNEL & CORN SKILLET
Servings: 2 -4 servings
Ingredients
1 tablespoon olive oil
1 fennel bulb washed and thinly sliced
2 cups of frozen corn (I used organic white kernels, but any variety should be good)
kosher salt to taste
freshly ground black pepper to taste
2-3 teaspoons fresh lemon juice
small handful fresh Italian parsley leaves chopped
Optional: freshly grated pecorino romano or parmesan cheese
Directions
In a large skillet, warm the oil over medium high heat. Add the fennel and corn and toss to coat. Saute until crisp and tender, about 6-8 minutes. Season with salt and pepper to taste. Add lemon juice and toss to coat. Remove from the heat. If desired, sprinkle lightly with cheese immediately before serving.
Original Source: https://barefeetinthekitchen.com/lemon-fresh-fennel-and-corn-skille/
For more recipes check out our farm recipe blog: https://blackdirtrecipes.wordpress.com
Follow us on Instagram @yesifarm
Fall Share Week #2
The night temperatures are steadily falling, cold enough that the more tender herbs like basil are turning black in the fields. There’s a smell of smoke in the air that we can’t figure out where it’s coming from. We all feel it’s related to the California fires. Our hearts go out to all those who are dealing with nature's ugly side, it’s a tough, tough road to travel. On the upside for us, the weather is quite spectacular—cool nights, chilly mornings, warm afternoons, trees are gradually putting on their coats of many colors, pumpkins are glowing with their sunny dispositions, it is indeed the perfect fall weather pattern. This is the kind of weather that just screams of soups, chowder, stews, freshly baked breads, luscious desserts of apple, pumpkin, spices and caramel.
VEGETABLES — Sweet Corn, Bok Choy
PEACH & CORN SALSA
I hear that as part of the fruit shares you’re receiving peaches today so I thought I would send a peach and corn salsa recipe!
Ingredients
· 1 large ripe peach, peeled and diced
· 3 large not too ripe peaches, diced (see notes)
· ½ cup corn
· 2 large tomatoes, diced
· 1 red bell pepper, finely diced
· 1 green chilli peppers, chopped (see notes)
· ¼ cup red onion, diced
· 1 tablespoon fresh herbs for example: thyme, cilantro, parsley, dill or rosemary
· ½ teaspoon salt
· 1 tablespoon olive oil
· 1 ½ tablespoons lemon juice (or lime juice)
Directions
1. Combine everything except salt, olive oil and lemon juice,
2. Whisk together lemon juice, olive oil and salt. Pour it over the salsa and give it a good stir and serve.
Original recipe source: https://www.giverecipe.com/fresh-corn-peach-salsa/
Notes from Cheryl:
1. Recipe calls for 1 peeled & 3 unpeeled peaches. I personally do not appreciate the fuzzy skin of peaches in my food so I would peel all of them. When you’re peeling them hold the peaches over a bowl so you can capture all those luscious juices into the resulting salsa. You could substitute canned peaches for fresh but seriously why?
2. How to peel a fresh peach —
Method One: Using a small paring knife or potato peeler, remove skin from peach.
Method Two: You need a small pot of water for heating and a small bowl of ice water to stop heating. Bring the small pot of water to boil, at the bottom of each peach lightly score the skin of the peach with an "X." Put them in a pot of boiling water for about 40 seconds, remove and immediately place in a bowl of ice water. Once cooled, using a small paring knife or potato peeler remove skin. They are ready to use!
3. Chilies – This is a very personal choice. Use whatever lights your taste buds up!!! Some prefer less heat, others more. Choose what suits you best. And for those who do not like any heat a nice sweet bell or Italian frying pepper will work very nicely as well.
BOK CHOY — POK CHOY — BAC CHOY — WHITE CHINESE CABBAGE
So many names for one little vegetable. Originating in China and grown for thousands of years now, Bok choy is a member of the cruciferous family making it a cousin to cabbage. So rich in nutrients, low in carbs and fat make this a must-have vegetable for your table.
Some Quick tips — Possessing a mildly sweet flavor and crisp texture make Bok Choy an agreeable addition to almost any dish:
– Shred raw bok choy and toss with other fresh vegetables to make a salad
– Add chopped bok choy to hot and sour soup
– Stir-fry bok choy with a variety of vegetables, some soy sauce, and sesame oil
– Sauté fresh garlic and ginger in olive oil until soft, then add bok choy and continue to sauté until desired tenderness
– Mix minced bok choy, mushrooms, chives, and soy sauce to make a homemade dumpling filling
Original source: https://www.medicalnewstoday.com/articles/280948#diet
How to Cut Bok Choy
– The stalks can often have dirt or grit at the base of the stem so be sure to remove them and rinse it well.
– To cut Bok Choy, cut the greens off and keep them separate from the whites part since they need less time to cook.
How to Cook Bok Choy
– This veggie is quick and easy to cook and comes together in no time flat.
– Combine sauce ingredients and set aside (per recipe below).
– Stir fry the garlic, ginger and sliced bok choy in oil for a few minutes.
– Stir in the sauce and add the tops and simmer a few minutes more.
– Sprinkle with toasted sesame seeds and serve.
Bring out the best in bok choy by serving it with Asian noodles, ramen noodles or Jasmine rice. Rice or udon noodles make excellent accompaniments.
Steamed fish or sautéed shrimp are excellent pairings for this recipe. If you’re in the mood for something more substantial, consider sautéing it with teriyaki chicken or Chicken and Broccoli Stir Fry.
Storing and Reheating the Leftovers
Leftovers will keep in a tightly covered container in the refrigerator for up to four days, or in the freezer for up to four months. Reheat on low or medium in the microwave or stovetop until heated through. Don’t overdo the heat or your bok choy could get mushy and overdone.
SESAME GINGER BOK CHOY
Ingredients
1 tablespoon vegetable oil
2 cloves garlic crushed and chopped
1 teaspoon fresh ginger
8 heads baby bok choy
1 teaspoon sesame oil
1 tablespoon soy sauce
1 tablespoon water
¼ teaspoon chili flakes
sesame seeds for garnish
Directions
– Combine sesame oil, soy sauce, water and chili flakes in a small bowl. Set aside.
– Heat the oil in a large skillet and cook the garlic and ginger until fragrant, 1 to 2 minutes.
– Mix in the whites of the bok choy and cook 3-4 minutes. Add soy sauce mixture and leaves and cook 2 minutes more or until heated through and leaves are gently wilted.
– Sprinkle with sesame seeds and serve.
Original recipe source: https://www.spendwithpennies.com/sesame-ginger-bok-choy/
For more recipes check out our farm recipe blog: https://blackdirtrecipes.wordpress.com
Follow us on Instagram @yesifarm
Fall Share Week #1
Here we are—fall, the passing of the seasons almost seem like rights of passage. Cooler rainy days and we find ourselves holding our breaths as we harvest tomatoes and other summery crops. How much longer will the weather hold? I don’t smell it yet but we know the hint of frost is hanging over our heads like some specter in a haunted movie. The SunGold tomato plants are looking like brown sticks in the fields. No cucumbers, no summer squashes, sweet lettuces turn to bitter greens, cool weather crops are advancing up the harvest list. This is the beauty of living with the seasons. I am always in awe of how the crops fit the weather — once light and summery now hearty and filling ... visions of casseroles, roasts, and fresh baked bread fill my dreams of delicious meals to come.
VEGETABLE – Chicory
Chicory, one of the bitter greens very popular in Italy and an autumn treat. Bitter greens are called that because that’s how they taste – bitter. They are known to help the digestive system and improve absorption of food. Bitter greens are packed with healthy fiber, soluble and insoluble, which encourages healthy gut bacteria.
SAUTEED CHICORY GREENS
A delicious way of making greens, sauteed chicory.
Ingredients
1 bunch chicory (1 pound /500-600 grams)
2-3 tablespoons olive oil (26-39 grams)
1-2 cloves garlic chopped
1/2 teaspoon salt (2 1/2 grams)
pinch of hot pepper flakes (if desired)
Directions
– Wash leaves and cut in half (or leave whole), cook in boiling water (unsalted) until tender but not mushy, drain well.
– In a medium frying pan add olive oil and garlic, then add the chicory, salt and hot pepper flakes, toss gently, heat 1–2 minutes on medium heat.
– Serve immediately, with a squeeze of lemon if desired. Enjoy!
Original recipe source: https://anitalianinmykitchen.com/sauteed-chicory/
For more recipes check out our farm recipe blog: https://blackdirtrecipes.wordpress.com
Follow us on Instagram @yesifarm
Summer Share Week #12
Wow hard to believe 12 weeks have come and gone!!! That weather really rocked us yesterday — the heavy rain slowed us down and kept us harvesting from 7:00AM till after 2:00PM. Usually we have your produce picked by 11:00–ish and then start washing and packaging it. Fortunately we don’t have sloppy days like yesterday too often, at least not this season. Muck boots and rain suits are the uniform of the day with a quick lunch of roasted chicken and sweet corn to keep the energy and mental levels up. It can be tough to keep going when the rain is coming down so hard that you can barely see what’s right in front of your face, the soil becomes a slip and slide and the crates feel heavier than normal due to all the excess moisture. And yet through it all my crew—your farmers—keep smiling and are so happy to grow and present you with the crops from our fields. I am so ever grateful to them and you for our farm would not exist without all of your support!!!
VEGETABLE — Latin Herbs: Papalo and Aclapanchle
I keep saying this is it on the basil and I think I really mean it this time (LOL). That is the excitement of farming you just never know. How’s that saying go? "Man plans and Mother Nature (God) laughs." Part of the fun of belonging to a CSA is trying new things — this week we have a Latin herb bouquet for you to try. It has 2 types of herbs that our farmers adore — Papalo and Aclapanchle. When they introduced us to them I was told “Comemos como sheevos” (transl) "We eat them like sheep!" Apparently these and others grow everywhere in Mexico. Like some of us eat carrot sticks our farmers put these herbs on everything. Mostly they like them on their sandwiches.
The flat largish succulent leaf is Papalo. I always advise everyone to go easy with this herb as I personally find it to be very strong. The flavor notes are evocative of cilantro–green pepper–cucumber. I have found that most folks who dislike cilantro tend to like this. It’s a great addition to a sandwich or an awesome salsa. “Papalo — This distinctive herb is an essential ingredient in the heroically large Poblano sandwiches, cemitas. The sharp flavor of the papalo buzzes through the layers of cheeses and meats in the sandwich like a serrated knife." Source: https://www.villagevoice.com/2012/08/09/more-than-mere-cilantro-a-guide-to-mexican-herbs/
The tinier more delicate leafed herb is Aclapanchle, also known as Bolivian Coriander. Some describe the flavor as similar to arugula and cilantro. This has become one of my favorite herbs. Again used on sandwiches and in salsa. Note: Keep them fresh by placing them in a glass of water on the counter.
BASIC SALSA RECIPE
Chopped fresh tomatoes, herb of your choice – cilantro, papalo, aclapanchle and fresh chilies chopped fine – quantity to your preference and heat of the chile. Salt to finish.
Other add-ins: Finely chopped garlic or onion.
SALSA VERDE WITH PAPALO
Servings 2 cups; Author – Lisa Fain
Ingredients
· 2 cups chopped tomatillos
· 2 tablespoons papalo leaves, chopped
· 1 avocado, peeled, pitted, and chopped
· 3 Serrano chiles, seeded and chopped
· 4 cloves garlic, chopped
· Juice from 1/2 lime
· Salt
Directions
Throw the tomatillos, papalo, avocado, Serrano chiles, garlic, and lime juice in a blender and mix well. Taste and add salt.
Original Recipe source: https://www.homesicktexan.com/2008/01/what-do-you-know-its-papalo.html
For more recipes check out our farm recipe blog: https://blackdirtrecipes.wordpress.com
Follow us on Instagram @yesifarm
Summer Share Week #11
I was picking tomatoes yesterday and it seemed like the plants jumped a couple feet in height since the last time I harvested them. Keep checking the eggplants and they’re crawling along not sure how soon we’ll be able to harvest enough to send to you. The basil this week is purple – a fun one to play with! Makes for pretty vinegar, dark pesto and a cool compound butter which would be awesome on the sweet corn!! We think the cucumbers are done for we haven’t seen blossoms for two weeks now, but the squashes are hanging in there and keep producing!! The tomatoes this week are a random mix of green and heirlooms — they are soooo pretty and tasty too!!! Sweet peppers may be bells or Italian frying varieties. So far I picked two tomatillos and a handful of ground cherries, like you we are anxiously awaiting Mother Nature to do her thing and get those vegetables to hasten their way to harvest.
BASIC HERBAL VINEGAR
Ingredients
1 garlic clove, peeled, optional
12 to 18 inches fresh oregano, basil or tarragon sprigs
1-1/4 cups white vinegar or white wine vinegar
Directions
– If desired, cut garlic in half and skewer with a toothpick. Place in a glass jar or bottle. Add oregano; set aside. In a small saucepan, bring vinegar to a simmer (do not boil). Carefully pour into containers. Let cool to room temperature.
– Remove garlic after 24 hours. Cover and store in a cool dry place for up to a year.
Cheryl’s notes – I tend to use cider vinegar in many of my recipes and an unseasoned rice vinegar is a great base for this as well. Keep in mind that the type of vinegar will affect the flavor of the infused vinegar so try to think about the end results you want!!!
– Other herbs and spices that are great additions are citrus rinds, peppercorns
– For an Italian style – red wine vinegar with oregano and basil is great
Original Recipe Source: https://www.tasteofhome.com/recipes/herb-vinegar/
HERB BUTTER: 8 RECIPES
Herb butter or compound butter is easy and fun to make. It enhances any food you'd normally add butter to.
HOW TO MAKE HERB BUTTER Author: Toni Dash, Servings: 8
Start with unsalted butter, it should be soft before you begin – easier to incorporate herbs. Herbs should be somewhat finely chopped to incorporate better into butter. I have a mini food processor that I’ll use to blend my butter and add ins. I like to shape my finished butter into logs, wrap in parchment and freeze. Just remember to keep track of when you put them in the freezer as they will keep for awhile but not indefinitely.
Ingredients
PARSLEY AND CHIVE BUTTER (baked potatoes, green beans, corn-on-the-cob,or red meats)
· 1/2 cup softened unsalted butter
· 2 tablespoons fresh chopped parsley
· 1 tablespoon fresh chopped chives
· 2 tablespoons lemon juice freshly squeezed
· sea salt and freshly ground pepper
BASIL BUTTER (vegetables, chicken, fish, or scrambled eggs)
· 1/2 cup butter
· 1 small bunch basil about five leaves, stemm
GARLIC HERB BUTTER (topping for garlic bread. Let the butter soften after the flavors have blended for easier spreading.)
· 1/2 cup butter
· 6 - 8 cloves garlic
· 1/4 cup mixed chopped herbs chives, basil, parsley, or rosemary
SAGE BUTTER (seafood, chicken, fresh green beans, or biscuits.)
· 1/2 cup butter
· 2-4 tablespoons fresh sage shredded
FINES HERBES BUTTER (vegetables, fish, or French bread)
· 1/2 cup butter
· 1 T chives parsley, tarragon, chervil,
· 1 teaspoon rosemary
MINT BUTTER (lamb or peas)
· 1/2 cup butter
· 1 tablespoon dried mint
· 1 tablespoon lemon juice
TARRAGON BUTTER (lamb, chicken, or fish before you roast it)
· 1/2 cup butter
· 2 teaspoons dried tarragon
· 1 1/2 teaspoon dried parsley
· 1 tablespoon lemon juice
HORSERADISH AND CHIVE BUTTER
· 1 cup unsalted butter
· 1 tablespoon horseradish cream
· 3 tablespoons chopped chives
· Sea salt and freshly ground pepper
Directions
PARSLEY AND CHIVE BUTTER
1. Allow the butter to soften.
2. Mix the parsley and chives together and then stir them into the softened butter.
3. Slowly add the lemon juice, stirring constantly.
4. Mix in sea salt and pepper to suit your taste.
BASIL BUTTER
1. Allow the butter to soften.
2. Remove the basil leaves from the stem.
3. Pile them one on top of the other and roll into a tube. Envision a cigar.
4. Slice in 1/8- 1/4 inch slices all along the roll.
5. Allow the pieces to fall apart.
6. Stir the basil pieces into the butter.
GARLIC HERB BUTTER
1. Allow the butter to soften.
2. Mince the garlic and add it to the butter.
3. Combine the herbs to suit your taste.
4. Place in the fridge for 2 hours before using, so the flavors can blend.
SAGE BUTTER
1. Allow the butter to soften.
2. Cut the sage into 1/4 inch square pieces.
3. Mix the two together.
FINES HERBES BUTTER
1. Allow the butter to soften.
2. Finely chop the parsley, tarragon, and chervil.
3. Snip the rosemary leaves.
4. Add all of the herbs to the butter and mix well
5. This butter will enhance the flavor of vegetables, fish, or French bread.
MINT BUTTER
1. Allow the butter to soften.
2. Crumble the dried mint into the lemon juice. Stir well.
3. Slowly pour the juice into the butter stirring constantly.
TARRAGON BUTTER
1. Allow the butter to soften.
2. Crumble the dried herbs into the lemon juice and stir well.
3. Slowly pour the juice into the butter stirring constantly.
HORSERADISH AND CHIVE BUTTER
1. Allow the butter to soften.
2. Stir in the horseradish cream and the chopped chives.
3. Add salt and pepper to taste.
4. Refrigerate butter for several hours before serving.
Cheryl’s notes: You can mix finely chopped up scallions into butter as well and radishes are fun too!!!
For more recipes check out our farm recipe blog: https://blackdirtrecipes.wordpress.com
Follow us on Instagram @yesifarm
Summer Share Week #10
Well the weather is certainly different this week! Cooler days and nights are a hint of fall days to come. Giant pumpkins are showing up on the neighbors’ yards and mums are popping up everywhere. We’ll probably have the Italian basil one more week before those plants are done for the season. The bean plants are so beautiful in the fields right now. Tomatoes are coming slowly but surely. The corn plants rattle with the slightest breeze. Bees are busy pollinating, everywhere you look you see their fuzzy little bodies flitting about from one flower to the next. Their buzzing hum a steady companion as we weed and harvest. It’s always been a dream of mine to have my own bees. I have either depended on nature or hired a beekeeper to bring their hives to the farm. I talked to a beekeeper about putting up a hive on the farm this coming year and Rich said he’ll get me started with a book – Beekeeping for Dummies. He works with young school children teaching them how to care for their own hives. So I guess if they can do it so can I!!!
VEGETABLE – Green Tomatoes, Sweet Corn, Snap Beans
FRIED GREEN TOMATOES
Ingredients
2 medium, firm green tomatoes
Salt
1 cup all-purpose flour1/2 cup milk or buttermilk
1 egg
1/3 cup cornmeal
1/2 cup fine dry bread crumbs
1/4 cup peanut oil or extra virgin olive oil
Optional: 1 Tbsp Cajun seasoning or hot red pepper flakes
Directions
1. Slice and salt green tomatoes: Cut unpeeled tomatoes into 1/2 inch slices. Sprinkle slices with salt. Let tomato slices stand for 5 minutes.
2. Set out shallow bowls with coating ingredients: While the salted green tomato slices are resting, place in separate shallow bowls: the flour and Cajun seasoning (if using), buttermilk and egg, and breadcrumbs and cornmeal.
3. Dip green tomato slices in flour, egg, then breadcrumbs: Heat the peanut oil in a skillet on medium heat. Beat the egg and the buttermilk together. Dip the green tomato slices in the flour-seasoning mix, then the buttermilk-egg mixture, then the cornmeal-breadcrumb mix.
4. Fry the green tomatoes: In the skillet, fry half of the coated tomato slices at a time, for 3-5 minutes on each side or until brown.
Set the cooked tomatoes on paper towels to drain.
Note: These fried green tomatoes are fantastic with a little Tabasco sauce. I enjoy them with a poached egg on top add a salad and what a great dinner.
Source: Simply Recipes https://www.simplyrecipes.com/recipes/fried_green_tomatoes/
SWEET CORN RISOTTO — Yield: Serves 4
Ingredients
· 3 medium ears corn, shucked
· 6 cups chicken or vegetable stock, store-bought or homemade
· 1 large leek, white and light green parts chopped and rinsed
· 1 1/4 cups arborio rice
· 1/4 cup dry vermouth
· 2 tablespoons butter
· 1/2 cup freshly grated Parmigiano Reggiano
· Olive oil
· Salt and pepper
Directions
1. Cut the corn from the cobs. Place the stock and stripped corn cobs in a pot over high heat (break the cobs in half if needed). Once the broth comes to a boil, reduce the heat to low and cook for 15 minutes. Remove the cobs, scraping along the length of the cobs with a spoon or spatula to remove any extra liquid.
2. Coat the bottom of a large, heavy-bottomed pot with olive oil and place over medium heat. Once the oil is hot, add the leek and a pinch of salt, and sauté until tender, about 5 minutes. Add the rice and sauté another 2 minutes. Add the vermouth and stir until almost full evaporated, 1 minute.
3. Add a ladle of stock to the rice. Stirring often, continue adding stock as the rice absorbs each addition, until the mixture is creamy and the rice is cooked through but still firm (al dente), about 30 minutes. Stir in the butter, cheese, and corn kernels. Season to taste with salt and pepper and serve warm.
Recipe Note: If you run out of stock before the risotto is done, warm a little water to use for your final addition.
PARMESAN ROASTED SNAP BEANS
Ingredients
8 oz green beans—original recipe calls for green beans but you can use golden or mix the green and gold together
2 teaspoons olive oil
¼ teaspoon kosher salt
1/8 teaspoon pepper
¼ cup Parmesan Cheese — freshly-grated is best
1/8 teaspoon garlic powder (Optional)
Directions
1. Preheat the oven to 375° convection or 400° conventional. Clean and trim 1/2 pound of green beans. Try to use beans of constant size. The skinny ones with dry out.
2. In a medium bowl combine beans with 2 teaspoon olive oil. Mix well then add 1/4 teaspoon kosher salt and 1/8 teaspoon pepper and mix again.
3. Cover a baking sheet with parchment paper. Spread the beans evenly across the paper. Cover with 1/4 cup Parmesan cheese (fresh preferred).
4. Bake until browning some, 10-15 minutes.
Pro Tip: An easy recipe to double and still use a half sheet pan.
Original recipe source: https://www.101cookingfortwo.com/parmesan-roasted-green-beans/?utm_campaign=yummly&utm_medium=yummly&utm_source=yummly#wprm-recipe-container-26021
For more recipes check out our farm recipe blog: https://blackdirtrecipes.wordpress.com
Follow us on Instagram @yesifarm
Summer Share Week #9
The heat has been fierce this week. You know it’s hot when you’re sitting still and the sweat just oozes out of your pores and your body is covered in a wet sheen that you could scrape off with one of those window squeegees. I told our farmers to take the day off Monday and Tuesday. As soon as there was enough daylight to see by, I was out in the fields and out of there by noon. Big straw hats, bottles of water, ice packs, fresh fruit all part of the uniform of the day. Tuesday, mid-day, the valley was empty. Usually you’ll see crews everywhere busy working in the crops but the heat was just too oppressive. Hard to believe that in two days August is half over and for most of us, regardless of the seasonal equinoxes, September is the place holder for fall. Signs of autumn are popping up on the farm, winter squashes are showing themselves and I am so, so very tempted to pick a few but am restraining myself. I feel as though once I do summer will come to a screaming halt and as much as I love the fall I want to hang onto summer for just a bit longer.
VEGETABLE — Basil, Spigarello, Sweet Corn
BASIL — A classic basil pesto recipe, plus many more variations to try!
Prep Time: 5 mins
Total Time: 5 mins
Serves 1 cup
Ingredients
Basic Basil Pesto:
1/2 cup toasted pine nuts
2 tablespoons lemon juice
1 small garlic clove
1/4 teaspoon sea salt
freshly ground black pepper
2 cups basil leaves
1/4 cup extra-virgin olive oil, more for a smoother pesto
1/4 cup grated parmesan cheese, optional
Variations:
– Replace the basil with: Mint, Cilantro, Parsley, Spinach
– Replace half the basil with:
1 cup arugula
1 cup chopped kale
1 cup cubed raw zucchini
4 artichoke hearts
1 roasted red pepper
1/2 an avocado
1/2 cup kale stems, boil until soft
– Replace the pine nuts with: Walnuts, Pistachios, Almonds, Pecans, Pepitas, Hemp Seeds
– For something extra, add:
Nutritional yeast, in place of the parmesan
Pinches of red pepper flakes
1 charred jalapeño
2 to 4 sun dried tomatoes
Splash of honey or maple syrup, if your pesto is too sharp
Directions
1. In a food processor, combine the pine nuts, lemon juice, garlic, salt, pepper, and pulse until well chopped.
2. Add the basil and pulse until combined.
3. With the food processor running, drizzle in the olive oil and pulse until combined. Add the parmesan cheese, if using, and pulse to briefly combine. For a smoother pesto, add more olive oil.
Original recipe source: https://www.loveandlemons.com/pesto-recipe/
SPIGARELLO WITH POACHED EGGS — Spigarello aka Leaf Broccoli
Ingredients
1 bunch spigarello, washed and stems removed
1 large clove garlic, minced
1 tablespoon olive oil
2 eggs, cracked into a small bowl
Coarse salt, to taste
Freshly cracked black pepper, to taste
Directions
1. Bring a large pot of salted water to a boil. Plunge the spigarello into the boiling water for 2-3 minutes.
2. Meanwhile, heat the olive oil in a saute pan over medium heat and then add in the garlic, cooking until fragrant, about 30 seconds.
3. With tongs or a slotted spoon, remove the spigarello from the boiling water and put it in the saute pan, tossing to coat. Saute for about 3-4 minutes.
4. Meanwhile, turn the heat on the cooking water down to low. When the boiling dies down, swirl the water in the pot gently and slip the eggs into the middle of the whirlpool. Cook the eggs for 5-6 minutes (or however done you like them).
5. When the eggs are done, remove them from the water with a slotted spoon and transfer them to a folded paper towel to soak up any water.
6. Plate the spigarello with the eggs on top. Sprinkle with extra salt and pepper and serve immediately.
Original recipe source: https://food52.com/recipes/23000-spigarello-with-poached-eggs
CORN — The following recipe is from one of my older cookbooks: Recipes from a Kitchen Garden by Renee Shepherd & Fran Raboff
FRESH CORN MUFFINS
Ingredients
1 1/3 cups all-purpose flour
2 ½ teaspoons baking powder
½ teaspoon baking soda
½ teaspoon salt
3 tablespoons sugar
2/3 cup cornmeal
2 eggs, lightly beaten
1 cup buttermilk ( or use yogurt)
2 tablespoons melted butter
1 cup cooked corn kernels (about 1 large ear)
Directions
– Preheat oven to 375F
– Lightly grease 12 muffin cups.
– Sift together flour, baking powder, baking soda, salt and sugar.
– Mix in cornmeal.
– In a separate bowl combine the beaten eggs with buttermilk and corn kernels.
– Add wet to dry ingredients, mixing just until blended. Don’t overmix.
– Spoon batter into muffin tins.
– Bake 20-25 minutes, until a cake tester inserted in the center comes out clean.
Enjoy them hot with honey drizzled over for an extra special treat!!!
For more recipes check out our farm recipe blog: https://blackdirtrecipes.wordpress.com
Follow us on Instagram @yesifarm
Summer Share Week #8
Isaias left its mark on our neighborhood—power outages, trees down, six inches of rainfall. Our farm is off a road that skirts around the bottom of a mountain so the run off when we have a “normal” heavy rain will scour the entry to the fields and leave little ravines. The rains from Isaias were so fierce they scoured a gully over eight inches deep down the drive. We couldn’t access the farm from the East due to all the trees that were down and couldn’t access from the West due to the electrical wires that were down—so hot when they hit the pavement it looked like a mini volcano erupted, the tar was molten! Since we couldn’t get to the farm with vehicles we hoofed it. Luckily I had prepped the day before so we had fuel and plenty of containers in the fields. As our farmers harvested I piled the crates on the disc harrow and brought them out to the end of the fields. Then our farmers helped me hoist the crates on top of the Kubota (tractor) and I was able to ferry them up the steep driveway to the road. From there I drove as close as I could safely around the downed cables, and we transferred the crates to a hand truck and walked the harvest out to my van. It took several hours longer than normal to harvest and carry out the produce but we did it!!!! I am ever so grateful to our farmers who toil seemingly effortlessly to help bring our crops in for you all. I know they were exhausted at the end of a day like yesterday but their beaming smiles at the knowledge of "mission accomplished" said it all!!!
VEGETABLE — Zucchini and All Summer Squash
I know folks often think of zucchini and summer squash as different types of vegetables. I have found that for the most part I use them equally in all my recipes. Last week I made a squash bread and subbed different squashes for the zucchini. I shred my squash coarsely so you see the shredded bits in the bread which I happen to like. It’s like bits of confetti!!
THE BEST CLASSIC ZUCCHINI BREAD
Ingredients
1 1/2 cups grated zucchini - lightly packed -do not drain liquid
1 cup granulated sugar
1/4 cup packed light brown sugar
1/2 cup unsweetened applesauce
1/3 cup vegetable oil – or your preferred cooking oil
2 large eggs
1 teaspoon vanilla extract
1 1/2 cups all purpose flour
1/2 teaspoon baking powder
1/2 teaspoon baking soda
1/2 teaspoon salt
1/2 teaspoon ground cinnamon
Directions
– Preheat oven to 350 degrees F. Spray a 9x5 inch loaf pan with cooking spray.
– In a large bowl, add the grated zucchini, sugar, brown sugar, applesauce, oil, eggs, and vanilla. Whisk until well combined.
– Add the flour, baking powder, baking soda, salt, and cinnamon. Stir just until no dry flour remains, trying not to over mix.
– Pour the batter into the loaf pan. Bake for 50 to 54 minutes. A toothpick inserted into the center of the bread should come out with moist crumbs on it.
– Cool in the pan for 10 minutes. Remove from the pan and transfer to a wire cooling rack to cool completely before slicing.
– Store covered in the refrigerator.
*Note: This bread is best served after it has been refrigerated for at least 12 hours.
Original recipe source: https://www.thewholesomedish.com/the-best-classic-zucchini-bread/
Here is a link to some great summer squash recipes – it’s a gallery that you can click through and you pull up the recipe that most appeals to you: https://www.countryliving.com/food-drinks/g4379/summer-squash-recipes/
For more recipes check out our farm recipe blog: https://blackdirtrecipes.wordpress.com
Follow us on Instagram @yesifarm
Summer Share Week #7
And so it goes ... It seems like no matter how much you know or how much experience you have, something dumb will happen that will really put a monkey wrench in the plans of the day. While I was scouting the fields yesterday morning, I was driving by the sweet potato vines and in avoiding driving over them I got too close to the drainage ditch and slid in. The ground is so dry and powdery it’s like driving on sand and the effect is the same as mud. This is so frustrating as I grew up out here and know the pitfalls and the waste of time and energy on extricating a vehicle as well as potential damage to the vehicle. Getting unstuck is quite the adventure, you have to properly connect the chains between vehicle and tractor or you’ll tear off the bumper or bend a tie rod. The cable or chain has to be long enough so the tractor can get the necessary traction to pull the vehicle out or you’ll get the tractor stuck too. So with the help of neighbors and friends off I go to “unstick” my van and get on with the day's work.
VEGETABLES: YELLOW CORN, VERDOLAGA, CUCUMBER
Yellow Corn – Today’s corn is all yellow. I know for some folks it’s bi-color or the highway but you really need to give it a try – In my opinion this batch is actually sweeter than the bicolor you had last week. It makes a super pretty relish too!! Use it just as you would the bi-color.
Verdolaga – This is a super important vegetable and has gradually become more mainstream. Usually only found at farmers markets as the life span is short—so use this sooner than later. Verdolaga is the Spanish name that means green water. It is one of the only land vegetables that contains the omega 3 fatty acids like those found in fish. Our farmers love this vegetable and can’t wait for it to come in season. I asked them how they like to eat it and this is a photo of it and what they shared:
VERDOLAGA CON JUEVOS (VERDOLAGA WITH EGGS)
This recipe is based on our conversation and it is home cooking at its best so I have no quantities.
Ingredients
Verdolaga, eggs - scrambled, onion - chopped, salt and pepper
Directions
In a saute pan heat some oil until it shimmers, add chopped onion, saute until translucent and turning golden – keep an eye on it so it doesn’t burn! Toss in verdolaga, cook until wilted. Stir in scrambled eggs and cook until desired doneness. I like my scrambled eggs soft. Season to taste with salt and pepper.
Cheryl's Notes:
– You could season with chilies, garlic, serve on toast, so many options!!!
– I have used it as a salad green dressed with lemon juice salt and pepper
– I have added it to my potato salad
– I have dipped it in batter and fried it like tempura or squash blossoms
Cucumber – They got away from us with the heat pushing the plants—these are great if you hollow out the seeds and stuff with salads like egg, tuna or chicken. A cottage cheese stuffing of cottage cheese mixed with relish or salsa is good too.
ROASTED CUCUMBERS & ONIONS WITH FRESH HERBS
By jrh143 — "I invented this recipe out of a need for a way to use the surplus cucumbers from a friend's garden this summer. I had never heard of someone roasting cucumbers, and a quick internet search turned up nothing, so I thought it would make an interesting culinary experiment. As it turned out, though, I discovered a new family favorite! This fast and easy recipe makes a great side dish for any occasion. Great with chicken or steak! I've even eaten it by itself for a light lunch. What more could you ask for?"
Yield: 4 servings
Ingredients
· 2 tablespoons Butter, with salt
· 1 large Cucumber, peeled, raw
· 1 small sweet onion
· 1 teaspoon Basil, fresh
· 1 teaspoon Parsley, raw
· 1 teaspoon Cilantro, raw
· 1 teaspoon Mint Leaves-Raw
Directions
· Step 1: Preheat the oven to 350 degrees F (175 degrees C). Line a 9x13-inch baking dish with aluminum foil. Spray the foil with olive oil cooking spray.
· Step 2: Spread pieces of butter into the baking sheet and lay cucumber spears over the butter. Top with slices of sweet onion and scatter basil, parsley, cilantro, and mint over the top. Spray the vegetables again with olive oil cooking spray.
· Step 3: Roast cucumber mixture in the preheated oven until cucumber spears begin to soften, about 10 minutes. Turn the cucumbers and onion slices over and return to oven; roast until cucumbers are tender, 15 to 20 more minutes.
Original recipe source: https://www.allrecipes.com/recipe/228218/roasted-cucumbers-and-onions-with-fresh-herbs/?printview
The following is one way we grew up eating cucumbers—it’s based on Polish cuisine as that is where my family originally came from.
Cucumber – slice off ends and rub the cut off piece on the cucumber. I still do this out of habit and was always told that you have to do this to help take away any bitter in the cucumber. Peel and slice in chunks or circles however you would like to eat them. Sprinkle with salt and pepper. Add a splosh of sour cream – you can use mayo or both. Season with fresh dill. Let set for a bit so flavors develop and blend. Then enjoy.
You can always do a vinaigrette dressing instead of the sour cream!!
For more recipes check out our farm recipe blog: https://blackdirtrecipes.wordpress.com
Follow us on Instagram @yesifarm
**Zigi's note: I had to look up Spigarello?! From a google search—"Believe it or not, spigarello is the kooky crazy member of the extensive broccoli family." Check out this blogpost for more info and how to cook: http://blog.grubmarket.com/how-to-cook-spigarello/
Summer Share Week #6
Take a walk on the wild side—following are links to Instagram and facebook—same video—but you can take a quick walk through the corn with me!!! I shot the video yesterday morning.
Instagram: @yesifarm, here's the link: https://www.instagram.com/p/CC8XZ0pJFUV/?utm_source=ig_web_copy_link
Facebook: Cheryl Rogowski personal page, Rogowski farm farm page
Part of the fun of being a CSA member is the different things you receive — some are old familiar vegetables and some are "WHAT????" We planted some garlic in late spring and that is part of your share today. And we gave you the whole plant so you can see what it looks like. Everyone will receive snow peas this week and the colors are an array of yellow, green and purple. The potatoes are a variety called Strawberry Paw, their flesh is a brilliant white!! And that skin peeling off the potatoes? That is a sure indicator that they are new and just dug. Sweet corn is bi-color meaning there are both white and yellow kernels on the cob. We also gave you kale, collards and you have a choice in your herbs. There’s a random mix of sage, rosemary, thyme, oregano, basil, dill—basically whatever the farmers chose to harvest. Enjoy!
BABCIA'S POTATO SALAD
Babcia is Polish for Grandmother and this is my Mom's recipe for potato salad. No quantities — I cook by eye and feel — pretty much how I was taught!
Potatoes — I use whatever I can put my hands on the quickest, but most folks like a red skin for salad. Don’t peel – wash them. If on the bigger side cut into manageable cubes for eating. Put potatoes in a pot with enough water to cover the potatoes. Add a sprinkle of salt. Bring to boil, then reduce to a simmer. You know they’re done when a fork or knife slips into the flesh easily. I usually remove them from heat when they’re still a bit firm. As with most things the residual heat will keep them cooking even if not on a burner. Be careful not to boil too long or you’ll end up with mashed or smashed potatoes. Once tender, drain. Mom used yellow onions but I like to grate red onion into the warm potatoes, maybe some chopped celery, salt, pepper, mayonnaise to taste and consistency you prefer. If you do this while potatoes are still warm – it all melts together, I can make a meal out of this!!! Some other options: add hard-boiled eggs, parsley, green olives, chopped scallions or chives instead of onions.
SUMMER CORN CHOWDER
This Summer Corn Chowder is creamy, comforting and full of flavor. Made with bacon, garlic and cheese it's pretty hard to resist and can be enjoyed all summer long! Serve in big bowls with a side of crusty bread.
Ingredients
4 ears fresh sweet yellow corn, husked and silks removed and kernels cut from cob
1 1/2 Tbsp butter
2-3 slices bacon, cut into 1/4 to 1/2-inch pieces
½ medium yellow onion chopped (3/4 cups)
1/8 cup all-purpose flour
1/2 clove garlic, minced
2 1/2 cups water
1 lb potatoes, cut into 1/2-inch pieces
¼ tsp dried thyme
1 small bay leaf
Salt and freshly ground black pepper
½ cup half and half
½ Tbsp honey
1-2 Tbsp chopped fresh chives
Shredded cheddar cheese, for serving (optional)
Directions
1. Melt butter in a large pot over medium heat. Add the onion and bacon and cook, stirring frequently, until the onion has softened and just starting to brown around the edges, about 8 - 10 minutes. Add in the flour and garlic and cook for 1 1/2 minutes. While whisking, slowly pour in water (or low-sodium chicken broth may be used as well).
2. Bring mixture to a boil, stirring constantly, then stir in corn kernels and potatoes. Add in thyme and bay leaf and season with salt and pepper to taste. Bring to a light boil, then reduce heat to medium-low and allow to simmer, stirring occasionally, until potatoes are tender, about 20 minutes.
3. Remove bay leaf then transfer 1 ¼ cups of the chowder to a blender and blend until smooth. Stir the mixture back into the pot then stir in half and half and honey. Sprinkle each serving with chives and optional cheddar.
Notes from Cheryl: I don’t peel my potatoes for this and will use red skin or a yukon
Original recipe source: https://www.cookingclassy.com/summer-corn-chowder/
GARLIC ROASTED SUMMER SQUASH
Ingredients
2 summer squash
¼ cup olive oil
3 cloves garlic, minced, or more to taste
1 teaspoon herbes de Provence
1 pinch salt to taste
1 pinch ground black pepper to taste
Directions
Step 1: Preheat oven to 450 degrees F (230 degrees C).
Step 2: Trim the ends from the squash, and cut each squash in half lengthwise. Cut the halves in half again crosswise, to make 4 pieces; cut those pieces in half twice more the long way, to make 16 short spears from each squash. Toss the squash with olive oil and garlic in a bowl; place into a shallow baking dish. Sprinkle with salt and black pepper.
Step 3: Roast the squash until the spears and garlic start to brown, 5 to 10 minutes. Check the squash after 5 minutes, and add time in 2- to 3-minute intervals to avoid burning.
Notes from Cheryl: You could also sprinkle some grated parmesan cheese or nutritional yeast over the squash when you take it out of the oven.
Original Recipe Source: https://www.allrecipes.com/recipe/217995/garlic-roasted-summer-squash/
For more recipes check out our farm recipe blog: https://blackdirtrecipes.wordpress.com
Follow us on Instagram @yesifarm
Summer Share Week #5
Watching the sky change, greyer and greyer but will it rain? It was a week ago today I was ”robbing” potatoes, i.e. stealing a few potatoes here and there from under the plants while leaving the plants to keep growing and maturing. That was when that tropical storm was moving through the region. The top layer of soil, about an inch, was absolute mud but under that it was so dry like a desert. It would take time for that moisture to wick down to where it’s needed the most—the root systems. But how much would get there? How much will evaporate before the plant can really absorb that life sustaining liquid? These thoughts silently wander in the back of your mind while at the same time you are so profoundly grateful that it did rain and the plants received a drink and even more importantly that we can plant again—seeds and transplants so we can get fall and winter crops ready.
VEGETABLES — SNOW PEAS & SNAP BEANS
Yellow Snow Peas: Excellent sources of vitamins A, C and K as well as folate manganese and of course fiber.
This special treat is an heirloom that originated in India. Their flavor is especially nice paired with carrots and parsley. They can be eaten raw in salads, sautéed in oil with salt and pepper, maybe some chilies.
SWEET GARLICKY GLAZED SNOW PEAS
Ingredients
½ tablespoon olive oil
1 garlic cloves, minced
½ tablespoon sugar
1 tablespoon soy sauce
½ pound snow peas
½ tablespoon water
Directions
– In a large skillet, heat olive oil to medium-high heat. Add garlic and sauteé until golden-brown, about 1 minute.
– Add sugar, soy sauce, broccoli and snow peas, stirring to coat. Add water and cover skillet.
– Cook until tender, stirring occasionally, about 8 minutes.
Original recipe source: https://www.simplywhisked.com/sweet-garlicky-glazed-snow-peas/#tasty-recipes-17540
Nutritional Info: https://specialtyproduce.com/produce/Golden_Snow_Peas_10436.php
Snap Beans: What’s in a name—string beans, snap beans, green beans all used interchangeably for this vegetable.
STRING BEANS WITH GARLIC AND OIL
Ingredients
1/2 lb fresh string beans (washed, ends trimmed)
1 tbsp extra virgin olive oil
2 cloves garlic (sliced thin)
salt and fresh pepper
Directions
– Bring a large saucepan filled with 1 inch of water to a boil.
– Lower a steamer basket filled with the green beans into it, tightly cover the pan, and steam for 4-5 minutes (don't overcook), until the beans are tender crisp. Drain.
– In a saute pan heat olive oil. Add garlic and cook until golden.
– Add string beans, salt and fresh pepper to taste and toss well.
Original recipe source: https://www.skinnytaste.com/string-beans-with-garlic-and-oil/
For more recipes check out our farm recipe blog: https://blackdirtrecipes.wordpress.com
Follow us on Instagram @yesifarm
Summer Share Week #4
As the proverb goes, "to everything there is a season" and that is definitely how we roll here on the farm. The garlic scapes you are receiving today are the last until next year. They can be chopped and put in Ziploc bags in the freezer if you have space and want to hoard a few for a mid-winter treat! We are getting so close to harvesting peas — I was nibbling on some yesterday while scouting the fields. The rain that came through here yesterday and the heat that is coming will most certainly accelerate the growth and production of the plants. The rain was heavy enough that when I took off my boots and socks I just poured water out of them. The farmers were weeding the potatoes this morning. We’ll start to rob some this week. They are confident that the zucchini will be ready soon also. There’s a new crop of baby lettuces coming if we can keep the deer away long enough for us to harvest. Planted kohlrabi but it doesn’t seem to want to “ball” up the way it should so that may be a lost crop for now — we’ll plant more and keep our fingers crossed for a better crop next go-around.
VEGETABLE — Arugula
So many folks look for this vegetable — with its peppery bite, arugula is related to kale, radishes and cabbage. Originating in the Mediterranean, it was brought to the Americas in the 17th Century. A nutrition powerhouse with loads of vitamins and antioxidants.
Nutrition information: https://www.webmd.com/food-recipes/benefits-arugula
SIMPLE ARUGULA SALAD — Yield: Serves 4 to 6
Ingredients
· 2 tablespoons olive oil
· 2 tablespoons freshly squeezed lemon juice
· 1/8 teaspoon kosher salt
· Freshly ground black pepper
· 5 ounces arugula (about 5 packed cups)
· 2 ounces shaved Parmesan cheese (about 2/3 cup)
Directions
Whisk the olive oil, lemon juice, salt, and a few grinds of black pepper together in a large bowl. Add the arugula and toss to combine. Top with the shaved Parmesan and serve immediately.
Recipe Notes
Make ahead: The dressing can be made up to 5 days ahead of time and stored in an airtight container in the refrigerator. Re-whisk again before using.
Original recipe source: https://www.thekitchn.com/recipe-simple-arugula-salad-254833
ARUGULA MINT PESTO — Yield: Serves 8 (serving size: 2 tbsp.)
By JAMIE VESPA, MS, RD April 2018
We like the flavor of toasted, skin-on, whole almonds, but any almonds will taste great–just be sure to toast them first for the extra depth of flavor. Serve this sauce over grilled flank steak or lamb chops, or toss with tuna, white beans, and cherry tomatoes.
Ingredients
5 cups loosely packed arugula
1/2 cup fresh mint
1/4 cup toasted almonds
1/2 ounce grated Parmigiano-Reggiano cheese (about 2 Tbsp.)
2 garlic cloves
1 teaspoon lemon zest
2 tablespoons fresh lemon juice
3/4 teaspoon kosher salt
1/3 cup extra-virgin olive oil
2 tablespoons warm water
Directions
Pulse loosely packed arugula, fresh mint, toasted almonds, grated Parmigiano-Reggiano cheese (about 2 Tbsp.), garlic cloves, lemon zest, fresh lemon juice, and kosher salt in a food processor until finely chopped. With processor running, slowly drizzle in extra-virgin olive oil. Add warm water; process until blended.
Farmer Cheryl’s Notes: Sub garlic scapes for the garlic!! Remember to zest your lemon before juicing or it can be a squishy mess to handle. Pesto can be frozen up to 6 months
Original recipe source: https://www.cookinglight.com/recipes/arugula-mint-pesto
More Recipe Sources: 30 Arugula recipes that aren’t just salads: https://www.cookinglight.com/cooking-101/arugula-recipes
31 Arugula Recipes So You Can Eat It All the Time
https://www.bonappetit.com/recipes/slideshow/get-spicy-19-awesome-ways-eat-arugula
For more recipes check out our farm recipe blog: https://blackdirtrecipes.wordpress.com
Summer Share Week #3
Finally rain, and a goodly amount too depending on where you are in the valley. That and this heat will give everything a nice boost of growth. I’m seeing flowers everywhere — on tomatoes, potatoes, herbs, and eggplant which is a very good thing. I am going to see if I can rob some baby potatoes later today, it might be a bit too early yet. The farmers are busy planting and weeding, it seems almost non-stop, because it is!! Some days it feels like you no sooner weed out a bed than you’re back on it again because the weeds grew that fast. The winter and summer squash plants are filling in nicely and I am trying to remember where we planted the okra and kohlrabi ...
VEGETABLE — Herbs
The herbs you received today are a random mix — you may find oregano, rosemary, chives, thyme, basil, parsley, mint or cilantro. I asked the farmers to pick a random assortment so it’s basically pot luck today! They can make such a difference in a dish. Season eggs, an entree, a beverage, your salad. There are so many possibilities.
Here’s a link to on how to store fresh herbs:
https://www.cookinglight.com/cooking-101/techniques/how-to-store-fresh-herbs
And here is one on how to use fresh herbs:
https://www.cookinglight.com/cooking-101/essential-ingredients/all-about-herbs-slideshow
One cookbook in my collection that I will turn to for inspiration is
The Herbfarm Cookbook by Jerry Traunfeld. I can’t believe it was published in March 2000!!
For more recipes check out our farm recipe blog: https://blackdirtrecipes.wordpress.com
Summer Share Week #2
Weather — all we ever talk about as farmers but we literally live and die by it. Was chatting with another farmer the other day and he told me that thanks to the intense heat during the day, during the night his lettuce bolted. That’s bad if you’re a vegetable farmer. Basically it means that the lettuce went from edible to not in less than 24 hours. For that farmer it means he just lost the whole crop.
As I am writing this email, our farmers are out in the fields frantically weeding. As you may or may not know we do not spray chemicals on our farm which is so very awesome but so very challenging. Being a “Black dirt Farmer” means we have access to some of the most amazing soil on planet earth. Here’s a great link to a BBC article about it. http://www.bbc.com/travel/story/20190822-new-yorks-beloved-black-dirt-onions
But it also means that the weed pressure is fierce and a lot of our time is spent on just weeding so the plants we want to grow can survive and thrive. It’s not easy to work without chemicals and I am so ever grateful for the crew that supports us. They work so hard to bring in a successful harvest and are fiercely proud of what they produce. I share my Instagram and facebook posts with them and they are delighted at the pictures and make suggestions of other things to photograph. So to the farmers who toil behind the scenes – THANK YOU!!!!
VEGETABLE: Broccoli
Actually a flower, broccoli is a member of the cruciferous family meaning it’s related to vegetables like cabbage, kale, and cauliflower. Broccoli is a native plant of eastern Mediterranean and Asia Minor. Cultivated as sprouting broccoli in Italy during the times of ancient Rome, it was introduced to England and America around the 1700s. One of the healthier vegetables you can eat due to it’s high fiber content. It also has a considerable amount of fiber, Vitamins A, C and K.
Nutrition sources: https://www.healthline.com/nutrition/foods/broccoli
https://www.verywellfit.com/broccoli-nutrition-facts-calories-and-health-benefits-4118226
https://www.britannica.com/plant/broccoli
Recipes or Eat it raw!
OVEN ROASTED BROCCOLI
One of my favorite ways to cook broccoli and other vegetables. Preheat the oven to 450 degrees Fahrenheit. Break it up into florets. Cut the stem into smallish pieces. Place in a bowl or on a sheet pan to save on dirty dishes! Toss with olive oil or sunflower seed oil. Sprinkle with salt and pepper. Place in a hot oven. Roast for about 20 minutes — If you use the high heat like I do start checking at 10 minutes and give them a stir. The florets can get brown and crispy pretty quickly. Once they are cooked to your preference remove and enjoy. I’ll add them to a salad, pasta, sprinkle with some cheese and enjoy like that.
Seriously, The Best Broccoli of Your Life
This recipe takes roasting broccoli to a whole other level!!!
Ingredients
1 pound broccoli
1 garlic clove peeled and thinly sliced
Good olive oil or for Keto—butter-flavored coconut oil
¼ teaspoons kosher salt
freshly ground black pepper
1/2 teaspoons grated lemon zest
1/2 tablespoons freshly squeezed lemon juice
1/4 cup freshly grated Parmesan cheese
Directions
1. Preheat the oven to 425 degrees F.
2. Cut the broccoli florets from the thick stalks, leaving an inch or two of stalk attached to the florets, discarding the rest of the stalks. Cut the larger pieces through the base of the head with a small knife, pulling the florets apart.
3. Place the broccoli florets on a sheet pan large enough to hold them in a single layer. Toss the garlic on the broccoli and drizzle with 1-2 Tablespoons of olive oil. Sprinkle with the salt and pepper.
4. Roast for 20 to 25 minutes, until crisp-tender and the tips of some of the florets are browned.
5. Remove the broccoli from the oven and immediately toss with 1 1/2 teaspoons olive oil, the lemon zest, lemon juice, and Parmesan. Serve hot.
Original Recipe Source: https://www.errenskitchen.com/seriously-best-broccoli-life/
From Bon Appetit: 27 Broccoli recipes to make tonight
https://www.bonappetit.com/recipes/slideshow/broccoli-recipes
For more recipes check out our farm recipe blog: https://blackdirtrecipes.wordpress.com
Summer Share Week #1
We do a lot of things on the farm—weeding, planting, harvesting, but one of the more important tasks is saving our own seed. When I was a kid on the farm one of the most important jobs was selecting the onions that would be planted for their seed. In many ways this was a determining factor of the future success of the farm. Dad would school me on how to pick just the right onions. In those days early yellow globes were the style of onion most prevalent. The most desired traits were perfectly round, firm onions with deeply colored coppery gold skin, a firm nub in the neck and each one about 2–3 inches in diameter. We would select these jewels from the fall harvest, carefully store them all winter, and then plant the onions in early spring. The seed harvest would happen in late summer. We still save seed on the farm—that broccoli raab you’re getting today is a result of our seed-saving efforts on the farm!
VEGETABLE — Lettuce
Leaf lettuce is one of nature's perfect salad greens. Delicate leaves yet sturdy enough to hold up to a cream dressing. My favorite go-to salad dressing is cider vinegar blended with either olive oil or sunflower seed oil.
WILTED LEAF LETTUCE SALAD
Ingredients
· 2 cups torn leaf lettuce
· 1 small onion, sliced
· 2 radishes, sliced
· 3 bacon strips, diced
· 1 tablespoons vinegar
· 1/2 teaspoon brown sugar
· 1/8 teaspoon ground mustard
· 1/8 to 1/4 teaspoon salt
· pepper to taste
Directions
In a large salad bowl, toss lettuce, onion and radishes; set aside. In a skillet, cook bacon until crisp; remove with a slotted spoon to drain on paper towel. To the drippings, add vinegar, brown sugar, mustard, salt and pepper; bring to a boil. Pour over lettuce and toss; sprinkle with bacon. Serve immediately.
Original Recipe Source: tasteofhome.com/recipes/wilted-leaf-lettuce-salad/
LEAF LETTUCE SALAD
Ingredients
1 bunch leaf lettuce
1 cup mayonnaise
2 tablespoons vinegar (I prefer red wine vinegar or apple cider vinegar)
3 tablespoons sugar
Directions
- Put the Mayonnaise, Vinegar and Sugar into a bowl and stir until mixed. Place in the refrigerator to allow the ingredients to blend and to allow time for the sugar to dissolve.
Note: This is enough dressing for about half a large bunch of lettuce. Remaining lettuce can be stored in the refrigerator, covered, for use tomorrow.
- Remove the individual leaves from the main plant. Do not cut, pull them apart.
- Rinse each leaf under cold water and shake excess water off the leaves.
- Remove the tender portion of the leaf from the stalk and discard the stalk
- 'Tear' leaves into whatever size you think will fit into your mouth
- Start by tossing a third or so of the lettuce with the dressing and add lettuce until the lettuce is coated well with the dressing (you don't want a pool of sauce in the bottom of the bowl but you want the lettuce well coated).
- This is best if the lettuce is mixed with the dressing just prior to eating. The flavor won't change but the lettuce tends to get soggy after about an hour after mixed with the dressing
Recipe Source: https://www.food.com/recipe/leaf-lettuce-salad-130176
LETTUCE SOUP
Ingredients
1/2 cup chopped onions, scallions, and/or shallots
1 garlic clove, chopped
1 ½ tbsp unsalted butter
¼ tsp ground coriander
½ tsp salt
1/8 tsp black pepper
½ cup diced (1/3 inch) peeled potato
4 cups coarsely chopped lettuce leaves including ribs (3/4 lb)
1 1/2 cups water
Directions
1. Cook onion mixture and garlic in butter in a 4- to 5-quart heavy pot over moderately low heat, stirring, until softened, 3 to 5 minutes. Add coriander, salt, and pepper and cook, stirring, 1 minute.
2. Stir in potato, lettuce, and water and bring to a boil, then reduce heat and simmer, covered, until potato is very tender, about 10 minutes.
3. Purée soup in batches in a blender (use caution when blending hot liquids) and transfer to a 2- to 3-quart saucepan. Bring soup to a simmer, then whisk in remaining tablespoon butter and salt and pepper to taste.
Original Recipe Source: https://bostonorganics.grubmarket.com/recipes/lettuce-red-leaf/lettuce-soup
For more recipes check out our farm recipe blog: https://blackdirtrecipes.wordpress.com
Spring Share Week #12
How have we reached week 12 in the spring share? So hard to believe it but yes it’s true. On behalf of all of us here at the farm THANK YOU for your support!!! It means so much to all of us and gives us hope. And if there is one thing a farmer must have it’s hope – so again THANK YOU for all you do!!! Got a bit of a late start this morning. I hit the fields around 6 AM and started weeding the dill and transplanting lettuces. The weather today is absolutely perfect for transplanting—overcast and so far the gentlest of showers. Now if I can keep the doggone deer and woodchucks out we should have some gorgeous lettuces in a couple weeks.
Vegetables — Quelites
That’s the bunch of greens in today's share that sort of reminds you of spinach. Euell Gibbons, an early health food advocate known for his wild foraging, refers to them as Red Root, as kids we grew up knowing them as pigweed and our farmers refer to them as delicious!!! As with so many foods quelites have an interesting history. Back in the day like the 12–1300s, they was considered a food source for the aristocracy. Then as travel and trade evolved and other cuisines were introduced, quelites were considered peasant food and of course as part of the greater evolution of food became fodder for pigs hence the name “pigweed.” We would see our farmers taking bushels of “weeds” home and finally out of curiosity asked the big question, what are you doing with that? Turns out this weed that I spent hours and days yanking out of the onion and lettuce fields is a member of the amaranth family and considered a delicacy in many food cultures! Who’da thunk? Quelites only grow in warm weather and there is a season as to the best times to eat them, so enjoy them now!!!
Scapes
The ever infamous scapes!!! Only available now and only grow on hard neck garlic. So delicious with all that awesome garlic flavor. Use wherever you want the taste of garlic, make pesto or pickles. If you can’t use them all up now you can freeze them and pull them out as you like. They make a cool bouquet too—place in a vase of water on the table and they will keep sucking nutrients out of the water and continue to grow and loop and curl!!
Now what do I do with this wild stuff? On our blog there is a recipe for a dip made with the quelites. Here is a Mexican Greens Recipe:
MEXICAN-STYLE SAUTEED GREENS
This is kind of how our farmers make the quelites but they don’t put tomatoes in it. As you can see this recipe is good for pretty much any green
Author: Pamela
Serves: 4
Ingredients
1 Tablespoon unrefined, cold-pressed, extra-virgin olive oil
½ onion, finely diced
1 jalapeno, thinly sliced (remove seeds to make it milder)
1 cup cherry tomatoes, halved
1 pound kale, stems removed and leaves cut into strips or 10 ounces baby greens such as baby kale, Swiss chard and spinach
Sea salt and freshly ground black pepper to taste
1 Tablespoon fresh lemon juice
Directions
1. In a large sauté pan, heat the oil over medium heat. Add the onion and jalapeño and cook until onion is tender and translucent, about 3 minutes.
2. Add tomatoes and cook for another 2 minutes, or until tomatoes just start to lose their shape.
3. Add the greens and a sprinkle of sea salt and black pepper. Cook, stirring frequently, until greens are wilted and just tender. Sturdier greens will take longer than baby greens.
4. Pour lemon juice on top and taste for seasoning. Serve immediately.
Source: https://pamelasalzman.com/mexican-style-sauteed-greens-recipe/
Tip: You can also mix the different greens
Here’s a link for the garlic scapes:
https://www.seriouseats.com/recipes/2010/06/the-crisper-whisperer-what-to-do-with-garlic-scapes-recipe.html
More of an idea list—there don’t seem to be links to recipes.
You can basically sub scapes for garlic in recipes – how many? This is entirely up to you and your palate. My sister can eat it until it absolutely oozes out of her pores, other folks not so much. Start with a little, then adjust to taste. The pesto is definitely garlicky!!!
GARLIC SCAPE PESTO
Pesto is a pantry staple. Freeze fresh summer pesto for a burst of summer in the middle of winter. This Garlic Scape Pesto is, versatile and a fabulous addition to pizza, pasta, crostini, potato salad or sandwiches. Recipe yields about 1 1/4 Cup. This recipe is vegetarian + gluten free | The nutrition estimate below is for about 1 Tbs per serving.
Ingredients
· 10 (154g) Garlic Scapes
· 1/3 C (44g) Pine Nuts *see note for substitute!
· 1/3 C (38g) Parmesan Asiago or simply Parmesan diced or shredded **see note
· 1/2 Lemon, juiced
· 1/8 tsp Fine Sea Salt
· A few grinds of Pepper
· 1/3 C (70g) Olive Oil
Directions
1. Trim the garlic scapes by cutting just below the bulb. Discard the bulb and set the remaining scape aside.
2. In a food processor, add the scapes, twirling them around the center so that they all fit. Add the pine nuts, cheese, juice of the lemon and salt and pepper. Process by pulsing until the mixture begins to break down. Scrape the bowl down.
3. With the processor running, slowly add all the olive oil. Continue to process until all the ingredients are incorporated and broken down, about one minute.
4. Store in a covered container or lidded jar in the fridge and enjoy within a week. Also, you can freeze the pesto in a jar or in an ice-cube tray. Once frozen, in the ice-cube tray, remove and place in a zip top bag in the freezer.
Notes
*The price of pine nuts have gone through the roof! Toasted walnuts will be a fine sub for this recipe. Simply rough chop the walnuts and measure 1/3 C (30g).
**Parmesan Cheese: Look for vegetarian-friendly Parmesan cheese (one that does not use rennet in production). BelGioioso vegetarian Parm can be hard to find, but Organic Valley is more widely available and Stella offers a vegetarian friendly Parm. I found this comprehensive list that shows brands who produce vegetarian-friendly parmesan cheese. For more information, check directly with your preferred cheesemaker.
Recipe adapted from Epicurious.
Source: https://vanillaandbean.com/garlic-scape-pesto/
For more recipes check out our farm recipe blog: https://blackdirtrecipes.wordpress.com
Spring Share Week #11
I truly hope you are all safe and well. We think of you all here at the farm all the time. This crazy weather, huh? The rain, heat and humidity are creating some incredible growing conditions on the farm – not only for vegetables but for weeds, and the high moisture can generate breeding grounds for diseases within the plants. We have to really be on our game now. The potatoes are growing nicely and the Colorado potato beetles have already found them and are laying eggs. ARGH!!! I’m beginning to feel like I have potato issues. The farmer next door to me put in a couple of acres of potatoes and they are conventional so they spray. This means the bugs will migrate to us since we are chemical free and this will create even more pressure on our plants. The sweet potato slips arrived from Georgia the other day. I hope, I hope, I hope we will have a good crop from them – I ordered purple, blue, white and yellow varieties in addition to the traditional orange. Now that’s what I get excited about!!!!
VEGETABLE — Spinach
Most folks love baby spinach in their smoothies. I enjoy mine in salads, and a favorite—and pretty much daily breakfast for me—is to heat up a small sauté pan, put in some olive oil, a tiny pat of butter, throw a heaping mess of spinach into it, sprinkle with some salt and pepper. Turn off the flame, cover the pan and just let it wilt. Once it’s cooked down, I remove the spinach from the sauté pan, leaving behind as much of the oil and juice from the spinach as possible. I crack two eggs into the spinach liquor, put the cover back on, and basically steam the eggs. I like to leave the yolk a bit runny but sometimes get distracted and to be honest forget about the eggs. For me it doesn’t matter as the yolks get so creamy in texture.Sometimes the pan has cooled off a little too much so you may have to turn the heat up under the pan for a minute or two. As soon as you have enough heat in there turn off the flame. I think that’s why I enjoy this so much, it’s very forgiving. Once the eggs are cooked to your desired texture, remove from pan and put on top of spinach. YUM!!! I know this is so simple but I can make and eat it in minutes and be out the door asap. If I have time and am feeling creative, I’ll sauté some mix-ins for the spinach — scallions, mushrooms, herbs, onions, tomatoes, sun-dried tomatoes, potatoes, even broccoli or cauliflower. Some cheese melted over the top of the eggs and a side of toast, and I’m good for a couple of hours!
When we made the delivery yesterday I noticed a lot of rhubarb in the store — so I’m guessing that’s in the fruit share this week — here are a couple of links to help you out with that:
I like the Taste of Home recipe site — my Mom used to subscribe to their magazine and the recipes remind me of the home cooking I grew up on as a kid: https://www.tasteofhome.com/collection/top-10-rhubarb-recipes/
Saveur is another personal favorite resource of mine: https://www.saveur.com/best-rhubarb-recipes-desserts/
For more recipes check out our farm recipe blog: https://blackdirtrecipes.wordpress.com
Spring Share Week #10
Some might find todays grey, overcast sky depressing but right now it makes me happy. The soft misty sprinkles of rain and cooler temps are perfect growing conditions for the transplants we put out. The plants go through “shock” when you move them from the greenhouse and out of their 4” pots into the big wide open fields. Today’s conditions help them make the adjustment to the fields a little easier and more quickly. I’m going to try getting some basil plants in today and pray we won’t get too many chilly nights as that would be a death knoll for the basil.
VEGETABLE
Garlic Chives — Often called a Chinese Leek
These beauties have been around for over 4,000 years. OK, but what are they? Its Latin name, Allium tuberosum, gives you a clue that it’s a member of the onion family. Unlike onions, you eat the leaves and flowers not the roots. Chives have a straw like leaf whereas garlic chives have a flat leaf kind of like a leek. The flower of a garlic chive is umbrella shaped and composed of little star shaped, white flowers. The flowers are tasty in herbal vinegars, salads, soups, compound butter and even in soft cheeses.
Sources: https://www.gardeningknowhow.com/edible/herbs/garlic-chives/growing-garlic-chives-plants.htm
https://www.thespruceeats.com/garlic-vs-regular-chives-1807018
CHINESE SCRAMBLED EGGS WITH CHIVES
This recipe for Chinese scrambled eggs is made with Chinese garlic chives. These go very nicely with egg, but you can use regular chives as well. This dish typically calls for a lot of chives, feel free to reduce the amount to 2 or 3 tablespoons and add other seasonings if desired.
Ingredients
1 bunch Chinese garlic chives
4 large eggs
1 1/2 teaspoons light soy sauce (or up to 1/2 teaspoon salt)
Freshly ground black or white pepper (to taste)
2 tablespoons vegetable or peanut oil
Directions
1. Gather the ingredients.
2. Wash and drain the garlic chives. Remove the hard ends and any wilted green leaves at the top and chop into 1 inch lengths until you have 1/3 cup (5 tablespoons).
3. Beat the eggs. Add the soy sauce or salt, 1 teaspoon vegetable oil and pepper.
4. Heat a heavy skillet over medium-high heat.
5. Add the remaining oil, lifting the frying pan so that the oil covers the bottom of the pan. When the oil is hot, add the chives.
6. Stir-fry briefly, then add the beaten egg mixture.
7. Reduce the heat to medium and gently scramble the eggs.
8. Remove them from the heat when they are just done but still moist.
9. Serve hot and enjoy.
Source: https://www.thespruceeats.com/chinese-scrambled-eggs-with-chives-694150
GARLIC CHIVE RECIPES FROM BLOGS
In Erika’s Kitchen: 99 Ranch Market soup with snow pea shoots and garlic chives
Nut Free Wok: Garlic Chive Flowers Stir-fry
No Recipes: Niratama (Garlic Chive Scrambled Eggs)
She Simmers: Stir-Fry of Flowering Garlic Chives and Pork
Thai Food & Travel: Stir-fried Chive Flower Buds with Shrimp and Oyster Mushrooms
Azelias Kitchen: Chinese Garlic Chives & Bacon
Epicuious: Stir-fried Garlic Chives with Chile
Source: http://www.jackiegordon.com/index.php/blog/garlic_chives_two_ten_ways
For more recipes check out our farm recipe blog: https://blackdirtrecipes.wordpress.com
Spring Share Week #9
"Hoo-boy" are we busy at the farm—planting, transplanting, and now the weeds are coming!! This week we are planting snap, shell and lima beans, summer squashes, cucumbers, and melons. And we'll be transplanting tomatoes, peppers and herbs. Cabbages, broccoli and cauliflower are going out too. Sweet potato slips should arrive from Georgia this week and next we’ll get the winter squashes in the ground. Keeping a close eye on the potatoes for those nasty beetles to pop up—they over-winter in the ground and since this was a mild winter ...
VEGETABLE
Chive Blossoms
Not really a vegetable but they were so sweet-looking in the fields I just had to bring you a little bouquet. These oniony tasting blossoms are wonderful sprinkled over eggs or salads. The stems can get woody once the blossoms come on but you can add them (stems and blossoms) to a vinegar like a cider, sherry, rice or white wine vinegar—just choose a softly-flavored one, I find white vinegar is too sharp for this. Let set for, oh about 3 weeks and you’ll have delightfully flavored vinegar!
Broccoli Rabe (aka Broccoli Raab, Rapini)
Renowned as a bitter green which of course means it’s good for you—I know how many times we have been told that?! But it really is good for you—high in fiber, low in calories, and full of all sorts of vitamins, minerals and antioxidants. Being high in vitamins A and C means it can really help give your immune system a boost. This amazing vegetable is actually related to turnips and mustard. The Italian name "cime de rape" translates to turnip tops. When it comes to cooking, do so in plenty of well-salted water, like pasta. Once drained, broccoli rabe just begs to be enrobed in olive oil, garlic, and even a little chile heat. I like to add roasted peppers or sun-dried tomatoes to mine.
Sources:
https://nutritiouslife.com/eat-empowered/nutrient-dense-broccoli-rabe/
http://www.grandvoyageitaly.com/cucina/the-bitter-truth-about-broccoli-rabe
BROCCOLI RABE PASTA WITH GOLDEN GARLIC
Ingredients
· 1/2 large head of garlic, separated into cloves
· 1/3 cup extra-virgin olive oil, plus additional for drizzling
· 1/8 teaspoon crushed red pepper
· 4 ounces corkscrew or gemelli pasta
· 1/2 pound broccoli rabe, lower coarse stems discarded and remainder cut crosswise into 2-inch strips
· Accompaniment: grated Parmigiano-Reggiano
Directions
1. Bring a 6- to 8-quart pasta pot of water to a rolling boil and season generously with salt.
2. Meanwhile, peel the garlic cloves, leaving them whole, then cut them lengthwise into thin slices. Cook the garlic slices in the olive oil in a heavy skillet over medium heat, stirring occasionally, until the oil bubbles, then reduce the heat to medium-low and cook the garlic slowly, stirring occasionally, until pale golden, 5 to 6 minutes. Stir in the red pepper and remove the pan from the heat (the garlic will continue to cook in the residual heat.)
3. Add the pasta to the boiling salted water and cook it, stirring once or twice in the beginning, according to the package instructions. About 4 to 5 minutes before the pasta is done (depending on how tender your broccoli rabe is), stir in the broccoli rabe and continue to boil the mixture, uncovered, until the pasta is al dente and the broccoli rabe is tender.
4. Drain the pasta mixture in a colander and transfer it to a large serving bowl. Spoon the garlic/oil mixture over the pasta and drizzle it with additional olive oil to taste.
Original recipe source: https://www.epicurious.com/archive/blogs/editor/2014/05/get-into-broccoli-rabe.htm
ORECCHIETTE WITH BROCCOLI RABE PESTO
Ingredients
· Salt
· 1 bunch (about 1/2 lb.) broccoli rabe (rapini)
· 1/2 lb. orecchiette or other short-cut pasta
· 1/4 cup toasted walnuts
· 1/2 rounded tbsp. Calabrian chili paste, or 3 to 4 pickled hot cherry pepper rings and a splash of brine
· 1-2 cloves garlic, crushed
· 3/4 cup grated Parmigiano-Reggiano
· 3/4 cup grated Pecorino Romano
· 1/4 to 1/2 cup Extra Virgin Olive Oil (EVOO)
Directions
1. Prepare a large bowl of ice water. Bring a pot with a few inches of salted water to a boil. Trim the broccoli rabe of any yellow leaves; cut off the tough ends from the stalks. Cook until crisp-tender, 3 to 4 minutes. Drain and transfer to the ice water to cool. Drain and pat dry. Chop into bite-size pieces.
2. Meanwhile, bring a fresh pot of water to a boil for the pasta. Salt the water and add the pasta. Cook until 1 minute shy of the package directions.
3. While the pasta cooks, place about two-thirds of the broccoli rabe in a food processor. (Reserve the prettier pieces and small florets to toss with the pasta.) Add the nuts, chili paste, and garlic. Pulse to get the pesto going. Add about 1/2 cup of each cheese. Pulse a few more times. With the machine running, gradually stream in the EVOO. Season the pesto with salt.
4. One minute before draining the pasta, add the reserved broccoli rabe to the pot with the pasta to heat it through. Reserve 1 cup of the pasta cooking water. Drain the pasta and broccoli rabe; return to the pot. Add the pesto and cooking water. Toss until coated. Divide among 4 shallow bowls. Top with the remaining cheeses.
Options: Fry some sausage and add to dish—could be sweet or hot, pork or chicken, or keep it vegetarian and add some mushrooms—if using dried mushrooms keep liquid from rehydrating the 'shrooms and toss that in with the pasta. I like to add sun-dried tomatoes to my pesto when I make it but you could add it to the pasta dish too. For my pasta I like to use any type that can hold the pesto into it’s nooks and crannies.
Original recipe source: https://www.rachaelraymag.com/recipe/orecchiette-with-broccoli-rabe-pesto
Here’s another recipe source (but the NY Times requires a subscription):
https://cooking.nytimes.com/recipes/12860-orecchiette-with-sweet-sausage-and-broccoli-rabe-pesto
For more recipes check out our farm recipe blog: https://blackdirtrecipes.wordpress.com
Spring Share Week #8
I was so enjoying the sunshine earlier today – our lettuces are big enough to transplant and I picked radishes the size of dimes, not too many but enough to finally have serious encouragement and hope!!! The mechanic has the Kubota purring like a kitten – one doesn't realize how heavily the stress of having broken equipment and not being able to do your job efficiently weighs on you. Charlie, that’s the mechanic, worked on the D-14 yesterday. Fingers crossed that it’s ready to roll later today. This tractor is used to haul our tillivators – these are basically tools made of L-shaped blades that spin at a rapid-fire pace and chop up anything in it’s path. And I do mean anything, this tool is nondiscriminatory – one slip and you move off the row and you’ll wipe out not only the weeds but the vegetables too – NOT GOOD!!! The D-14 also carries the Whirly bird, this is basically a giant funnel with a gear in the bottom. We use this to put fertilizer on the fields (the chicken poop). It’s kind of like a coffee grinder – pour the fertilizer in top and as you move – the gear at the bottom spins and the fertilizer is broadcast over the field.
VEGETABLE
Asparagus
Once classified in the lily family, like the other related Allium species, onions and garlic, I always thought it was a member of the grass family but from what I was reading recently it seems to have it’s own classification. Asparagus is a nutrient-packed vegetable and is a very good source of fiber, antioxidants and vitamins. Another plus is that 1 cup of cooked asparagus has 40 calories, 4 grams of protein, 4 grams of fiber and 404 milligrams of potassium. Used as a vegetable, in medicine, and widely viewed as an aphrodisiac. Evidence of its use is pictured in an Egyptian frieze dating back to 3000BC. Asparagus was eaten fresh by the ancient Greeks and Romans and dried to be eaten in winter. Emperor Augustus is credited as having created the expression “faster than cooking asparagus” to describe taking quick action! By 1469, asparagus was cultivated in French monasteries and brought to North America by European settlers as early as 1655.
Sources: https://en.wikipedia.org/wiki/Asparagus
https://www.healthline.com/nutrition/asparagus-benefits#section2
https://www.medicalnewstoday.com/articles/270805#nutrition
https://modernfarmer.com/2014/04/10-surprising-facts-asparagus/
Recipe Ideas:
One of my absolute favorite ways to cook asparagus is roasted in the oven with olive oil and some salt and pepper – like many other vegetables cooked this way, it’s so addicting you can’t stop eating it!!! Super simple – pre-heat oven to high heat, I aim for 450 degrees. Toss the spears with oil season to taste with coarse salt and fresh cracked pepper. Spread out on a sheet pan – leave space between the spears to get those crispy crackly edges all around. Start checking after about 10 minutes and remember – food will keep cooking from the residual heat in it and the pan it’s on. Let cool till you can handle it with your fingers and enjoy!!!! In my opinion this could give freshly popped and buttered popcorn a run for its money!!!! Another option is to sprinkle lightly with red pepper flakes if you like it zesty or some grated or shaved parmesan is nice too once it’s melted into those spears.
PANKO-CRUSTED ASPARAGUS SPEARS
Servings: 2
Ingredients
Cooking spray, preferably canola oil
⅓ cup low-fat mayonnaise
2 scallions, trimmed and finely chopped
2 tablespoons white miso (see Notes)
1 teaspoon chile-garlic sauce
½ teaspoon toasted sesame oil
1/2 bunch asparagus (about 1/2 pound), trimmed
¾ cup Japanese-style Panko (see Notes)
¼ cup sesame seeds
Directions
Step 1: Preheat oven to 450 degrees F. Line a baking sheet with foil; coat with cooking spray.
Step 2: Combine mayonnaise, scallions, miso, chile-garlic sauce and oil in a small bowl.
Step 3: Place asparagus in a shallow dish and toss with half the miso mixture (about 1/4 cup), making sure the asparagus is well coated.
Step 4: Combine Panko and sesame seeds in another shallow dish. Working with one spear at a time, roll in the Panko mixture and place on the prepared baking sheet, leaving a bit of room between each spear. Coat the prepared spears with cooking spray.
Step 5: Roast the asparagus until the coating is browned and crispy and the asparagus is tender, 20 to 25 minutes. Serve with the remaining miso mixture as a dipping sauce.
Notes: Miso is fermented soybean paste made by inoculating a mixture of soybeans, salt and grains (usually barley or rice) with koji, a beneficial mold. Miso is undeniably salty, so a little goes a long way. White or sweet miso (Shiromiso), made with soy and rice, is yellow and milder in flavor; use for soup, salad dressings and sauces for fish or chicken. Look for it near tofu at well-stocked supermarkets.
Original Recipe Source: http://www.eatingwell.com/recipe/252796/panko-crusted-asparagus-spears/
Other sources for Asparagus recipes:
http://www.eatingwell.com/recipes/19289/ingredients/vegetables/asparagus
For more recipes check out our farm recipe blog: https://blackdirtrecipes.wordpress.com
Spring Share Week #7
It's going to be short and sweet today–the weather has seriously turned in our favor–thank you Sweet Lord!!! Even though tomorrow night and early Saturday the forecast is for cold and snow, the heat of these past few days has really helped jumpstart the crops in the fields. Fingers crossed we’ll have asparagus next week!!!! I picked up about a half-ton of organic composted chicken poop this morning. We’ll spread that out in the potato field and get the potatoes planted by the weekend! Sorry for the short chat but gotta run. I started working at 5:00 AM and lots to do yet before we lose daylight!!!
PAN-ROASTED CARROTS WITH MINT AND PARSLEY GREMOLATA
Ingredients
1 pound carrots, cut on a diagonal into 3-inch-long pieces, halved lengthwise
1/2 cup low-sodium vegetable or chicken broth
3 teaspoons olive oil
Kosher salt and freshly ground black pepper
1/4 cup chopped mint
1/4 cup chopped parsley
2 teaspoons fresh lemon juice
1/2 teaspoon finely grated lemon zest
Directions
1. Place the carrots, broth and 1 teaspoon of the oil in a large skillet and bring to a boil over medium-high heat. Cover, reduce the heat to medium and continue to cook until the carrots are tender, 12 to 14 minutes. Uncover and cook, stirring, until the liquid has evaporated and the carrots are lightly browned, another 2 to 3 minutes. Season with 1/4 teaspoon salt and 1/4 teaspoon pepper.
2. Meanwhile, combine the mint, parsley, juice, zest and remaining 3 teaspoons oil in a small dish. Sprinkle with salt and pepper. Toss the warm carrots with the herb mixture.
Original recipe source: https://www.foodnetwork.com/recipes/food-network-kitchen/pan-roasted-carrots-with-mint-and-parsley-gremolata-recipe-2119429
ROASTED CARROT AND SCALLION VINAIGRETTE (the vinaigrette is a good recipe for other purposes as well)
Author: Kayla Howey
Ingredients
Scallion Vinaigrette
· 1 tbsp olive oil
· 1 shallot, thinly sliced
· 4 scallions, thinly sliced
· 3 tbsp white wine vinegar
· 1 tbsp honey
· 1/3 cup neutral oil (safflower, grapeseed, vegetable, etc.)
· ½ cup raisins
· kosher salt
Roasted Carrots
· ½ cup raw hazelnuts (can sub other nuts – hazelnuts are very hard to find)
· 1 pound carrots
· olive oil
· kosher salt
· feta cheese, shaved or crumbled (as much as you’d like)
· parsley, mint, carrot fronds for garnish
Directions
Scallion Vinaigrette
1. Heat a medium sauté pan over medium heat. Add the olive oil. When the oil is hot, add the shallots. Cook until tender and caramelized, just a few minutes, stirring often.
2. Lower the heat and toss in the scallions. Continue to cook for another minute.
3. Stir in the white wine vinegar and honey. Let the mixture come to a bubble and simmer for a minute. Turn off the heat.
4. Transfer the mixture to a bowl and slowly drizzle in the neutral oil until emulsified. Fold in the raisins. Season with salt to taste.
5. Let the vinaigrette sit while you make the carrots.
Roasted Carrots
1. Preheat the oven to 425°F. Lay the hazelnuts out onto a baking sheet. Roast for 5 minutes. Let cool just slightly and use a kitchen towel to rub the hazelnuts between your hands in order to remove the skins. Discard the skins. Roughly chop the hazelnuts and set aside.
2. Meanwhile, lay the halved carrots out onto a baking sheet. Toss with enough olive oil to coat them well. Spread them into one, even layer. Season with a pinch of salt.
3. Roast the carrots for 12-15 minutes, or until tender and slightly caramelized (time may vary depending on your oven).
4. Toss the warm carrots with the scallion vinaigrette. Serve them with the chopped roasted hazelnuts, feta cheese, and carrot top leaves (optional) on top.
Original recipe source: https://www.theoriginaldish.com/2019/01/22/roasted-carrots-with-scallion-vinaigrette/
For more recipes check out our farm recipe blog: https://blackdirtrecipes.wordpress.com
Spring Share Week #6
Tuesday seemed like it was the first day we saw the sun in forever. It was a good day here at the farm, the mechanic came and finally got the Kubota put back together. I took it for a test run yesterday and it didn’t overheat and did all I asked of it. Such a relief!!! Now just waiting for the bill; the parts were $1,000 and I’m sure the mechanic will be around $400. But in the grand scheme of things this is a bargain. A new tractor like this one would cost over $30,000. It is a cost-saver in so many other ways as well. The hand labor to do what this machine can do would cost many thousands more over time. And farming is a time sensitive business, it is vital that seeds are started at the right time and plants transplanted at the right time as well. So many different vegetables take months to come to harvest. Having a tractor like the Kubota helps us to stay on top of cleaning the fields of weeds, preparing seed beds, laying mulch so many tasks that can be done in hours rather than days!! Oh and the seed potatoes were delivered! Over 1,000 pounds – can’t wait to get these in the ground!!!
Recipe Ideas:
BEETS – one of my favorite ways to eat beets is so simple, roast them, peel them, cut them into whatever size pieces I’m in the mood for and serve with:
· a drizzle of good olive oil and a sprinkle of parsley
· butter, salt and pepper
· dollop of goat cheese on still warm beets and let it melt into them
· drizzle with walnut or hazelnut oil and chop some nuts sprinkled over a scoop of crème fraiche
· sprinkle with some chopped scallions, salt and pepper
· add chopped beets to a salad of spinach or salad greens, some feta and a simple vinaigrette dressing
· true decadence and something I rarely indulge in would be a sprinkle of truffle oil and some smoked sea salt
For me the following salad could be a main course and not just a side dish:
ROASTED SWEET POTATO KALE AND DRIED CHERRIES, FETA & PEPITAS
YIELD:4 SERVINGS
Ingredients
For the salad:
2 medium sweet potatoes, diced into cubes (unpeeled is fine)
1 tablespoon olive oil
1 teaspoon maple syrup
2 cloves garlic, minced
1/4 teaspoon salt
1 bunch of kale, stemmed and very finely chopped (about 6 cups chopped kale)
For the dressing:
2 tablespoons olive oil
1 tablespoon fresh orange juice or lemon juice
1 tablespoon apple cider vinegar
1 teaspoon dijon mustard
1 teaspoon maple syrup
Freshly ground salt and pepper, to taste
For the topping:
1/4 cup pepitas pumpkin seeds
¼ cup feta cheese crumbles
⅓ cup dried cherries
½ cup roasted or canned chickpeas
Directions
1. Preheat oven to 375 degrees F.
2. Place cubed sweet potatoes on baking sheet, drizzle 1 tablespoon olive oil and maple syrup over the top then add garlic and salt. Toss to evenly coat the sweet potatoes with oil and spices.
3. Spread sweet potato cubes evenly around pan and roast for 35-45 minutes, stirring halfway through, until sweet potatoes are fork tender.
4. While the sweet potatoes are cooking, chop your kale if you haven’t already and add it to a large bowl.
5. Next prepare your dressing: In a small bowl add the following: olive oil, orange juice, apple cider vinegar, dijon mustard and maple syrup; whisk until smooth.
6. Pour dressing all over the chopped kale and use your (clean) hands to gently massage the dressing into the kale for a few minutes. This helps remove any bitterness from the kale and adds flavor the the leafy green.
7. Once sweet potato cubes are done cooking, add it to the kale.
8. Pour into 4 salad bowls, or 1 large bowl for sharing.
9. Before you serve the salad, top with pumpkin seeds, feta and roasted crunchy chickpeas. (Tip: Don’t add the cheese or pumpkin seeds until you are ready to eat; you want them crunchy not soggy.)
You can swap out so many ways with this salad – instead of feta use goat cheese. No dried cherries? Use cranberries, blueberries, even dried prunes or dates will work. No pumpkin seeds? Use sunflower seeds; or mix them together.
Original recipe source: https://www.skinnytaste.com/kale-salad-with-roasted-sweet-potato-dried-cherries-feta-pepitas/
For more recipes check out our farm recipe blog: https://blackdirtrecipes.wordpress.com
Spring Share Week #5
The radishes show how the weather can slow us down in the fields. Under warmer conditions we should have been harvesting already. This season there is barely any change in the plants from 2 weeks ago till now. I’m going to see about putting some remay or agribond over the plants in the hopes of warming them up and speeding the growing up a bit. Remay or agribond are the manufacturer names of basically what I call vegetable blankets. The fabric is like a super heavy cheesecloth it lets in air, sunlight and rain but keeps out bugs while adding a layer of warmth to the plants and soil underneath. Sorry for the abbreviated chat toady – UPS is banging on the back door with supplies, USPS delivering at the front door with seeds, a dispatcher on the phone calling about where to send the tractor trailer with the seed potatoes, the mechanic on hold on the phone finalizing deets about fixing the tractor—YIKES!
Recipe Ideas:
ROASTED POTATOES WITH GREENS
Roasted potatoes mingle with fresh spinach in a sauce of garlic, butter, sea salt and fresh rosemary. Finish with a drizzle of olive oil and/or a good shredded hard cheese like Parmesan or Pecorino if you like.
Servings: 2
Ingredients
6 small red or gold potatoes, quartered
2 tablespoons butter
2 cloves garlic, minced
1 tablespoon fresh rosemary, chopped sea salt and ground black pepper to taste
1 cup fresh spinach leaves
Directions
Step 1: Preheat the oven to 400 degrees F (200 degrees C).
Step 2: Place the potatoes in a single layer in a ceramic casserole dish. Melt the butter in a skillet over medium heat. Add garlic, and cook until golden. Stir in the rosemary, and cook just until fragrant. Pour over the potatoes in the dish. Season with sea salt and pepper.
Step 3: Roast uncovered for about 30 minutes in the preheated oven, until the potatoes are fork tender. Remove from the oven, and toss with the spinach leaves. Return to the oven for 1 to 2 minutes, until the spinach has wilted.
Original Recipe Source: https://www.allrecipes.com/recipe/82452/roasted-potatoes-with-greens/
BEST SWEET POTATO CASSEROLE
Ingredients for Filling
2 tablespoons unsalted butter, melted, plus more for buttering the baking dish
1 to 2 large sweet potatoes (about .75 pounds), peeled and cubed
1/4 cup milk
1/8 cup brown sugar, packed
1/2 teaspoon pure vanilla extract
1/4 teaspoon kosher salt
1 large egg
Ingredients for Topping:
1/4 cup all-purpose flour
1/4 cup brown sugar, packed
2 tablespoons unsalted butter, melted
1/8 teaspoon kosher salt
1/4–1/2 cup chopped pecans
Directions
Special equipment: 1-quart baking dish
1. For the sweet potatoes: Add peeled and cubed sweet potatoes to a large pot of salted water. Bring to a boil over high heat, then lower the heat to a simmer and cook until the potatoes are very tender, 15 to 20 minutes. Drain and cool. Mash the sweet potatoes.
2. For the filling: Preheat the oven to 350 degrees F. Butter a 1-quart baking dish.
3. Whisk together the butter, mashed sweet potatoes, milk, brown sugar, vanilla, salt and eggs in a large bowl. Transfer to the prepared baking dish.
4. For the topping: Combine the flour, brown sugar, butter and salt in a medium bowl until moist and the mixture clumps together. Stir in the pecans. Spread the mixture over the top of the sweet potatoes in an even layer. Bake until mostly set in the center and golden on top, 25 to 30 minutes. Serve hot.
Original recipe Source : https://www.foodnetwork.com/recipes/food-network-kitchen/sweet-potato-casserole-3364945
SWEET POTATO & YUKON GOLD BAKE
Yield: Serves 3 to 4
Going vegan? Swap out the butter in step 3 with olive oil.
Ingredients
Caramelized Onions:
1 tablespoon extra virgin olive oil
2 cups sliced onions (1/8 to 1/4-inch slices)
1/2 teaspoon fresh thyme, minced
1/4 teaspoon salt
Sweet Potatoes and Yukon Golds:
1 pound of sweet potatoes, peeled and sliced into 1/8-inch thick rounds
1 pound Yukon Gold potatoes, peeled, and sliced into 1/8-inch thick rounds
1 tablespoon melted butter
1/2 teaspoon of salt
1/8 teaspoon black pepper
Sprigs of fresh thyme
Directions
1. Caramelize the onions: Heat olive oil in a large, thick-bottomed pot on medium heat. Add the sliced onions, toss to coat, lower the heat to medium low and cover. Let cook for 15 to 20 while you are slicing the sweet potatoes and yukon golds, stirring occasionally, until completely softened.
Then increase the heat to medium high and cook uncovered until golden brown. Remove from heat and stir in salt and thyme.
2. Peel and slice all of the sweet potatoes and Yukon Golds. Try to make them uniform in size.
Place the slices in a bowl of water while you are prepping them to prevent them for discoloring. If using purple sweet potatoes, keep the slices in a different bowl of water (the color bleeds).
Drain the slices, place them in a bowl.
3. Line baking dish with onions, sweet potato and potato slices: Place the caramelized onions in an even layer over the bottom of a rectangular or oval casserole dish.
Arrange slices of sweet potatoes and Yukon Gold potatoes in rows on top of the caramelized onions.
Brush with melted butter, sprinkle with salt and pepper.
4. Cover with foil and bake in a 400°F oven for 45 minutes, until the potatoes are cooked through.
5. Remove foil, bake uncovered for 15 minutes more, until the edges are crispy and browned.
Sprinkle with a little more salt and pepper. Garnish with sprigs of fresh thyme. Serve immediately.
Original recipe source: https://www.simplyrecipes.com/recipes/sweet_potato_and_yukon_gold_bake/
For more recipes check out our farm recipe blog: https://blackdirtrecipes.wordpress.com
Spring Share Week #4
We are a little light this week as we wait for the plants to “recharge.” Quite a few years ago when I came back full time to the farm I was so very nervous about planting. I had been on the outside so to speak doing marketing, building the website, emails, writing newsletters, doing all the stuff that was considered social media of the day. I invited a fellow farmer to take a ride through the fields with me and indeed welcomed his opinion. Laughing about it now I didn’t give myself enough credit, having grown up on the farm, as to just how much I knew then. His solemn pronouncement was “Yup you’ll be harvesting those vegetables in two weeks” no matter if it was carrots, beets, radishes, lettuce, turnips or anything else I had out there at the time, “two weeks” was the answer. Well it wasn’t two weeks and each vegetable was ready in its own sweet time. Some took four weeks, some like tomatoes were two months away. So while I planted radishes over five weeks ago and in June weather we would already be harvesting (21-25 days to harvest)—in memory of Ed, I shall pronounce "they should be ready in two weeks!"
VEGETABLE — Watercress
I don’t know about you but I used to think of watercress on sandwiches at a proper high English Tea as the only way it should be eaten. Couldn’t be further from the truth!!! Like so many awesome vegetables, watercress has a history of culinary use as far back as the ancient Persians, Greeks and Romans. At one time used as a breath freshener and palate cleanser it was featured as a main item on the first Thanksgiving Day menu!! Hippocrates grew it on the Island of Kos where he founded the first hospital and used it to treat blood disorders. English cultivation began in early 1800 when a farmer near London began promoting it as a salad ingredient. This little vegetable gets credit for Captain James Cook being able to circumnavigate the globe 3 times because he included it in his sailors’ diet! What a powerhouse plant – loaded with vitamins K and C among many other antioxidants and nutrients. Believe it or not, it is a member of the Brassica family which includes vegetables like mustard, kale, Brussel sprouts and cabbage! The light peppery, spicy notes make this a special treat and it can be used in so many dishes. It is recommended that to get the most benefits out of watercress eat it raw or lightly steamed.
Some ideas are:
Sprinkle it on your salad.
Stir it into your soup near the end of cooking.
Use it to replace lettuce in a sandwich.
Turn it into pesto by blending it with garlic and olive oil.
Serve it with eggs.
Use it to top any dish.
Our farmers like it best raw with lemon juice salt and pepper. I like it that way too and will add a hard boiled egg or radishes as well.
Sources: https://www.healthline.com/nutrition/watercress-benefits https://bwqualitygrowers.com/watercress/history-and-facts/
GINGERED WATERCRESS
Ingredients
1 bunch fresh watercress, trimmed (about 1/2 pounds)
1 tablespoon oil
1 clove garlic, minced
1/3 knob fresh ginger, minced
1 tomato - small, seeded and chopped
Kosher salt and freshly ground black pepper
Directions
Wash the cress and spin it dry. Heat the oil in a wok or skillet. Add the garlic and ginger and cook 1 minute. Add the tomato and cook to paste. Add the cress, and cook down, turning occasionally with tongs, until tender, about 10 minutes. Season and serve.
Original recipe source: https://www.cookingchanneltv.com/recipes/gingered-watercress-2010234
WATERCRESS SOUP RECIPE
Ingredients
· 1 tablespoons butter
· 1 cup white or yellow onion, chopped (could use less I like a lot onion)
· Salt
· 1/3 cup white wine, chicken stock, or vegetable stock (wine or veg stock for vegetarian version)
· 1/3 pound potatoes, peeled and cut into chunks
· 2 cups water
· 2 cups fresh watercress, chopped, stems included
· Black pepper to taste
· About 2 tablespoons sour cream, stirred in, or for garnish (can also use plain yogurt)
Directions
1. Cook the onions: In a large pot, heat the butter until frothy, then cook the onions over medium heat until soft and translucent, about 5 minutes. Salt the onions as they cook.
2. Add potatoes, wine/stock, simmer: Add the wine or stock, potatoes and water and bring to a boil. Turn the heat down to low, cover the pot and simmer until the potatoes are soft, about 30 minutes.
3. Add watercress: Add the watercress to the pot. Stir well and cook for 2 minutes.
4. Purée the soup: Turn off the heat and purée the soup with an immersion blender. If you don't have an immersion blender, pour the soup in batches into a blender and transfer the blended soup to a clean pot. Be careful when blending hot liquids to only fill the bowl a third of the way, and to hold down the blender's lid while you purée the soup.
5. Season and garnish to serve: Add salt to taste, then add the black pepper. You can either stir the sour cream into the whole batch of soup, or serve a tablespoon in the center of each person's bowl.
Original recipe source: https://www.simplyrecipes.com/recipes/watercress_soup/
Some more links to Watercress recipes:
BBC Good Food 33 recipes for watercress https://www.bbcgoodfood.com/recipes/collection/watercress
Here’s a fun link to the all-time top ten watercress recipes: https://www.watercress.co.uk/all-time-top-ten-watercress-recipes
For more recipes check out our farm recipe blog: https://blackdirtrecipes.wordpress.com
Spring Share Week #3
More always more—more time, more help, more seeds, more plants, more weeds, more ideas, more wishes, more dreams, more crazy ideas, and of course more sleep! Always the need and demand for more. Some days I feel like my brain is just a tangled-up ball of yarn trying to figure out what to do first. There are days when several tasks seem to have an equal sense of urgency and priority on that moment's to-do list. Then a fly-ball out of left field and the whole agenda just changed. I’m guessing some of you are saying to yourselves, "Yes that’s me too!" So for today, here's what I am planning: Getting serial numbers off of a tractor so the right parts can be ordered for it; checking on the growth of the seeds and weeds while stopping to pull some weeds because I can’t stop myself; changing the oil in my van; planting more seeds in the greenhouse; making shortbread dough so it can chill properly so I can bake them to have for sale Saturday at the farmer's market (Oh and harvest some stinging nettle because I want to make that into a shortbread); order more seeds and plants; pick up supplies for a project I have Benito working on; making sure Lupe has everything she needs for her work load tomorrow; and make dinner and lunch for my sister. Should be fun!!! And yes I love what I do!!!!!
VEGETABLE
Parsley
This herb, a cousin of carrots, dill and celery, has been cultivated for over 2,000 years. A native of the Mediterranean region of Southern Europe, parsley was regarded by the ancient Greeks as sacred and used to crown victors of athletic contests and decorating tombs of the deceased. As far back as the times of ancient Rome parsley was used as a garnish. No one seems sure of when it first was used as a herb but there are those who say Charlemagne was responsible for its popularity. It is now considered to be the most popular herb in the world.
The two most known varieties are curly and flat. Of the two the flat or Italian variety is more fragrant and less bitter. I love the perfume of parsley and good parsley tastes like it smells—vibrant and fresh. While the curly variety seems doomed to forever be a garnish on your plate and then tossed out to the compost bin without a second thought, parsley is a natural breath freshener so after that garlicky plate of pasta be sure to enjoy that parsley garnish on the side!!! Fun note: Parsley or Cilantro which is which? One easy way to tell the difference is like this: Parsley is spelled with a P and the leaves are Pointy, Cilantro is spelled with a C and the leaves are Curvy.
Nutritionally parsley is low in calories and rich in Vitamins K, A and C. It also contains many powerful antioxidants and the whole plant is edible so make sure and use those stems too!
Recipe Ideas: A Few Quick Serving Ideas
· Combine chopped parsley with bulgur wheat, chopped green onions (scallions), mint leaves, lemon juice and olive oil to make the Middle Eastern classic dish, Tabouli.
· Add parsley to Pesto Sauce to add more texture to its green color.
· Combine chopped parsley, garlic and lemon zest, and use it as a Rub for Chicken, Lamb and Beef.
· Use parsley in Soups or Tomato Sauce.
· Serve a colorful Salad of fennel, orange, cherry tomatoes, pumpkin seeds and parsley leaves.
· Chopped parsley can be sprinkled on a host of different recipes, including salads, vegetable sautés and grilled fish.
I make my PESTO with parsley, kale and spinach and use sundried tomatoes and sunflower seeds, Sunflower seed oil, garlic, salt and pepper. Sorry I have no recipe as I just do it by feel and taste. Experiment!
Here are some pointers:
The kale will bring on bitter notes so less of that, unless I am looking for those flavor notes. Baby spinach is sweeter in flavor. The sundried tomatoes give a kind of umami flavor and salty notes, so I go easy on salt, adding more if needed as I taste it. The parsley gives a bright finish and I mostly use the stems in my pesto, adding some of the leaves as well. If I’m in the mood and have them I will add fresh lemon zest or a pinch of red pepper flakes. This is such a fun thing to play with and if like me you made enough for an army—freeze it—you can keep it for up to 6 months that way!
WALNUT PARSLEY PESTO RECIPE
Prep time: 15 minutes
Yield: Makes about 1 1/4 cups
Ingredients
· 1 cup shelled walnuts, about 3 1/2 ounces
· 2 cups chopped parsley, about 1 bunch
· 1/2 cup grated pecorino or parmesan cheese
· 3 garlic cloves, roughly chopped
· 1/2 teaspoon salt
· 1/2 cup extra virgin olive oil
Directions
1. Put the walnuts, parsley, cheese, garlic, and salt in a food processor and pulse for a few seconds to combine. Scrape down the sides of the bowl, then pulse again.
2. Drizzle in the olive oil while the machine is running just long enough to incorporate the oil, about 20-30 seconds.
Use immediately or cover with plastic wrap and refrigerate to store. Will last several days chilled.
Use with pasta or as a spread on bread or toast.
Source: Simply Recipes ©2003-2020 Simply Recipes, Inc. https://www.simplyrecipes.com/recipes/walnut_parsley_pesto/
PARSLEY PESTO
MARTHA ROSE SHULMAN
YIELD: About 1/2 cup / 5 ounces/ 150 g
TIME: 5 minutes
Andrew Scrivani for The New York Times
A twist on the typical basil recipe, this pesto combines flat-leaf parsley and some mint. It’s marvelous on sandwiches and pizza and, if you thin it out with a little pasta water, it’s a great addition to spaghetti. Shower the dressed bowl with Parmesan and serve.
Ingredients
· 2 garlic cloves, halved, green shoot removed, roughly chopped
· Salt to taste
· 2 cups, tightly packed, flat-leaf parsley leaves, coarsely chopped
· 1 tablespoon, tightly packed, mint leaves, coarsely chopped
· ⅓ cup extra virgin olive oil, as needed
· 6 tablespoons freshly grated Parmesan
· Freshly ground pepper (optional)
Directions
· Turn on a food processor fitted with the steel blade and drop in the garlic.
· When it is chopped and adhering to the sides of the bowl stop the machine and scrape down the bowl.
· Alternatively, mash with a generous pinch of salt in a mortar and pestle.
· Add the parsley and mint to the food processor (or to the mortar and pestle) and process until finely chopped or grind to a paste.
· With the machine running slowly add the olive oil and process until the mixture is smooth (or slowly work into the mixture using a mortar and pestle).
· Stop the machine, scrape down the sides of the bowl and add the cheese. Pulse to combine.
Source: https://cooking.nytimes.com/recipes/1015448-parsley-pesto
QUINOA & PARSLEY SALAD
Source: https://www.myrecipes.com/recipe/quinoa-parsley-salad
TABBOULI / TABOULI / TABBOULEH SALAD (PARSLEY SALAD)
Source: https://www.food.com/recipe/tabbouli-tabouli-tabbouleh-salad-parsley-salad-197922
Here are links to more recipes:
https://www.thekitchn.com/10-delicious-ways-to-use-up-a-bunch-of-parsley-246217
https://www.tasteofhome.com/collection/ways-to-use-up-parsley/
http://www.whfoods.com/genpage.php?tname=foodspice&dbid=100
https://www.precisionnutrition.com/encyclopedia/food/parsley
For more recipes check out our farm recipe blog:
https://blackdirtrecipes.wordpress.com
Spring Share Week #2
Hello everyone, hope this finds you all safe and well. I cannot begin to tell you all how grateful we at the farm are for your support. It means the world to all of us. We supply produce to some farmers markets here in the Hudson Valley and most of them have shut down. One is in a hospital and the other at a corporate park in Tarrytown. As a result I needed to cut back on the hours I give to my farmers and have assumed the greater portion of the work load personally. Thankfully our farmers have been able to hang in there with us. In doing much of the work myself I have started planting in the fields and in the greenhouse. Once the weeds start to grow and the harvesting of the field crops begins I will bring the farmers back almost daily (which should be in a couple weeks). Pretty soon they’ll be working a full work week.Without your support none of this would be possible. My farmers always ask how you all are doing, especially now with the COVID situation. So please know how much you matter to us and how grateful we are to have you as a part of our lives!!!
Update on the Kubota (our big tractor): The mechanic decided a new water pump and thermostat were in order so now waiting on parts and pray that this was the fix it needed!!!
VEGETABLE
Dandelion Greens
Yes dandelion greens, so often considered a pesky weed most folks overlook the tremendous value these leafy greens bring to the plate! One of my favorite things to make is dandelion jelly, which is SUCH a pain in the tail. Not for the actual making of the jelly but the harvesting of the flowers. For the best flavor you have to make sure none of the green petals that surround the yellow blossoms get into the batch. They totally wreck the delicate, sweet honey like flavor. This is a true labor of love as the batches are small but oh so delicious. Anyway back to the leafy greens. You can eat them raw or cooked, personally I prefer the little baby leaves raw and the more mature ones cooked. They are an excellent source of Vitamins A, C and K and a few minerals like iron, calcium and potassium. This seems to be true for quite a few of the early spring greens which I would classify in the “bitter” family. That bitterness is one of the reasons why they are so healthy for you. To alleviate some of that bitter flavor, a quick cook in boiling salted water will help.
Fill a large saucepot with water and add some salt. Once water comes to a boil add the greens. After they turn a richer shade of green (this happens quickly—don’t walk too far away!), working as quickly as possible, remove greens from water and pour into an ice bath (water and ice cubes).
This technique known as “shocking” helps to prevent overcooking the greens while minimizing the bitter notes and is very useful for other greens like broccoli raab.
SAUTÉED DANDELION GREENS WITH EGGS
Prep Time: 5 minutes
Cook Time: 30 minutes
Total Time: 35 minutes
Yield: 2–4 Servings
Ingredients
· 4 cups chopped dandelion greens, thick stems removed (about 1–2 large bunches)
· 2 tablespoons unsalted butter, clarified butter, or ghee
· 1 large leek, white and light green parts only, finely chopped
· 4 large eggs
· 1/4 cup crumbled feta cheese
Directions
1. Bring a large pot of salted water to a boil. Add the chopped dandelion greens and blanch for 1 to 2 minutes. Drain the greens thoroughly, using a wooden spoon to drain and press out as much liquid as possible.
2. Melt the butter or ghee in a 10-inch sauté pan set over medium heat. Sauté the leeks until tender, about 5 minutes, stirring occasionally. Add the drained dandelion greens one handful at a time. Cook each handful until wilted, then add more.
3. When the greens are wilted, crack the eggs into the pan on top of the greens. Top with feta cheese and cook uncovered until the whites of the eggs are set, about 5 minutes.
TIPS FOR SUCCESS: Blanching the dandelion greens removes some of their natural bitterness.
Recipe source: https://www.abeautifulplate.com/sauteed-dandelion-greens-with-eggs/
DANDELION GREENS WITH A KICK
"Dandelion greens are one of my favorite bitters! They're not for everyone, but I enjoy their unique flavor. I decided to try them sautéed instead of in a salad and it was a huge hit! Makes good use of those dandelions in the yard or you can usually find dandelion greens at the grocery or Asian market."
Ingredients
· 1/2 teaspoon salt
· 1/2 pound dandelion greens, torn into 4-inch pieces
· 1/2 teaspoon salt
· 1 tablespoons olive oil
· 1/2 tablespoon butter
· 1/4 onion, thinly sliced
· 1/8 teaspoon red pepper flakes
· 1 cloves garlic, minced
· salt and ground black pepper to taste
· 1/2 tablespoon grated Parmesan cheese (optional)
Directions
Soak dandelion greens in a large bowl of cold water with 1 teaspoon salt for 10 minutes. Drain. Bring a large pot of water to a boil with 1 teaspoon salt. Cook greens until tender, 3 to 4 minutes. Drain and rinse with cold water until chilled.
Heat olive oil and butter in a large skillet over medium heat; cook and stir onion and red pepper flakes until onion is tender, about 5 minutes. Stir in garlic until garlic is fragrant, about 30 seconds more. Increase heat to medium-high and add dandelion greens. Continue to cook and stir until liquid is evaporated, 3 to 4 minutes. Season with salt and black pepper.
Sprinkle greens with Parmesan cheese to serve.
Recipe Source: https://www.allrecipes.com/recipe/222744/dandelion-greens-with-a-kick/print/?recipeType=Recipe&servings=4&isMetric=false
DANDELION PESTO
Serves: 10
Ingredients
· 3 cups washed and cleaned dandelion leaves
· ¾ cup olive oil
· 3 cloves garlic, peeled
· ½ cup walnuts, lightly toasted
· 1 teaspoon sea salt
· ⅓ cup raw parmesan cheese
· zest of a lemon
· juice of half a lemon
Directions
Combine all ingredients in a food processor or Vitamix and blend until creamy and smooth
Notes
Serve as pizza sauce, on top of pasta, dressing or marinade. Please choose all organic ingredients if possible.
Notes from Cheryl: Instead of nuts I often use sunflower seeds in my pestos—just be careful if you’re worried about food allergies as some seeds are roasted in peanut oil. And instead of parmesan cheese I’ll use sundried tomatoes to get that “umami” flavor and keep it vegan!!
Recipe source: foodbabe.com/dandelion-pesto-pizza/
And here’s a link to some other great recipes: wideopeneats.com/dandelion-greens-recipes/
Nutrition sources: https://www.healthline.com/nutrition/dandelion-benefits#section1
For more recipes check out our farm recipe blog: https://blackdirtrecipes.wordpress.com
Spring Share Week #1
So glad to see the sun shining this morning that alone makes me feel so happy. The mechanic is coming today to look at the Kubota (tractor), this too makes me very happy, praying for a not too expensive fix and easily procured parts to get the job done quickly so we can get moving in the fields. Been planting by hand which is a start but it’s still pretty chilly and the ground needs to warm up to help those seeds germinate. Inside the greenhouse between heaters and grow mats (sheets of rubber with electric cables inside that heat the seed trays so seeds will germinate quicker) we are moving along and getting plants ready to put out into the fields. Some of the things we’ve already started are leeks, onions, shallots, cabbages, broccoli. Tomatoes, peppers and cauliflower are next on the list. We’re sorting the potatoes for planting. After I finish writing this I am headed to the fields to check on the watercress which grows in the stream on one end of the fields and see how the radishes are coming along that I planted two weeks ago. Patience is definitely a desired personality trait to be a farmer!!! If you want to see more up-to-date pics from the farm I post almost daily on Instagram and Facebook, and I have a twitter account—I’m not that active there—but you can find me at #yesifarm @yesifarm. Facebook is rogowskifarm or my personal page, Cheryl Rogowski. When we really get working in the fields I pretty much post daily, during the winter I tend to hibernate a bit. OK, I'm rambling now—need to keep moving—be safe be well!
VEGETABLE
Scallion
So much confusion—scallions and green onions are actually one and the same vegetable. White bottom and green top—kinda looking like a mini leek. The whole plant is edible right down to the roots! The white part is slightly stronger in flavor and usually cooked while the green part is generally used raw. As for the roots, I add them to my soup stocks as they can be a bit fibrous.
Nutrition-wise scallions have very few calories, are very high in Vitamin K and C, and are a good source of fiber and folate. They are also on the low side for sugar and carbs.
Some suggested uses for scallions aka green onions:
1. Top Off a Soup: Finely sliced scallions sprinkled over a bowl of soup add bold eye-catching color as well as a zingy brightness to balance out rich stews.
→ Baked Potato Soup With Bacon, Scallions & Cheddar
2. Fry Up Some Rice: Stir fried rice, a.k.a. “getting rid of all your leftovers in one fell swoop.” Throw your leftover rice, leftover veggies, an egg or two, and yes, your scallions in a hot skillet and cook until crispy. Dinner is done.
→ How to Make Fried Rice
3. Add Scallions to Salads: I add scallions to salads whenever I want a bit of onion flavor, but I don’t necessarily want the pungency of red or yellow onions. I also like the crunch it adds to grain salads and cold noodle salads.
→ Sweet & Crunchy Quinoa Salad with Sweet Potatoes, Pine Nuts and Cranberries
4. Make Some Scallion Pancakes: Um, yes, please! This staple of Chinese restaurants is dangerously easy to make at home. Plus they make a great pre-dinner nibble.
→ How to Make Scallion Pancakes
5. Tuck Them Into Sandwiches: Tunafish salad on the menu for tomorrow’s lunch? Perk it up with some scallions. Your mouth will thank you.
→ The Perfect Tuna Salad
Source: https://www.thekitchn.com/5-ways-to-use-up-a-bunch-of-scallions-199374
Slurp them. Make vichyssoise, the creamy soup that’s usually made with leeks and potato and eaten cold. Swap in scallions for onions or leeks.
For more ways to cook with scallions and other herbs, check out:
Source for nutrition info https://www.webmd.com/food-recipes/scallions-health-benefits#1
For more recipes check out our farm recipe blog: https://blackdirtrecipes.wordpress.com
Winter Share Week #11
Happy Spring!!!!! So hard to believe that this is the last share for the winter season!!! Hope you are safe and well. In our efforts to continue to provide a safe and secure food supply we chose to pre-bag your shares at the farm this week. The paper bag has the root crops in it and then there are two plastic bags—one with spinach and one with kale. The tomatoes and peppers are packed in freezer bags—you choose which you prefer.
We are continuing to plant in the greenhouse and fields. I finally found a mechanic to come out to the farm and fix the Kubota. This is our big 4-wheel drive tractor that does the heavy work of discing, plowing, hauling, etc. Once we get that puppy rolling we will really be moving!!! Right now we’re doing things the old fashioned way—by hand. It works for now as we’re planting the row crops like scallions, carrots, beets, leafy greens, herbs, peas, radishes, turnips—cool weather crops that can take the early spring chill and the cool temps of the soil at this time of year. In April we’ll plant potatoes and transplant onions, leeks, broccoli, cauliflower, cabbages and other starts from the greenhouse. In May we will plant beans, tomatoes, peppers, eggplants, cucumbers, squashes—summer and winter, melons, sweet potatoes and tender herbs like basil. I can already see them growing!!!!
VEGETABLE
Frozen Peppers and Tomatoes
Word of warning: When you defrost these, they will look like a wet pile of limp noodles. So while not appealing for fresh salads they are great to cook with! Add them to a favorite recipe to beef up the flavor or try one of the suggested recipes below. Enjoy!
GARDEN TOMATO SAUCE
For pizza sauce: Cook until thickened to about the consistency of pizza sauce. Remove from the heat, transfer to a blender, add 1/2 tablespoon tomato paste and blend until smooth.
Ingredients
1 pound frozen tomatoes - defrosted (or fresh)
1 Tablespoon olive oil
1 small onion chopped
1 clove garlic
¼ tsp dried basil
¼ tsp dried thyme
¼ tsp dried oregano
¼ teaspoon salt ( add more if preferred)
1/8 teaspoon freshly ground pepper
OPTIONAL:
¼- ½ teaspoon sugar
Pinch of red pepper flakes
Directions
- To defrost frozen tomatoes remove from container and set tomatoes in a bowl to capture the juices. You can always run cool water over the container to speed up the process a little bit.
- Heat oil in a Dutch oven over medium heat. Add onions and cook, stirring, until beginning to brown, about 4 to 6 minutes. Add garlic and cook, stirring, for 1 minute. Add the tomatoes (and any juice), basil, thyme, oregano, salt, pepper and sugar (if using). Bring to a boil. Reduce heat to maintain a simmer and cook until thickened to desired consistency, stirring occasionally, 1 to 1 1/2 hours. Taste and season with additional salt, pepper and/or sugar.
Tips
For fresh tomatoes:
bring a large pot of water to a boil. Make a small X in the bottom of each tomato and plunge into the boiling water until the skins are slightly loosened, 30 seconds to 2 minutes. Transfer to a bowl of ice water for 1 minute. Peel with a paring knife, starting at the X. If using frozen tomatoes, run each under warm water and peel or rub the skin off. Thaw in the refrigerator or defrost in the microwave until mostly thawed. Chop the tomatoes, reserving any juice.
Original recipe source: http://www.eatingwell.com/recipe/250085/garden-tomato-sauce/?printview
Frozen Sweet Peppers can be used in almost any recipe that calls for sweet peppers (cooked, not raw). Use them in stir fries, soups, stews, pasta sauces, over fish or meat, added to rice - really any way you would use peppers in the middle of summer.
The peppers are cleaned and cut into strips. If you want smaller pieces chop with a knife while still frozen or toss in your food processor and chop quickly. They are difficult to handle once defrosted so it’s best to work quickly!!! Here’s a link to a quick video on chopping frozen peppers. https://www.youtube.com/watch?v=d6lhY9TgVVI&feature=youtu.be
WEEKNIGHT SKILLET FAJITAS
https://imagesvc.meredithcorp.io/?w=180&url=https://images.media-allrecipes.com/userphotos/3898720.jpg
Servings: 4
Ingredients
1 Tablespoon vegetable oil
1 pound boneless, skinless chicken breasts –thinly sliced
½ pound peppers
½ pound onions
1 teaspoon ground cumin or fajita seasoning blend
1 teaspoon salt
8 tortillas, warmed
Directions
Heat oil in large nonstick skillet over medium-high heat and cook chicken, stirring occasionally, 5 minutes.
Stir in Peppers and Onions, cumin and salt. Continue cooking, stirring occasionally, 5 minutes or until chicken is thoroughly cooked.*
Serve in flour tortillas. Garnish, if desired, with lime wedges.
Tips
*Cook chicken to an internal temperature of 165 degrees F as measured with a food thermometer.
Original recipe source: https://www.allrecipes.com/recipe/233034/weeknight-skillet-fajitas/
For more recipes check out our farm recipe blog: https://blackdirtrecipes.wordpress.com
Winter Share Week #10
Seems like every conversation begins nowadays with the phrase “it is with abundant caution” and indeed the current world status does require the use of abundant caution. On the farm we are making sure to employ all possible sanitary applications to keep us all safe and secure—sanitizing all surfaces, harvesting tools, wearing proper gloves—in reality these are safe food practices that we employ on a routine basis. We are following these practices even more closely and more frequently (e.g.: sanitization practices-cleaning our containers with a bleach solution before and after each use). I would prefer to avoid plastic bags but in our discussions with the Fulton Stall Market staff we agree it is better to err on the side of caution and have bagged the parsley as well as the spinach. The CDC has said that food is NOT a source of infection but in an effort to help however we can we will pre-bag things as appropriate.
We hope you enjoyed the corn last week, next week we will be bringing frozen items from the summer harvest—tomatoes and sweet peppers.
An Irish Proverb:
May your blessings outnumber the shamrocks that grow,
And may trouble avoid you wherever you go.
VEGETABLE
Rather than focus on one vegetable today—I will be giving you resources for Irish themed dishes. There are a few recipes today:
NYC Corned Beef and Cabbage
Irish Boxty
Colcannon
Trio of Mashed Roots—A recipe from an Irish Grandmother
Easy, Irish Roasted Beets & Carrots Recipe
Cabbage—great source of Vitamin C and fiber, while associated with Ireland, corned beef and cabbage is a North American thing. After the great potato famine many Irish immigrated to America and found that here corned beef and cabbage were considered lower working class foods and as such were relatively inexpensive.
NEW YORK CITY CORNED BEEF & CABBAGE
Ingredients
One 3-pound corned beef brisket (uncooked), in brine
16 cups cold water
2 bay leaves
2 teaspoons black peppercorns
4 whole allspice berries
2 whole cloves
½ large head green cabbage (about 2 pounds), cut into 8 thick wedges
8 small new potatoes (about 1¼ pounds), halved
Freshly ground black pepper
Directions
Preheat the oven to 300°F.
Place the corned beef in a colander in the sink and rinse well under cold running water.
Place the corned beef in a large Dutch oven with a tight-fitting lid; add the water, bay leaves, peppercorns, allspice, and cloves. Bring to a boil, uncovered, and skim off any scum that rises to the surface. Cover and transfer pan to the oven, and braise until very tender, about 3 hours and 45 minutes.
Transfer the corned beef to a cutting board and cover tightly with foil to keep warm. Add the cabbage and potatoes to the cooking liquid and bring to a boil. Lower the heat and simmer until the vegetables are tender about 20 minutes.
Using a slotted spoon, transfer the cabbage to a large platter. Slice the corned beef across the grain of the meat into thin slices. Lay the slices over the cabbage and surround it with the potatoes. Ladle some of the hot cooking liquid over the corned beef and season with pepper. Serve immediately with mustard or horseradish sauce.
Recipe Source: https://www.irishcentral.com/culture/food-drink/history-new-york-irish-corned-beef-cabbage
POTATOES
Cooked potatoes with skin are a good source of many vitamins and minerals, such as potassium and vitamin C. Traditional Irish Boxty are the holy grail of pancakes for potato lovers! Combining mashed and raw potato with buttermilk makes a dreamy, yet simple meal. Also called Irish Potato Cakes, they are often made for St. Patrick’s Day here in the US.
TRADITIONAL IRISH BOXTY: the Best Ever Potato Pancakes, with a Twist (Irish Potato Pancakes)
A wonderful and hearty Irish potato pancake recipe.
Ingredients
2 cups (9 oz) all-purpose flour
1 tsp baking powder
1 tsp Kosher or sea salt
1 cup (8 oz) mashed potatoes, boiled in salted water (I prefer Idaho© potatoes)
1 1/2 cups (8 oz) grated, raw potato
1 cup buttermilk (or more if needed)
butter for the pan
Directions
1. In a small bowl, place the flour, baking powder and salt; set aside.
2. In a large mixing bowl, combine the mashed potatoes with the grated raw potato, then add the flour and mix well.
3. Slowly add the buttermilk and stir gently (do not over mix).
4. The mixture should be like a very firm, thick batter; almost like a dough, so add more buttermilk if needed (I just used 1 cup/8 oz).
5. Heat a nonstick frying pan over medium-high heat, and add a pat of butter, just before scooping out some of the boxy batter onto the pan.
6. Flatten and shape into a nice, round pancake shape and fry until golden brown on the bottom.
7. Turn and continue to cook until golden brown on top too, turning the heat down if they are browning too quickly (remember there is raw potatoes which need to cook).
8. Continue to add a little butter and fry the boxy until all the batter is finished. Serve hot.
YIELD: 6
SERVING SIZE: 2
Recipe Source: https://www.christinascucina.com/traditional-irish-boxty-best-ever/
Nutrition source: https://www.healthline.com/nutrition/foods/potatoes#vitamins-and-minerals
COLCANNON
Colcannon is most commonly made with only four ingredients: potatoes, butter, milk and kale. Irish historian Patrick Weston Joyce defined it as "potatoes mashed with butter and milk, with chopped up cabbage and pot herbs".[1] It can contain other ingredients such as scallions (spring onions), leeks, Laverbread, onions and chives. Some recipes substitute cabbage for kale.
Ingredients
3 pounds potatoes, scrubbed
2 sticks butter
1 1/4 cups hot milk
Freshly ground black pepper
1 head cabbage, cored and finely shredded
1 (1-pound) piece ham or bacon, cooked the day before
4 scallions, finely chopped
Chopped parsley leaves, for garnish
Directions
1. Steam the potatoes in their skins for 30 minutes. Peel them using a knife and fork. Chop with a knife before mashing. Mash thoroughly to remove all the lumps. Add 1 stick of butter in pieces. Gradually add hot milk, stirring all the time. Season with a few grinds of black pepper.
2. Boil the cabbage in unsalted water until it turns a darker color. Add 2 tablespoons butter to tenderize it. Cover with lid for 2 minutes. Drain thoroughly before returning it to the pan. Chop into small pieces.
3. Put the ham in a large saucepan and cover with water. Bring to the boil and simmer for 45 minutes until tender. Drain. Remove any fat and chop into small pieces.
4. Add cabbage, scallions, and ham to mashed potatoes, stirring them in gently.
5. Serve in individual soup plates. Make an indentation on the top by swirling a wooden spoon. Put 1 tablespoon of butter into each indentation. Sprinkle with parsley.
Recipe source: https://www.foodnetwork.com/recipes/colcannon-recipe-1913556
Info source: https://en.wikipedia.org/wiki/Colcannon
TRIO OF MASHED ROOTS (Parsnip, Turnip and Carrot)
"This fall and winter farm recipe was passed down from my Irish-Canadian grandmother Agnes Walsh (Donahoe). It's a simple mash that I updated with a dash of nutmeg and cayenne. An exciting (and affordable) side dish for all holiday menus."
Ingredients
3 carrots, peeled and chopped
2 large parsnips, peeled and chopped
2 turnips if small or 1 large, peeled and chopped
1/2 cup butter
1/4 cup heavy whipping cream
1/8 teaspoon ground nutmeg
1/2 pinch cayenne pepper
salt and ground black pepper to taste
Directions
1. Place carrots, parsnips, and turnips into a pot and cover with cold, lightly salted water. Bring to a boil and cook until a fork easily breaks apart the vegetables, about 25 minutes; drain. Return vegetables to the pot.
2. Mix butter, cream, nutmeg, cayenne pepper, salt, and black pepper into vegetables; roughly mash together with a potato masher until vegetables are broken down but individual colors are still visible.
Original recipe source: https://www.allrecipes.com/recipe/230772/trio-of-mashed-roots-parsnip-turnip-and-carrot/
EASY, IRISH ROASTED BEETS & CARROTS – Great with Corned Beef!
Did you know that the Irish love their root veggies? Potatoes (of course), parsnips and turnips, but they love beets and carrots, as well. My mother served these often, and this combo always got rave reviews at our house, so I’d like to share my recipe with you as an idea for your St. Patrick’s Day Sunday supper.
ROASTED BEETS & CARROTS
Yield: 4 servings
Prep Time: 10 minutes
Cook Time: 30 - 35 minutes
Total Time: 45 minutes
An easy, healthy, tasty way to prepare beets and carrots!
Ingredients:
2 if large 4 if small red beets, washed, peeled, tops removed
4 carrots, washed, peeled, tops trimmed
2 Tablespoons olive oil
1 Tablespoon balsamic vinegar
1 Tablespoon fresh thyme, leaves removed from stem
Salt and pepper to taste
Directions:
Preheat oven to 400 degrees.
Cut the beets into 4 wedges each (if small – 8 or more if large), leave the carrots whole.
Place them on a baking sheet and sprinkle them with the olive oil, making sure that they are totally coated with oil.
Spritz or drizzle them with balsamic vinegar. (Putting vinegar in a spray bottle makes this sooo simple)
Sprinkle with fresh thyme.
Roast in oven for 15 minutes then turn and roast for approximately 15 more minutes (they should be fork tender when done).
Remove from oven and sprinkle with salt and pepper.
Serve.
Original recipe source: http://www.returntosundaysupper.com/2012/03/easy-irish-roasted-beets-carrots-recipe-great-with-corned-beef.html
For more recipes check out our farm recipe blog: https://blackdirtrecipes.wordpress.com
Winter Share Week #9
So close—the weather is steadily working it’s way toward spring. Waiting on a mechanic to take a look at the Kabota, that’s the tractor we use for the heavy work like plowing and discing. Some of the mechanical things I can take care of myself—changing oil, filters, spark plugs, points etc. And even on an older tractor like the AC-G, I can adjust the clutch. But a more modern tractor like the Kabota eludes me not only in knowledge but the necessary tools to rip open a machine like that. I was reading an article a few weeks back on how farmers in the Midwest are starting to seek out older tractors because they can fix them on the farm. The new high tech equipment requires all sorts of computer diagnostics, specialized technicians and sometimes a lengthy wait time for parts to be delivered. Often times the technology is patented which precludes the farmer from doing any work themselves. The high cost of inventory means the old time bricks and mortar parts supply stores are harder to find. I try and keep different parts in inventory myself but that too can be costly and parts like belts will deteriorate over time and may be rotten by the time you really do need it. So in the meantime the best thing we can do is preventive maintenance, being careful operating equipment in the fields and a whole lot of prayer!!!
VEGETABLE
Sweet Corn
Corn, which at one time was thought to be a grass, is native to the Central Americas. Pollen grains discovered in a drill core taken In Mexico City from over 200 feet deep are thought to be over 80,000 years old and a discovery of wild pre-historic corn from about 5,000 BC was discovered in a cave in Southern Mexico. The first known documented sharing of sweet corn between Iroquois and European settlers occurred in 1779.
A good source of fiber—100 grams of kernels have 2 grams of fiber, corn is also a good source of folic acid, some of the B-complex vitamins and essential minerals. Sadly sweet corn also ranks high on the glycemic index meaning it naturally contains higher levels of sugar so folks with diabetes need to be mindful of that.
The sweet corn in today’s share is from last fall’s harvest. Lupe husked and cut the kernels off the cobs by hand. As soon as she finished I packed them in freezer bags and popped them into the freezer. So these are raw kernels. If you’re going to use them in a salad allow time for the kernels to defrost and drain as there will be moisture released and you don’t want your salad to end up a soggy mess. They are also most awesome as a side dish, in a chowder, soup or stew.
CORN SALAD
Ingredients
1 bag frozen corn
1 red bell pepper, diced
1 orange bell pepper, diced
1/2 red onion, diced
4 stalks green onions, chopped
1/2 bunch cilantro leaves, chopped
3 tablespoons red wine vinegar
1/4 cup canola oil
1 clove garlic, minced
1 teaspoon kosher salt
1/8 teaspoon cayenne pepper
Directions
If you're using frozen corn, put frozen corn in a colander. Run water over the corn until it’s thawed. Mix the corn with the red bell pepper, orange bell pepper, red onions, green onions, and cilantro. In a spill-proof container (such as an empty, clean spaghetti jar or plastic container with a lid), add the red wine vinegar, oil, garlic, salt and cayenne. Close the lid and shake furiously. You could also whisk the ingredients for the dressing together. Drizzle the dressing over the corn mixture.
Recipe Source: https://www.seriouseats.com/recipes/2010/09/easy-corn-salad-recipe.html
SUMMER CORN CHOWDER
Ingredients
8 ears fresh sweet yellow corn, husked and silks removed and kernels cut from cob or use frozen kernels
3 Tbsp butter
5 slices bacon, cut into 1/4 to 1/2-inch pieces
1 medium yellow onion chopped (1 1/2 cups)
1/4 cup all-purpose flour
1 clove garlic, minced
5 cups water
1 lb Gold potatoes, cut into 1/2-inch pieces
1/2 tsp dried thyme
1 bay leaf
Salt and freshly ground black pepper
1 cup half and half
1 Tbsp honey
2 - 3 Tbsp chopped fresh chives
Shredded cheddar cheese, for serving (optional)
Directions
1. Melt butter in a large pot over medium heat. Add the onion and bacon and cook, stirring frequently, until onion has softened and just starting to brown around edges, about 8-10 minutes. Add in the flour and garlic and cook 1 1/2 minutes. While whisking, slowly pour in 5 cups water.
2. Bring mixture to a boil, stirring constantly, then stir in corn kernels and potatoes. Add in thyme and bay leaf and season with salt and pepper to taste. Bring to a light boil, then reduce heat to medium-low and allow to simmer, stirring occasionally, until potatoes are tender, about 20 minutes.
3. Remove bay leave then transfer 2 1/2 cups of the chowder to a blender and blend until smooth. Stir the mixture back into the pot then stir in half and half and honey. Sprinkle each serving with chives and optional cheddar.
Notes from Cheryl:
-No chives? Use parsley.
-Feeling spicy? Use cilantro and some dried or fresh chilies.
-Honey isn’t necessary. I generally don’t add a sweetener to my soups but my sister would, for a different flavor you could also try maple syrup—just add it to a bowl and taste first before you add it to the whole batch.
-Instead of half-and-half you can also use sour cream, crème fraiche, yogurt.
-In lieu of cheddar a good Monterey jack or habanero spiced cheese, chevre or feta would also work.
Recipe source: https://www.cookingclassy.com/summer-corn-chowder/
Nutrition and other Information Sources:
https://cals.arizona.edu/fps/sites/cals.arizona.edu.fps/files/cotw/Sweet_Corn.pdf
https://en.wikipedia.org/wiki/Sweet_corn
https://www.nytimes.com/1990/11/18/nyregion/gardening-sweet-corn-has-a-bountiful-history.html
For more recipes check out our farm recipe blog: https://blackdirtrecipes.wordpress.com
Winter Share Week #8
Don’t know what you all know about me, but I grew up farming. As a kid pretty much my whole family farmed, Mom, Dad, Grampy, Babci (Polish for Grandmother), Ciocis (Polish for Aunt), Uncles, cousins and most of the neighborhood too. If your immediate family didn’t farm then you worked for someone who did. Growing up like that meant most everything you ate came from someone’s farm. It also meant you did a lot of food preservation—canning, fermenting, freezing, butchering. I remember so vividly picking peas and beans, learning how to trim and blanch them for the freezer. My Dad planted a grape vine right by the house just so he could harvest the leaves for his dill pickles in the crock. Of course he enjoyed the grapes too—that vine still grows and I still pick the leaves for my pickles in a crock. Dad turned the garage into a root cellar, he would take crates fill them with soil and pack them with carrots for the winter. By March, those things would get so hairy with long white roots. Mom would spend many long hours shucking corn and putting it away in the freezer. As kids, while we were peeling, trimming, blanching and packing, I don’t know how much we appreciated or anticipated the labor of love and preservation that was happening in that moment. I do know that when Mom and Dad would send us to the cellar to bring up whatever treasures they needed for the meal they were cooking, we would look forward in great anticipation to those sweet carrots and crunchy kernels of corn in soups, stews and chowders!!! So next week I’ll begin to share some of those sweet memories with all of you—as part of the share I will be bringing down sweet corn from last Fall's harvest that we cleaned and froze. It should still be frozen when you pick up your share. The packages are one pound bags.
VEGETABLE — Shallots
Shallots are a part of the allium family which means they are related to leeks, chives, scallions, garlic and onions. Some describe the flavor as being between a garlic and onion. On the inside they look like big fat cloves of garlic. In comparison to onions they are a much more concentrated source of protein, fiber and micronutrients.
Nutrition Information Source: https://www.healthline.com/nutrition/what-are-shallots#bottom-line
ROASTED SHALLOTS AND KEUKA GOLD POTATOES
Ingredients
2 large shallots, peeled and halved lengthwise
2 tablespoons extra-virgin olive oil, divided
1 pound medium Yukon Gold potatoes, washed (you can peel them if you wish – I don’t) and quartered
Salt and Pepper
Directions
1. Preheat oven to 400°F with rack in lowest position.
2. Toss shallots with 1 tablespoon oil, 1/2 teaspoon salt, and 1/4 teaspoon pepper in a 13-by 9-inch baking pan, spreading evenly.
3. Roast, stirring occasionally, until shallots are golden, about 30 minutes.
4. Toss potatoes with remaining 1 tablespoons oil, 1/2 teaspoon salt, and 1/4 teaspoon pepper in a bowl, then add to shallots.
5. Roast, turning occasionally, until vegetables are tender and potatoes are crusty, 40 to 50 minutes.
These can be served as a side dish, over a salad, with an egg for breakfast, the possibilities are endless!!
Original recipe source: https://www.epicurious.com/recipes/food/views/roasted-potatoes-and-shallots-350605
For more recipes check out our farm recipe blog: https://blackdirtrecipes.wordpress.com
Winter Share Week #7
This time of year is such a conundrum—coming out of Winter but not really in Spring mode yet. The hint of new growth like the snowdrops teases at us. You find yourself double-checking because you’re not really sure if you see a tender young shoot peeking through the winter detritus or not. Anything planted in tunnels grows so-ooo slowly now. Even though the daylight hours are gradually lengthening it’s still not enough to support real strong growth patterns. But we keep nibbling away with visions of summer squash and sweet peas in our heads.
VEGETABLE — Green Cabbage
If you believe everything you hear, cabbage is supposed to be the new kale. Who would think that a vegetable like cabbage could be sexy? I know I know ... the word cabbage brings visions of dishes like sauerkraut, coleslaw and possibly windy conditions. It’s a member of the Brassica family which includes broccoli, cauliflower and kale! Cultivated in North China since around 4,000 BC and domesticated in Europe around 3,000 years ago, it is low in calories and seriously high in Vitamin C (used to prevent scurvy back in the day!), Vitamin K, and folate as well as being an excellent source of fiber. In ancient Rome cabbage was considered a luxury, often used for medicinal purposes and eaten in large quantities the night before a drinking binge to allow the indulger to drink even more! And then the morning-after juice from boiled cabbage was drunk as a hangover cure. China is said to be the largest producer of cabbage in the world today and Russia the biggest consumer. No matter how you prepare it: raw in salad, steamed, pickled, stewed, sautéed or braised—cabbage is definitely on the must-eat list and moving fast up the hot, sexy vegetable list!
This recipe is a good easy one and kind of how I sauté my cabbage. Depending on my mood and what’s around I’ll add apples, pears, caramelized onions, sundried tomatoes, scallions, fennel, shredded kale or spinach, even mandarin oranges for a sweeter mood. Pomegranate ariels or cranberries added at the end of cooking give a nice burst of color and texture. Not necessarily all together—choose one or two! I have a tiny mandolin for slicing garlic and will slice up Brussels sprouts on it and throw them in the mix. Some shredded radishes, carrots or parsnips work too. As far as spices and herbs I’ll use dill, caraway, coriander, fennel seeds (or fronds if fresh is around), and I love the flavor of bay leaves with cabbage! You can always add kielbasa, shrimp, mushrooms, and believe it or not a good quality fresh chevre with some roasted beets! Sprinkle with sunflower or pumpkin seeds. The possibilities are endless!!! Again—have fun and play with it!!!
Sautéed Cabbage
YIELD: 6 SERVINGS
PREP TIME: 5 MINS
COOK TIME: 10 MINS
TOTAL TIME: 15 MINS
Sautéed cabbage is an easy, DELICIOUS vegetable side that's healthy and goes with so many dishes! Vinegar is the secret ingredient to making it taste great.
Ingredients
1 small head green cabbage—about 2 1/2 pounds
1 tablespoon extra virgin olive oil
1 tablespoon unsalted butter
1 1/2 teaspoons kosher salt
1/2 teaspoon freshly ground black pepper
½ tablespoon apple cider vinegar—plus additional to taste
1 tablespoon chopped fresh thyme—optional
Directions
1. Cut the cabbage in half from its top down through its core. Place the cut-side down on your cutting board, then slice it as thinly as possible around the core so that you have fine ribbons. Discard the core.
2. Heat a large sauté pan or similar heavy-bottomed pot over medium-high heat. Add olive oil and butter. Once the butter is melted, add the cabbage, salt, and pepper. Sauté for 10 to 15 minutes, stirring occasionally, until the cabbage is tender and begins to brown. Don't feel like you need to constantly stir it. Leaving cabbage undisturbed for a minute or two as you go is what will allow it to develop brown caramelized bits (aka FLAVOR).
3. Remove from the heat and stir in the apple cider vinegar. Taste and add a bit of additional salt and pepper if you like, or a splash more vinegar if you'd like to add more zippy and acidic flavors. Sprinkle with thyme. Serve warm.
Recipe Notes
TO STORE: Store Sautéed Cabbage in an airtight container and place in the refrigerator for up to one week.
TO REHEAT: Place Sautéed Cabbage in a microwave-safe bowl or on a plate and reheat gently until warm. You can perk your leftovers up by adding another sprinkle of salt and a splash of apple cider vinegar after reheating.
TO FREEZE: Sautéed Cabbage can be frozen if placed in a freezer-safe container. The texture of the cabbage may change slightly while frozen, but will still taste delicious when thawed.
Original Recipe Source: https://www.wellplated.com/sauteed-cabbage/
Texas Coleslaw
Ingredients
1 head of cabbage, chopped coarsely
1/2 cup chopped fresh cilantro
2 ears fresh corn kernels, or 1 11-oz can corn, drained
3 tablespoons fresh lime juice
1/4 cup salad oil/vegetable oil
1/2 teaspoon ground cumin
1/2 teaspoon salt
Directions
Place cabbage, corn and cilantro in a large bowl. Combine lime juice, oil, cumin and salt in a jar and shake. Pour over salad ingredients, toss and chill, covered, for at least 2 hours before serving
Recipe Source: https://www.farmersalmanac.com/texas_coleslaw-5571
Nutrition Sources: https://www.healthline.com/nutrition/benefits-of-cabbage#section5
For more recipes check out our farm recipe blog: https://blackdirtrecipes.wordpress.com
Winter Share Week #6
Signs of Spring are starting to show themselves. The orchardists are pruning, baby animals are being born, seeds being planted in greenhouses, tractors and implements are being repaired and tuned. The soil is subtly changing color as the various weather conditions assault it. Even the air smells differently, a little sweeter, the daylight is subtly longer, geese are flying in from their winter havens, and though it sounds gross—dead skunks are appearing on the side of the road. Yesterday I saw my fourth one in two weeks. I have found this to be a true signal of Spring's arrival as the animals are waking up from their winter hibernation and venturing out ... with not the best results at times.
I pulled back some of the covers from the potatoes in storage and was alarmed at the length of the roots that had grown. In the center of the pile it is quite warmer than the rest of the space, as vegetables generate their own heat. Under the dark covers over the potatoes (we do this to keep out sunlight so the potatoes won’t turn green) it’s the perfect atmosphere for growing sprouts. My own potato cave!!! We set aside garlic for spring planting and the garlic in the basement is holding pretty well, whatever was in the greenhouse is sending out pretty green shoots. The garlic bulbs look like hip hoppers with those lime green shoots standing straight up out of the bulbs. As soon as Mother Nature lets us, we’ll be planting these bulbs and tubers!
VEGETABLE — Sweet Potato
I once received a “talking to” by a southern farmer. I made the mistake of calling sweet potatoes "yams" in his presence. Turns out yams aren’t even grow in the continental United States. They are produced in Africa (about 95% of the worlds crop is grown there), Asia, Latin America and the Caribbean. They also look very different than sweet potatoes: yams have a rough scaly appearance, are starchy and have different nutrients than sweet potatoes. Sweet potatoes come in different colors—orange is the most common, white and purple are becoming more popular. A starchy root vegetable, sweet potatoes are rich in fiber, vitamins, and minerals. They’re also high in antioxidants and a good source of beta-carotene.
Some popular ways to enjoy sweet potatoes include:
Sweet potato chips: Peeled, thinly sliced, and baked or fried.
Sweet potato fries: Peeled, cut into wedges or matchsticks, and baked or fried.
Sweet potato toast: Cut into thin slices, toasted, and topped with ingredients like nut butter or avocado I like goat cheese on mine!
Mashed sweet potatoes: Peeled, boiled, and mashed with milk and seasoning.
Baked sweet potatoes: Baked whole in the oven until fork-tender.
Sweet potato hash: Peeled, diced, and cooked with onion in a pan.
Spiralized sweet potatoes: Cut into spirals, sautéed, and sauced.
In baked goods: Sweet potato puree adds moisture without fat.
Sources: https://ncsweetpotatoes.com/
https://www.healthline.com/nutrition/sweet-potato-benefits#section8
KALE AND SWEET POTATO SAUTÉ
Cutting the sweet potato into 1/4-inch cubes shortens the cooking time so you can get this delicious dish on the table fast. Feel free to substitute cubed butternut squash, if desired.
INGREDIENTS
2 cups cubed and peeled sweet potatoes, cut into ¼-inch cubes (about 1 large or 2 medium)
1 Tbsp. cooking oil (coconut oil, olive oil or avocado oil)
½ cup thinly sliced red onion (about ½ small onion)
3 cloves garlic, minced
4 cups kale, tightly packed, washed and torn with tough stems removed (about 1 bunch
Sea salt and pepper to taste
Avocado, fried eggs, Lemon wedges, optional
*** See note below
DIRECTIONS
1. Heat oil in a large skillet placed over medium-high heat.
2. Add sweet potato and onion. Sauté, stirring occasionally, for 5-8 minutes or until onions and potatoes start to soften a bit.
3. Add garlic and cook an additional 30 seconds or until fragrant.
4. Add 2 Tbsp. water and cover with a lid. Cook additional 3-4 minutes or until potatoes are just about done.
5. Add kale, toss well and continue to cook for 3 minutes, stirring occasionally, until kale is wilted and tender.
6. Remove from heat, season with salt and pepper to taste. Serve with lemon wedges, avocado slices or a fried egg, if desired.
*** This is a versatile recipe – not only can you sub butternut for the sweet potato I would also use Kabocha or Honey-nut and you could also use regular potatoes, the textures will be different. Instead of Kale I would also use Spinach or some other leafy green – Collards paired with the sweet potatoes is especially yummy. I cook by feel so depending on my mood and what’s available I would toss in some sundried tomatoes or oven roasted cherry tomatoes. If I were in the mood for “heat” I would add some chili pepper flakes. Black beans or chickpeas make a great addition as well. Essentially have fun with it!!!
Original recipe source: https://therealfoodrds.com/kale-and-sweet-potato-saute/
For more recipes check out our farm recipe blog: https://blackdirtrecipes.wordpress.com
Winter Share Week #5
The potatoes this week are "field run." This means they are not sorted for size. They are as they were harvested—tiny ones the size of quarters and big 3-inch plus in size. Have fun and pick the size best suited for your use. And remember: same size will cook at about the same time—of course you can always cut them to the same size!
Still working on seed orders for spring and early summer plantings. Seed-buying is a project that kind of goes on all year long. Seed has a varied shelf-life, some longer than others. Some seeds will keep their virility for years, others only one or two. So you don’t want to overbuy and have too much hanging around too long. As I am looking at the print and online catalogues I’ve been playing Mind of a Chef on Netflix in the background, alternating with Edith Piaf on Pandora (my favorite baking station). It really has me thinking more like a cook as I look at the possibilities of the future harvest. All morning I’ve been asking myself, What should Spring look like? What do I want Spring to look like on my farm? So far my vision is this: lush and green, nettles, wild violets, baby green garlic, peas and pea shoots, Fava bean shoots, scallions, baby green onions, fresh herbs, leafy greens, baby cabbages, baby broccoli, edible flowers, asparagus, radishes, baby leeks the size of pencils and tiny baby cucumbers. Mmmmm.
VEGETABLE
Leeks
Another one of my favorite vegetables—I know you probably get tired of hearing me say that (LOL) but it is true! There’s a sweetness that comes through when they’re roasted that is different than onions. Leeks are in the same family as onions and garlic so they do possess similar flavonoids. With a subtly sweeter flavor than onions, I really enjoy them with chicken or in a potato leek soup, or roasted with a whole bunch of other vegetables, that I will serve over salad, rice or pasta.
Leeks are thought to have originated in Asia and brought to Europe by the Romans. So valued were leeks for their health benefits, that is said Nero ate them daily to make his voice stronger!
The lower white and pale green portions are what you want to eat. I use the tougher fibrous tops for added flavor in my stock for my potato leek soup. Lop off the dark tops and set aside for stock. The lower portions either slice in thin medallions or lengthwise in thin strips. Wash in cool water—rinse several times as the soil gets inside those rings and isn't that tasty!
A recipe from Food 52:
"So often leeks are the delicious basis for something else, like a good soup. This recipe lets the leek shine with other savory flavors that are meant to simply enhance. I love that this is a Lebanese-style leek dish, one that surprised me when I first adapted it from Hussein Dekmak’s The Lebanese Cookbook. The Lebanese are devoted to careful preparation of our vegetables, here with fine olive oil and a garlicky herbal undertone." —Maureen Abood
PREP TIME 10 minutes
COOK TIME 10 minutes
SERVES 4
Ingredients
2 leeks
3 tablespoons excellent quality extra-virgin olive oil
3 garlic cloves, peeled and minced (green center removed)
3 tablespoons cilantro, finely chopped, plus more for garnish
1 pinch salt and pepper to taste
Directions
1. Trim the dark green ends of the leeks, leaving only the light green and white ends. Trim away most of the root but leave enough to keep the leek intact. Slice the leeks in half lengthwise, but not through the stem that connects the leek layers, to clean them, removing outer layer and rinsing well between the layers. Slice off the root end completely and slice the leeks crosswise into 2-inch chunks.
2. In a small frying pan, heat the olive oil to hot but not smoking. Turn down the heat and add the garlic and cook just until fragrant, about 30 seconds. It’s very easy to overcook garlic; you are barely cooking it, just enough to bring out the aroma. Add the cilantro and cook for another 30 seconds. Season lightly with salt and pepper. Remove from heat.
3. In a medium saucepan, bring 8 cups water to boil. Salt the water with 2 tablespoons salt. Add leeks to the boiling water and reduce heat to simmer. Poach until the leeks are just tender to bite, about 4 minutes; do not overcook because the leeks will “melt” and fall apart. Taste a leek every minute or so to determine when they are done.
4. Drain the leeks and add them to the olive oil mixture, stirring gently to coat the leeks completely. Serve immediately, garnished with more cilantro if you like.
Recipe source: https://food52.com/recipes/20374-garlicky-leeks-in-olive-oil
This recipe is a roundabout tribute back to my Polish heritage.
Description — This Ukrainian leek salad makes for a crunchy and refreshing side dish.
LEEK SALAD WITH APPLES AND CARROTS
Ingredients
1 large or 2 small leeks
1 large or 2 small carrots, peeled and grated (about 1 cup)
1 Granny Smith apple (or another tart apple variety), cored and cut into matchsticks
¼ cup vegan mayo (I like Sir Kensington’s)
¼ teaspoon fine sea salt
Freshly ground black pepper, to taste
Directions
1. Start by cleaning the leek: Trim the root end of the leek, as well as a few inches off the dark green portion (just the part that looks bruised and/or dry). Halve the stalk lengthwise and cut the leek into thin half moons. Place the sliced leeks into a big bowl of water and swirl them around with your hands to release all the dirt. Lift the leeks out of the water and place back onto your cutting board. Drain the water and replace with new water. Repeat the process once or twice more until the leeks are clean.
2. In a large bowl, combine the leeks, carrot, apple, mayo, salt, and pepper. Toss to combine. Taste and adjust the seasonings, if needed. Serve immediately.
NOTE: Because the leeks are raw there is a sharpness in flavor that comes through. I would definitely serve this with a fatty fish like herring or salmon
Recipe source: https://thenewbaguette.com/ukrainian-leek-salad/
From Bon Appetit:
20 Leek Recipes That Are Like, 'Onions Who?'
https://www.bonappetit.com/recipes/slideshow/23-favorite-leek-recipes-like-onions
For more recipes check out our farm recipe blog: https://blackdirtrecipes.wordpress.com
Winter Share Week #4
Working on some projects to help extend the season on the farm. Getting materials together for low tunnels or caterpillars so I can get some cool weather crops started a bit earlier. Folks often are curious about the tunnels—they are above ground and are basically arcs covered with a pretty thick plastic. No heat goes in them just the power of the sun, so things like kale, spinach and other hearty greens do pretty well in them. Scallions and radishes will thrive also. Tinkering with some lettuces, so we’ll see how that goes. Next week it's supposed to be in the 50s so that will help warm things up a bit; but I am sure colder temps are right behind that so I can’t be too overly confident!
VEGETABLE
Parsnips
This has become another one of my favorite vegetables. I like to call them the “elegant carrot.” They are really quite versatile. Last year my sister wouldn’t tell me what kind of cake to make for her birthday, it’s in January, so I made her parsnip cake. It was quite delicious if I do say so myself. One of the simplest ways I like to prepare them, as with so many of my root vegetables, is to roast them. There’s a sweetness in parsnips that isn’t as intense as a carrot might be and a subtle hint of spice that is just divine. If I am baking with parsnips my go-to spice is nutmeg and my sweetener is maple syrup.
Parsnips are a good source of Vitamin C, which we can all surely use this time of year! They are also high in vitamin K, folate, other micronutrients and fiber. One cup of parsnips has about 100 calories and these babies are just full of all sorts of good-for-you nutrients that can help with boosting your immune system among other things. I just put a stew in the crockpot and basically threw in whatever was laying on the kitchen counter—onions, carrots, parsnips, turnips, mushrooms, sweet potatoes, shallots, leeks, thyme, bay leaves, and parsley ... I debated on putting in the apples but I didn’t want to go that sweet. The kitchen smells amazing already!!!
Nutrition source: https://www.healthline.com/nutrition/parsnip
This recipe can be used for most any root crop –potato, sweet potato, beets …
ROASTED PARSNIP CRISPS
Ingredients
5 cups thinly sliced parsnip rings or raw “chips”
2 tbsp extra virgin olive oil
Sea salt to taste
Optional spices
¼ tsp cardamom
¼ tsp powdered ginger root
¼ tsp curry powder
Directions
1. Slice parsnips in a food processor or mandolin on a thin (2 mm) setting.
2. Using an olive spray bottle or brush, lightly apply oil to the parsnips.
3. Lay chips out in single layer on baking sheet and apply seasoning.
4. Bake at 350F until lightly browned and crisp.
Watch closely as they may take anywhere from 30-35 minutes depending on the amount, the thickness and your oven.
5. At 15 minutes, flip chips and move them around to avoid over cooking the chips on the outer edge.
Yield
Makes 4 cups of roasted crisps
This recipe works not only for parsnips but carrots, BrusselS sprouts, and sweet potatoes—
ROASTED PARSNIPS
Simple to make and incredibly delicious as a vegetable side to any dinner. They have a natural sweetness that caramelizes in the oven for a delicious flavor.
Ingredients
1 lbs parsnips
1tbsp olive oil
sea salt and freshly ground black pepper to taste
Directions
1. Preheat the oven to 425F.
2. Peel the parsnips, then cut into evenly sized matchsticks.
3. Place in a large bowl and toss with the olive oil, salt, and pepper.
4. Evenly distribute the parsnips on a baking sheet in a single layer, making sure they have a little room on the sides to brown and caramelize.
5. Roast for about 20-25 minutes, until the parsnips are starting to turn golden brown on the edges. Toss the parsnips to redistribute, then roast for another 10-15 minutes, until tender and golden.
Serve warm and enjoy!
Original Recipe source: https://www.fifteenspatulas.com/roasted-parsnips/
And for more inspiration:
19 Awesome Parsnip Recipes for Mains, Sides, and More
https://www.bonappetit.com/recipes/slideshow/parsnip-recipes
For more recipes check out our farm recipe blog: https://blackdirtrecipes.wordpress.com
Winter Share Week #3
Hello!—so no spinach today; we were really rocked by those high winds and below-freezing temperatures which, combined with the poor daylight quality slowed things down in terms of growing. It really does seem to be the quality and length of daylight that affects plant growth rather than temperature, which obviously is important with plants that need higher temps to thrive. I am always amazed at how plants seem to enter stasis mode in winter months and then on March 1 as the Spring Equinox approaches BOOM! the plants seem to double in size overnight, all due to the amount of daylight!!! This is the time of year I would drive my father crazy–a bit of warmer January weather and I would be after him, "Can’t we plow? Can’t we put some seed in the fields?" and he would just shake his head and chuckle, “Cher, relax we still have to get through February. It’s not time, it will come.” So here I am yet again anxiously awaiting seed to be delivered and the season to turn so we can once again plow and plant in the fields.
VEGETABLE
Beets
Yet again this seems to be a love/hate vegetable. At the top of my list for favorite vegetables—the caveat being I have eaten canned beets—"EHEEW!" I’m sure done correctly there is a place for them as I do love my pickled beets! Perhaps it was the taste of the metal can coming through, I don’t know, but if that were my only experience with beets I get it why folks don’t exactly fall in love with them. I still grow the same variety my Dad grew, Detroit Red, mostly because of the flavor. They are a great source of antioxidants—I mean look at that gorgeous ruby color! Research suggests that ancient Babylon, Greece, and Rome enjoyed the root veggie, and archaeologists have found evidence of their use in certain parts of North Africa as well. Not only did these ancient cultures prize the leaves and stalks of beets for culinary use, they also used their roots as medicine. The ancient Greeks and Romans even turned to beets for their professed aphrodisiac qualities. Aphrodite the goddess of love supposedly ate beets to make herself even more attractive! It might have something to do with all their great nutrients like manganese, folate, vitamin B2, and potassium. In addition, they are a good source of fiber, natural sugar, iron, sodium, low in calories and a source of the antioxidants betaine, boron, and tryptophan.
Nutrition information source: https://www.everydayhealth.com/diet-nutrition/diet/beets-nutrition-benefits-types-how-cook-more/
Can you eat beets raw? Yes you can, peel and shred into your favorite salad, a lot of folks juice them.
I love to eat with all my senses and this recipe covers most of them – the eye candy of the layers is the most gratifying.
WINTER LAYERED SALAD with BEETS and BRUSSELS SPROUTS
Layered is the new chopped! We've taken winter's best vegetables and gone vertical for this colorful salad.
We love the tender-chewy barley, but it can be swapped out for your favorite whole grain, like brown rice or quinoa. Don't skip the walnuts - the toasty-nutty little guys are our favorite part!
Level: Easy
Total: 1 hr 5 min
Active: 40 min
Yield: 4 servings
Ingredients
1 cup walnut halves
1 cup pearled barley
2 large pink grapefruits
3 tablespoons red wine vinegar
1 small shallot, finely chopped
2 teaspoons Dijon mustard
1/2 teaspoon honey
Kosher salt and freshly ground black pepper
1/3 cup extra-virgin olive oil
8 cups mesclun greens (about 5 ounces)
1/2 pound Brussels sprouts, thinly sliced
4 large cooked and peeled beets, cut into wedges (about 10 ounces)
1/2 cup pomegranate seeds
Special equipment: A straight-sided 3-quart tall glass bowl or four 16-ounce widemouth glass jars with lids
Directions
Preheat the oven to 350 degrees F.
Spread the walnuts out on a rimmed baking sheet, and bake until golden and toasted, 8 to10 minutes. Let cool, and roughly chop. Meanwhile, bring a small saucepan of water to a boil. Add the barley, and simmer until plumped and tender, 20 to 25 minutes. Strain and rinse under cold water. (The barley can be made and refrigerated up to 2 days ahead.)
Use a sharp knife to remove peel and pith from the grapefruits. Cut the grapefruits into pieces, and remove the seeds.
Whisk the vinegar, shallots, mustard, honey, 1/2 teaspoon salt and a few grinds of pepper in a medium bowl. Slowly drizzle in the oil, whisking constantly, until blended into a vinaigrette.
Using a 3-quart straight-sided tall glass bowl for 1 large salad or four 16-ounce wide-mouth glass jars for 4 individual salads, make a first layer with half the mesclun, then add the following in separate layers: the grapefruit, the Brussels sprouts, the barley, the beets, and the remaining mesclun. Sprinkle the walnuts and pomegranate seeds on top.
If making 1 salad, just before serving, transfer it to a large bowl, toss with the vinaigrette and season with salt and pepper. If making 4 salads, add vinaigrette to each jar, season with salt and pepper, cover with the lid and shake to coat.
Original Recipe Source: https://www.foodnetwork.com/recipes/food-network-kitchen/winter-layered-salad-with-beets-and-brussels-sprouts-3363606
SHAVED BRUSSELS SPROUTS SALAD with ROASTED BEETS, PECANS and GOAT CHEESE
This hearty Brussels sprouts salad sweetened with roasted beets and crunchy pecans is delicious as a vegetarian main dish or served as a side. The tangy mustard dressing softens the bite of the Brussels sprouts with a hint of maple syrup that's topped with creamy goat cheese.
Ingredients
3 medium size beets
Extra virgin olive oil
Kosher salt
12 ounces fresh Brussels sprouts
1/4 cup slow roasted pecans roughly chopped
1/4 cup extra virgin olive oil
1 tablespoons apple cider vinegar
1/2 tablespoon grainy mustard
1/2 tablespoon Dijon mustard
1/2 tablespoon maple syrup or more to taste
1/8 teaspoon kosher salt
1/8 teaspoon freshly ground black pepper
1-2 ounces goat cheese
Instructions
1. Preheat the oven to 400 degrees F. Trim the ends of the beets and wrap in aluminum foil in groups of three, drizzle with olive oil and sprinkle with kosher salt. Seal the foil packets tightly and place on a baking sheet. Bake for 45 minutes or until beets are fork tender. Remove from the foil and allow to cool, then rub and cut the skins off of the beets. Set aside or if making ahead, refrigerate for up to 3 days.
2. Use a sharp knife to cut away the end of the core of the Brussels sprouts and finely slice around the core of the cabbage heads one at a time, discarding the core. Place in a large bowl.
3. Slice the beets into bite size pieces and scatter on the Brussels sprouts with the chopped pecans.
4. In a small jar with a screw top lid, add the olive oil, mustards, maple syrup, kosher salt and freshly ground black pepper. Shake well and season to taste. Pour over the salad and toss well to coat. Season with more salt and pepper if desired.
Allow to sit 15-30 minutes before serving for flavors to marry. When ready to serve, sprinkle with chunks of goat cheese.
Recipe source: (c) 2019 - FoodieCrush.com - Shaved Brussels Sprouts Salad With Roasted Beets, Pecans and Goat Cheese
And if you need more inspiration here's a link to 38 recipes from Bon Appetit
https://www.bonappetit.com/recipes/slideshow/roast-em-fry-em-grate-em-38-ways-cook-eat-beets
For more recipes check out our farm recipe blog: https://blackdirtrecipes.wordpress.com
Winter Share Week #2
Riding out the wave of these weather swings – from over 60 to below freezing. We keep getting asked how does this affect us on the farm – right now the cycling weather is not too onerous. Keeping the temps as stable as possible in the storage is probably the biggest challenge. If the temps cycle up and down with major degrees of difference in between, it will cause the produce in storage to think it’s time to grow and the potatoes and onions in particular will start to sprout. Some of the garlic is looking like it has neon green hair. For our seed stock we do want to see that but just not this early in the growing season. There’s still about three months to go before we have to get those babies in the ground for the next seasons crops. So we really try and hold them as steady as we can so there are no huge growth spurts. Right now the focus is on getting ready to plant long-season crops in the greenhouse for transplanting into the fields once it warms up. Some folks say we’re going to have an early summer so could be sooner than later—I dunno, only time will tell!!
VEGETABLE
The Broccoli is smallish – and probably the last until the warmer weather breaks in earnest.
Red-skinned Potatoes contain fewer calories, carbs and fiber than Russet potatoes but they are also a bit higher in vitamin K and niacin. Most of their nutrients are in the skin so peeling them can take away many of the healthy reasons to eat them.
Baking, boiling and steaming potatoes are the best choices in terms of minimizing their fat and calorie contents, compared to frying.
ROASTED RED POTATOES
Ingredients
1 ½ pounds potatoes (red-skinned preferred)
1 medium onion
2 teaspoons butter
1 tablespoon extra-virgin olive oil
1/2 teaspoon dillweed (dried or fresh, chopped)
1/2 to 1 teaspoon basil (fresh or freeze-dried, chopped)
1 to 2 teaspoons parsley (fresh or freeze-dried, chopped)
1/2 teaspoon salt
1/4 teaspoon black pepper (coarsely ground)
Directions
1. Gather the ingredients.
2. Preheat oven to 400 F. Oil a shallow baking pan.
3. Scrub the potatoes. Peel the potatoes, if desired, or leave them unpeeled. Cut them into halves (for small potatoes) or wedges of equal sizes.
4. Peel the onion and trim the ends. Cut it into 6 to 8 wedges.
5. In a small cup, melt the butter with the olive oil in the microwave.
6. In a large bowl, combine the potato wedges, onion wedges, melted butter and oil, dill weed, basil, parsley, salt, and pepper. Toss to combine and coat potatoes.
7. Transfer potatoes and onions to the prepared pan.
8. Roast for about 30 to 40 minutes, turning occasionally until potatoes are tender and golden brown.
9. Transfer the potatoes to a serving dish. Serve hot and enjoy!
Tips
Refrigerate any leftover potatoes, covered, in the refrigerator for up to four days.
Reheat them in the microwave or crisp them up in the oven. Leftovers are great to serve for breakfast alongside eggs or breakfast meats such as bacon, sausage, or ham.
Recipe source: https://www.thespruceeats.com/herb-roasted-red-potatoes-3051072
I don’t have an Insta-Pot but I think this recipe will work in one: (I personally would increase the amount of lemon in it–but I really like lemon flavor in my food.)
PRESSURE-COOKER LEMON RED POTATOES
Butter, lemon juice, parsley and chives enhance this simple side dish. I usually prepare these potatoes when I'm having company. Since they cook in the pressure cooker, there's plenty of room on the stove for other dishes. —Tara Branham, Austin, Texas
TOTAL TIME: Prep/Total Time: 25 min. YIELD: 6 servings.
Ingredients
1-1/2 pounds medium red potatoes
1/4 cup butter, melted
3 tablespoons minced fresh parsley
1 tablespoon lemon juice
1 tablespoon minced chives
Salt and pepper to taste
Directions
1. Cut a strip of peel around the middle of each potato. Place potatoes and 1/4 cup water in a 6-qt. electric pressure cooker. Lock lid; close pressure-release valve. Adjust to pressure-cook on high for 12 minutes. Quick-release pressure. Drain any cooking liquid; return potatoes to pressure cooker.
2. In a small bowl, combine butter, parsley, lemon juice and chives. Pour over potatoes; toss to coat. Sprinkle with salt and pepper.
© 2020 RDA Enthusiast Brands, LLC
For more recipes check out our farm recipe blog: https://blackdirtrecipes.wordpress.com
Nutrition source: https://www.healthline.com/nutrition/are-potatoes-healthy#section9
Winter Share Week #1
Whoo-wheee that wind was fierce yesterday and the snow squalls–just blinded us at times. The plastic on the greenhouse is rattling and I just pray it holds up through spring this year until we can replace it. That is the only protection our starts and winter production get from the elements. This morning—so tranquil and peaceful, a powder blue sky, looking across the valley you just can’t wait for spring to come and start some serious growing in the fields.
VEGETABLE
Those baby fingerling potatoes are stunning roasted whole in the oven with a drizzle of olive oil, salt, pepper and fresh thyme!!!
Winter Squash – today there is Kabocha or Butternut. Most folks are familiar with Butternut. Roasted, in a soup, mashed even in a pie it’s pretty common. Kabocha seems to be less recognized even though it’s been around for ages. Also known as "Japanese pumpkin," Kabocha is often found in curries and soups. A rich thick meaty kind of flesh can easily be substituted for Butternut in recipes, and score–once cooked the skin is edible! Both squashes are good sources of fiber, and other nutrients. A single cup of Kabocha has 40 calories, 7 grams of carbs. Butternut squash has 60 calories and 16 grams of carbs. Both are excellent sources of betacarotene which our bodies convert to Vitamin A which is vital for healthy white blood cells, good immunity and for vibrant eyes, skin and hair.
Kabocha can be roasted in the oven simply (perhaps with a dusting of cinnamon) or can create a creamy base for any soup. The world of desserts can also be explored with this 'pumpkin'.
Source: https://www.organicauthority.com/eco-chic-table/why-we-love-kabocha-squash
Here is a link to easy ways to prep a Kabocha for cooking and how the squash is cooked in Japanese cuisine. I had a customer tell me this is how her Mom makes it!!
https://www.justonecookbook.com/simmered-kabocha-squash/
BUTTERNUT SQUASH SPINACH SALAD
Ingredients
1 butternut squash
1 tablespoon olive oil
1 cup baby spinach leaves
1 tablespoon raw pumpkin seeds
½ an orange peel removed and chopped into cubes
1 teaspoon sliced red onion
1 teaspoon finely chopped parsley
1 tablespoon red wine vinegar
1 teaspoon honey
salt
Preparation
Preheat oven to 350 degrees Fahrenheit. Cut the squash in half lengthwise and remove the seeds. Pour 1 cup of water into a rimmed baking sheet or glass baking dish and roast squash, flesh side down for 40 minutes.
Heat a small nonstick skillet over medium-high heat and add a tiny drop of olive oil and the pumpkin seeds. Shake the pan every 30 seconds so the seeds toast evenly. They will begin to pop after about two minutes. Continue cooking for 3 minutes until about half of them are dark brown and add a pinch of salt. Set aside.
When the squash is soft when pricked with a fork, remove it from the oven to cool. Remove the skin from half of the squash and cut into 10-15 cubes. You’ll have lots of squash left over, so make a delicious pasta or soup with the leftovers.
Make the vinaigrette by whisking the olive oil, red wine vinegar, chopped parsley and honey in a bowl.
Add the spinach, orange, red onion and squash to a plate. Drizzle the vinaigrette and toasted pumpkin seeds on top and serve.
Recipe source: https://www.organicauthority.com/organic-food-recipes/baked-squash-and-spinach-salad-recipe-with-a-parsley-honey-vinaigrette
Nutrition Information: https://www.organicauthority.com/
For more recipes check out our farm recipe blog: https://blackdirtrecipes.wordpress.com
Fall Share Week #11
Hope you enjoyed a wonderful Thanksgiving!!! Ours was very nice, great company, lots of good food (not because I cooked LOL), roaring fire in the fireplace and a holiday movie marathon to finish the evening. Now back to reality – over a foot of snow between Sunday and Monday evening. Storm started with icy rain, so many trees and branches came down. Shoveled pathways twice between Sunday night and Monday morning, will be back out there again today. The snow and ice is a heavy weight on the greenhouse and if not dealt with quick enough could cause it to collapse. Turned the heat up a bit higher in there to help the snow melt faster and we’re pulling the snow off with rakes and shovels. Luckily the weather is warming and helping to melt the snow relatively quickly.
VEGETABLE
Turnips– Seem to be another one of those "love, hate, I-have-no-clue" vegetables. We didn’t grow up on them and had no idea how to use them, but since that long-ago time I have found that I like them!!!! They are a member of the cruciferous family, meaning that they are related to cabbage, Brussel sprouts, kale and other like-minded vegetables. I wouldn’t have said this, but apparently they are one of the most important vegetables in the world because they are used as food for humans and animals!! Very low in calories, high in fiber, certain vitamins and low in carbs these are another vegetable that deserves a space on our plates!
Nutrition source: https://www.healthline.com/nutrition/turnip-nutrition
I usually roast them as I do with most of my roots.
Directions
Simplest way: Preheat oven to 450 degrees (F). Wash, peel, cut into bite-size cubes, toss with olive oil, salt and pepper. Lay on a sheet pan – leave some space between pieces – this is how you get those crispy edges!!! Start checking after about 20 minutes for your desired level of “doneness,” poke ‘em with a fork, this will show how firm they are. I don’t like mine cooked too soft, as I will toss these over salad greens with other vegetables and sometimes top that with a poached egg. I can eat this morning, noon and night!!!
If you have time and patience chop into a very fine mince with potatoes, onions, carrots, whatever catches your fancy, toss the lot with olive oil, salt and pepper, then roast or sauté them in a fry pan for a wonderful hash!!! If you roast this – keep an eye on them as the finely-sized pieces can burn quickly.
Here’s a link to a recipe if you prefer step by step instructions:
https://www.healthyseasonalrecipes.com/roasted-turnips/
Check this link out for a guide to turnips: https://www.healthyseasonalrecipes.com/produce-spotlight-the-ultimate-guide-to-turnips/
Some folks think of turnips as bitter – here is a recipe that uses sugar to “sweeten” the pot:
https://www.thespruceeats.com/mashed-turnips-recipe-101858
This recipe sounded so good I had to share it and can’t wait to make it myself!!!
https://www.fromachefskitchen.com/rosemary-garlic-crushed-potatoes-lemon-chive-aioli/
For more recipes check out our farm recipe blog: https://blackdirtrecipes.wordpress.com/
Fall Share Week #10
Feels like Spring today – doesn’t smell like it, but it feels like it. Spring feels like fresh new air, cool but warm at the same time. The sky is a pastel baby blue. Spring smells of cool damp earth, makes you want to start digging in the soil, get planting, start working in the fields. We hold onto this respite and try not to think of the winter days to come.
Don’t know about you but I’m busy trying to figure out my menu for Thanksgiving Day. We all take turns hosting holidays for our family, mine is Thanksgiving!!! I cherish this time of year, there is so much to be grateful for! Definitely on the menu is turkey with Mom’s stuffing, fresh cranberry sauce, mashed potatoes and gravy. Thinking about trying out the celery soup recipe that was in the NY Times Dining section yesterday, squash and Brussel sprouts, pies, maybe a pumpkin pudding, pickles of course, maybe some cheeses from the farmers market. My only problem, well two really, is when to stop cooking and when to stop eating. Hope you all have a safe and delicious Thanksgiving!!!!!
Vegetable:
Bouquet of Herbs
I consider these the holy trinity of herbs for fall and winter cooking especially. Rosemary, Sage and Thyme, they go with so many things — eggs, cheese, poultry, pork, lamb, seafood. When I roast my turkey and whole chickens too I’ll throw a bouquet inside the cavity with some lemon and orange wedges. Between the fresh herbs and bright citrus notes the bird becomes so fragrant and tasty. The sage leaves can be fried in oil for a sensational garnish, all three can be dried, you can also make simple vinegar from one or any combination of the herbs, and then use the flavored vinegar as a base for a marinade or salad dressing!!! I tend to prefer apple cider vinegar – put herbs in a pint jar, cover with vinegar, let sit for about 4 weeks. Keep out of direct sunlight. Taste to see if you like the flavor. Strain the herbs out, pour flavored vinegar back into clean pint jar or other decanter and enjoy!!
HERB ROASTED POTATOES
Found this recipe on Yummly pretty close to what I do …
Ingredients
· 1 onions (medium, chopped)
· 2 cloves garlic (chopped)
· 2 tablespoons fresh herbs ((rosemary, parsley, sage and/or thyme) or 1/2 tsp. dried rosemary leaves, crushed)
· 1/8 teaspoon ground black pepper
· 4 all purpose potatoes ((about 2 lbs) peeled, if desired, and cut into 1-inch chunks)
· i can't believe it's not butter! spray made with extra virgin olive oil
Directions
Preheat oven to 450°. Toss first 5 ingredients in large bowl. Generously spray* with I Can't Believe It's Not Butter!® Spray made with Extra Virgin Olive Oil. Arrange potatoes in single layer on ungreased baking sheet. Roast, stirring occasionally, until potatoes are tender and golden, about 50 minutes.
Recipe Source:https://www.yummly.com/recipe/Herb-roasted-potatoes-298085#recipeDirections
CHICKEN THIGHS BAKED WITH LEMON, SAGE, ROSEMARY & THYME
By Bill Devin Fine Cooking Issue 46
Scott Phillips
Servings: 6
In addition to the lemon and fresh herbs, the chicken thighs are flavored with an emulsified mash of garlic, salt, and olive oil, called allioli. I like to garnish each plate of chicken with a spoonful of Romesco sauce.
Ingredients
2 large cloves garlic
Coarse salt or sea salt
3 to 4 Tbs. extra-virgin olive oil
12 chicken thighs, trimmed of fat, rinsed, and patted dry
2 large lemons, each cut into six 1/4-inch rounds
1 bunch fresh rosemary, snipped into twelve 2-inch pieces
1 bunch fresh thyme, snipped into twelve 2-inch pieces
12 sage leaves
Freshly ground black pepper
Directions
Using a mortar and pestle, mash the garlic with a large pinch of salt to create a coarse paste (or use a small mixing bowl and the back of a spoon, or mince the garlic very finely on a cutting board). Add the oil very slowly in drops while pounding and grinding the paste, continuing until the allioli is thick, creamy, and emulsified. Put the chicken in a bowl. Rub the allioli all over, including under the skin. Cover and refrigerate at least 2 hours or overnight. A pestle is perfect for pounding garlic, salt, and olive oil to a creamy paste.
Heat the oven to 425°F and set an oven rack in the middle of the oven. Arrange the lemon slices in one layer in a large shallow roasting pan or baking dish (9x13x2 inches is good). Top each slice with a piece of rosemary and thyme and a sage leaf. Set the chicken thighs, skin side up, on top; sprinkle them generously with salt and pepper. Bake until the skin is golden and the juices are clear, 45 minutes to 1 hour.
Sometimes the lemons and chicken produce a lot of juices, in which case you can make a delicious pan sauce. Transfer the chicken (keeping the herbs and lemon slices underneath) to a plate and cover loosely with foil. Tilt the pan to pool the juices in one corner. Spoon off the fat that rises to the top. Set the pan over medium heat (if the pan isn’t flameproof, pour the juices into a small skillet) and scrape up any stuck-on juices. Let the juices boil and reduce so they thicken to a saucy consistency. Drizzle the sauce around, not on, the chicken to maintain the crisp skin.
Recipe Source: finecooking.com/recipe/chicken-thighs-baked-with-lemon-sage-rosemary-thyme
For more recipes check out our farm recipe blog: https://blackdirtrecipes.wordpress.com/
Fall Share Week #9
OOOOH Baby it’s cold outside but nothing like what is yet to come!!!! Our farmers were busy re-configuring our heated greenhouse and no time too soon!!! Still hoping to get some caterpillar tunnels up in the fields as the ground is not completely frozen yet. Caterpillars are mini tunnels that we construct above ground. We build them out of metal and plastic tubes. The tubes are bent into arch shapes like a rainbow. We insert the ends of the arcs into the soil and then cover the tunnel with plastic. We lash the plastic in place with ropes that we anchor to the ground with pins. This structure creates a greenhouse-type atmosphere by trapping heat closer to the ground and allowing us to grow things later in the season and start planting earlier in the season. Not fail-proof as we are totally reliant on the prevailing weather conditions since we do not add heat to these structures but they’re pretty darn effective!!!
Vegetable
Baby Green Garlic
This is a delicacy usually only seen in Spring. When we harvested the bulb garlic we missed a bunch of heads in the field. These heads germinated and sprouted. When I was scouting the fields last week I discovered the green garlic and I harvested it specially for you. The whole plant is edible right down to the roots. It is garlic so anywhere you like that garlic flavor you can use it—pesto, in soups, stews, salad dressings. If you can’t get to it right away it can be frozen.
Spinach Green Garlic Soup
2 Tbsp. olive oil
1 Tbsp. unsalted butter
½ to ¾ lb. green garlic, thinly sliced (white and pale green parts only)
Salt
1 qt. vegetable or mild chicken broth
8 to 10 oz. baby spinach leaves
1 Tbsp. crème fraîche
Warm the olive oil and butter in a large saucepan or Dutch oven over medium heat. Add the green garlic and a pinch of salt, and cook, stirring frequently, until it is soft and translucent. Also, as the garlic cooks, you should notice that its scent changes from raw and sharp to sweeter and more mellow; that’s what you’re after. When the garlic is ready, add the stock, raise the heat a bit, and bring it to a boil. Then adjust the heat to maintain a gentle simmer, and continue to cook for about 15 minutes. Add the spinach, and immediately turn off the stove. Let it sit for 5 minutes – not too long, or the spinach will lose its color – and then, working in batches, purée the mixture in a blender. (Remember never to fill the blender more than a quarter or a third full, because the hot liquid will expand when you turn on the motor.) The soup should be a rich shade of green and very smooth.
Return the soup to the pot, and place it over low heat to rewarm gently. Add 1 Tbsp. crème fraîche and another pinch or two of salt. Taste, and adjust seasoning as necessary. Serve warm or hot, with a drizzle of olive oil or a dollop of crème fraîche, if you like.
Yield: 4 servings – recipe source: http://orangette.net/2008/04/that-easy/
For more recipes check out our farm recipe blog: https://blackdirtrecipes.wordpress.com/
Fall Share Week #8
Wish you were in the fields with me this morning. The sky increasingly had that ominous tinge of grey, several flocks of geese were moving about overhead in their typical V formation. Across the valley on the neighbors fields mountains of pumpkins lay about waiting to now be sold as deer food. Their bright orange color screams like a sirens call against the dark, rich earth. As I pull vegetables from the soil, some go gracefully with barley a tug, others dig in their roots and won’t release their tenacious hold in the soil. There’s something so deeply soul satisfying about working the land. Mother Nature rules with a stern at times unforgiving hand. As much rain as it seems we’ve had lately the soil is still so dry, a quick scratch at the surface and the dust flies everywhere. It becomes my foundation, my face scrub really from the grittiness of the granules.
VEGETABLE:
Brussel sprouts remind me of miniature cabbages. Best harvested after they’ve frozen and we’ve had a few freezes so they should be pretty tasty right now.Low in calories but high in many nutrients, Brussels sprouts contain kaempferol, an antioxidant that may reduce cancer growth, decrease inflammation and promote heart health. They are high in fiber, which can promote regularity, support digestive health and reduce the risk of heart disease and diabetes. They are also a good source of Vitamin C. The fiber and antioxidants in Brussels sprouts may help keep your blood sugar levels stable.
Nutrition Source: https://www.healthline.com/nutrition/benefits-of-brussels-sprouts#section11
Oven Roasted Parmesan Brussel Sprouts
Oven roasted parmesan Brussel sprouts are a quick & easy 20 minute side dish that are healthy and delicious. Only a few simple ingredients to the best Brussel sprouts that are bursting with flavor.
1/2 lbs Brussel sprouts (trimmed & halved)
2 teaspoons olive oil
1/4 cup parmesan cheese
1/4 teaspoon garlic powder
pinch salt
pinch pepper
Instructions
Heat oven to 425 degrees. Very lightly spray a cookie sheet with cooking spray. In a bowl, combine Brussel sprouts (that have been halved and ends trimmed) with the remaining ingredients. Toss together to coat all the Brussel sprouts. Spread onto the cookie sheet making sure they are not touching.
Cook for 16-18 minutes. Serve immediately.
Original recipe source: https://togetherasfamily.com/oven-roasted-parmesan-brussel-sprouts/
Some other recipe links for you:
https://www.wellplated.com/roasted-brussels-sprouts-with-garlic/
https://www.apinchofhealthy.com/lemon-garlic-roasted-brussels-sprouts/
https://simpletasty.recipes/14-easy-and-quick-brussel-sprout-recipes/?utm_source=%2Bbrussel%20%2Bsprouts&utm_medium=14EasyandQuickBrusselSproutRecipes&utm_campaign=adw_us&gclid=Cj0KCQiAno_uBRC1ARIsAB496IWoVrLX3bqikkZveD054HJsOEYUeMR6Ng98_FIJmUw1mSKVAn2zUHsaAkchEALw_wcB
For more recipes check out our farm recipe blog: https://blackdirtrecipes.wordpress.com/
Fall Share Week #7
Happy Halloween!!!
Beets – these are one of my personal favorite vegetables. My family roots begin in Poland so we grew up on borscht and pickled beets. This seems to be another one of those love hate vegetables. I remember when we were kids and canned foods were becoming so popular, mostly for their convenience factor, Mom got on the bandwagon and broke out a tin of canned beets – they were so gross. So much of the flavor profile of beets starts with the variety and then of course the soil. To this day I still grow Detroit Red, the same variety my Dad grew. Germination can be iffy – germination is when, after the seed is planted the shell of the seed breaks open and the little leaves and roots begin to emerge. We look for minimum 90% germination, an example of this is: plant 100 seeds and count how many seedling emerge from the soil. If 80 emerge you have 80% germination which is pretty low. This is how Dad always tested our homegrown onion seed and I still use this practice today! So for me even though a seed/variety may have lower germination rates, I also look to flavor and will choose flavor over production rates.
Beets are low in calories and high in vitamins and minerals and other plant compounds that are so beneficial.
Nutrition info source: https://www.healthline.com/nutrition/benefits-of-beets#section7
One of the simplest ways to cook beets are rinse, do not peel, put in a pot with enough water to cover by about an inch. Bring to a boil, they are done when fork tender. Drain and let cool. If you’re impatient you can run cold water over them. The peels will slip right off and you can prepare the beets however you want. Again a simple way to eat, after cooking – slice into desired pieces, add butter or olive oil, season with salt and pepper, enjoy or mash them.
I like to roast beets too – preheat oven to 425 degrees, rinse beets, place in roasting pan, cover with foil, bake for an hour until fork tender – if the beets are big you can halve or quarter them.
Yogurt Mint Dressing
1 cup plain yogurt
¼ cup sliced red onion
1 clove minced garlic
¼ cup chopped fresh mint
Pinch of sugar
Salt and pepper to taste
Mix all dressing ingredients. When beets are ready drizzle with dressing. Garnish with fresh mint leaves. Serve warm or chilled.
Roasted Beets with Balsamic Glaze
https://www.simplyrecipes.com/recipes/roasted_beets_with_balsamic_glaze/
Here’s a link to more recipes: https://www.bonappetit.com/recipes/slideshow/roast-em-fry-em-grate-em-38-ways-cook-eat-beets
For more recipes check out our farm recipe blog: https://blackdirtrecipes.wordpress.com/
Fall Share Week #6
Another week gone by how the time just flies. Benito and Lupe have been busy with finalizing fall field work and prepping the greenhouse for Winter and Spring work. Yes I said Spring. I was floored by the arrival of seed catalogs in the mail this week. But I have to confess I have been trolling Instagram pages and websites looking for inspiration for spring planting. For me I guess besides coffee that is my addiction.
VEGETABLE
Sugar Pumpkin
“I would rather sit on a pumpkin, and have it all to myself, than be crowded on a velvet cushion.” – Henry David Thoreau
Nutrition: Rich in vitamin A. It's also a good source of omega-3 fatty acids, vitamin C, potassium, and fiber.
Homemade Pumpkin Puree
INGREDIENTS
as many sugar pumpkins as you want to roast (they range from 6-8 inches in diameter and weigh about 2-3 pounds)
DIRECTIONS
Preheat oven to 350 degrees F.
Cut off the top of each pumpkin.
Cut each pumpkin in half (or into quarters).
Scoop out the seeds (rinse and dry overnight if you want to roast them later).
Place pumpkin halves on a baking sheet, and pour about a cup of water into the pan.
Roast pumpkin in oven for 45-60 minutes, until flesh is soft through and through when pierced with a knife.
Remove from oven, cool slightly, and peel skin. Discard skin.
Place pumpkin chunks in a food processor and puree for 2-3 minutes, until no lumps remain. If needed, add some water to smooth out the puree.
Set a tea towel, paper towel, or cheesecloth in a strainer, set it over a bowl, and add puree. Strain for about an hour to release excess water and thicken up the puree.
Use within 5 days, or freeze for later use (Ziploc baggie, airtight containers, etc.)
Source: adapted from Annie’s Eats & Skinny Bits
PRINTED FROM www.scrumptiousandsumptuous.wordpress.com
Some quick ideas on how to use your Sugar Pumpkin:
Source Bon Appetit:
Halve, seed, and peel the sugar pumpkins, then proceed as directed.
Side
Coat chunks of sugar pumpkin with olive oil, butter, salt, pepper, and lime juice. Roast until tender; sprinkle with fresh thyme.
Salad
Toss chunks of roasted sugar pumpkin into a salad of frisée, endive, and radicchio; accompany with a balsamic vinaigrette.
Pilaf
Stir cubes of roasted sugar pumpkin into wild rice toward the end of cooking; season with rosemary.
Soup
Simmer cubed sugar pumpkin in vegetable stock, along with sautéed onions, chopped sage, salt, and pepper, until pumpkin is tender. Puree, thinning with more stock, if desired.
Gratin
In a buttered baking dish, mix slices of roasted sugar pumpkin with sautéed leeks, goat cheese, and chopped toasted hazelnuts. Drizzle with cream; bake gratin until heated through.
Source: https://www.bonappetit.com/trends/article/sugar-pumpkins
Stuffed Pumpkin
These adorable little ground beef stuffed pumpkins are so delicious! They make the perfect fall entree. This recipe can easily be adapted to any winter squash.
Prep Time 10 minutes
Cook Time 55 minutes
Total Time 1 hour 5 minutes
Servings 2 servings
Calories 416kcal
Author: Vered DeLeeuw
Ingredients
1 sugar pumpkins, about 2 lb. each
1 tablespoons extra virgin olive oil
½ lb. lean ground beef
½ teaspoon kosher salt, plus extra for pumpkins (not fine table salt!)
¼ teaspoon black pepper, plus extra for pumpkins
½ teaspoon garlic powder
½ teaspoon onion powder
½ teaspoon sweet paprika
½ teaspoon ground cumin
1/4 teaspoon dried thyme
1/4 teaspoon cinnamon
Instructions
1. Preheat oven to 350 degrees F. Line a large rimmed baking sheet with parchment paper.
2. Wipe the pumpkins clean with a wet paper towel. Microwave each pumpkin for 2 minutes (1 minute on each side), to make them just a little softer and easier to cut.
3. Using a sharp chef’s knife, cut the pumpkins in half. Scoop out the pulp and seeds, reserving the seeds for roasted pumpkin seeds.
4. Place the pumpkins, cut side down, on the prepared baking sheet. Bake until fork-tender, 45-50 minutes.
5. While the pumpkins are baking, prepare the filling. Heat the olive oil in a large, deep skillet over mediumhigh heat. Add the ground beef and cook until no longer raw, stirring to break the meat up as it cooks, about 5 minutes.
6. Stir in the salt, pepper, garlic powder, onion powder, paprika, cumin, thyme and cinnamon. Cook, stirring, 2 more minutes.
7. Remove the filling from heat. When the pumpkins are ready, sprinkle them with a little kosher salt and black pepper, then stuff them with the filling.
Original recipe source: https://healthyrecipesblogs.com/stuffed-pumpkin/
For more recipes check out our farm recipe blog: https://blackdirtrecipes.wordpress.com/
Fall Share Week #5
What a crazy weather day yesterday – but I think you had it worse in the city than we did up on the farm. So often we are asked where IS the farm? We are located in Pine Island, NY, a tiny hamlet in the Town of Warwick. Dad always said we are about 60 miles Northwest of the GW Bridge and that’s pretty accurate. What is so cool about the area we live and farm in is our soil. We farm on what we call black dirt, essentially a giant bowl of compost formed when the dinosaurs roamed the area. Because of the ingredients that makeup our soil it is naturally higher in sulphur and nitrogen. As long as we properly care for the land via crop rotations, minimal tillage, replenishing the nutrients used by the growing plants with organic high quality amendments like chicken poop and sea kelp, minimal compaction of the soil from mechanical tilling, basically loving the land, it pays us back tenfold. Our potato harvest was so good this year. Benito and Lupe finished gleaning the potato patch this past weekend and there are now thousands of pounds of potatoes in storage for the winter.
VEGETABLE
Cabbage
In my opinion cabbage is often an under-appreciated vegetable. Of course my Polish heritage plays a big part in this growing up with traditional dishes like kapusta with noodles (cabbage and noodles), golombki (stuffed cabbage) and the inevitable sauerkraut and kielbasa and of course my Moms most excellent coleslaw. Cabbage was a common but not so common tasting vegetable in our daily lives. Mom would make a massive pan of golombki and while seemingly outraged, inwardly was very pleased at how Dad would eat almost half the pan in one sitting leaving not very much for leftovers!! Golombki is one of those time consuming, labor of love dishes that you gather some family and friends and make a lot of at once. It freezes well and is another one of those dishes that the flavor gets better with time.
Here is a link to a pretty good you-tube video on how to make Stuffed Cabbage or as she calls them cabbage rolls, She says hello in Polish so give it 2-3 seconds the video is in English.
https://www.youtube.com/watch?v=5ckKeuH9j9A
Instead of meat you can do a barley or brown rice stuffing to fill the cabbage leaves!!!
Cabbage Salad
· 1 small head cabbage, shredded
· 1/2 cup chopped green pepper
· 1/2 cup chopped onion
· 3 tablespoons mayonnaise
· 2 tablespoons white vinegar
· 1 tablespoon sugar
· 1/4 teaspoon salt
· 4 bacon strips, cooked and crumbled
In a large bowl, combine cabbage, green pepper and onion. In a small bowl, combine mayonnaise, vinegar, sugar and salt. Pour over cabbage mixture and toss to coat. Cover and refrigerate for at least 4 hours. Stir in bacon just before serving.
Nutrition Facts
3/4 cup: 90 calories, 6g fat (1g saturated fat), 5mg cholesterol, 169mg sodium, 8g carbohydrate (5g sugars, 2g fiber), 2g protein.
Notes from Cheryl: Options for the salad in addition to or instead of the green peppers if you don’t have any home or are looking for something different you can add shredded carrots, or minced jalapeño for some spice. Instead of mayonnaise you can use yogurt or sour cream or a blend of any of these. I use cider vinegar instead of white.
Recipe Source: https://www.tasteofhome.com/recipes/favorite-cabbage-salad/
Some other recipe links:
https://detoxinista.com/sweet-sesame-lime-cabbage-salad/
For more recipes check out our farm recipe blog: https://blackdirtrecipes.wordpress.com/
Fall Share Week #4
So now begins the fall cleanup, while we’re still harvesting from the fields we have to take down the trellising and stakes from the tomato vines, clean up stalks from the corn and sunflowers, and dig the gladiola bulbs, any the deer haven’t eaten that is. This was the first year they ate the gladiola flowers – unfreakin' believable!!!!! But as I chat with other farmers in the area they too have suffered the ravages of those giant goats. At least they left our squashes alone, other farmers weren’t so lucky and lost their entire planting of winter squashes to the freeloaders. It’s a shame because they are really lovely creatures to watch and see roaming about in the woods and open pastures. But I digress — another very important job especially now is culling seeds from the crops that matured enough to bear them for us. We are saving seeds from basil, callaloo, amaranth, lettuces, onions, sunflowers, peppers, tomatoes and more. We were able to save some white carrot seed this year too. Carrots are a bit trickier being biennial – which means they must grow a full season, produce the root then continue growing, flower and then produce the seeds. So with the length of time involved it’s not always practical for us to save seeds from certain vegetables.
Vegetable
Carrots
Everyone loves our carrots, they are so sweet. Partially due to the varieties I choose to grow, and also due to our soil and it’s mineral content. I think because we let them grow at a natural pace and don’t push them full of synthetic fertilizers also helps. Here’s a fun link to the world carrot museum, it has tons of information on carrots. For the younger folks there’s a link to a page where you can “create” a carrot character, kind of like Mr. Potato Head. http://www.carrotmuseum.co.uk/
Carrot "Spaghetti" with Lemon Thyme Butter Sauce
serves two
Like a good man, a good peeler is hard to find. I've had the same vegetable peeler (and man) for about 15 years now, and neither show any sign of becoming dull.
3 medium carrots (about 3.5 ounces/105 grams), scrubbed clean or outer layer peeled
few sprigs of fresh lemon thyme – you can substitute regular thyme and lemon zest if you don’t have lemon thyme
1 teaspoon unsalted butter
sea salt and freshly ground pepper, to taste
Using a vegetable peeler, peel thin lengthwise strands from each carrot, stopping just before the core. Place in a glass microwave-safe bowl, add a few tablespoons of water, cover and cook on HIGH for 3 minutes, or until tender, but still toothsome (see Note).
Meanwhile, remove the leaves from the lemon thyme, discarding the stems, and roughly chop. Set aside.
Drain the water from the bowl, toss with butter and lemon thyme. Season with salt and pepper and serve.
Note: You can alternately cook the carrot strands in a pot of boiling water until "al dente".
Recipe source: https://www.injennieskitchen.com/2010/09/carrot-fettucine-with-lemon-thyme-butter-sauce/
Check out this link for some creative carrot recipes - http://www.carrotmuseum.co.uk/recipes.html
For more recipes check out our farm recipe blog: https://blackdirtrecipes.wordpress.com/
Fall Share Week #3
So sweet corn didn’t last as long as I thought it would so hopefully you had your fill of it. Still had some peppers hanging on and we started to pull other root crops like carrots. Greens are slowly starting to come in and the rainy showers have been a most welcome change from the dry dusty conditions we’ve been enduring. The whole scenery of the valley is changing, from lush full fields of green to empty black carcasses being put to bed for a well-deserved winters rest.
Vegetable
French Fingerling
Potatoes are great but fingerlings are even better and these French ones are pretty special. A red-rose skin and a marbled flesh, French fingerlings stay firm when cooked and possess an almost nutty flavor, the texture is referred to as waxy. These cuties originated in France back in the 1950’s as a result of crossing two types of potatoes a rose and val – giving the name roseval , also called nosebag because they were supposedly smuggled into this country in a horse’s nosebag. While I have a number of folks telling me they boil them, I prefer roasting but that is most definitely a personal preference. Like most of my vegetables I also do not peel them, just give a good scrub under running water. The smaller ones I rub together like marbles.
As per www.specialtyproduce.com, French fingerling potatoes pair well with garlic, shallots, tomato, red onions, cucumber, lemon, cilantro, chives, chervil, rosemary, sage, thyme, fennel, leeks, vinegar, Dijon mustard, hazelnut oil, bacon, roast chicken, wild game, liver pate, and light bodied red wines. So you can see they are pretty diverse!!!
ROASTED FINGERLING POTATOES
This recipe for oven Roasted Fingerling Potatoes gives you a perfectly crispy and delicious result. It's easy enough to make on a busy weeknight, and stunning enough to serve guests!
Store these potatoes in an airtight container in the fridge for 3-5 days. Reheat them in the oven at 400F in a skillet or on a sheet pan covered with foil. Bake for 5-10 minutes, then remove the foil and cook for another 5 minutes.
These potatoes will last 10-12 months in the freezer. Bake in a skillet or sheet pan covered in foil at 400F for 15 minutes, then remove the foil and cook for another 5 minutes.
1 1/2 lbs fingerling potatoes sliced in half lengthwise
2 tbsp butter unsalted, melted
3 cloves garlic minced
1 tbsp Italian seasoning
1/2 tsp salt
1/2 tsp pepper
1 tbsp olive oil
1 tbsp parsley fresh, chopped, for garnish
Directions
1. Preheat your oven to 425 F degrees.
2. Toss the potatoes with the butter, garlic, Italian seasoning, salt, and pepper. Add the olive oil to a large skillet, then spread the potatoes evenly in a large cast iron skillet.
3. Bake for 20 to 25 minutes, or until crispy. Garnish with parsley and serve
Recipe Source: https://www.jocooks.com/recipes/roasted-fingerling-potatoes/
https://www.tasteofhome.com/recipes/spectacular-fingerling-potatoes/
For more recipes check out our farm recipe blog: https://blackdirtrecipes.wordpress.com/
Fall Share Week #2
This is the last hurrah for the tomatoes and I think the sweet peppers as well. Sweet corn should still be available for another week or two. We’ve been busy putting produce away for the winter CSA and for our own use too. So far we put over 50 pounds of corn in the freezer, 50+ pounds of tomatoes and around 20 pounds of sweet peppers. The hot peppers we will put out to dry and cure. Benito is busily harvesting seeds from lettuce, broccoli raab, cilantro, basil, calaloo, amaranth and a bunch of other plants as well. We hope to finish harvesting the potatoes this weekend and then will have to begin sorting and grading them. Between the crates and burlap sacks there’s thousands of pounds going into storage. Winter squashes are drying and curing in the greenhouse we’ll have different varieties available as the season goes on.
Vegetable
Kale
Folks still seem to have a love hate relationship with kale – either love, hate or are tired of it. Still though a good sized portion has minimal calories – 100 grams raw has about 49 calories and loads of other nutrients!! With the weather shifting gears, although we’re supposed to hit high 80’s next week, I lean toward one-pot stews and casserole-type dishes now. Here’s a recipe for a dish called:
BOERENKOOL STAMPPOT or KALE HASH
3 lbs potatoes
2 onions
1 bay leaf
1 lb kale
1 pinch salt
1 pinch ground pepper
1 lb smoked sausage
1⁄2 cup milk
2 tablespoons butter
DIRECTIONS
Peel and dice potatoes and onions. Clean, trim and slice kale. Add the potatoes, onion, kale, a bay leaf, a pinch of salt and just enough water to cover all in a 3 quart pan. Cover and boil gently for about 25 minutes. Meanwhile steam the smoked sausage for the same amount of time and slice. Remove the bay leaf, drain the vegetables, and mash them. Add milk and butter. Stir in the hot, sliced smoked sausage, add salt and pepper to taste and serve.
Recipe source: https://www.food.com/recipe/boerenkool-stamppot-kale-hash-33269
I make something like this and will use kielbasa or chorizo. I like to add beans to the dish as well!!
https://blackdirtrecipes.wordpress.com/
Fall Share Week #1
The last couple nights have certainly been chilly. This morning when I went into the fields I could see that the more tender weeds and herbs were frozen. There was no “warning” sign – no notice on the news of frost, no seriously cold days leading up to cooler nights. But somehow you knew it was coming, maybe not exactly when, but there’s a “feel” in the air, you can sense it, almost taste and smell it. As soon as I heard on the news that we were going to be in the low 40s I started to worry – how much longer could we harvest tomatoes and peppers, corn will keep coming till hard frost, have to get all the winter squashes in, finish digging potatoes, start prepping for winter. In some ways feels like we only just started harvesting summer crops and now they will become a fond memory relegated to conversations of remember how good the tomatoes were last year and how sweet the corn was and oh the herbs how aromatic.
Vegetable
Acorn Squash
Aptly named because of its acorn like shape, this is a favorite fall squash. Dark green skin and yellow flesh, this is one of the better squashes for stuffing and roasting. Native to North and Central America, acorn squash is a great source of Vitamin C and is also high in fiber and potassium.
Nutrition sources: https://theforkedspoon.com/how-to-roast-an-acorn-squash/
The simplest way to prepare an acorn squash is roasting in the oven. Wash, cut in half, scoop out the seeds from the cavity with a spoon. I usually place the halves face down on a sheet pan, this way the excess moisture can drain away and the flesh will be a drier texture. I like to roast at high heat so my oven will be at 400 degrees. Cover with foil or not – I usually don’t – let bake until fork tender. Season to taste with salt and pepper, now is where the fun begins you can sweeten it to taste with honey, maple syrup, brown sugar, or whatever sweetener you prefer. I am often asked if you can eat the skin - it’s all up to you, no judgement! A little bit of salted butter and it’s kind of like eating potato skins but tastes like squash! This is also one of my favorite squashes for stuffing – after you scoop out the seeds fill the cavity with your favorite stuffing – could be rice, meat, tomatoes and beans, bread, whatever you choose. Let roast till fork tender and voila dinner in a bowl!!!
Here are some links to our farm recipe blog:
One for the spaghetti squash and another for a squash apple soup. There is a search engine feature on the blog to help you find recipes.
https://blackdirtrecipes.wordpress.com/2013/10/03/spaghetti-squash/
https://blackdirtrecipes.wordpress.com/2010/10/04/squash-apple-soup/
And here are some links to a couple other places with some good suggestions:
https://www.marthastewart.com/275063/acorn-squash-recipes